
1 Objective
The objective of this chapter is to provide guidance on the accounting processes of property, plant and equipment (PP&E) transactions within the Umoja environment in line with IPSAS requirement. This chapter details how an end user, based on the involved Umoja user profiles, should perform roles and responsibilities related to accounting of PP&E transactions.
This chapter is based on guidance under IPSAS 17: Property, Plant, and Equipment.
2 Summary of IPSAS Accounting Policies
2.1 Recognition and Measurement
Property, plant and equipment (PP&E) are tangible assets held by the organization provided they meet the following recognition criteria:
· Controlled by the organization i.e. benefit and risk consideration accrue and born by the organization.
· Probable that future economic benefit or service potential flow to the UN for more than a year
· Cost or fair value is measured reliably.
· Amounts meet the minimum established threshold
2.1.1 Valuation
PP&E is stated at historical cost less accumulated depreciation and accumulated impairment losses. Historical cost comprises the purchase price and any costs directly attributable to bringing the asset to its location and condition including associated costs. For PP&E acquired at nil or nominal cost (including donated assets), the cost will be measured at the fair value of the asset. Refer to the Corporate Guidance on Property, Plant and Equipment for detailed guidance on establishing the fair value of an asset.
Once identified as an asset based on recognition criteria, the asset is recorded as an item of PP&E. We refer to the Corporate Guidance on Property, Plant and Equipment for additional detail.
Asset under construction costs will be capitalized if they are directly identifiable exclusively to the construction of the particular assets or group of assets and meet the required thresholds.
A gain or loss resulting from the disposal of PP&E arises where proceeds from disposal differ from its carrying amount. Those gains or losses are recognized in the statement of financial performance.
2.1.2 Leasehold Improvements
Leasehold improvement should be viewed from a project perspective. If the improvement relates to one project to be completed in stages, the threshold should be evaluated based on the aggregate value of the stages over the life of the improvement. If the leasehold improvement relates to projects that are planned for and budgeted independent of each other, then the threshold should be evaluated based on the individual amounts.
2.1.3 Subsequent Recognition
Costs incurred subsequent to initial acquisition are capitalized only when it is probable that future economic benefits or service potential associated with the item will flow to the UN and the cost exceeds the established threshold for initial recognition. Repairs and maintenance (day-to-day servicing) are charged to surplus or deficit in the statement of financial performance in the year in which they are incurred.
2.1.4 Subsequent Measurement
The organization has elected the cost model to measure PP&E after initial recognition. PP&E is depreciated over their estimated useful life using the straight-line method except for land and assets under construction, which are not subject to depreciation. For non-peacekeeping operations, significant components of real estate assets with different useful life are depreciated using components approach. Given the expected pattern of usage of the item of PP&E, the residual value is nil unless residual value is likely to be significant.
2.1.5 PP&E Thresholds and Useful Lives
|
Asset Class |
Sub class |
Threshold (USD) |
Estimated Useful life (In years) |
|
Buildings |
Fixed |
100,000 |
20-50 |
|
Temporary and mobile* |
5,000 |
7 |
|
|
Commercial finance lease |
100,000 |
Shorter of term of arrangement or useful life of buildings |
|
|
Donated RTU |
100,000 |
Shorter of term of arrangement or useful life of buildings |
|
|
Land |
|
No threshold |
Unlimited |
|
Leasehold improvements |
Fixtures and fittings |
100,000 |
5 |
|
Minor construction works |
|||
|
Infrastructure Assets |
All types of Infrastructure Assets |
100,000 |
Set** (up to 50 years) |
|
Assets Under Construction |
Buildings Under Construction |
100,000
|
No depreciation |
|
Infrastructure Assets Under Construction |
|||
|
Other assets under construction |
|||
|
Furniture and fixtures |
Office Equipment |
20,000 |
4 |
|
Furniture |
20,000 |
10 |
|
|
Library Reference Material (incl. books) |
20,000 |
3 |
|
|
Fixtures and fittings |
20,000 |
7 |
|
|
Machinery and Equipment |
Light engineering and construction equipment |
20,000 |
5 |
|
Heavy engineering and construction equipment |
20,000*** |
12 |
|
|
Printing and publishing equipment |
20,000 |
20 |
|
|
Water treatment and fuel distribution |
20,000 |
7 |
|
|
Equipment |
20,000 |
5 |
|
|
Medical equipment |
20,000 |
7 |
|
|
Transportation equipment |
20,000 |
7 |
|
|
Security and safety equipment |
20,000 |
5 |
|
|
Vehicles |
Light wheeled vehicles |
5,000 |
6 |
|
Heavy wheeled vehicles and engineering |
5,000 |
12 |
|
|
Support vehicles |
5,000 |
12 |
|
|
Specialized vehicles, trailers and attachments |
5,000 |
Set**** (6-12 year range) |
|
|
Communication and IT equipment |
IT equipment |
20,000***** |
4 |
|
Communications equipment |
20,000****** |
7 |
|
|
Audio visual equipment |
20,000 |
7 |
* Temporary & mobile buildings are included in Galileo where they are referred to as prefab buildings for Peacekeeping.
** Specific useful lives and residual values will be applied for high cost and/or specialized items of PP&E when application of the standard useful life for the class would result in non-compliance with IPSAS.
*** Heavy engineering and construction equipment includes generators with a threshold of USD 5,000.
**** IT equipment includes network equipment with a threshold of USD 5,000.
***** Communication equipment includes satellite communication systems with a threshold of USD 5,000.
Note: Major upgrades to land and buildings are recognized as assets on the basis of the threshold of USD 100,000.
2.2 References
For more details on the IPSAS requirements regarding PP&E, refer to:
• The UN IPSAS Policy Framework;
• The Corporate Guidance on Infrastructure Assets;
• The Corporate Guidance on Property, Plant and Equipment (excluding infrastructure assets);
• The Corporate Guidance on Impairment of non-cash generating assets.
3 Desktop Procedures
3.1 Asset Accounting (AA) Module Overview
In Umoja, the Asset Accounting (AA) module deals with the accounting of PP&E, which are classified as non-current assets in the Statement of Financial Position. The AA module manages the complete lifecycle of an asset starting from the creation of the master data of the asset, acquisition of the asset and its capitalization, transfers between entities and retirement when the asset is no more useable. During this time, the system calculates appropriate depreciation values and impairment losses.
3.2 Other Modules Integrated with AA
The asset accounting module is integrated with the following modules across Umoja to allow for eased flow of data and communications:
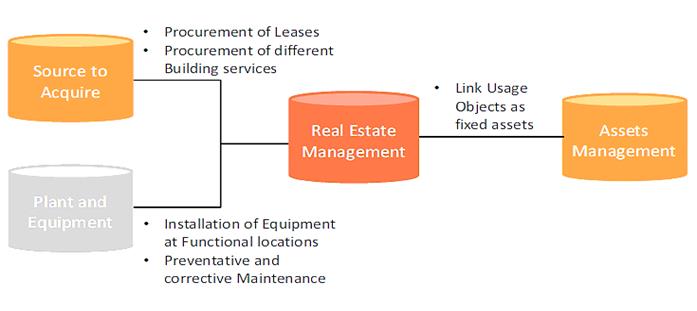
The real estate asset will be created as a real estate object in the real estate module. When the asset master record is created in the AA module, it will be linked to the information stored in the real estate module via the field 'Real Estate Object'. The related real estate record stores further information such as land and building physical/operational parameters, building floors, spaces and lease details, if any.
In the case of plant and equipment, the equipment master is created automatically upon goods receipt. All maintenance and related logistical information will be maintained on the equipment master in the Plant Maintenance module. Fixed asset and equipment master records are linked to each other through a cross reference field in the respective master data records.
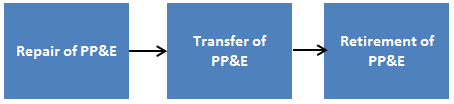
3.3 Overview of the PP&E Lifecycle

3.4 Creation of Asset Master Record
The asset shall containing the primary parameters such as cost center, fund, business area etc. should be created before processing any transactions related to that asset. The asset shall is the basis to create the complete asset master record. The asset master record is created in Umoja in two methods:
3.4.1 Automatic Creation of Assets Master Record
This is the process whereby the asset shell is created when the procurement of the asset is carried out from the material master called ZSAST or by selecting the account assignment 'A' during the source to acquire (procurement) processes. When a Requisitioner selects the asset from the ZSAST material master and creates the shopping cart, the asset shall is automatically created based on backend configuration. The asset shall is subsequently updated during the follow-on purchase order and goods receipt transactions and becomes asset master record completed for all the required parameters for the downstream management of the asset.
3.4.2 Manual Creation of Asset Master Record - Current Year Acquisitions
When an asset is not acquired from ZSAST material master through the source-to-acquire processes (Requisitioning àPurchase Order àGoods Receipt) i.e. when an asset related to current year acquisitions is donated, self-constructed, found through physical verification or incorrect material number was used and no asset master was created (i.e. the item was expensed), such asset is manually created using T-code AS01 as follows:
A. Steps to manually create asset master record in current year /Transaction Code: AS01
This step to be performed by users with role: FA.15 - Financial_Accounting: Asset_Accounting_User
A.1. Log in to Umoja ECC.
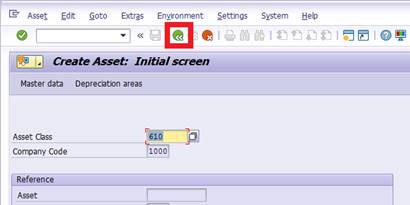
A.2. Execute transaction code AS01.
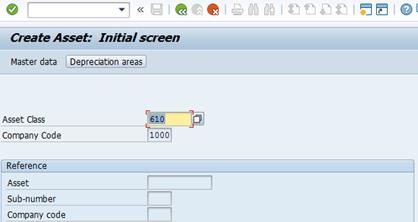
A.3. On the Create Asset: Initial screen:
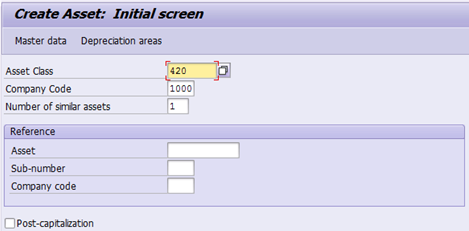
· Asset Class: Enter the Asset Class of the asset you are creating.
· Company Code: Always equal to 1000
· Number of similar assets: If you are creating many similar assets, you can specify how many here up front.
· Reference: You may fill in the Asset, Sub-number, and Company code of a similar asset as a template that you would like to copy.
· Post-capitalization: This should not be checked (it is not used for current year acquisitions)
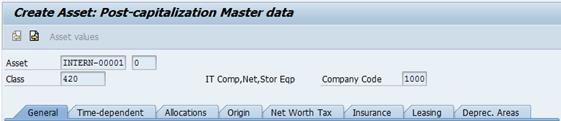
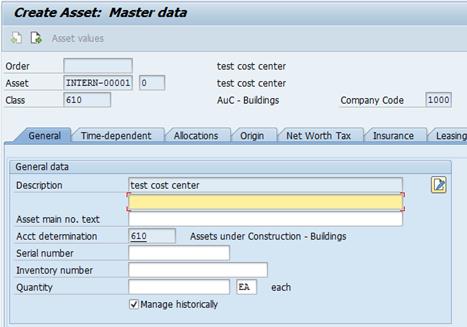
A.4. When you have made all of your selections, press Enter on your keyboard. You will be taken to the Create Asset: Master data screen. There are several tabs on the screen that you will need to go through and fill out data.
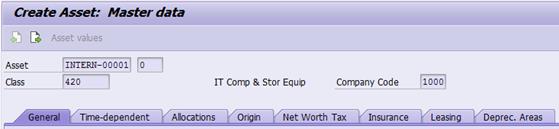
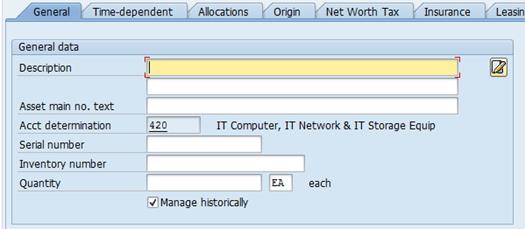
A.4.1. General tab:

· Description: Use an appropriate description, i.e. Server, vehicle etc.
· Asset main no. text: This is inherited from the Main Asset for sub-assets.
· Serial number: This field is not used, it is maintained in the equipment master.
· Inventory number: This is only used during conversion and ramp up, in these cases it should be equal to the 'Technical ID' in the Equipment Master record.
· Quantity: Always leave blank. The quantity is entered during the acquisition of the asset.
· Manage historically: Keep this checked
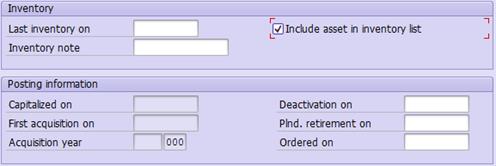
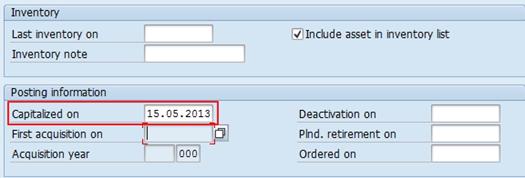
· Include asset in inventory list: Keep this checked
The rest of the fields on the General tab do not need to be filled out at this time, or are automatically populated later on.
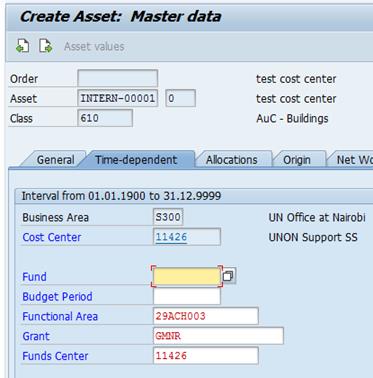
A.4.2. Time-dependent tab:

In the 'Interval from…' section you should fill in the Cost Center, Fund, and (if applicable) Grant. After filling these in you can press Enter to have the system derive the rest of the fields.
Fill in the following fields if this asset is related to an Investment Order or Project:
· Investment Order: If applicable, enter an investment order (internal order) here.
· WBS element: If this asset is project-funded, enter the WBS Element here.
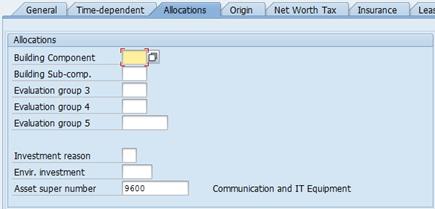
A.4.3. Allocations tab:
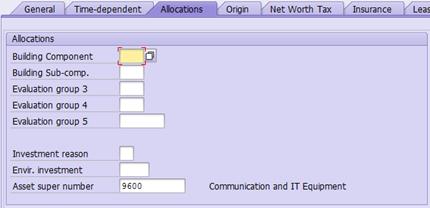
· Building Component: Only used for building components. If applicable, select one from the list.
· Building Sub-comp.: Only used for building components. If applicable, select one from the list.
· Asset super number: This corresponds to the IPSAS asset class, and should be derived automatically already from the Umoja asset class you entered earlier.
The rest of the fields on the Allocations tab do not need to be filled out at this time, some are automatically populated later on.
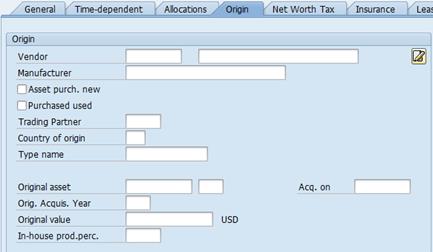
A.4.4. Origin tab:
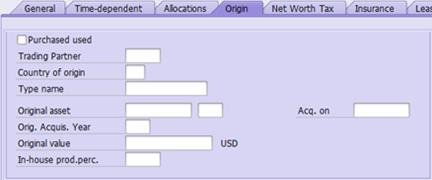
The fields on the Origin tab do not need to be filled out at this time, some are automatically populated later on during acquisition, transfer etc. processes.
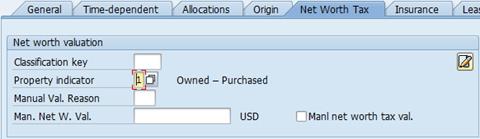
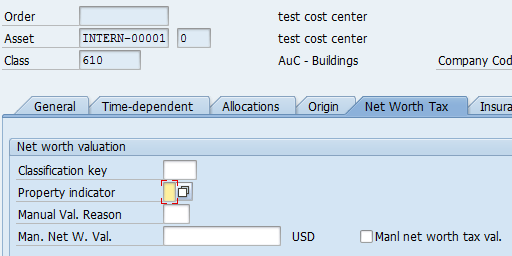
A.4.5. Net Worth Tax tab:
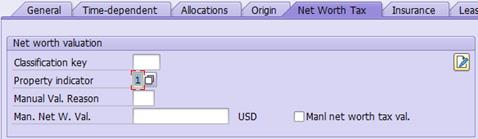
· Property indicator: Select a value from the selection box regarding the ownership/lease-situation of this asset.
The rest of the fields on the Net Worth Tax tab do not need to be filled out at this time, or are automatically populated later on.
A.4.6. Insurance tab - Not applicable at this time.
A.4.7. Leasing tab - Not applicable at this time.
A.4.8. Deprec. Areas tab:

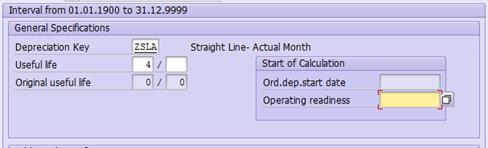
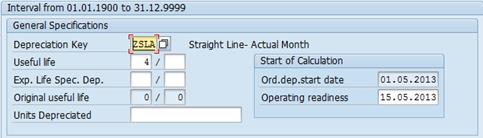
All values should normally be defaulted based on the Asset Class. For certain Real Estate Fixed Assets (e.g., Buildings in Asset Class 120), default UseLife will be set to 999. For such Fixed Assets, you should adjust the UseLife to 20, 25, 40 or 50 years, as per IPSAS.
You can also add the Date of Operating Readiness by double clicking on the line item and entering a value in the Operating readiness field (shown below).
Click the ![]() Back button after adding this date to
return to the Create Asset: Master data screen.
Back button after adding this date to
return to the Create Asset: Master data screen.
A.5. When you have entered data in all of the tabs, click on the Save icon at the top of the screen to create the Asset Master record.

A.6. Make sure to write down the Asset Number displayed in the status bar at the bottom of the window.
![]()
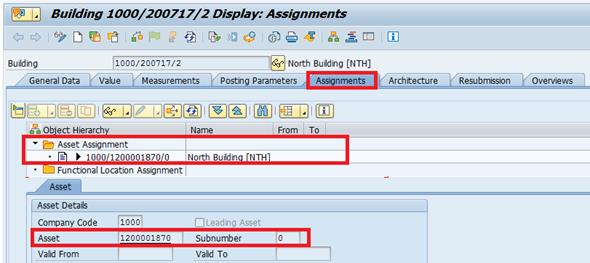
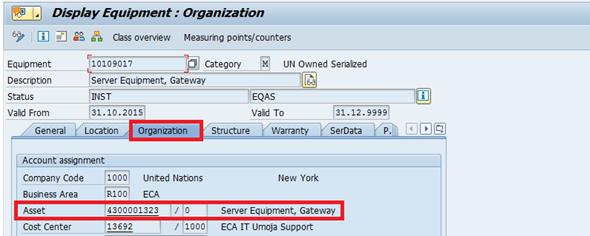
The new Fixed Asset must be linked to an operational object. Follow the instructions below based on the type of Fixed Asset.
1. Equipment Asset: Share the new Asset Number with the Property Custodian responsible for the Equipment (Role SD10). They must link the Fixed Asset to the associated Equipment. A review of the cost centre should also be undertaken to ensure it aligns to the asset record.
The Property Custodian can reference the Services Delivery job aid titled Equipment Creation Post Go-Live.

2. Real Estate Asset: Share the new Asset Number with the Facilities Planner responsible for the Real Estate Usage Object. They must link the newly created Fixed Asset to the associated Real Estate Usage Object.
The Facilities Planner can reference instructions in the Real Estate Portfolio Management training materials.
3. Intangible Asset: No operational object exists to represent intangible assets in Umoja. No link is required in Umoja.
3.4.3 Manual Creation of Asset Master Record - Prior Year Acquisitions
When an asset is not acquired from ZSAST material master through the source-to-acquire processes (Requisitioning à Purchase Order à Goods Receipt) i.e. when an asset related to current year acquisitions is donated, self-constructed, found through physical verification or incorrect material number was used and no asset master was created (i.e. the item was expensed), such asset is manually created using T-code AS01 as follows:
B. Steps to manually create asset acquired in prior year /Transaction Code: AS01
B.1. Log in to Umoja ECC.
B.2. Execute transaction code AS01.
B.3. On the Create Asset: Initial screen:

· Asset Class: Enter the Asset Class of the asset you are creating.
· Company Code: Always equal to 1000
· Number of similar assets: If you are creating many similar assets, you can specify how many here up front.
· Reference: You may fill in the Asset, Sub-number, and Company code of a similar asset as a template that you would like to copy.
· Post-capitalization: This MUST be checked (it is used to enable capitalisation in prior years)
B.4. When you have made all of your selections, press Enter on your keyboard. You will be taken to the Create Asset: Master data screen. There are several tabs on the screen that you will need to go through and fill out data.
B.4.1. General tab:
· Description: This description is inherited from the Material Name during the normal procurement process. For ramp up purposes, please use an appropriate description, i.e. Server, vehicle etc.
· Asset main no. text: This is inherited from the Main Asset for sub-assets.
· Serial number: This field is not used, it is maintained in the equipment master.
· Inventory number: This is only used during conversion and ramp up, in these cases it should be equal to the 'Technical ID' in the Equipment Master record.
· Quantity: Always leave blank. The quantity is entered during the acquisition of the asset.
· Manage historically: Keep this checked
· Include asset in inventory list: Keep this checked
· Capitalized on: Set actual capitalisation date for this asset, from any prior year.
The rest of the fields on the General tab do not need to be filled out at this time, or are automatically populated later on.
B.4.2. Time-dependent tab:

Fill in the Cost Center, Fund, and (if applicable) Grant. After filling these in you can press Enter to have the system derive the rest of the fields.
Fill in the following fields if this asset is related to an Investment Order or Project:
· Investment Order: If applicable, enter an investment order (internal order) here.
· WBS element: If this asset is project-funded, enter the WBS Element here.
B.4.3. Allocations tab:
· Building Component: Only used for building components. If applicable, select one from the list.
· Building Sub-comp.: Only used for building components. If applicable, select one from the list.
· Asset super number: This corresponds to the IPSAS asset class, and should be derived automatically already from the Umoja asset class you entered earlier.
The rest of the fields on the Allocations tab do not need to be filled out at this time, some are automatically populated later on.
B.4.4. Origin tab:
The fields on this tab do not need to be filled out at this time, or are automatically populated later on.
B.4.5. Net Worth Tax tab:
· Property indicator: Select a value from the selection box regarding the ownership/lease-situation of this asset.
The rest of the fields do not need to be filled out at this time, or are automatically populated later on.
B.4.6. Insurance tab - Not applicable at this time.
B.4.7. Leasing tab - Not applicable at this time.
B.4.8. Deprec. Areas tab:

All values should normally be defaulted based on the Asset Class. For certain Real Estate Fixed Assets (e.g., Buildings in Asset Class 120), default UseLife will be set to 999. For such Fixed Assets, you should adjust the UseLife to 20, 25, 40 or 50 years, as per IPSAS.
You can also add the Date of Operating Readiness by double clicking on the line item and entering a value in the Operating readiness field (shown below).
Click the ![]() Back button after adding this date to
return to the Create Asset: Master data screen.
Back button after adding this date to
return to the Create Asset: Master data screen.
Note: The Ordinary Depreciation Start field (ODep Start in Deprec. Areas tab, and also Ord.dep.start date in the detail window that opens on double‑click) will already be populated with the first day of the month when we are capitalizing this asset (derived from the Capitalized on value in General tab). This is specific and expected for post-capitalization procedure.
B.5. When you have entered data in all of the tabs, click on the Save icon at the top of the screen to create the Asset Master record.

B.6. Make sure to write down the Asset Number displayed in the status bar at the bottom of the window.
![]()
The new Fixed Asset must be linked to an operational object. Follow the instructions below based on the type of Fixed Asset.
1. Equipment Asset: Share the new Asset Number with the Property Custodian responsible for the Equipment (Role SD10). They must link the Fixed Asset to the associated Equipment. A review of the cost centre should also be undertaken to ensure it aligns to the asset record.
The Property Custodian can reference the Services Delivery job aid titled Equipment Creation Post Go-Live.
2. Real Estate Asset: Share the new Asset Number with the Facilities Planner responsible for the Real Estate Usage Object. They must link the newly created Fixed Asset to the associated Real Estate Usage Object.
The Facilities Planner can reference instructions in the Real Estate Portfolio Management training materials.

3. Intangible Asset: No operational object exists to represent intangible assets in Umoja. No link is required in Umoja.
4 Acquisition of Assets
The first step in the PP&E lifecycle is acquisition of the asset. Assets can be acquired in following ways; as a standalone (purchased) asset, asset under construction or through donation. The following sections describe the Umoja processes for each acquisition method, starting with the process for standalone purchased of assets.
4.1 Standalone (Purchased) Assets
One potential means for the UN to acquire asset is through direct purchase of completed assets through the source to acquire process in the SRM module of Umoja. Standalone assets are those for which no additional costs are anticipated and are capitalized at the time of receipt. A standalone asset is recognized by the UN when the risks and rewards of the asset have passed to the UN based on the underlying contract and control criteria.
Standalone (purchased) assets are recorded at cost. When referring to the 'cost' of an asset, the following cost components are included:
• Its purchase price, including import duties and non-refundable purchase taxes, after deducting trade discounts and rebates;
• Any directly attributable costs to bringing the asset to the location and condition necessary for it to be capable of operating in the manner intended by management (associated costs);
• The initial estimate of the costs of dismantling and removing the item and restoring the site on which it is located.
We refer to the Corporate Guidance on Infrastructure Assets and the Corporate Guidance on Property, Plant and Equipment (excluding infrastructure assets) for more details on cost components of an asset.
4.1.1 Asset Requisitioning and Creating Process
When acquiring a standalone asset, the Requisitioner initiates the purchasing via creating the shopping cart by picking product ID starts with 21 (Material Master called ZSAST) or select the A (Asset) in the Account Assignment tab . When the shopping cart is saved, the asset shall be automatically created with the basic parameters necessary for the follow-on transaction processing of placing a purchase order and generating goods receipt.
Items should be added to the Shopping Cart based on the description. The Requisitioner must verify if a product is considered to be an Asset in accordance with the IPSAS guidelines i.e. it is valued at equal to or more than USD 20,000 (or equal to or more than USD 5,000 for specified smaller entities) or for certain items (i.e. vehicles) valued at equal to or more than USD 5,000.
Product IDs for Assets valued at USD 20,000 or more typically start with 21 i.e. the Product ID for a Computer, Server, Standalone (Asset) is 2100001083. Product IDs are created by the UN's Master Data Maintenance Team in consultation with the Business. However, smaller offices that have the lower IPSAS Asset threshold of USD 5,000 may have Assets with product IDs not starting with 21 in which case the user has to choose the account assignment 'Asset' and capitalize the purchase.
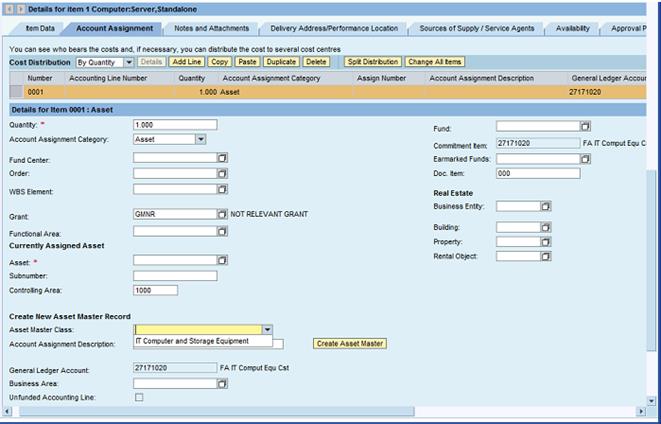
1. If an item with a Product ID beginning with 21 is selected, the Account Assignment Category automatically defaults to Asset as shown in the screen shot below and the appropriate General Ledger Account is also defaulted.
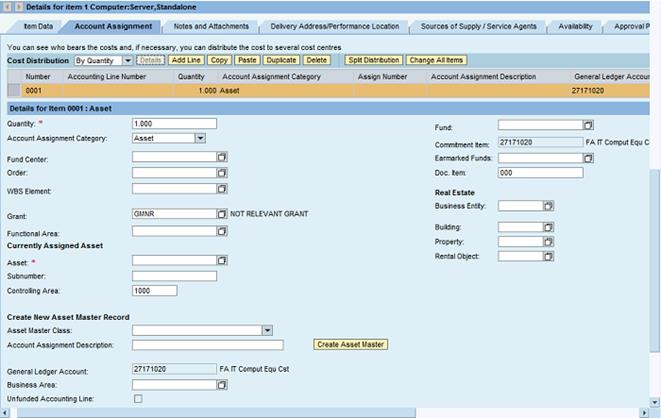
2. If the item is deemed an Asset in accordance with IPSAS and the Account Assignment Category field is not already populated with Asset, click the icon beside the Account Assignment category field and click to view the drop-down menu options. Double click on Asset select. Each Asset will require an individual, unique Asset Master Record number. Click the icon beside the Asset Master Class field and click on the defaulted description to select. Click Create Asset Master.
3. The asset is capitalized and reflected in the financial statements when the goods are received with the resulting accounting entry of:
Dr. Asset GL 27****** with asset subledger (Asset Master Record)
Cr. Goods Receipt Payable GRIR
For the detail Umoja process of raising a shopping cart from the ZSAST material master, creating the purchase order and goods receiving, refer to Finance Manual Chapter on Expenses, sections 3.2.4: Requisitioning Process for Goods and 3.2.6: Inbound Goods - Receiving and Receipting.
4.2 Assets under Construction (AuC)
Another means of acquiring an item of PP&E is through assets under construction. The stage of completion of the construction works should be reflected in the statement of financial position as AuC for the amount of costs incurred to date. If the asset under construction is completed and is available for use, then it should be moved from the AuC to final asset under the appropriate asset class and start depreciating. 'Available for use' is determined to be when the physical construction of the asset is complete even though routine administrative work might still continue.
Most of the organization's real estate assets are acquired through AuC. The AuC is set up for the following asset classes:
· Building
· Infrastructure
· Leasehold improvements
· Intangibles
For information regarding IPSAS requirements related to AuC, please refer to www.ipsas.un.org/
4.2.1 Cost Collectors
Under IPSAS the organization is required to capitalize costs related to AuC that are expected to exceed the USD 100,000 capitalization threshold. In order to collect the costs associated to the construction, a cost collector in the form of either Internal Order of Work Breakdown Structure Element (WBSE). The use of a cost collector in Umoja allows the organization to easily capture costs related to AuC and also ensure these costs are settled to the respective AuC and capitalized on monthly basis.
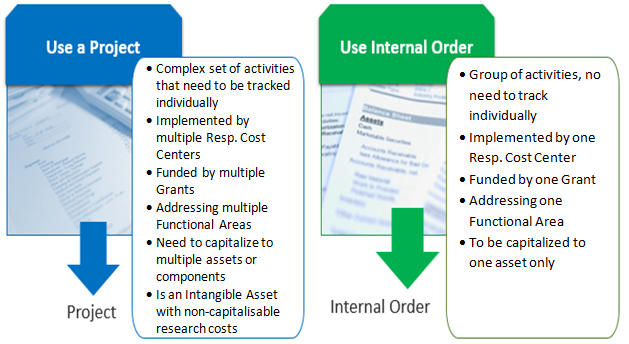
Before creating an Asset under Construction, ask the following questions:
· What type of funding? Assessed funds or grants? How many?
· At what level of detail do you need to record costs? How many cost centers / functional areas?
· What type of asset will this be? New Building, Leasehold Improvement, Major Alteration, Infrastructure, or Intangible Asset?
· Do you want to collect costs on a Project with WBS Elements or on an Internal Order?
· How will services and materials be procured? Is a Service Order going to be used for services?
· Should you create a project or an internal order?
Note that users with the following access rights will be able to create and make changes to the cost collector.
PP.01 Programme_Project: Project_Management_Approver
PP.02 Programme_Project: Project_Management_User
FA.15 Financial_Accounting: Asset_Accounting_User
FA.16 Financial_Accounting: Asset_Accounting_Senior_User
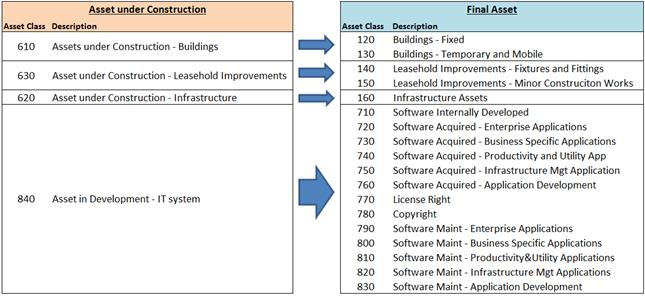
Assets under Construction can be used to create Final Assets within the following Asset Classes. The tables below show which AuC Asset Class is associated with each Final Asset Class.
4.2.1.1 Set Up an AuC as a Project with WBS Elements
In line with IPSAS requirements, a typical major building shall be reported in line with the following components and subcomponents and cost collectors should be set up based on this structure.

A standard project template which follows the typical componentization of a Building AuC (where the final assets are the sub-components) exists in the system. To use this as a starting point for your AuC, follow the instructions directly below, otherwise look at the section on creating a project from scratch.
4.2.1.2 Creating a Project from a Standard Project Definition Template
C. The steps to create a new Project and its WBSEs for an AuC / Transaction Code: CJ20N
C.1. Login to Umoja ECC.
You must have the FA.16, PP.01, or PP.02 security authorizations to create a project.
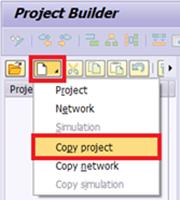
C.2. Execute transaction code CJ20N or navigate to the following path in the SAP Menu: Accounting à Project System à Project à Project Builder
C.3. Click on the Create icon and then select Copy project. This will open the Create Project window.
C.4. Fill out the form as instructed below:
·
Project Def.:
Click on the binoculars ![]() icon next to the Project Def. field. A value should appear
in this field. It is ok if it says 'test', a new project definition ID
will be generated later.
icon next to the Project Def. field. A value should appear
in this field. It is ok if it says 'test', a new project definition ID
will be generated later.
· Description: Fill in a description of this AuC.
·
Std proj. def.:
Click on the entry field for Std proj. def. and then click on the ![]() icon to bring up a search help window. Click on the green checkbox
to display the list of standard projects. Select the one you want by
double-clicking on it.
icon to bring up a search help window. Click on the green checkbox
to display the list of standard projects. Select the one you want by
double-clicking on it.
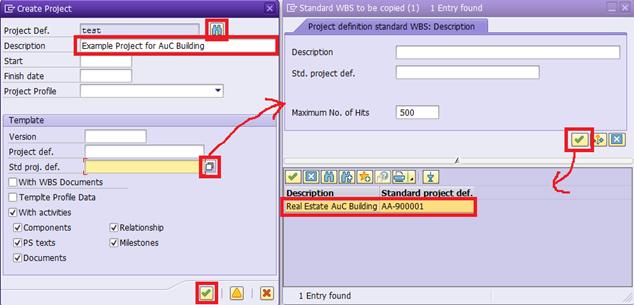
C.5. When done making the selections, click on the green check at the bottom of the Create Project window to proceed à you will see an Error message. Ignore it and click on the green check to continue.

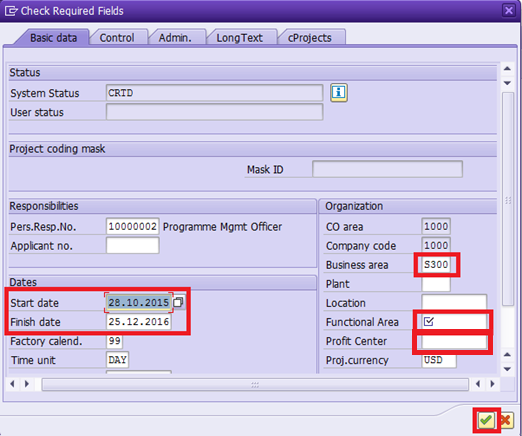
C.6. In the Check Required Fields screen, fill out the following fields:
· Start date and Finish date: Fill in planned dates here. These can be changed later, if necessary.
· Business Area: This should be changed to your local business area code.
· Functional Area: Select an appropriate functional area for this project. This field is mandatory at this time and will be defaulted into each WBS Element, though it is the WBS Element's functional area that is ultimately responsible for budget and postings. Note that this default value may not apply to all WBS Elements, so care should be taken to review when later defining each WBS Element.
· Profit Center: Enter the default profit center 9999.
C.7. Click on the green check at the bottom when ready to continue. The other tabs at the top Control, Admin, LongText, and cProjects do not need to be filled out at this time.
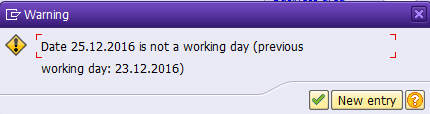
C.8. You may receive a warning message similar to this if either of your dates falls on a non-working day (e.g. weekend). You may go back and manually adjust the date by selecting New entry, or you can accept the suggested previous working day by clicking on the green check.
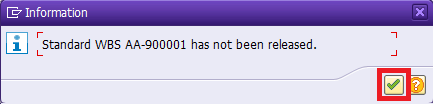
C.9. Click on the green check when you see this message. This is expected.
C.10. You will now be greeted with the Project Builder interface.

· The Worklist and Templates area contains recently viewed projects in the Worklist section and various elements that can be added to the project in the Templates section.
· The Project Structure Tree contains the Project Definition and all of the WBS Elements beneath it. Clicking on any of them will open them in the Work Area for display or editing.
· The Project Definition has been prepared already from the standard project definition and any values entered during step C.6.

C.11. Now the WBS Elements need to be customized for this project à select the top (Level 1) WBS Element by clicking on it in the Project Tree.
C.12. Update the Level 1 WBS Element.
Start by updating the WBS Element Description to match the description you gave to the Project Definition. This is a standard convention that the Project Definition and Level 1 WBS Element share the same description.

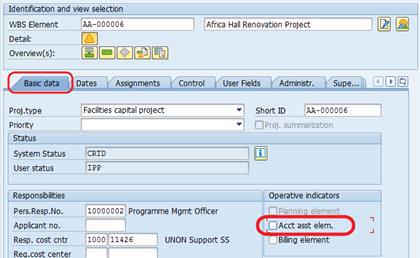
C.12.1. Basic Data tab:
· Resp. cost cntr: Enter company code 1000 and the Cost Center for this WBSE.
· For all WBSE elements that should not be used to charge costs the box Acct asst elem. should be unchecked. This will mean that users of the shopping carts etc. cannot use these lines to charge costs to. This will be the case for all level 1 WBSE.

*Reminder: Only leave the Account assignment element checked where you want to collect costs at this level.
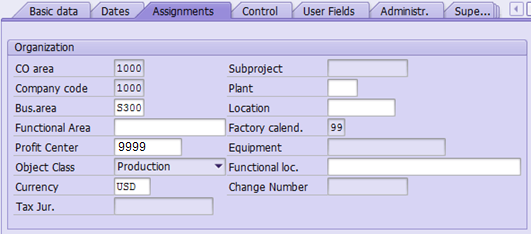
C.12.2. Assignments tab:
· Functional Area: Enter the Functional Area associated with the Responsible cost center defined on the Basic Data tab. This will NOT be automatically derived from the cost center, so it is important that care is taken to make sure they align. Use transaction KS03-Display Cost Center to confirm that the functional area relates to the cost center entered.
· Profit Center: Enter 9999
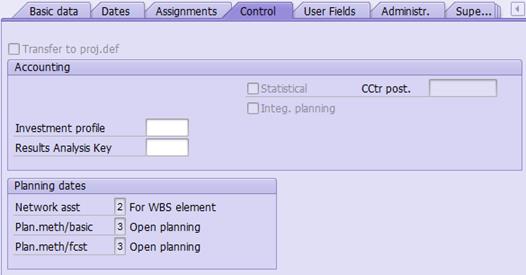
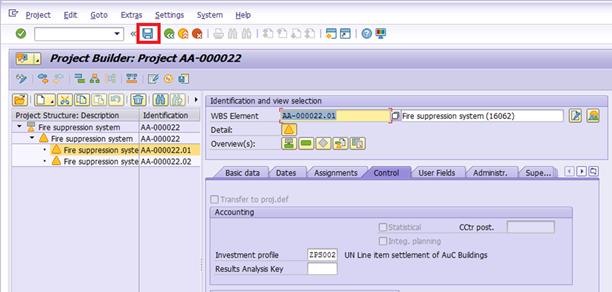
C.12.3. Control tab:
Review the Investment profile as that will determine whether or not this WBS Element will create an AuC asset. Typically, the Level 1 WBS Element will not have an investment profile.
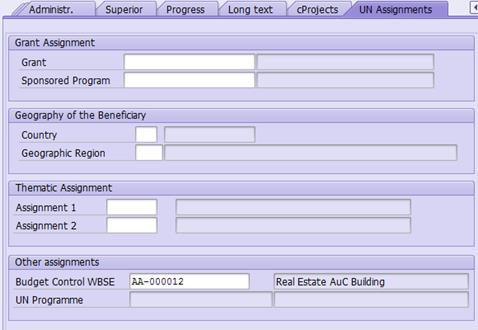
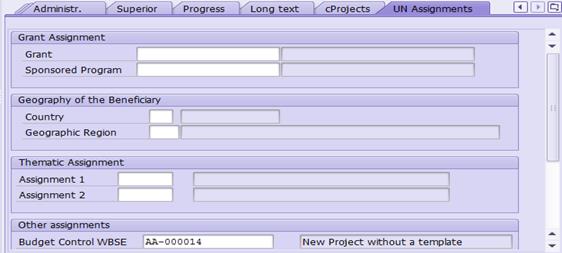
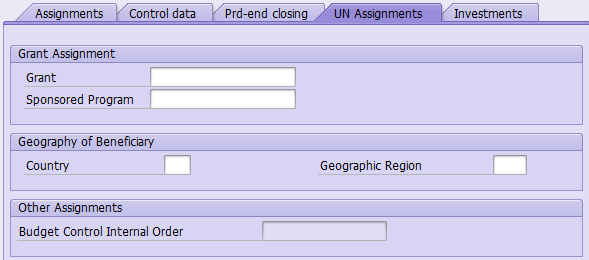
C.12.4. UN Assignments tab:
· Grant Assignment: Fill in the Grant and Sponsored Program that funds this WBSE.
· Geography of Beneficiary: Fill in the Country or Geographic Region if a Grant is assigned.
· Thematic Assignment: Fill in thematic assignments, if necessary.
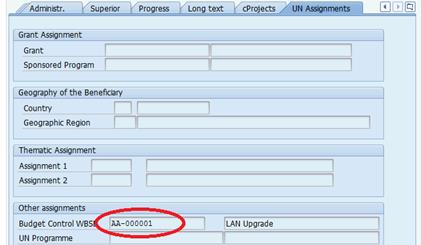
· Budget Control WBSE: This is the WBSE from which this WBSE receives its budget. This can be the WBSE or a parent WBSE, and allows multiple WBSE elements to share the same budget address.
C.13. For the Level 2 WBS Elements. The procedure is the same as in the previous step.
You may edit many WBS Elements at once in a tabular format by switching to the WBS Element Overview. This may be a more efficient way of viewing and managing the different properties of each WBS Element. The exception to this is the attributes found on the UN Assignments tab will not be shown in the Overview table, otherwise everything else is available in this overview.

Here you can see and edit all of the WBS Elements and most of their attributes.
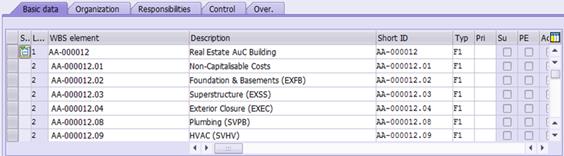
Note: Ensure that the Functional Area (Organization tab) correctly matches that of the Cost Center (Responsibilities tab) for each WBSE. If the functional area is not correctly aligned with the cost center at the WBSE level then the entity will receive budget exceeded messages. You can confirm the Functional Area assigned to each Cost Center with transaction KS03.
C.14. Fill out the necessary fields for all remaining WBS Elements.
** Only bottom-level WBS Elements should collect expenses, and therefore all 'parent' WBS Elements should have their Acct assn elem. Indicator unchecked on the Basic Data tab.
C.15. If you need to add a new WBS Element:
C.15.1. Determine which WBS Element you'd like to insert the new one beneath. If you want to add a Level 2 WBSE, choose the Level 1 WBSE. In the example screenshot below, we are creating a Level 3 WBSE beneath the 'Non-Capitalisable Costs' Level 2 WBSE.
C.15.2. Create a new WBS Element by right-clicking on an existing WBS Element and selecting Create à WBS element.
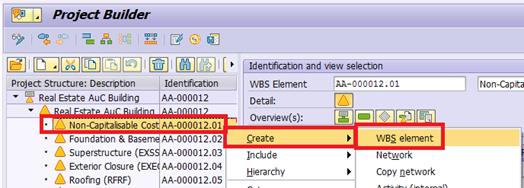
C.15.3. Fill in a description for this WBS Element and any other necessary fields as with any other WBSE.

C.15.4. The new WBSE should be visible in the tree view after pressing enter.

C.16. If you expect to have capitalisable charges that will be distributed across multiple final assets (i.e. building subcomponents) when the project is completed, AND you cannot define a % split when the shopping cart/Purchase order is set up, you can add an extra WBS Element to collect these costs during construction/development, calling this WBSE 'Other Capitalisable Costs'. At final project settlement, you settle these charges to multiple final assets on a percentage basis. It is recommended that you keep charges to this WBSE to a minimum to avoid a lengthy review process of expenses charged to this WBSE when the AuC is finalized.
Note: Non-capitalisable costs should NOT be charged to this WBSE, if part of the costs are capitalisable and part not capitalisable this split must be done at the time of the financial commitment.
Follow the instructions in the previous step to add the WBS Element. Be sure to give it a description that communicates its intended use, such as 'Other Capitalisable Costs'.
For example:
If your project will have service charges that will be capitalized across many of the building's subcomponents (Foundation, Superstructure, Roof, Interior construction, etc.), you could charge the 'Other Capitalisable Costs' WBS Element. At the final settlement, the entity would need to review the charges to this WBSE and define multiple settlement rules (on a percentage basis) for this WBS Element to the final assets of each of the subcomponents.

C.17.
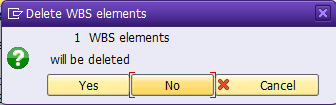
If you want to remove an existing WBS Element,
select it in the tree view and then click on the Delete ![]() button and confirm that you want to delete the WBS Element.
button and confirm that you want to delete the WBS Element.

C.18.
When you have added, removed, and updated all of
the WBS Elements, save the project by clicking on the Save ![]() icon at the top of the screen.
icon at the top of the screen.
C.19. You should see a message in the status bar similar to this, and the project will be closed.
![]()
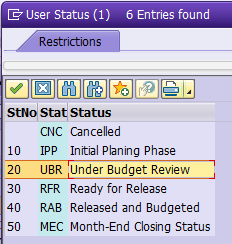
C.20. After initial creation, you will want to update the status of your project. In order to release the project. You will have to take 3 steps:
1. First step: Update the User Status of each WBS Element from 10: IPP to 20: UBR
2. Second step: Update the User Status of each WBS Element from 20: UBR to 30: RFR
3. Third step: Update the System Status of the Project Definition to Released.
Instructions on changing the User Status and System Status are covered in section 4.2.1.4 - Updating the Project/WBSE Status.
4.2.1.3 Creating a Project from Scratch
D. The steps to create a new Project and its WBS Elements for an AuC / Transaction Code: CJ20N
D.1. Login to Umoja ECC.
You must have the FA.16, PP.01, or PP.02 security authorizations to create a project.
D.2. Execute transaction code CJ20N or navigate to the following path in the SAP Menu: Accounting à Project System à Project à Project Builder
D.3. Click on the Create icon and then click Project.

D.4. Give the project a description

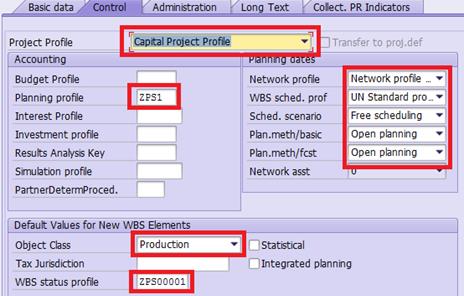
D.5. Fill in the following details in the Control tab:
· Project Profile: Capital Project Profile
· Planning profile: ZPS1
· Network profile: Network profile w/ activity acct. assignment
· WBS sched. prof: UN Standard profile - time scheduling
· Sched. scenario: Free scheduling
· Plan.meth/basic -- and - Plan.meth/fcst: Open planning
· Object Class: Production
· WBS status profile: ZPS00001
D.6. Fill out the following details on the Basic tab, and then press Enter.
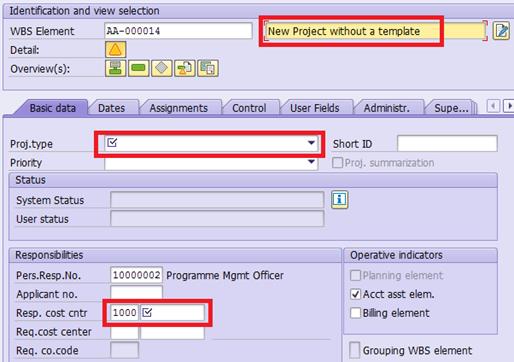
· Pers.Resp.No.: The role responsible for this project. This will usually be 10000002 - Programme Mgmt Officer.
· Start date and Finish date: Estimated (and adjustable) dates for projects start/finish.
· Factory calend.: Most should use calendar 99
· Business area and Functional Area: Select as appropriate for this project.
· Profit Center: Enter the default profit center 9999.

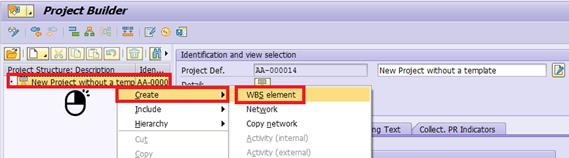
D.7. Create the first WBS Element. Right-click on the Project Definition from the Project Structure Tree and then select Create à WBS element.
D.8. Enter the description of the WBS Element. It should have the same description as the Project Definition that you created in steps D.4 through D.6. Next, fill out the following fields on the Basic tab.
· Proj.type: Select either Facilities, ICT, or Substantive Capital Projects.
· Resp. cost cntr: Enter the company code (1000) and Cost Center for this WBS Element.
D.9. In practice, the Level 1 WBS Element you just created will not be charged to. It will be the parent element for Level 2, and possibly Level 3, WBS Elements that will be charged to. Generally, if a WBSE has a child WBSE then it should not be charged to. The parent nodes are used for reporting and budgetary purposes only.
D.10. Continue adding WBS Elements. Right-click the parent WBSE that you wish to add the next one under and select Create à WBS element. You can also use the icon.

D.11. Give the new WBSE a description that conveys what type of expenses should be charged to it (or to its children). It is also good practice to indicate in the description whether or not the expenses incurred under this WBSE will be capitalized or not, especially if there are multiple non-capitalisable WBSEs within the project.
D.12. After describing it, fill out the following fields on the Basic tab.
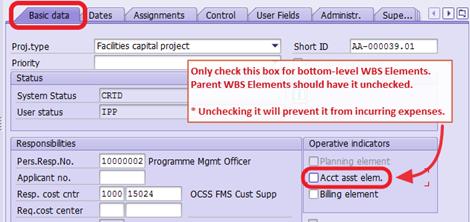
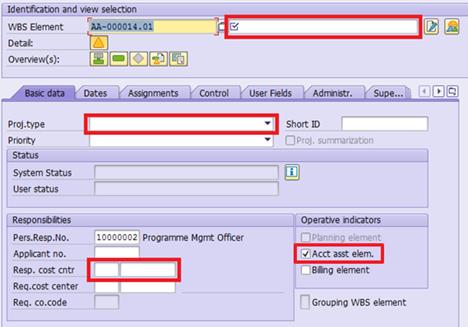
· Proj.type: Select either Facilities, ICT, or Substantive Capital Projects.
· Resp. cost cntr: Enter the company code (1000) and Cost Center for this WBS Element.
· Acct asst elem.: Uncheck this for parent WBS Elements where you do not want to incur expenses.
D.13. Go to the Control tab.
IMPORTANT: If this WBSE is to be used to collect information regarding capitalisable costs, select an Investment profile. Otherwise, leave that field empty.
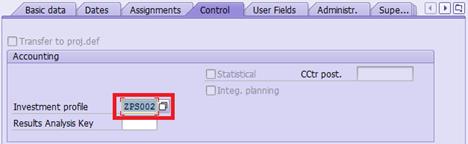
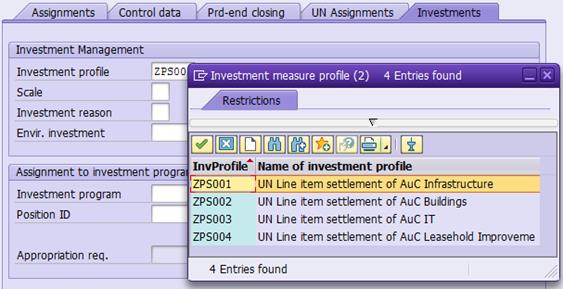
The investment profiles available are as follows:
D.14. Review the last tab UN Assignments and fill in a Grant / Sponsored Program if this WBS Element is Grant-funded.
D.15. Repeat steps D.10 - D.13 for all other required WBS Elements.
Note: As mentioned in the earlier section, if you expect to have capitalisable charges that will be distributed across multiple final assets or subcomponents when the project is completed and you cannot define a % split when the shopping cart/Purchase order is set up, you can add an extra WBS Element to collect these costs during construction/development, calling this WBSE 'Other Capitalisable Costs'. At final project settlement, you settle these charges to multiple final assets on a percentage basis. It is recommended that you keep charges to this WBSE to a minimum to avoid a lengthy review process of expenses charged to this WBSE when the AuC is finalized.
D.16. When you have added all required WBS Elements, save the project by
clicking on the Save ![]() icon at the top of the screen.
icon at the top of the screen.
D.17. You should see a message in the status bar similar to this, and the Project Builder screen will be closed.
![]()
D.18. After initial creation, you will want to update the status of your project. In order to release the project, you will have to take 3 steps:
1. First step: Update the User Status of each WBS Element from 10: IPP to 20: UBR
2. Second step: Update the User Status of each WBS Element from 20: UBR to 30: RFR
3. Third step: Update the System Status of the Project Definition to Released.
Instructions on changing the User Status and System Status are covered in the next section.
4.2.1.4 Updating the Project/WBSE Status
There are two types of status in Umoja, System Status and User Status. A project goes through several statuses before it can be used. Each WBS Element, and the Project Definition, has its own status.

|
System Status |
User Status |
State of the Project / Actions |
|
CRTD - Created |
IPP - Initial Project Planning |
Initial Status of Project / WBS Elements. |
|
CRTD - Created |
UBR - Under Budget Review |
All WBS Elements have been defined and the project is ready to have budget allotted. |
|
CRTD - Created |
RFR - Ready for Release |
Budget has been allotted. It is
ready to be released. |
|
REL - Released |
RFR - Ready for Release |
The project has been released. Individual WBS Elements can now have their User Status set to Ready for Release. |
|
REL - Released |
RAB - Released and Budgeted |
The project is Released and Budgeted. Goods and services can now be procured against these WBS Elements. |
E. The steps to update a project's User Status / Transaction Code: CJ20N
E.1. Execute transaction code CJ20N or navigate to the following path in the SAP Menu: Accounting à Project System à Project à Project Builder
E.2.
Reopen the project you created earlier by either
clicking on the Open ![]() icon and entering the project definition number, or by clicking on
the dropdown arrow (
icon and entering the project definition number, or by clicking on
the dropdown arrow (![]() ) next to Last Projects Processed and double-clicking your
new project.
) next to Last Projects Processed and double-clicking your
new project.

E.3. To change the User Status for all WBS Elements, select the Level 1 WBS Element in the Project Tree and then select Edit à Status à User Status à Set & Pass On from the top menu bar.

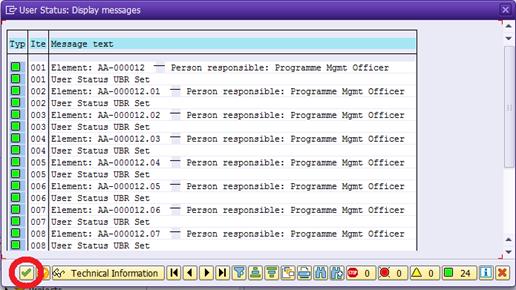
E.4.
Double click on the new User Status you
want to change to. Review the messages that are displayed in a new window and
click on the green check to continue. Save ![]() the project.
the project.
F. The steps to update a project's System Status to Released / Transaction Code: CJ20N
F.1. Execute transaction code CJ20N or navigate to the following path in the SAP Menu: Accounting à Project System à Project à Project Builder
F.2. Reopen the project you created earlier. All WBS Elements should be in status RFR (Ready for Release) in order to release the project.
F.3. Select the Project Definition (the top line in the Project Structure Tree) and then select Edit à Status à Release from the top menu bar.

F.4.
Save ![]() the Project.
the Project.
F.5. Before posting to any of the WBS Elements, the User Status must be updated once again to RAB (Released and Budgeted). This should not be done, however, until budget has been allocated by FM or GM colleagues.
4.2.1.5 Updating the Budget Control WBSE Field for FM/GM Users
A special transaction code exists for determining where each WBS Element derives its budget from. This enables FM and GM Users access to allocate budget to projects without giving them access to change any other project fields. You may have already defined this for your project in the UN Assignments tab of each WBSE, but this is an alternative specifically for FM and GM Users. Asset and Project Management Users cannot use this transaction without having the appropriate FM or GM authorizations.
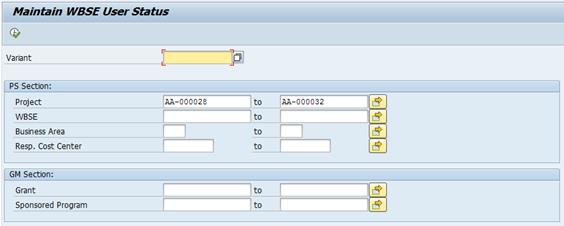
G. Steps to update the budget control for FM/GM Users / Transaction Code: ZPJWBS
G.1.
Enter transaction code ZPJWBS and then enter selection
criteria (usually just the project you wish to modify) and click on ![]() Execute.
Execute.

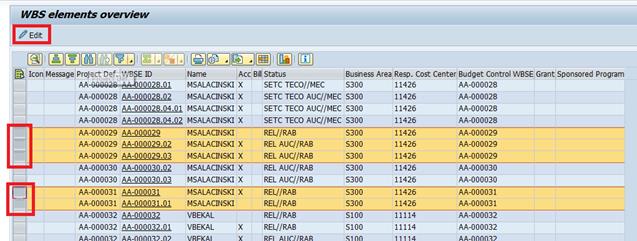
G.2. Select the WBS elements you wish to modify by clicking on the button to the left of their rows, and then click the Edit button in the toolbar.

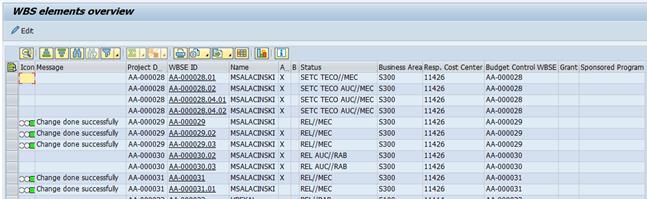
G.3.
Fill out the window that opens and click on the Save ![]() icon
to update the WBS Elements.
icon
to update the WBS Elements.

4.2.1.6 Ensure that Higher-Level WBS Elements Cannot Incur Expenses
It is good practice to only collect costs at the lowest level WBS Elements within the structure. If a WBS Element has 'children', then it probably should not be charged to. Charging to these 'parent' WBS Elements can be prevented by ensuring the Acct asst elem. indicator is not checked (expenditure will then not be able to be charged to this WBSE, however budget can still be assigned).
H. The steps to review and change WBS Elements so that they cannot be charged to / Transaction Code: CJ20N
H.1. Enter transaction code CJ20N.
You must have the FA.16, PP.01, or PP.02 security authorizations to make this change.
H.2.
Open the project you created earlier by clicking on the Open
![]() icon
and entering the project definition number, or by opening it from the Worklist
à Last Projects Processed
section.
icon
and entering the project definition number, or by opening it from the Worklist
à Last Projects Processed
section.
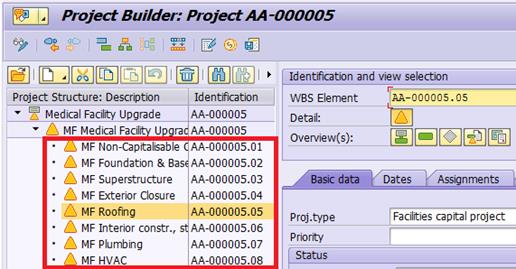
H.3. From the project structure tree on the left, find each of the WBS Elements that should not be able to incur expenses.
In this example screenshot, we have 3 'parent' WBSEs that should have the Acct asst elem. Indicator unchecked.
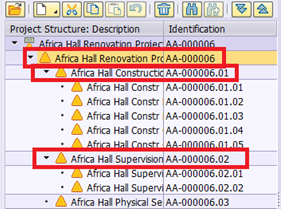
H.4. Select each 'parent' WBSE and then confirm whether or not the Acct asst elem. Indicator checkbox is checked. Uncheck it if necessary.
H.5.
Repeat steps H.3 and H.4 for all parent WBSEs and Save ![]() the
project.
the
project.
NOTE: The Acct asst elem. Indicator becomes unchangeable once the project or WBSE's System Status is set to Released. Be sure to confirm the appropriate checkbox status before releasing.
4.2.1.7 Review that Budget has been Assigned to the Project
All projects will have one or more 'Budget Control WBSEs'. These are WBSEs within the project that receive budget allocations. The other WBSEs on the project will reference these Budget Control WBSEs in the UN Assignments tab and derive/share their budget from it.
I. The steps to review the budget for a project / Transaction Code: ZPJPRJBUDBAL
I.1. Enter transaction code ZPJPRJBUDBAL.
Any Fixed Asset or Project Management Users can access this transaction.
I.2.
Enter the project or WBSEs that you wish to review and click on ![]() Execute.
Execute.
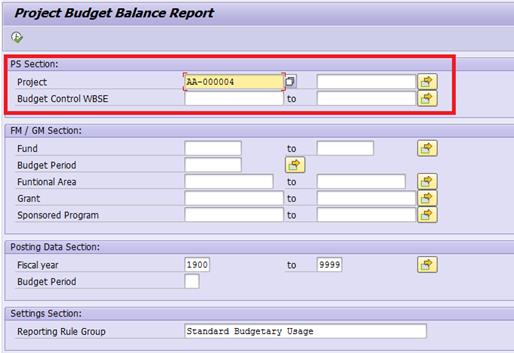
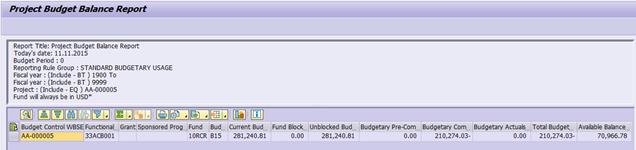
I.3. You will see a report similar to the below summarizing the status of each Budget Control WBSE.
Note: Take care to ensure that the Functional Area aligns correctly with the Cost Center. WBS Elements inherit the Functional Area from that of the Project Definition, so if the Cost Center has a different Functional Area then the Functional Area would need to be manually corrected. Use KS03 to review which Functional Area belongs to which Cost Center.
4.2.1.8 Create Settlement Rules for Non-Capitalisable WBS Elements
Settlement rules must be created for each WBS element that will be settled to a cost center (non-capitalisable AuC costs). This is not required for WBS elements that are settling to an AuC asset because those settlement rules are automatically generated during settlement (it will need to be done later however when you are settling to the final asset).
Notes:
· Settlement Rules must be maintained for the lowest level WBS elements where the expenditures have been incurred.
· If a service order is used, the expenditures incurred for the service order must first be settled to the project and then to the AuC.
J. The steps to update Settlement Rules for WBS Elements / Transaction Code: CJ20N
J.1. Enter transaction code CJ20N.
You must have the FA.16, PP.01, or PP.02 security authorizations to create settlement rules.
J.2.
Open the project you created earlier by either clicking on the Open
![]() icon
and entering the project definition number, or by double clicking on it in the Worklist
à Last Projects Processed
section.
icon
and entering the project definition number, or by double clicking on it in the Worklist
à Last Projects Processed
section.
J.3. From the project structure tree on the left, select the WBS Elements for which settlement rules need to be created. You will have to create them one WBS Element at a time (repeat steps J.4 and J.5 for each one).
J.4. Select the WBS Element and go to Edit > Costs > Settlement Rule from the top menu bar.
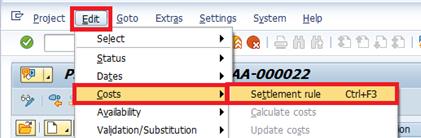
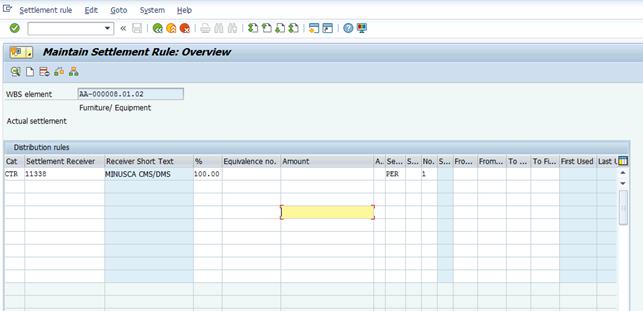
J.5. The Maintain Settlement Rule: Overview screen opens up for the selected WBS Element. Populate the following fields:
· Category: CTR - This defines the settlement receiver type to be a cost center.
· Settlement Receiver: Enter the appropriate Cost Center (this is often the Responsible Cost Center of the WBSE).
· Settlement Percentage: 100%
If there is split settlement you may adjust the percentage here by adding multiple lines that sum to 100%.
· Settlement Type: PER (periodic settlement, the rule used for month end).
J.6.
Press the Enter key on your keyboard, and then click the Save
![]() icon
in the initial screen (the project builder).
icon
in the initial screen (the project builder).
NOTE: For all WBS Elements with a selected Investment profile, a Settlement Rule to the corresponding AuC will be generated automatically.
4.2.1.9 Define Investment Profile and Create AuC Asset after Project is Already Released
If your AuC project has already been released, but you need to add an Investment profile to it, there are a few additional steps to complete compared to adding an Investment profile to an unreleased project.
K. Steps to add Investment profile to a released AuC / Transaction Code: CJ20N
K.1. Execute Transaction code CJ20N and open the project.
K.2. Select the WBS Element you wish to create an Investment profile for. Go to the Control tab.
K.3. From the Control tab, select the appropriate Investment profile for this WBS Element.
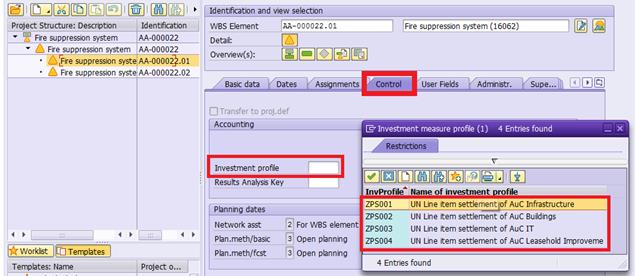
![]()
K.4. After selecting the investment profile, press the Enter key on your keyboard.
K.5. You should receive a warning message similar to the following. Press the Enter key again to dismiss this message.
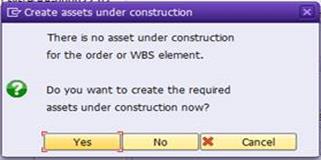
![]()
K.6. On the next prompt, click Yes to create an asset under construction for this WBS element.
K.7.
On the next screen (Create Asset: Initial
screen), just click on the Back ![]() button before going any further. If you instead hit Enter at
this screen or go further into to Master data, then you will be forced
to enter a Fund and Budget Period for this AuC Asset before
clicking the Back button (adding a fund at this stage is not necessary).
button before going any further. If you instead hit Enter at
this screen or go further into to Master data, then you will be forced
to enter a Fund and Budget Period for this AuC Asset before
clicking the Back button (adding a fund at this stage is not necessary).
K.8. After this the asset has been created in the background and the system has accepted the investment profile you entered. Don't forget to Save the project after this.
4.2.2 Set up an AuC as an Internal Order
L. The steps to create a new Internal Order for an AuC / Transaction Code: KO01
L.1. Login to Umoja ECC.
You must have the FA.16 (Senior User) security authorization to create an Internal Order.
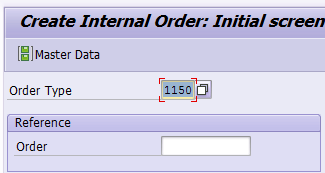
L.2. Execute transaction code KO01 or navigate to the following path in the SAP Menu: Accounting à Controlling à Cost Element Accounting à Master Data à Accrual Order à Create
L.3. Select Order Type 1150 - Capital Activities (AuC) and press the Enter key. If you know of a similar Internal Order that you wish to copy, you can enter its # in the Reference section
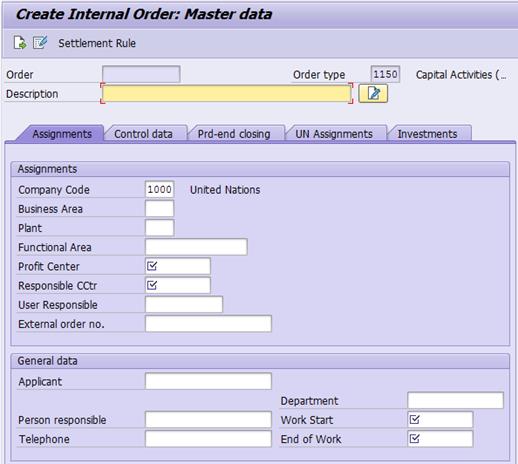
L.4. On the Create Internal Order screen, fill in the following fields on the Assignments tab:
· Description: Fill in a description of this AuC.
· Profit Center: Enter the default profit center 9999
· Responsible CCtr: Enter the responsible Cost Center. This will derive the business area and functional area.
· Work Start and End of Work: Fill in planned dates here. These can be changed later, if necessary.
·
User Responsible:
Enter an Umoja User ID of the person responsible for this AuC. You can use the ![]() icon to search for someone by their name if you do not know their
user id.
icon to search for someone by their name if you do not know their
user id.
· External order no.: If this AuC should reference a specific order number outside of Umoja, you can enter it here.
· Person responsible: Enter the name of the person responsible for this AuC.
· Telephone: Enter the telephone number of the Person responsible.
· Department: Enter the department responsible for this AuC.
L.5. You can skip the Control data and Prd-end closing tabs.
L.6. On the UN Assignments tab, fill in Grant and Sponsored Program if this AuC is grant-funded.
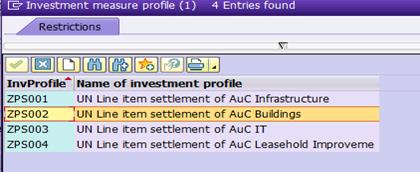
L.7. On the Investments tab, select an appropriate Investment profile from the list depending on if the Asset under Construction is an Infrastructure, a Building, an IT / Intangible asset, or a Leasehold Improvement.
L.8.
When you're done, click on the Save ![]() icon. You should see the following informational message. Press the
Enter key to proceed.
icon. You should see the following informational message. Press the
Enter key to proceed.
![]()
L.9. You will then see this prompt. Choose Yes to create the AuC asset master now.

L.10. The system will bring you to the Asset Master creation screen, with the correct Asset Class for the AuC you are creating as determined by the Investment profile specified on the Investments tab.
L.11. Press the Enter key to proceed and select the green check to continue.

L.12. Most fields on the asset master should have been automatically filled out based on information provided in the Internal Order earlier. Go to the Time-dependent tab.
L.13. On the Time-dependent tab, enter the Fund and the other fields should derive from the Cost Center and Fund.
NOTE: The Cost Center came from the responsible cost center on the Internal Order.
L.14. On the Net Worth Tax tab, fill in the Property indicator, this will often be 2 - Owned Constructed.
L.15.
Click on the Back ![]() icon at the top of the screen to complete the AuC asset master.
icon at the top of the screen to complete the AuC asset master.
L.16.
Click on the Save ![]() icon to save your internal order and Asset under Construction. You
should see a message at the bottom of the screen showing your Internal Order
number.
icon to save your internal order and Asset under Construction. You
should see a message at the bottom of the screen showing your Internal Order
number.
![]()
Note: You do not need to create a settlement rule for an AuC Internal Order for its periodic settlements to the AuC asset. It will be automatically created during your first periodic settlement. For the final settlement, you will create one rule to settle to the final asset, this is covered in the Job Aid 3.3: Asset under Construction - Final Settlement.
4.2.3 Review of AuC and Monthly Settlements
4.2.3.1 Review of Project Structures
M. Steps to review project structures / Transaction Code: CN41
M.1. Log in to Umoja ECC.
M.2. Execute Transaction code CN41. All FA and Project users have access.
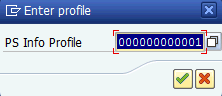
M.3. Select 000000000001 - std profile: structure overview description.
M.4. Enter AA* in the Project field and select the corresponding Business area from the dynamic extract all AuC projects for that particular business area.
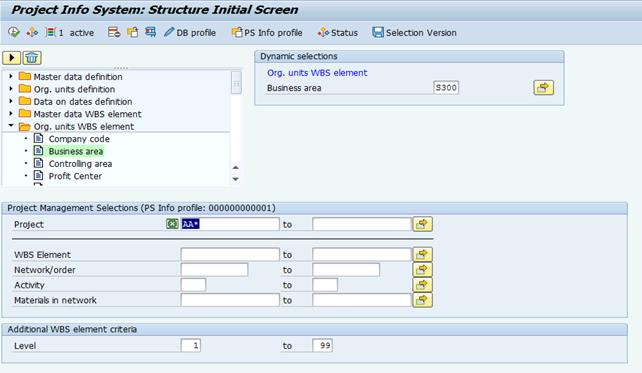
M.5. Review the list of projects and WBS elements to ensure completeness.

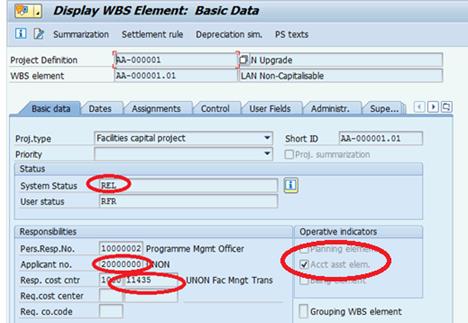
M.6. Double-click all project definitions (marked in ) to ensure that System Status is REL (Released) and that the Applicant no., Start date, Business area and Functional Area are correct.

M.7. Double click all WBS elements to ensure that System Status is REL and that the Applicant no., Responsible Cost Center, Business Area, Functional Area are correct. For each WBSE that is not at the lowest level, expenditures should not be posted. To prevent this, the Acct asst elem. indicator should not be checked.

4.2.3.2 Review Project Expenditure Postings
N. Steps to review project expenditure / Transaction Code: CJI3
N.1. Log in to Umoja ECC.
N.2. Execute transaction code CJI3. All FA and Project Users have access.
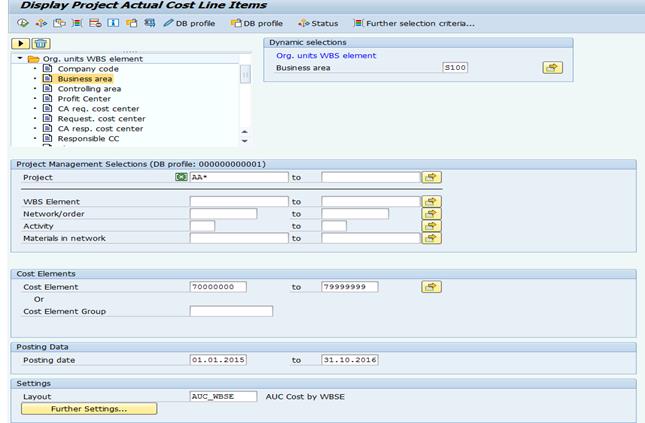
N.3. Enter the Projects or WBSEs being reviewed in the Project field, the Cost Element from 70000000-79999999 and ensure the Posting dates reflect the period you are interested in.
N.4.
Execute ![]() the
report.
the
report.
N.5. Review the postings. Double-click on any line to see more details.
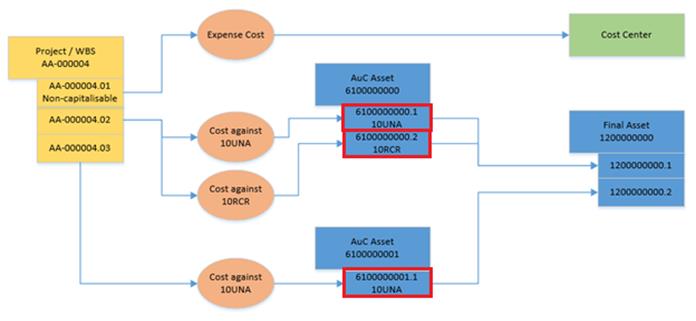
4.2.3.3 Create Sub-Assets for AuC
The Asset Accounting Senior User identifies that the construction project has costs to be capitalized at the end of the month. Initially, sub-assets need to be created for each distinct fund that is charged to a WBS Element. After initial creation, sub-assets usually do not need to be recreated in each accounting period (month). Exception to this is if a new fund is used during the month, when new sub-assets would need to be created for such fund.
Structure below is an example showing where sub-assets fit in.
O. Steps to create sub-asset / Transaction Code: AS11_FMIM
O.1. Log in to Umoja ECC.
You must have the FA.16 (Senior User) security authorization to create sub-assets for AuCs.
O.2. Execute transaction code AS11_FMIM.
O.3. Fill out the following fields as instructed:
· Controlling Area: Always set to 1000
· Company Code: Always set to 1000
· All fields in the Orders region should be empty and unchecked.

· All WBS Elements: Unchecked
· Project Definition: Enter the Project Definition number here.
· WBS Element: If you entered a Project Definition above, you may leave this blank, but it would allow you to only create sub-assets for specific WBSE's within the project.

· Clear any values in the Further Selections region.
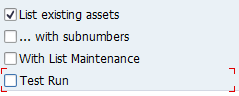
· List existing assets - and - Test Run: Both should be checked.


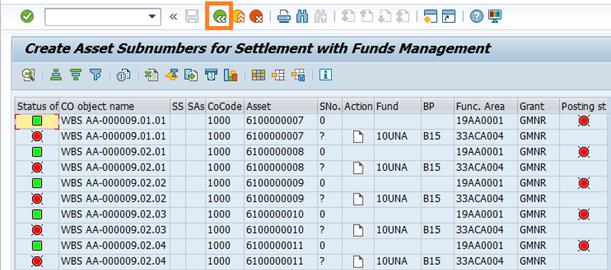
O.4.
Press the Execute button ![]() at the top of the screen. You should see a screen similar to the
one below for your review.
at the top of the screen. You should see a screen similar to the
one below for your review.
NOTE:
Each line with a Create Asset icon ![]() in the Action column shows new sub-asset(s) that will be
created if you uncheck the Test Run option and re-execute this
transaction. It is normal for these rows to have a red circle in the Status
of asset column.
in the Action column shows new sub-asset(s) that will be
created if you uncheck the Test Run option and re-execute this
transaction. It is normal for these rows to have a red circle in the Status
of asset column.
O.5.
Press the Back button ![]() to return to the previous screen. If prompted to 'Leave list' then
click Yes.
to return to the previous screen. If prompted to 'Leave list' then
click Yes.
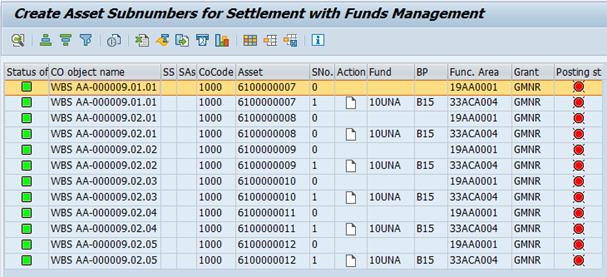
O.6.
Uncheck the Test Run button and then
press the Execute button ![]() again.
again.
O.7. The rows that previously had a red circle in the Status of asset column should now have green squares and an assigned sub-number indicating that the sub-assets have been created. You may close the transaction now.
4.2.3.4 Update User Status to MEC
Before performing any settlement, the User Status must be updated to MEC - Month End Closing to indicate that expenditures are ready to be settled to the AuCs. To update the user status, use T-code ZPJ_WBS_US to quickly change the User Status of one or more projects.
You must have the FA.16 security authorization to update the User Status using this transaction.
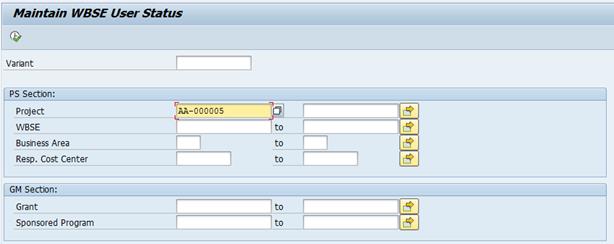
P. The steps to update user status / Transaction Code: ZPJ_WBS_US
P.1. Enter transaction ZPJ_WBS_US
P.2. Fill in selection criteria so that you will select all of the WBS Elements for which you need to change the status.
NOTE: WBS Elements that have not been Released will not be selected.
The example in the screenshot shows the selection of all WBS Elements from 5 projects.
P.3.
Click the Execute ![]() icon
to proceed to the next screen, listing out each WBS Element selected from the
criteria on the last screen. Select all of the WBS Elements you wish to change
by clicking on the squares to the left of each row and dragging. You can make
multiple selections (as shown in the screenshot below) by holding the CTRL key
on your keyboard.
icon
to proceed to the next screen, listing out each WBS Element selected from the
criteria on the last screen. Select all of the WBS Elements you wish to change
by clicking on the squares to the left of each row and dragging. You can make
multiple selections (as shown in the screenshot below) by holding the CTRL key
on your keyboard.
P.4.
When you have selected all of the WBS Elements, click on ![]() button
to change the User Status.
button
to change the User Status.
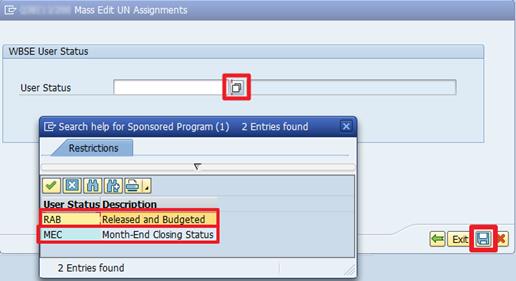
P.5.
In the Mass Edit screen, enter the User Status MEC
directly into the field, or select it from the selection list. Click on the Save
![]() icon
to make and save the change to all selected WBS Elements.
icon
to make and save the change to all selected WBS Elements.

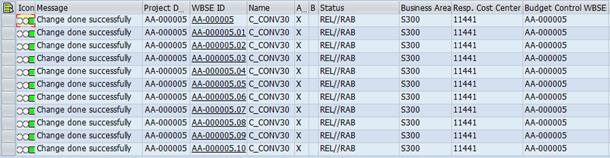
P.6. If the change succeeds, the table will update to show the changes made. The changes are saved immediately, so there is no further action required.
![]()
NOTE: Users can also use CJ20N and simply select edit user status, then set and pass on to change to MEC, it should be noted the system may produce warning messages, as a result of the missing account assignment elements, these should be ignored.
Keep in mind that only WBS Elements currently in User Status RAB can be set to new User Status MEC.
4.2.3.5 Special Note for Capitalisable WBSEs with Grant-Funding
AuC Projects that are funded by a Grant need to settle the non-capitalisable Indirect Costs (IDC) or Program Support Costs (PSC) charged to their WBS Elements.
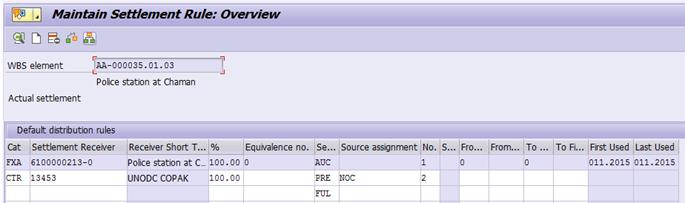
Because these IDC / PSC charges are NOT capitalisable, you must define an extra settlement rule to each capitalisable WBSE in the project so that these non-capitalisable charges will automatically settle to a cost center instead of an AuC. This new settlement rule will have an additional dimension is called Source assignment and the value to be selected is NOC which stands for 'not for capitalisation'.
For example:
The first line is the automatically generated settlement rule for settling capitalisable costs to the AuC.
The second line is the non-capitalisable settlement rule described above.
Q. To define the IDC settlement rules / Transaction Code: CJ20N
IMPORTANT: This settlement rule must be created AFTER the first settlement. This is because the system will automatically generate the AuC Asset settlement rule upon first settlement. This IDC settlement rule must be defined below the AuC Asset settlement rule.
Q.1. Enter transaction code CJ20N and open the project you are creating settlement rules for.
Q.2. From the project structure tree, select the WBSE for which costs will be settled one at a time.
Q.3. Go to the task bar and select Edit > Costs > Settlement rule
Q.4. Add a new line with the following dimensions (It should look similar to the screenshot above):
· Category: CTR (Cost Center)
· Settlement Receiver: The responsible cost center for this WBS Element
· Settlement Percentage: 100%
· Settlement Type: PRE (Preliminary)
· Source Assignment: NOC (Not to be capitalized)
Q.5.
Click on the Back button ![]() to
go back to the project builder screen.
to
go back to the project builder screen.
Q.6. Repeat steps Q.1 - Q.4 for all remaining WBS Elements.
Q.7.
Click on the Save icon ![]() to
save changes.
to
save changes.
4.2.3.6 Run Cost Settlement
After you have reviewed the costs against the project and have ensured that sub-assets exist for the AuCs, you can run cost-settlement to capitalize costs to the AuC sub-assets.
R. The steps to run Cost Settlement / Transaction Code: CJ88
R.1. Execute transaction code CJ88.
You must have the FA.16 (Senior User) security authorization to run project settlement.
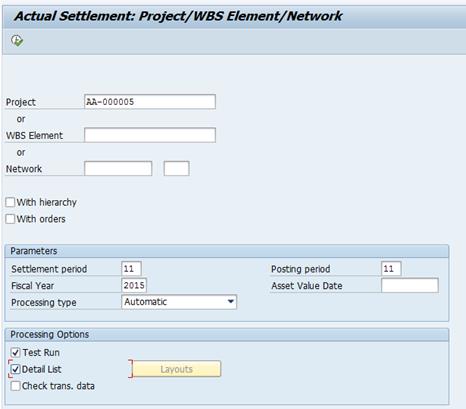
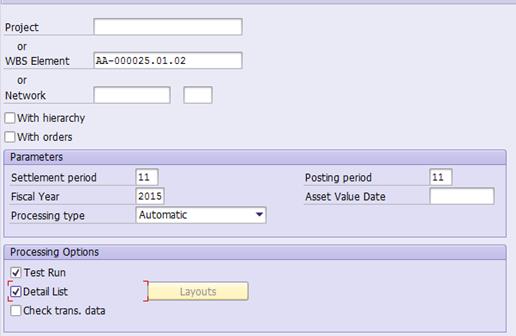
R.2. Define the Project/WBS Element to be settled by entering the following fields:
· 'Project' or 'WBS Element': Enter the Project ID, or the ID of a single WBS Element you wish to settle. If you enter it at the Project level, it will attempt to settle for all WBS Elements that are in the MEC - Month End Closing User Status.
· With hierarchy: Check this if you entered a WBS Element (instead of a Project) and wish to also settle all subordinate WBS Elements structured beneath it.
· Settlement period: Current month (should match posting period).
· Posting period: Current month.
· Fiscal Year: Current year.
· Asset Value Date: Usually today's date, or the last day of the month.
· Processing type: Automatic
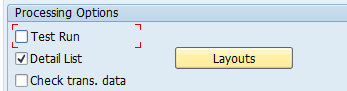
· Test Run: Checked
· Detail List: Checked
R.3.
Select the Execute icon ![]() .
.
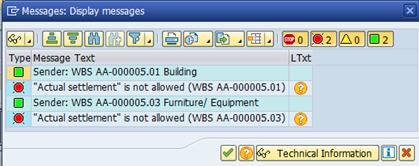
NOTE: If
there are any errors, warnings, or informational messages, there will be a
messages icon ![]() in
the Menu bar. Click on that icon to review and validate the messages. Any error
messages (red icon) will need to be fixed before a settlement will process.
in
the Menu bar. Click on that icon to review and validate the messages. Any error
messages (red icon) will need to be fixed before a settlement will process.
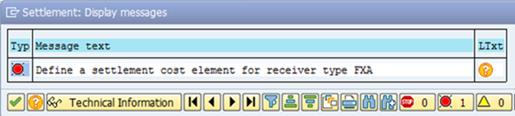
If you encounter an error stating 'Define a settlement cost element for receiver type FXA', this is likely because your project is Grant-funded and had IDC postings to this WBS Element.
If there are no
error messages, go Back ![]() to
the selection screen.
to
the selection screen.
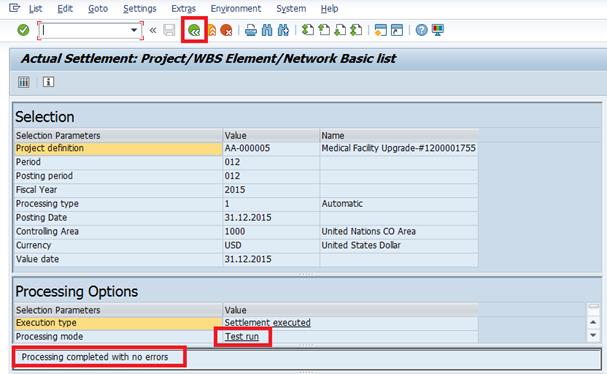
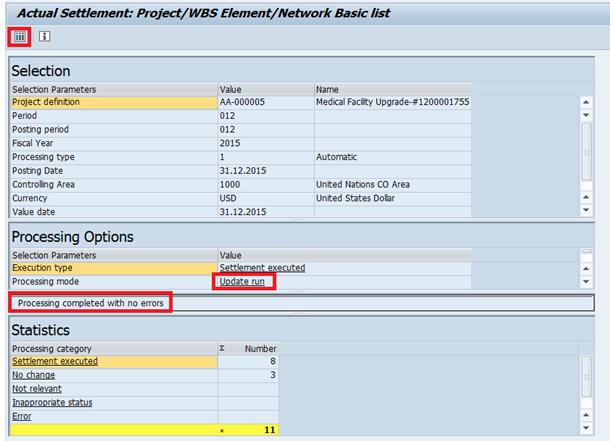
R.4.
Return to the Actual Settlement: Project/WBS Element/Network
Basic list screen, unselect the Test Run checkbox. Then click on the
Execute icon ![]() in
the Menu bar.
in
the Menu bar.
R.5. Review the results of the actual run.
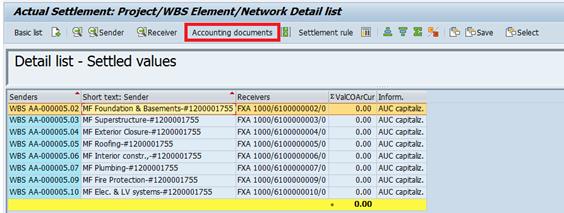
R.6.
On the Actual Settlement: Project/WBS Element/Network Basic
list screen, select the Detail lists ![]() button.
Each line in this view represents one WBS Element that was settled. Review the
postings for each by selecting the line and then clicking on Accounting
documents.
button.
Each line in this view represents one WBS Element that was settled. Review the
postings for each by selecting the line and then clicking on Accounting
documents.
R.7. From the pop-up window, double-click the document to be reviewed and validate the entries in the FI, CO, FM and GM documents.
R.8.
Click the Back icon ![]() and
repeat the process for each document to be reviewed.
and
repeat the process for each document to be reviewed.
R.9. Next, review the settlement line items before updating the WBS User Status back to RAB.
NOTE: If you do not change the User Status back to RAB, no new commitments can be raised against this WBS Element.
4.2.3.7 Run Line Item Report to Review Settlement
To validate that all expenses were settled to the AuC or Cost Center, run the line item report again.
S. The steps to run the Line Item Report / Transaction Code: CJI3
S.1. Execute transaction code CJI3.
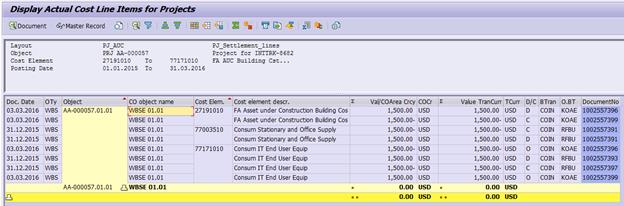
S.2. In the Project Actual Cost Line Item screen define the project for which the line item report should be run. If needed, narrow the report down to a specific WBS Element or a range of WBS Elements.
S.3. Provide Cost element ranges as 70000000-79999999
S.4. Adjust the Posting date range to cover only the period just settled.
S.5.
Click the Execute icon ![]() .
.
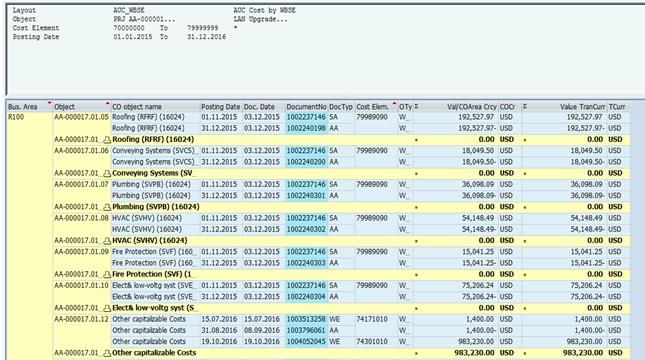
S.6. Confirm that the balance is as expected after settlement. All postings that can be settled should have been settled and the balance for each project is zero.
S.7. You may also review the settlement documents again by double-clicking the individual settlement line items.
From the Settlement Documents screen, select each row and click on Accounting documents to see all accounting documents associated with this settlement item. From the pop-up window double click the document to be reviewed and validate the entries in the documents related to the settlement posting.
S.8.
Click the Back icon ![]() and
repeat the process for each document to be reviewed.
and
repeat the process for each document to be reviewed.
S.9. After settlement is completed and reviewed, you will need to change the User Status of the project WBS Elements from MEC to RAB.
4.2.3.8 Review Fixed Asset Transaction Documents
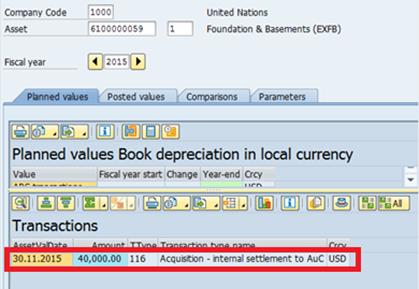
T. The steps to review Fixed Asset Transaction Documents / Transaction Code: AW01N
T.1. Enter transaction code AW01N. All FA and Project Users have access.
T.2. Populate data in the following fields:
· Company Code: 1000
· Asset Number: Asset (AuC) number generated in transaction AS11_FMIM
· Asset Sub-number: Usually '1', but if there are multiple costs with different funds, then there can be multiple sub-assets to review with sub-numbers 2, 3, 4, etc.
· Fiscal year: Current year.
T.3. Click the Enter icon.
T.4. Double-click the asset transaction to be reviewed
T.5. Click the General Ledger View icon.
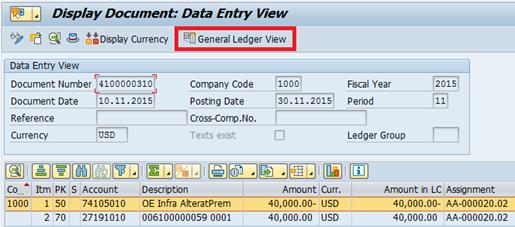
NOTE: Review each line and ensure the amounts and account assignments are correct according to the transaction posted.
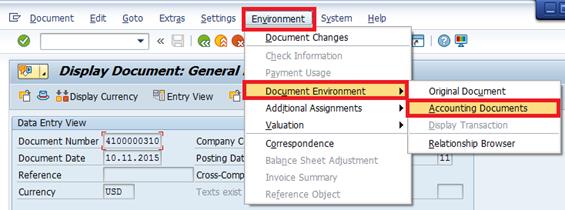
T.6. Select the Environment > Document Environment > Accounting Documents from the Menu bar.
T.7. From the pop-up window, double-click the document to be reviewed.
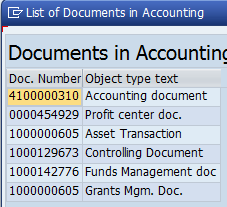
T.8.
Click the Back button ![]() and
repeat the previous steps for each document to be reviewed.
and
repeat the previous steps for each document to be reviewed.
4.2.3.9 Revert User Status to RAB after Settlement
The user status must be changed back to RAB - Released and Budgeted after settlement is completed, otherwise new expenditure will not be able to be charged to the WBSE.
U. The steps to update user status / Transaction Code: ZPJ_WBS_US
U.1. Enter transaction ZPJ_WBS_US
You must have the FA.16 security authorization to use this transaction.
U.2. Fill in selection criteria so that you will select all of the WBS Elements for which you need to change the status back to RAB.
The example in the screenshot shows the selection of all WBS Elements from 1 project.
U.3.
Click the Execute ![]() icon
to proceed to the next screen, listing out each WBS Element selected from the
criteria on the last screen. Select all of the WBS Elements you wish to change
by clicking on the squares to the left of each row and dragging. Or if you only
want to update for selected WBSE then hold CTRL and Left Click
each square. When you have selected all of the WBS Elements click on
icon
to proceed to the next screen, listing out each WBS Element selected from the
criteria on the last screen. Select all of the WBS Elements you wish to change
by clicking on the squares to the left of each row and dragging. Or if you only
want to update for selected WBSE then hold CTRL and Left Click
each square. When you have selected all of the WBS Elements click on ![]() button
to change the User Status.
button
to change the User Status.

U.4.
In the Mass Edit screen, enter the User Status RAB
directly into the field, or select it from the selection list. Click on the Save
![]() icon
to make and save the change to all selected WBS Elements.
icon
to make and save the change to all selected WBS Elements.
U.5. If the change succeeds, the table will update to show the changes made. The changes are saved immediately, so there is no further action required. The project can now receive new expenditures.
![]()
4.2.3.10 Reversing a Cost Settlement
V. The steps to reverse the settlement of a Project / WBS Element(s) / Transaction Code: CJ88
· Confirm the period that you wish to reverse. If you must reverse an older period, you must first reverse the more recent settlements. So if you need to reverse the settlement for January, but you have already settled February, then you must first reverse February before reversing January. Keep in mind that earlier posting periods may also not be open for posting anymore.
· Confirm that the User Status of the WBS Elements is set to MEC.
V.1. Execute transaction code CJ88.
You must have the FA.16 (Senior User) security authorization to reverse a settlement.
V.2. Define the Project/WBS Element to be reversed by entering the following fields:
· Project or WBS Element: Enter the Project ID, or the ID of a single WBS Element you wish to reverse. If you enter it at the Project level, it will attempt to reverse all WBS Elements that are in the MEC - Month End Closing User Status.
· With hierarchy: Check this if you entered a WBS Element and wish to reverse all subordinate WBS Elements structured beneath it.
· Settlement period: The month/period that you wish to reverse settlement of.
· Posting period: Should be the same as settlement period.
· Fiscal Year: The fiscal year of the period to be reversed.
· Asset Value Date: Leave this blank, it is not required for reversal.
· Processing type: Automatic.
· Test Run: Checked
· Detail List: Checked
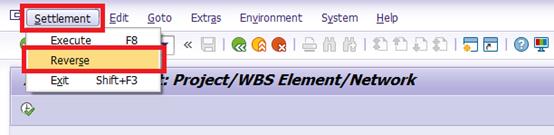
V.3. From the menu bar at the top of the screen, click on Settlement à Reverse
V.4.
Review the results and any messages from the reversal Test Run.
Click on the Back button ![]() .
.

V.5. If the Test Run had completed with no errors, uncheck Test Run and confirm the parameters.

V.6. To perform the actual reversal, click on Settlement à Reverse from the top menu bar.

V.7.
On the screen shown below, review the results and then select the
Detail lists ![]() button
from the toolbar.
button
from the toolbar.
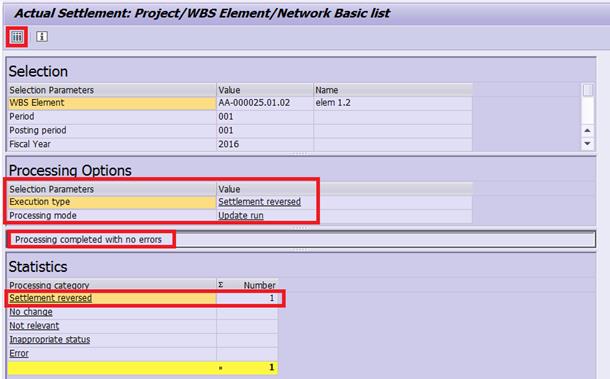
V.8. In the Detail List screen, each line represents one WBS Element that was reversed. Review the postings for each by selecting the line and then clicking on Accounting documents.

V.9. From the pop-up window, double-click the document to be reviewed and validate the entries in the FI, CO, FM and GM documents.
V.10.
Click the Back icon ![]() and
repeat the process for each document to be reviewed.
and
repeat the process for each document to be reviewed.
V.11. Review the settlement line items and update the WBSE's User Status back to RAB.
V.12. Finally, run the CJI3 report again to validate that all settled postings have been reversed.
4.2.4 Periodic Activities for AuC Internal Orders
4.2.4.1 Review Balances of Internal Orders
This report will display all AuC internal orders and which in turn assist the user to check whether or not they have unsettled balances.
W. Steps to review balances of internal orders / Transaction Code: S_ALR_87013015 or KOB1
W.1. Log in to Umoja ECC.
W.2. Execute transaction code S_ALR_87013015 or KOB1. All FA and Project Users have access.
W.3. Enter the following:
· Controlling Area: 1000
· Order Group: INTORD.1150 - this will restrict the report to only display Internal Orders with Order Type 1150, which is for AuC Orders.
· Or value(s): If known and as desired, enter the Internal Order Number(s) for a specific settlement(s).
· Cost Element: Range 70000000-79999999
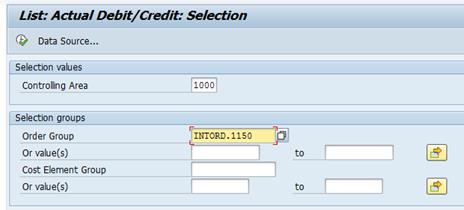
W.4.
Press the Execute ![]() button
to display the report. Unsettled balances will be shown in the right-most
column.
button
to display the report. Unsettled balances will be shown in the right-most
column.
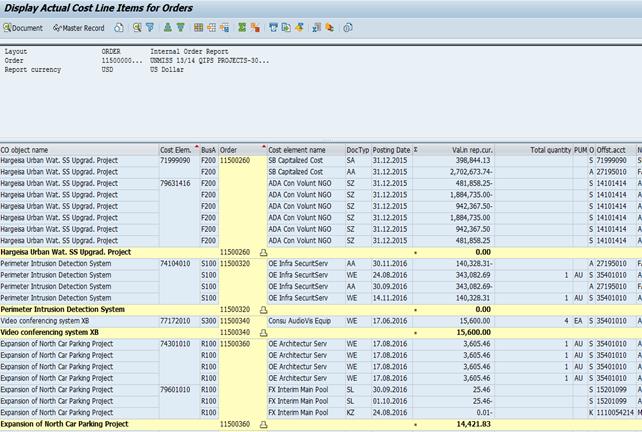
4.2.4.2 Review Internal Order Expenditure Postings
X. Steps to review internal order expenditure / Transaction Code: KOB1
X.1. Log in to Umoja ECC.
X.2. Execute transaction code KOB1. All FA and Project users have access.
X.3. Enter an Internal Order ID, or range of Order IDs in the Order field à select the Posting Date range you are want to review.
X.4.
Press the Execute ![]() button
to display the report.
button
to display the report.

X.5. Review the line item report. In the example screenshot below, you can see there are two costs posted to this internal order.

4.2.4.3 Special Note for Capitalisable Investment Orders with Grant Funding
AuC Investment Orders that are funded by a Grant need to settle the non-capitalisable Indirect Costs (IDC) or Program Support Costs (PSC) to a cost center instead of the AuC Asset because these IDC / PSC charges are NOT capitalisable.
You must define an extra settlement rule so that these non-capitalisable charges will automatically settle to a cost center instead of the AuC Asset. This new settlement rule will have an additional dimension is called Source assignment and the value to be selected is NOC which stands for 'not for capitalisation'.
For example:
The first line is the automatically generated settlement rule for settling capitalisable costs to the AuC.
The second line is the settlement rule described above for the non-capitalisable costs.

Y. Steps to define the IDC settlement rules / Transaction Code: KO02
Y.1. Enter transaction code KO02 and open the Investment Order that you are creating the settlement rule for.
Y.2. Click on the Settlement Rule button near the top of the screen.
Y.3. Add a new line with the following dimensions (It should look similar to the screenshot above):
· Category: CTR (Cost Center)
· Settlement Receiver: The responsible cost center for this WBS Element
· Settlement Percentage: 100%
· Settlement Type: PRE (Preliminary)
· Source assignment: NOC (Not to be capitalized)
Y.4.
Click on the Save icon ![]() to
save changes.
to
save changes.
4.2.4.4 Run Cost Settlement to AuC
Z. Steps to run cost settlement / Transaction Code: KO88
Z.1. Log in to Umoja ECC. You must have the FA.16 (Senior User) security authorization to perform AuC settlement.
Z.2. Execute transaction code KO88.
Z.3. Fill in the following values:
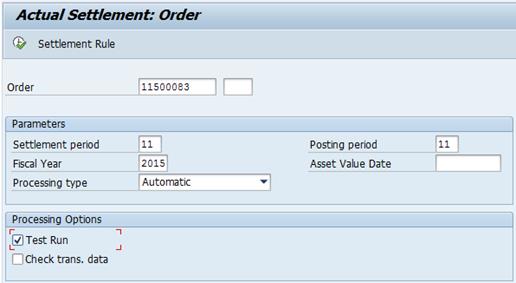
Z.4.
With Test Run checked, click on the Execute
![]() icon to simulate the settlement. You will likely see some messages
open in a window. Green and messages are ok and informational, red
messages will prevent the settlement from posting.
icon to simulate the settlement. You will likely see some messages
open in a window. Green and messages are ok and informational, red
messages will prevent the settlement from posting.
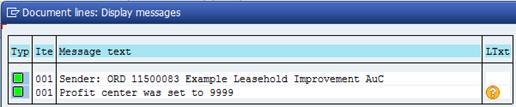
If you encounter an error stating 'Define a settlement cost element for receiver type FXA', this is likely because your IO is Grant-funded and had IDC postings to it.
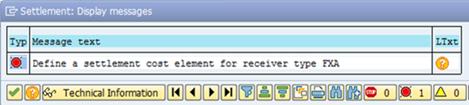
Z.5.
Review the results of the test settlement,
confirming that the processing completed without errors. Press the Back ![]() button to go back to the selection screen.
button to go back to the selection screen.
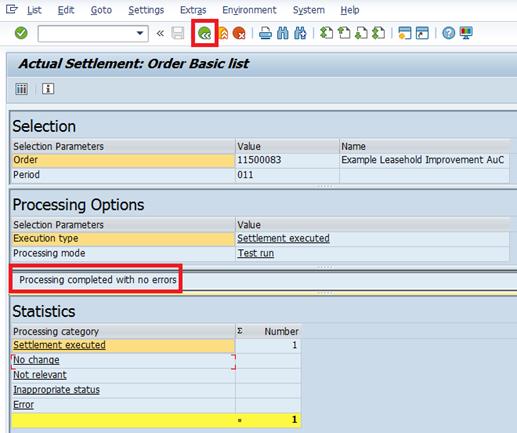
Z.6. Back at the selection screen, uncheck the Test Run box and confirm that Fiscal Year is still correct, as this sometimes changes to another year after a test run.
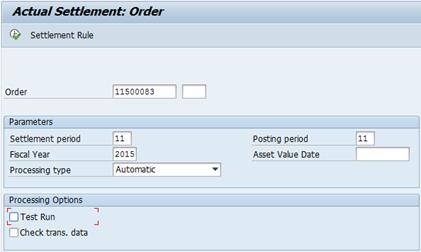
Z.7.
With Test Run unchecked, click on the Execute
![]() icon to process the settlement. Review any messages that pop up and
close them to see the results on the next screen.
icon to process the settlement. Review any messages that pop up and
close them to see the results on the next screen.
Z.8.
Review the results of the settlement run. You
should expect that there were no errors. Click on the Detail Lists ![]() icon to review the actual postings.
icon to review the actual postings.
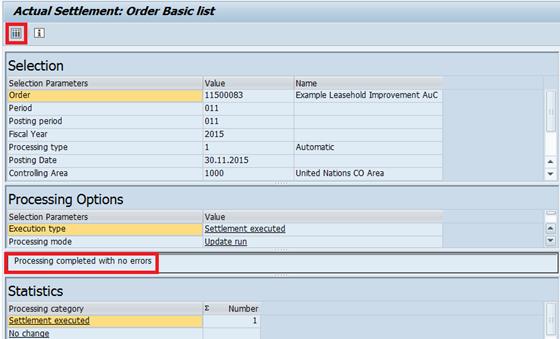
Z.9. Review the detail list, and click on Accounting documents when ready.
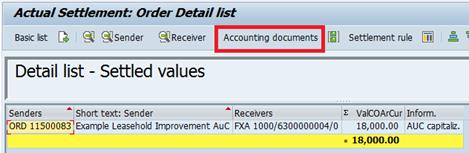
Z.10. Double-click on each accounting document within the list of documents to review the postings.

Z.11. Review the settlement line items following the instructions detailed in the next section.
4.2.4.5 Review Internal Order Settlement Postings
AA. Steps to review internal order settlement postings / Transaction Code: KOB1
AA.1. Log in to Umoja ECC.
AA.2. Execute transaction code KOB1. All FA and Project Users have access.
AA.3. Enter an Internal Order ID, or range of Order IDs in the Order field with Cost Element range of 70000000-79999999 and select the Posting Date range you want to review, in this case the period just settled. You can also choose the business are from dynamic selection button.
AA.4. Press
the Execute ![]() button
to display the report.
button
to display the report.

AA.5. Review the line item report. In the example screenshot below, you can see both the original cost and the settled cost postings.
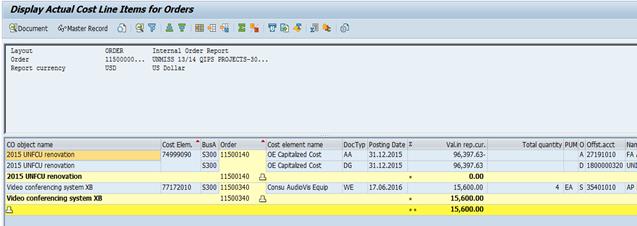
4.2.4.6 Review Fixed Asset AuC to Review Value Posted
BB. Steps to review fixed asset AuC / Transaction Code: KOO3
BB.1. Log in to Umoja ECC.
BB.2. Execute transaction code KOO3. All FA and Project Users have access.
BB.3. Enter your AuC's Internal Order number and press Enter.

BB.4. From the top menu bar, click on Extras and then Asset under Construction.

BB.5. From the Asset Master Data screen, click on Asset values to see the asset values.
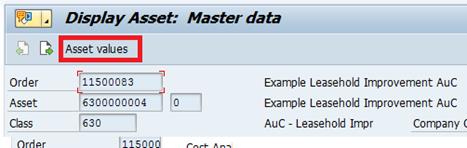
BB.6. You should see the familiar Asset Explorer screen. At the top you will see the asset number/sub-number of the AuC for this Internal Order. In the middle you can see the Planned values, Posted values, and Parameters of the asset. On the left-hand side, you can see related objects, including your Investment Order that created this AuC. Finally, at the bottom you can see the list of Transactions related to this AuC.
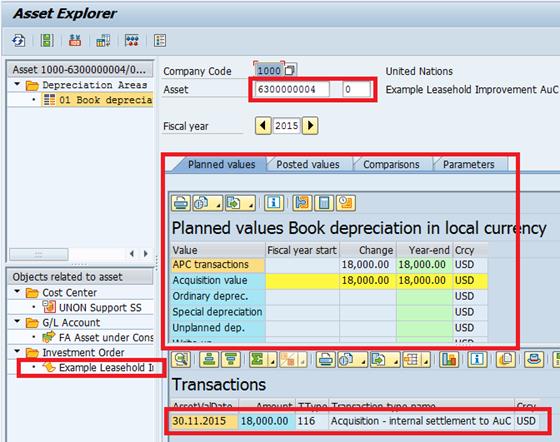
BB.7. Double-click on the transaction line to open the posting document.
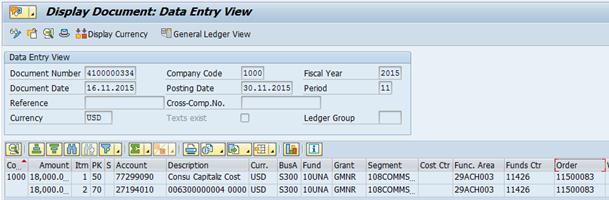
4.2.4.7 Reversing a Cost Settlement
CC. The steps to reverse the settlement of an Investment Order / Transaction Code: KO88
Confirm the period that you wish to reverse. If you must reverse an older period, you must first reverse the more recent settlements. So if you need to reverse the settlement for January, but you have already settled February, then you must first reverse February before reversing January. Posting periods may be also not be open in older periods anymore, either.
CC.1. Execute Transaction code KO88.
You must have the FA.16 (Senior User) security authorization to reverse a settlement.
CC.2. Define the Investment Order to be reversed by entering the following fields:
· Order: Enter the Investment Order ID to be reversed.
· Settlement period: The month/period that you wish to reverse settlement of.
· Posting period: Should be the same as settlement period.
· Fiscal Year: The fiscal year of the period to be reversed.
· Asset Value Date: Leave this blank, it is not required for reversal.
· Processing type: Automatic.
· Test Run: Checked

CC.3. From the menu bar at the top of the screen, click on Settlement à Reverse

CC.4. Review
the results and any messages from the reversal Test Run. Click on the Back
button ![]() .
.

CC.5. If the Test Run had completed with no errors, uncheck Test Run and confirm the parameters.

CC.6. To perform the actual reversal, click on Settlement à Reverse from the top menu bar.
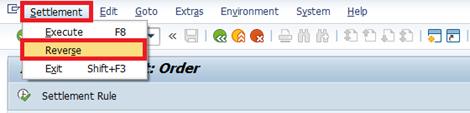
CC.7. On
the screen shown below, review the results and then select the Detail lists
![]() button
from the toolbar.
button
from the toolbar.
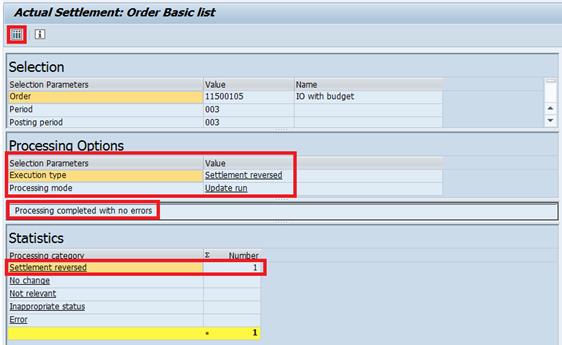
CC.8. In the Detail List screen, review the postings by clicking on Accounting documents
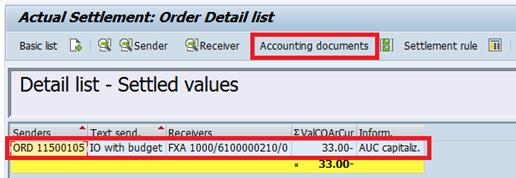
CC.9. From the pop-up window, double-click the document to be reviewed and validate the entries in the FI, CO, FM and GM documents.
CC.10.Finally, review the settlement line items and balance using transaction KOB1 following instructions in section 4.2.4.5.
4.2.5 AUC Report and Analysis
This section details various reports available in ECC that allow users mapped to the relevant roles to access information related to Assets under Construction (AuC). These include:
· AuC Hierarchy (CJ20N & CN43N)
· Funds Management and Consumption (ECC and BI)
· Costs charged to the AuC Project and balances settled to AuC and Cost Center (ZPJCOSTELEMENT, CJI3 & KOSRLIST)
· AuC Asset Balances Report (S_ALR_87011963)
· AuC Asset Master Validation Report (ZAAVALAS)
· Asset Master (AS03)
· Asset Explorer (AW01N)
· Asset History (S_ALR_87011990)
· Asset Transactions Report (S_ALR_87012048) - including list of completed AuCs
4.2.5.1 Project Builder
The Project Builder allows a user to review the setup of an AuC project. In the following screens we will outline how to view a better AuC visual for project structure.
It is available to the following users in the AuC context:
· FINANCIAL_ACCOUNTING: ASSET_ACCOUNTING_SENIOR_USER
· PROGRAMME_PROJECT: PROJECT_MANAGEMENT_APPROVER
· PROGRAMME_PROJECT: PROJECT_MANAGEMENT_USER
· REAL_ESTATE: FACILITIES_APPROVER
· REAL_ESTATE: FACILITIES_PLANNER
· REAL_ESTATE: LEASE_CONTRACT_APPROVER
· REAL_ESTATE: LEASE_PROCESSOR
DD.Steps to generate the report / Transaction Code: CJ20N
DD.1.Log in to Umoja ECC.
DD.2.Execute transaction code CJ20N.
DD.3.Enter the AuC Project number (or only the WBSE, if appropriate)
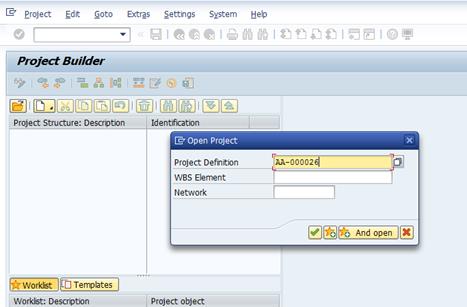
DD.4.Execute
DD.5.Click on the Expand
All ![]() button.
button.
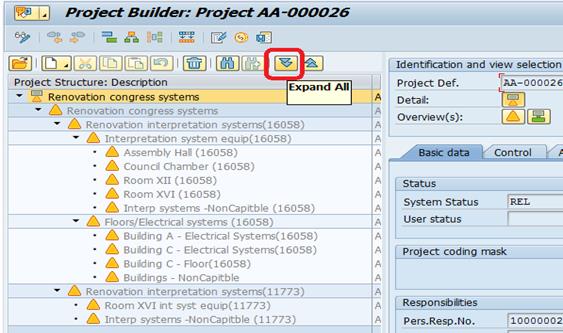
DD.6.Click on the Hierarchy
Graphic ![]() button.
button.
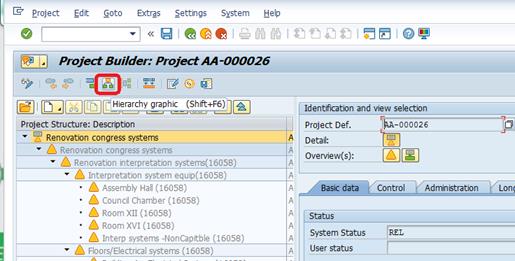
The project hierarchy will be displayed.

4.2.5.2 WBSE Report
This report allows users to review the WBS elements associated with an AuC project, as well as the Cost Center.
In the AuC context it is available to below users:
· EMPLOY_TO_DISPOSE: PLANT_MAINTENANCE_APPROVER
· EMPLOY_TO_DISPOSE: PLANT_MAINTENANCE_PLANNER
· FINANCIAL_ACCOUNTING: APPROVER_(GL)
· FINANCIAL_ACCOUNTING: ASSET_ACCOUNTING_SENIOR_USER
· FINANCIAL_ACCOUNTING: ASSET_ACCOUNTING_USER
· FINANCIAL_ACCOUNTING: CLOSING_USER
· FINANCIAL_ACCOUNTING: SENIOR_USER_(GL/AP/AR/CO)
· PROGRAMME_PROJECT: PROJECT_MANAGEMENT_APPROVER
· PROGRAMME_PROJECT: PROJECT_MANAGEMENT_MASTER_DATA_MAINTAINER
· PROGRAMME_PROJECT: PROJECT_MANAGEMENT_USER
· REAL_ESTATE: FACILITIES_APPROVER
· REAL_ESTATE: LEASE_CONTRACT_APPROVER
· SERVICES_DELIVERY: DISPOSAL_PLANNER
· SERVICES_DELIVERY: NOTIFICATION_APPROVER
· SERVICES_DELIVERY: ORDER_RELEASER
· SERVICES_DELIVERY: PLANNER
EE. Steps to generate the report / Transaction Code: CN43N
EE.1. Log in to Umoja ECC.
EE.2. Execute transaction code CN43N.
EE.3. Enter the AuC Project number (or the WBSE only if appropriate).

EE.4. Click Execute.
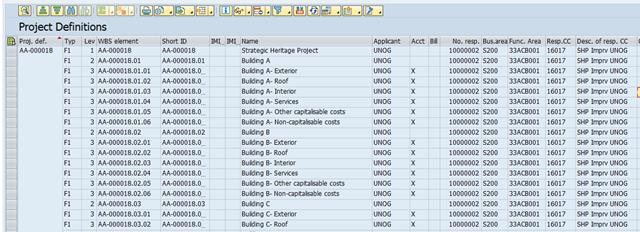
Information including the WBSE, name Business Area, Functional Area, Cost Center etc. will be displayed.
4.2.6 Funds Management and Consumption
These reports are available in ECC, and suit day to day needs of AuC projects/IO. Please note that entities are also encouraged to develop entity specific reports within BI.
4.2.6.1 Budget Availability Report
This section outlines the steps for using the Budget Availability Report in Funds Management. It provides more detailed information on budget availability and consumption (allowing for instance users to review budget availability for a budget class in a particular budget period).
This report can be used to:
· Monitor funding and budget consumption, including the released budget for grants
· Drill down on the details of budget distribution and budget consumption
· Troubleshoot budget availability errors
· Check for negative balances
In the AuC context it is available to below users:
· PROGRAMME_PROJECT: PROJECT_MANAGEMENT_USER
· PROGRAMME_PROJECT: PROJECT_MANAGEMENT_APPROVER
· FINANCIAL_ACCOUNTING: APPROVER_(AP)
· FINANCIAL_ACCOUNTING: USER_(AP)
· FINANCIAL_MANAGEMENT: BUDGET_OFFICE_USER
· FINANCIAL_MANAGEMENT: BUDGET_APPROVER
· FINANCIAL_MANAGEMENT: EARMARKED_FUNDS_DOCUMENTS_CERTIFIER
· FINANCIAL_MANAGEMENT: FUNDS_COMMITMENT_APPROVER
· FINANCIAL_MANAGEMENT: GRANTS_MANAGEMENT_ACCOUNT_APPROVER
· FINANCIAL_MANAGEMENT: GRANTS_MANAGEMENT_ACCOUNT_CREATOR
· FINANCIAL_MANAGEMENT: GRANTS_MANAGEMENT_ACCOUNT_USER
To correctly interpret the budget availability report, Users should already be familiar with:
· Master data in FM (Funds Management): fund, budget period, funds center, commitment item, functional area, funded program and grant;
· The hierarchy of commitment items;
· The relationship of GM (Grants Management) master data and FM master data; and
· The concept of budget control and the super class.
FF. Steps to generate the report / Transaction Code: FMAVCR02
FF.1. Log in to Umoja ECC.
FF.2. Execute transaction code FMAVCR02.
FF.3. Enter/select the following:
· FM Area: 1000
· Control Ledger: Z1 (UN Standard AVC Ledger)
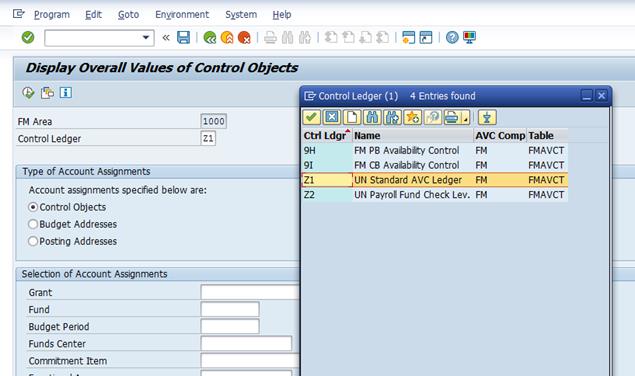
FF.4. Select Type of Account Assignments

FF.5. Input the selection criteria for Account Assignments.
This can be filtered as much as necessary, by entering Fund, Budget Period, Funds Center. If the user wants to simply review for the entire AuC they can simply enter the relevant Funded Program of the AuC. If the budget control for an AuC is set to the top level the Funded Program will simply be the same as the Project Definition, the Funded Program for IO
1. Example reviewing budget availability for an AuC project where the Funded Program is at the top level.
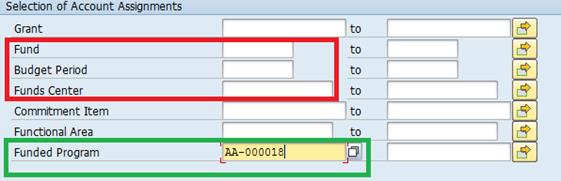
2. Example reviewing budget availability of an AuC that uses an Internal Order as a cost collector, User enters IO-[internal order number].
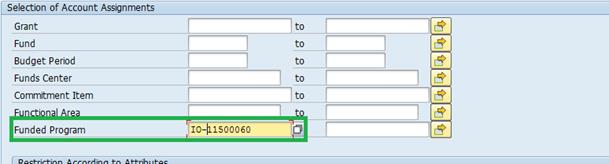
FF.6. In the first example (using AA-00018) the following report is generated:
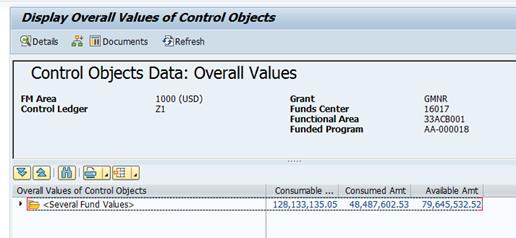
· Consumable Budget: Represents allotments made to the Funded Programme of the AuC.
· Consumed Amount: Represents Commitments and Actual Expenditure
· Available Amount: Represents the balance available. NOTE: Users need to drill to the lower levels to understand on which Fund, Funds Center, Funded Program, and Budget Class the amount is available.
FF.7. The User can further review information clicking on the arrow next to the folder.
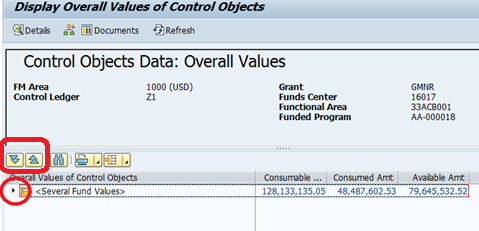
FF.8. Expanding the folders twice yields the following information, regarding Consumable Budget, Consumed Amount and the Available Amount, for the relevant Fund and Budget Period.

FF.9. Expanding further Users can see budget availability at the Budget Super Class level.
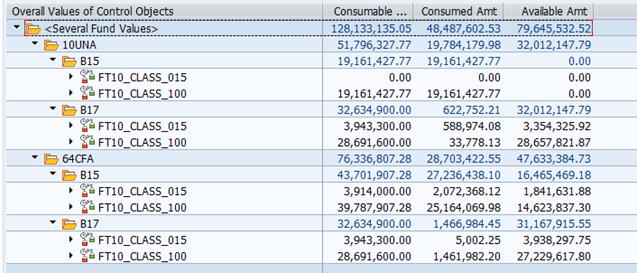
NOTE: Contact your local FM focal point for a list of Budget Classes and their description or for linkages of Budget Class to Commitment Items.
FF.10. Drilling to the next level the User will see the information for each fiscal year.
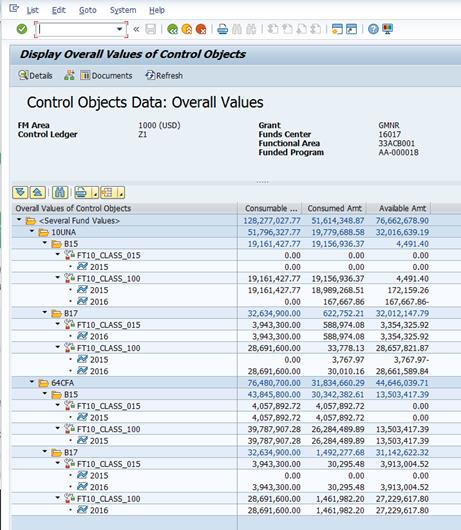
FF.11. At this level the User can further drill down by clicking in the Fiscal Year under the Fund they are interested in and then clicking the Hierarchy button circled below.

Information at the lowest level will then be displayed.

FF.12. Users with the appropriate access will also be able to drill down on the postings, by double clicking on the number.
Note there are also various reports available in BI that are very useful in relation to Funds Management which can be used in an AuC Context.
4.2.6.2 Project Budget Balance Report
This report provides Project Budget Balance Availability at fund level. However, it is generally recommended that Users refer to T-code FMAVCR02. If T-code ZPJPRJBUDBAL is used it should only be run for FT10 and FT20, it should not be run for FT30 (Grants Funds).
It details information including:
A. Current Budget
B. Unlocked Budget
C. Budgetary Pre-commitments (i.e. approved Shopping Carts, Funds Pre-commitments etc.)
D. Budgetary Commitments (i.e. Funds Commitments & Purchase Orders etc.)
E. Budgetary Actuals (amounts expensed, i.e. when a Goods Receipt/Service Entry Sheet has been entered or payroll has run etc.)
F. Total Budgetary Commitments (= C+D+E)
G. Available Balance (= B-F)
It is available to the following Users in the AuC context:
· EMPLOY_TO_DISPOSE: PLANT_MAINTENANCE_APPROVER
· EMPLOY_TO_DISPOSE: PLANT_MAINTENANCE_PLANNER
· FINANCIAL_ACCOUNTING: ASSET_ACCOUNTING_SENIOR_USER
· FINANCIAL_ACCOUNTING: ASSET_ACCOUNTING_USER
· FINANCIAL_ACCOUNTING: CLOSING_USER
· PROGRAMME_PROJECT: PROJECT_MANAGEMENT_APPROVER
· PROGRAMME_PROJECT: PROJECT_MANAGEMENT_MASTER_DATA_MAINTAINER
· PROGRAMME_PROJECT: PROJECT_MANAGEMENT_USER
· REAL_ESTATE: FACILITIES_APPROVER
· REAL_ESTATE: LEASE_CONTRACT_APPROVER
· SERVICES_DELIVERY: DISPOSAL_PLANNER
· SERVICES_DELIVERY: NOTIFICATION_APPROVER
· SERVICES_DELIVERY: ORDER_RELEASER
· SERVICES_DELIVERY: PLANNER
GG. Steps to generate the report / Transaction Code: ZPJPRJBUDBAL
GG.1. Log in to Umoja ECC.
GG.2. Execute transaction code ZPJPRJBUDBAL.
GG.3. Enter the AuC Project number (or the WBSE only if appropriate).
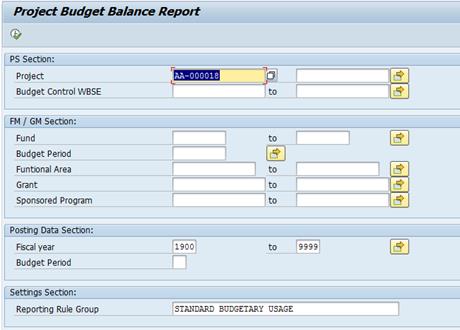
GG.4. Click Execute.
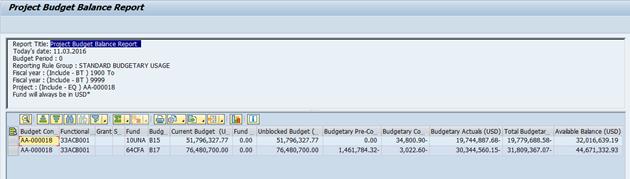
4.2.7 Costs Charged to AuCs
These reports are very important in managing the types and total costs collected for each project. It also helps in facilitating the settlement process by showing which costs are still outstanding for settlement to AuC.
4.2.7.1 Cost Elements Report
This report provides a good overall view of the AuC project and information concerning costs charged to the project (and WBSE) level, by cost element. Both Actuals and Commitments are displayed.
At the end of the report there is a summary of what has been settled to an AuC (i.e. capitalised as an AuC Balance), also costs settled to the Cost Center (i.e. non-capitalisable costs), as well as outstanding costs on the project.
It is available to the following Users in the AuC context:
· EMPLOY_TO_DISPOSE: PLANT_MAINTENANCE_APPROVER
· EMPLOY_TO_DISPOSE: PLANT_MAINTENANCE_PLANNER
· FINANCIAL_ACCOUNTING: APPROVER_(GL)
· FINANCIAL_ACCOUNTING: ASSET_ACCOUNTING_SENIOR_USER
· FINANCIAL_ACCOUNTING: ASSET_ACCOUNTING_USER
· FINANCIAL_ACCOUNTING: CLOSING_USER
· FINANCIAL_ACCOUNTING: SENIOR_USER_(GL/AP/AR/CO)
· PROGRAMME_PROJECT: PROJECT_MANAGEMENT_APPROVER
· PROGRAMME_PROJECT: PROJECT_MANAGEMENT_MASTER_DATA_MAINTAINER
· PROGRAMME_PROJECT: PROJECT_MANAGEMENT_USER
· REAL_ESTATE: FACILITIES_APPROVER
· REAL_ESTATE: LEASE_CONTRACT_APPROVER
· SERVICES_DELIVERY: DISPOSAL_PLANNER
· SERVICES_DELIVERY: NOTIFICATION_APPROVER
· SERVICES_DELIVERY: ORDER_RELEASER
· SERVICES_DELIVERY: PLANNER
HH.Steps to generate the report / Transaction Code: ZPJCOSTELEMENT
HH.1. Log in to Umoja ECC.
HH.2. Execute transaction code ZPJCOSTELEMENT.
HH.3. If pop-up for Enter profile appears, choose 000000000001.
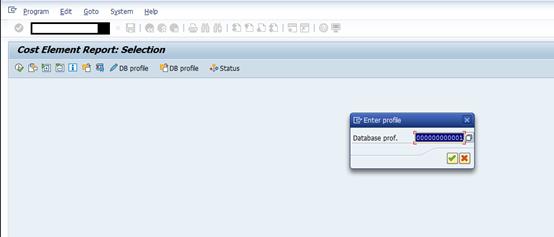
HH.4. Enter the Project number (or WBSE if the User only wishes to see information related to a certain WBSE).
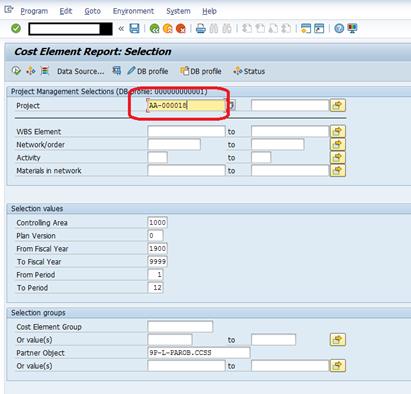
HH.5. The report will display the following information.
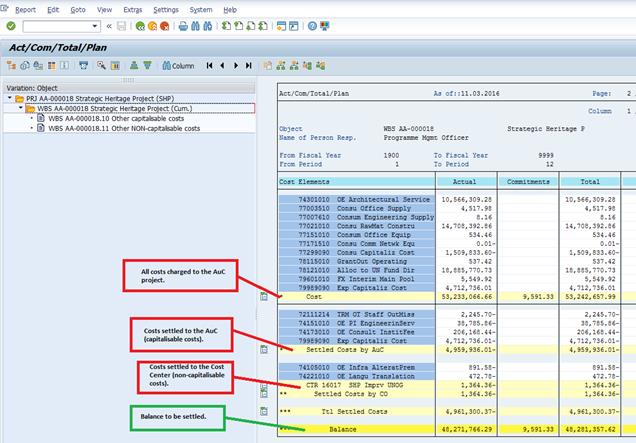
HH.6. Users can simply check on a WBSE element on the left-hand side to display information relevant to that WBSE only.
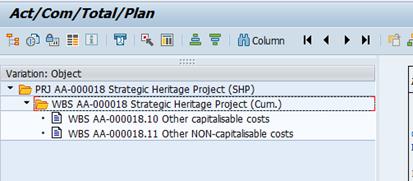
4.2.7.2 Project Actual Costs Line Items
This report can be used to view all actual costs charged to a WBSE (actual costs are charged when Goods Receipt Notes are done, Service Entry Sheets entered, Payroll is run, etc.). It is a useful report for the Senior Asset Accountant as it allows them to review the postings between the Expense and AuC Asset GL accounts.
If the User runs it for the Cost Elements related to expense accounts (70000000-79999999) it will give the balance of the amounts to be settled if they run it for the Cost Elements related to the AuC Cost Elements (27000000-27999999) then it will display all costs settled to the AuC.
It is available to the following Users in the AuC context:
· FINANCIAL_ACCOUNTING: ASSET_ACCOUNTING_SENIOR_USER
· FINANCIAL_ACCOUNTING: ASSET_ACCOUNTING_USER
· FINANCIAL_MANAGEMENT: BUDGET_APPROVER
· FINANCIAL_MANAGEMENT: BUDGET_OFFICE_USER
· PROGRAMME_PROJECT: PROJECT_MANAGEMENT_APPROVER
· PROGRAMME_PROJECT: PROJECT_MANAGEMENT_USER
· REAL_ESTATE: FACILITIES_APPROVER
· REAL_ESTATE: FACILITIES_PLANNER
· REAL_ESTATE: LEASE_CONTRACT_APPROVER
· REAL_ESTATE: LEASE_PROCESSOR
· SERVICES_DELIVERY: DISPOSAL_PLANNER
· SERVICES_DELIVERY: NOTIFICATION_APPROVER
· SERVICES_DELIVERY: PLANNER
4.2.7.3 All Postings to the AuC
II. Steps to generate the report / Transaction Code: CJI3
II.1. Log in to Umoja ECC.
II.2. Execute transaction code CJI3.
II.3. Enter the AuC Project number (or the WBSE only if appropriate) and the Cost Element range as 70000000-79999999.
II.4. Ensure the Posting dates cover the period you are interested in, if you want the whole period be sure to have the date as Umoja go live date or earlier, i.e. 01.01.2015 (only costs posted in Umoja will appear).
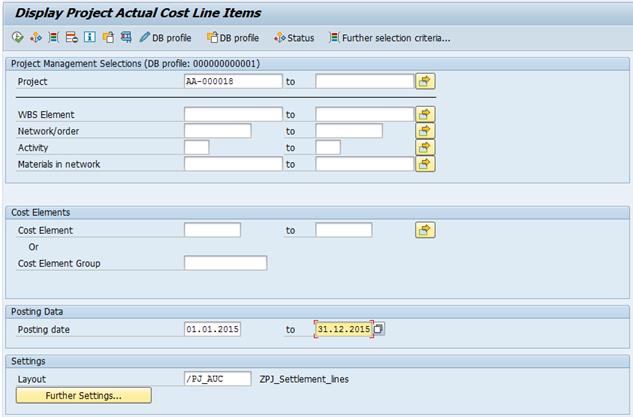
II.5. Execute the report. All postings to the AuC project are then displayed.
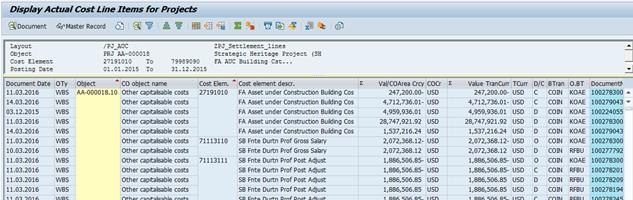
4.2.7.4 Expenses to be Settled
This report is generate when the User wants to look only at the balance of cost elements not yet settled to the AuC asset (for the capitalisable costs) or the Cost Center (non-capitalisable costs).
JJ. Steps to generate the report / Transaction Code: CJI3
JJ.1. Log in to Umoja ECC.
JJ.2. Execute transaction code CJI3.
JJ.3. Enter the AuC Project number (or the WBSE only if appropriate).
JJ.4. Enter the Cost Elements applicable to expenses accounts 70000000-79999999, alternatively there is a cost element group called ALL_CAP.
JJ.5. Ensure the Posting dates cover the period you are interested in, if you want the whole period be sure to have the date as Umoja go live date or earlier, i.e. 01.01.2015 (only costs posted in Umoja will appear).
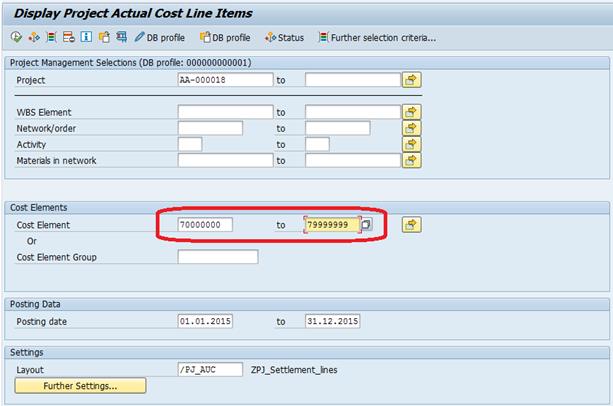
JJ.6. Scrolling all the way to the bottom will show the balance of the costs to be capitalised either to the AuC (capitalisable costs) or to the Cost Center (non-capitalisable costs).
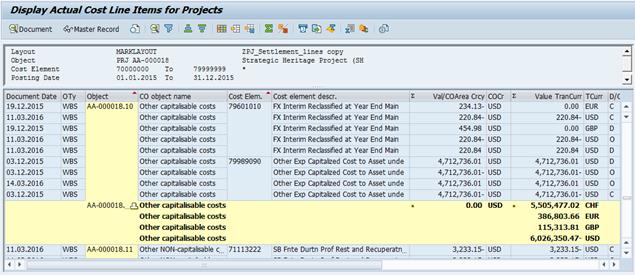

4.2.7.5 Amounts Capitalized
If the User wants to look only at the amounts capitalized to an AuC under the project on a certain date they can also use this report.
KK. Steps to generate the report / Transaction Code: CJI3
KK.1. Log in to Umoja ECC.
KK.2. Execute transaction code CJI3.
KK.3. Enter the AuC Project number (or the WBSE only if appropriate).
KK.4. Enter the Cost Elements applicable to expenses accounts 27000000-27999999, alternatively there is a cost element group called ALL_FA.
KK.5. Ensure the Posting dates cover the period you are interested in, if you want the whole period be sure to have the date as Umoja go live date or earlier, i.e. 01.01.2015 (only costs posted in Umoja will appear).
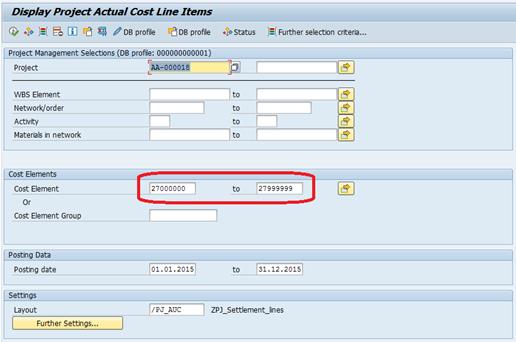
KK.6. Click Execute. The report displays the amounts already settled to an AuC Asset for the report period.

4.2.7.6 Settlement Rules Report
This report can be used to view all settlement rules created for AuC projects. It is a useful report for the Senior Asset Accountant as it allows them to review settlement rules defined for Capital Projects; especially the rules defined for final settlement.
It is available to the following Users in the AuC context:
· FINANCIAL_ACCOUNTING: ASSET_ACCOUNTING_SENIOR_USER
· FINANCIAL_ACCOUNTING: ASSET_ACCOUNTING_USER
· FINANCIAL_ACCOUNTING: CLOSING_USER
· PROGRAMME_PROJECT: PROJECT_MANAGEMENT_APPROVER
· PROGRAMME_PROJECT: PROJECT_MANAGEMENT_USER
· SERVICE: SERVICES_DELIVERY_APPROVER
· SERVICE: SERVICES_DELIVERY_MASTER_DATA_MAINTAINER
· SERVICE: SERVICES_DELIVERY_USER
· SERVICES_DELIVERY: APPROVER
· SERVICES_DELIVERY: MASTER_DATA_MAINTAINER
LL. Steps to generate the report / Transaction Code: KOSRLIST
LL.1. Log in to Umoja ECC.
LL.2. Execute transaction code KOSRLIST.
LL.3. Select Settlement profile: ZPS1 - Capital Project sttlmnt to AuC.
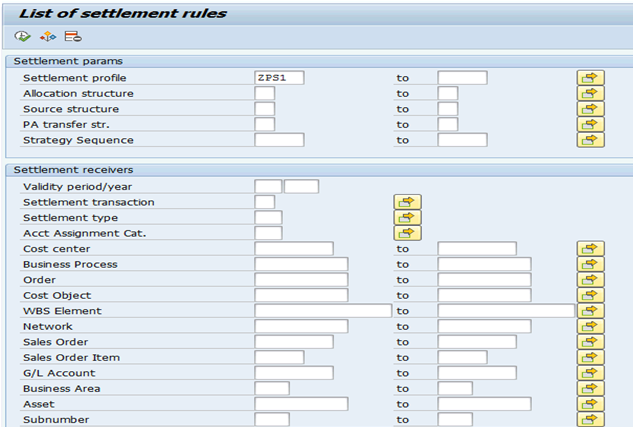
NOTE: If you want to run an open query listing ALL settlement rules defined for ANY AuC projects, execute the report with only the Settlement profile defined. In case you want to narrow down your search, define the asset Settlement Receiver.
LL.4. Click Execute.
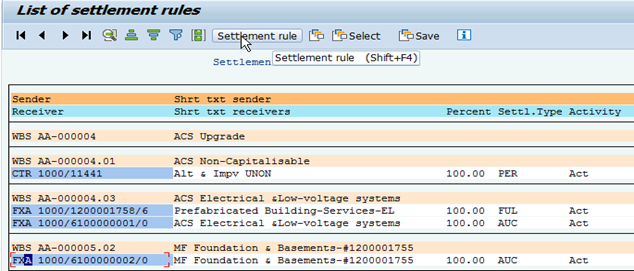
LL.5. To view a settlement rule in detail, highlight the corresponding line, then click the Settlement rule button.
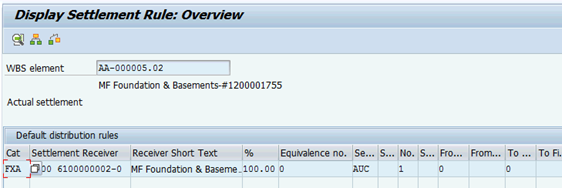
LL.6. The master record with the corresponding settlement rule will be displayed. To return to the list of settlement rules, select the Go Back option.
4.2.8 AuC Asset Balances Report
This report will highlight how to derive the current balances reported under the following AuC Umoja Asset Classes:
· 610: AuC - Buildings
· 620: AuC - Infrastructure
· 630: AuC - Lease Hold Improvement
· 840: Asset Dev IT Systems
MM. Steps to generate the report / Transaction Code: S_ALR_87011963
MM.1. Log in to Umoja ECC.
MM.2. Execute transaction code S_ALR_87011963.
MM.3. Click on the All Selections button.
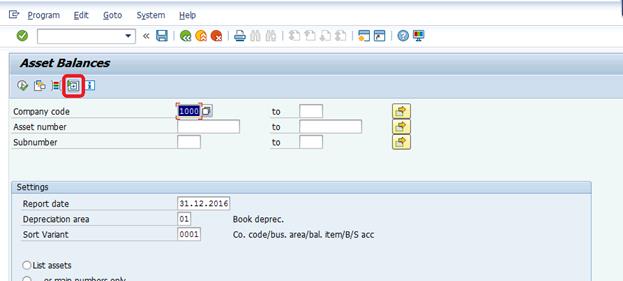
MM.4. Enter the AuC Asset classes.
![]()
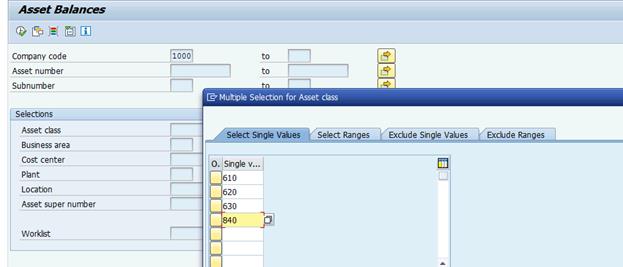
MM.5. Click on Execute.
MM.6. Enter the Business area to ensure the balances displayed are relevant to your entity.
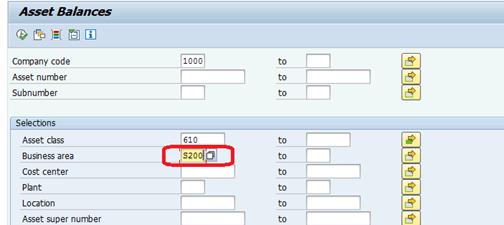
MM.7. Enter the Report date.

MM.8. Choose the level of detail required.
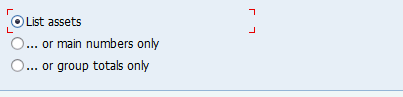
· List assets will display all AuC Main and Sub Assets
· ….or main numbers only will list assets grouped together by main asset (remember the main asset represents the WBSE, so this will be all the balances capitalised under the related AuC)
· ….or group totals only will group according to asset class only
MM.9. Click Execute.

4.2.9 AuC Asset Master Validation Report
The Asset Master Validation report is useful for reviewing many Asset Master records at one time. You can review the description, accounting elements assigned, and important dates for AuCs.
Note that each time an AuC project is 'Released' an AuC Main Asset is created for each WBSE with an Investment Profile (a capitalisable WBSE). Sub-assets for each main asset are created when a new fund is used and the Senior Asset Accountant runs the transaction code AS11_FMIM (for further details please section 4.2.3.3: Create Sub-Asset for AuC).
Assets under Construction fall under the following Umoja Asset Classes:
· 610: AuC - Buildings
· 620: AuC - Infrastructure
· 630: AuC - Lease Hold Improvement
· 840: Asset Dev IT Systems
NN. Steps to review all open AuC by Business Area / Transaction Code: ZAAVALAS
NN.1. Log in to Umoja ECC.
NN.2. Execute transaction code ZAAVALAS.
NN.3. Click on the Get Variant button and then select the variant called Z_AUC_ASSET. This variant will select only the AuC Asset Classes (610, 620, 630, and 840).
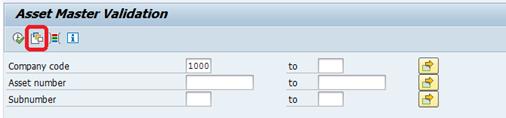
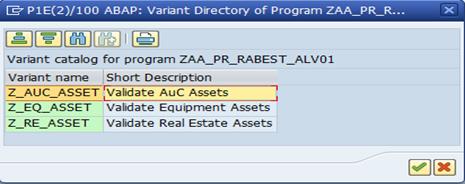
NN.4. Business area: Select your business area
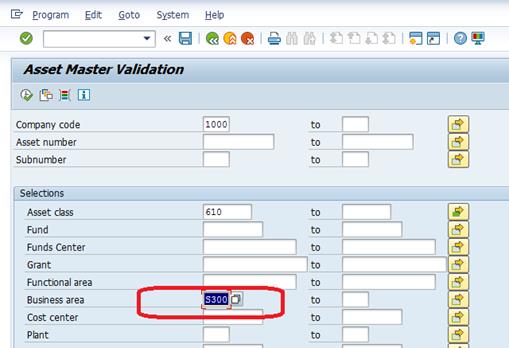
Note: Users can further filter by other relevant information as necessary, i.e. where you are interested only in AuC related to a certain Fund or Fund Center.
NN.5. Report date: This should always be set to the last day of the month.
![]()
NN.6.
After all selections are made, click on the Execute
![]() button to generate the report.
button to generate the report.
NN.7.
The report should be displayed, but you should
choose another layout that shows more information. Click the Select Layout ![]() button in the toolbar.
button in the toolbar.
NN.8. In the window that opens, select /ZPOSTVAL to change the layout to show a different set of columns, sorts, and filters.
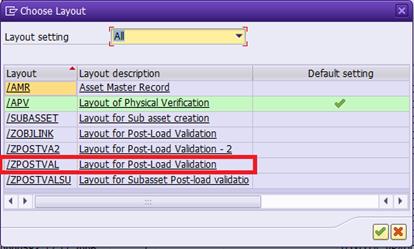
NN.9. Review the report.
With the /ZPOSTVAL layout selected there are many columns displaying information about the Asset Master record like its class, description, capitalisation date, and accounting elements.

NN.10. If you'd like to add/remove columns, change the sort order, or filter by specific values, you can click on the Change Layout button in the toolbar.
4.2.10 Display Asset Master
This transaction is useful for reviewing master data related to an AuC, including description, capitalization date, account assignments and so on.
OO. Steps to generate the report / Transaction Code: AS03
OO.1. Execute transaction code AS03.
OO.2. Some of the most important information per tab is listed below:
General tab:
· Description: The description is copied from the associated WBSE / Investment Order
· Acct determination: The Umoja asset class (which corresponds to the IPSAS sub-class GL accounts)
· Capitalized on: This will be the value date of the first settlement to this AuC
· Deactivation on: The date at which this asset was deactivated, likely due to settlement to a final asset
Time-dependent tab:
· This tab lists all account assignments for this AuC.
· If there are charges from multiple Funds or Budget Periods, the AuC will have multiple asset subnumbers for each combination. (e.g. 6100000121-1 and 6100000121-2)
· Investment Order corresponds to the Internal Order that this asset was funded with, if applicable
· WBS element shows the WBS Element that this asset was funded by, if applicable
Allocations tab:
· Asset super number is the IPSAS asset class (remember the Umoja asset class corresponds to the IPSAS sub-class)
Origin tab - Not relevant for AuCs
Net Worth Tax tab - Not relevant for AuCs
Insurance tab and Leasing tab - currently not used in Umoja
Deprec. Areas tab - Not relevant for AuCs

OO.3. To quickly jump to the Asset Explorer to view Asset Values instead of launching the T-code AW01N, press the Asset values button in the toolbar.

OO.4. To find the list of users who modified an asset master record, click the Environment menu --> Change documents --> On asset.
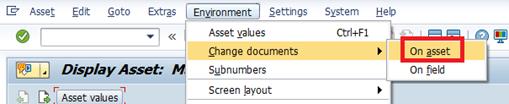
OO.5. To see who created the asset master record, and when it was created, click the Extras menu --> Management data…
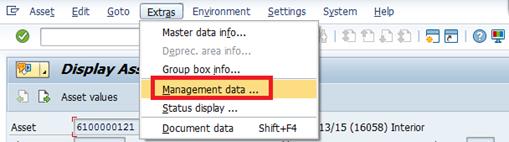
4.2.11 Asset Explorer
This report gives information like postings to AuC assets and the valuation of the AuC asset.
The Asset Explorer shows most of the financial information for a single asset or AuC. It shows the current book value, acquisition value, planned and posted depreciation, and any other transactions against the asset. Since we are looking at AuCs here, there will be no depreciation. The Planned values tab will be of most interest for AuC assets as it shows total accumulated costs as well as each settlement transaction.

You can see any WBS Elements, Investment Orders, or accounting elements that are linked to the asset record in the bottom-left corner window Objects related to asset.
The Planned values, Posted values, Comparisons, and Parameter tabs show details on the value of the asset over time.
You can see all transactions posted against this asset in the bottom window called Transactions if the Planned values tab is selected. In the example shown above, we see periodic settlements from the WBS Element for periods 11 and 12. You can double click on any transaction to see the FI document posted.
4.2.12 Asset History Sheet
This report is the most important and most comprehensive asset report for the year-end closing or for an interim financial statement. This report contains information from opening balances to the end of the year.
PP. Steps to generate the report / Transaction Code: S_ALR_87011990
PP.1. Execute transaction code S_ALR_87011990.
PP.2. Enter the following details:
· Select the four AuC Asset classes by clicking on the Multiple Selection button next to Asset class and entering 610, 620, 630, and 840
· Set the Report date to the last day of the fiscal year you wish to run the report for
· Select List assets if you want to see all assets individually in the report, otherwise group by Main Numbers or total by Asset Class by selecting … or group totals only
· As with many of the other Asset reports, you can generate it for any combination of selections (e.g. Business Area, Cost Center, Asset Class, etc)
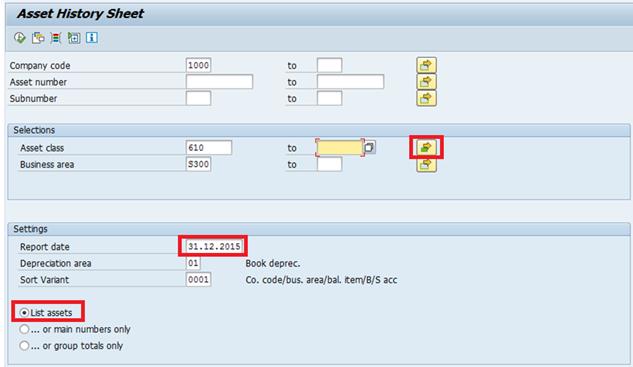
PP.3. Checking or unchecking Use ALV grid will change the output format of the report. Use ALV grid is recommended for display on a screen, but unchecking it may be better formatted for paper printouts.

PP.4.
Execute ![]() the report after all selections are made.
the report after all selections are made.
PP.5. View the Asset History Sheet for AuCs.
· The Acquisition column will show costs that have been settled to the AuC.
· The Transfer column will show costs that have been capitalized from the AuC to the Final Asset.

4.2.13 Asset Transactions Report
You can use the All Asset Transactions report to list out all Assets under Construction with their full transaction details. You may also limit the report to only show AuC Assets or Final Assets that have been completed and fully settled.
QQ. Steps to generate the report / Transaction Code: S_ALR_87012048
QQ.1. Execute transaction code S_ALR_87012048.
QQ.2. Click on the All Selections button.

QQ.3. The selection screen, like most asset reports, allows you to generate a report for any combination of selections (e.g. Business Area, Cost Center, Asset Class, etc.). Select at least a Business area to run the report for.
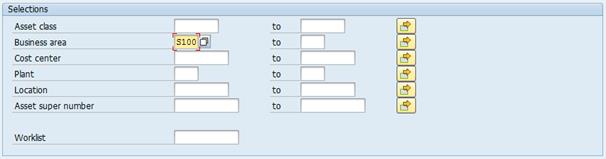
QQ.4. Set the Report date to the last day of the month within the Fiscal Year you wish to run the report for. Be sure to select List assets if you want to see each asset listed out individually.
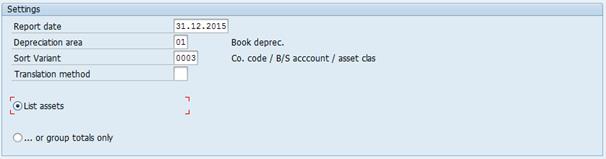
QQ.5. You may use the Transaction type field to limit the selection of assets:
· To limit the selection to Assets that have been capitalized to from a completed AuC, enter Transaction type 336.
· To limit the selection to completed AuCs that have been capitalized to a final asset, enter Transaction type 339.
· Or you may enter both transaction types to pull up both Final Assets and the AuC Assets.
· Or you can leave the field empty to see all AuC transactions, including monthly settlements.
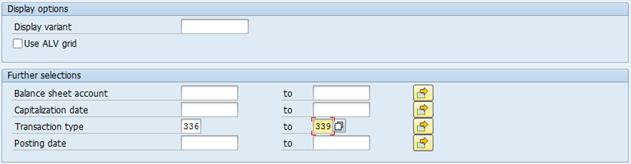
QQ.6.
Execute ![]() the report after all selections are made.
the report after all selections are made.

You can also drill down to individual transactions by double-clicking on a transaction line to see more details.
4.3 Manual Acquisition of Assets - Current Year
Assets would need to be manually created and acquired in the following instances:
1. Where assets are found after conversion through physical verification.
2. In cases where the wrong material number was used and no asset master was created (i.e. the item was expensed). NOTE: if the item was received into inventory and if not done already, the item should first be issued to consumption BEFORE the asset is created.
3. For Assets that are donated to the UN entity (non-Grant).
Users of this guide will be those assigned the following roles:
· FA.15 - Financial_Accounting: Asset_Accounting_User
· FA.16 - Financial_Accounting: Asset_Accounting_Senior_User
Manual recognition of assets related to current year is done in three steps:
1. The first step is for the Asset Accounting User (FA.15) to create the Asset Master record as per section 3.4.2
2. The second step is for the Asset Accounting User (FA.15) to create and park the asset acquisition document to post value to the Asset Master record and record the correct capitalization date.
3. The third step is for the Asset Accounting Senior User (FA.16) to review and post the parked asset acquisition document.
Excluding intangible assets, new Fixed Assets will need to be linked to either an Equipment record or a Real Estate record.
· Equipment: The Property Custodian responsible for the equipment (Role SD10) should link the newly created Fixed Asset to the associated Equipment. A review of the cost centre should also be undertaken to ensure it aligns to the asset record.
Refer to the Services Delivery Job Aid: Equipment Creation Post Go-Live.
· Real Estate object: The Facilities Planner responsible for the Real Estate Object should link the newly created Fixed Asset to the associated Real Estate Usage Object.
Refer to the instructions in the Real Estate Portfolio Management training materials.
For assets found that relate to prior years, accumulated depreciation entries are also needed. Please follow the instructions in section 4.4: Manual Acquisitions of Assets -Prior Fiscal Years Acquisitions (Post‑Capitalization).
4.3.1 Parking of Manual Acquisition of Assets
This includes current year acquired assets found through physical verification, incorrectly expensed assets and donated.
RR. Steps to park asset acquisition document / Transaction Code: F-90
The process it to be performed by users with role: FA.15 - Financial_Accounting: Asset_Accounting_User
RR.1. Log in to Umoja ECC.
RR.2. Execute transaction code F-90.
RR.3. Fill in the following fields:
· Document Date: Set this to today's date
· Posting Date: For Production use relevant posting date from current open posting period. For Ramp-Up use established date - usually the first day of first open posting period (e.g., 01.11.2015.) after conversion.
· Type: Use document type AA
· Reference: This is a free text field
· Doc.Header Text: This is another free text field
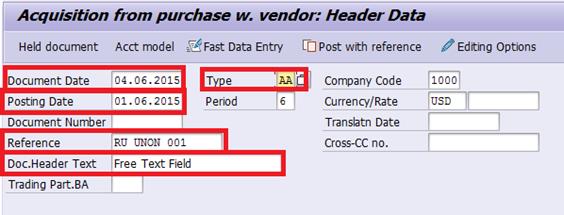
RR.4. In the First line item region at the bottom of the screen, fill out the following fields:
· PstKy: We are posting to the asset in the first line item, so use Posting Key 70 to debit the asset
· Account: Enter the asset number created in transaction AS01 here
· TType: The following Transaction types exist
o X10 assets added for ramp up (current fiscal year)
o Z13 asset added due to physical verification
o Z14 asset added due to incorrect initial classification as expense
o Z11 for manual AuC- peacekeeping and political missions.
o Z10 donated assets (non-grants related)
NOTE: If using Z14 and the item was procured into inventory, please ensure that the item has been issued to consumption before proceeding.
IMPORTANT: Ensure that you are not crossing a FI balancing element for example creating an asset which is funded from more than one fund, BA, Grant using these Ttypes.

RR.5. After you have reviewed all entries on the Acquisition from purchase w. vendor: Header data screen, press Enter on your keyboard. You will be taken to the Enter Asset Posting: Add Asset item screen.
RR.6. Under the Item 1 Debit asset / 70 enter the following:
· Amount: Enter the capitalized value here (cost plus standard associated cost percentage)
· Quantity: 1 EA
· WBS Element: If applicable, enter the WBS Element here
RR.7. Click on the More button.
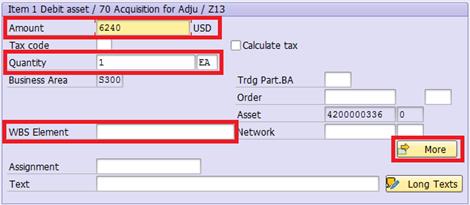
RR.8. IMPORANT: on the Reference Date field, enter the capitalization date of the Fixed Asset (this may be different than the posting date of this document). This date cannot be change later so it is very important that it is correct.
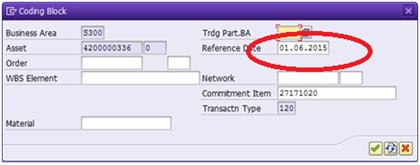
RR.9. Click on the Green Check button to return.
RR.10.In the Next line item region at the bottom of the screen, fill out the following fields:
· PstKy: Posting Key 50 to credit the account
· Make sure the related manual non-budget consuming GLs such as 77299070 Account are credited

RR.11.After you have reviewed all entries on the Enter Asset Posting: Add Asset item screen, press Enter on your keyboard. This will bring you to the Enter Asset Posting: Add G/L account item screen.
RR.12.Under the Item 2 / Credit Entry / 50 region, enter the following:
· Amount: Enter the acquisition value here (or the associated costs)3
· WBS Element: If applicable, enter the WBS Element here. If so, you should not have to enter any of the other account assignment elements as this will derive them
· Cost Center: Fill in the cost center here
RR.13.Click on the More button.
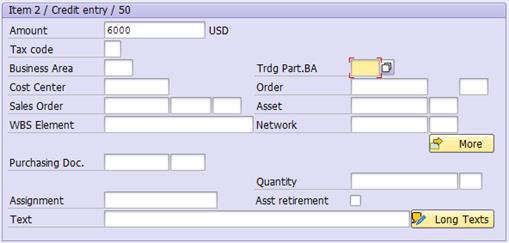
RR.14.Fill in the following fields:
· Fund: Enter the fund here
· Grant: Enter the grant here, if applicable
RR.15.Press the Green Check button to go back.

RR.16.Repeat the actions from steps RR.10 through RR.15 for the associated costs, if relevant, using GL 77299080 to enter the amount of the associated costs.

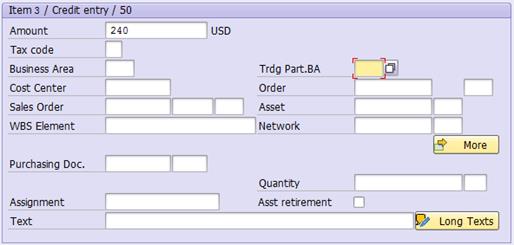
RR.17.After reviewing all entries, go to the top menu bar and click on Document and then click on Simulate.
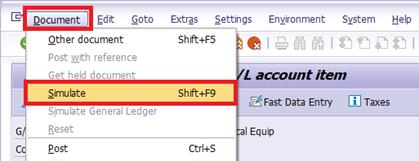
RR.18.If the simulation is successful, you should see be taken to the Display Overview screen and see a summary of the posting to be made.
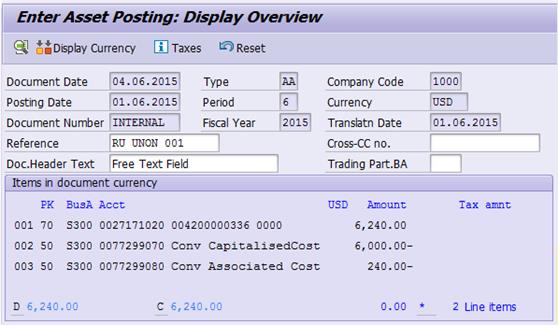
RR.19.Review the simulation and ensure that the posting looks as expected. Click on the Reset button to exit the simulation view.

RR.20.If you receive a warning message like the one shown below, ignore it and press the Enter key to proceed.
![]()
RR.21.Assuming the simulation looked correct, you are now ready to Park the document for review and posting by the Asset Accounting Senior User (FA.16). Click on the Park document button.
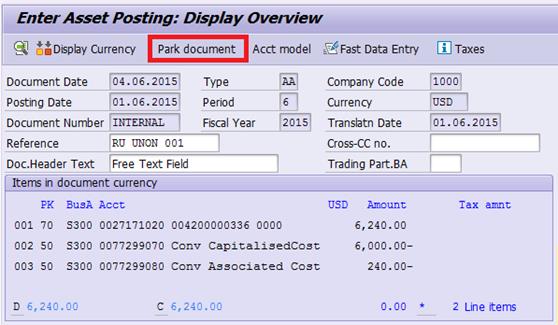
RR.22.View the bottom status bar for confirmation. Note the document number that was parked.
![]()
RR.23.At this point, the Asset Accounting User (FA.15) should notify the Asset Accounting Senior User (FA.16) that the asset is ready to have its acquisition document reviewed and posted. It is recommended that the users communicate using messages sent within Umoja to one another.
RR.23.1.Exit the F-90 transaction and execute transaction code SBWP.

RR.23.2.Draft a short message
with the parked document number(s) and some context for the asset(s). Enter as
recipient the SAP Logon Name of the appropriate Asset Accounting Senior User,
and check the box under Express Mail ![]() icon.
icon.

RR.23.3.Click on the Send
![]() button when ready. At this point, it is now up to the Asset
Accounting Senior User (FA.16) to review the parked document and post it. The
asset will not be capitalized until the document is posted.
button when ready. At this point, it is now up to the Asset
Accounting Senior User (FA.16) to review the parked document and post it. The
asset will not be capitalized until the document is posted.
4.3.2 Review List of Parked Asset Acquisition Documents to be Posted
After the Asset Accounting User (FA.15) creates the asset master record and parks the asset acquisition document, the Asset Accounting Senior User (FA.16) must review and post the asset acquisition document to capitalize the asset.
There are two ways within Umoja that the Asset Accounting Senior User can find out if there are any pending parked documents:
1. Review their Umoja Inbox
2. Review the list of parked AA documents within their Fund / Business Area
4.3.3 Review Umoja Inbox for Parked Document Messages
SS. Steps review inbox messages in Umoja / Transaction Code: SBWP
SS.1. Log in to Umoja ECC.
SS.2. Execute transaction code SBWP.
SS.3. Expand Inbox and click on Unread Documents to view any new incoming Umoja messages. Look for any messages from Asset Accounting Users that indicate that there are parked documents awaiting review and posting.
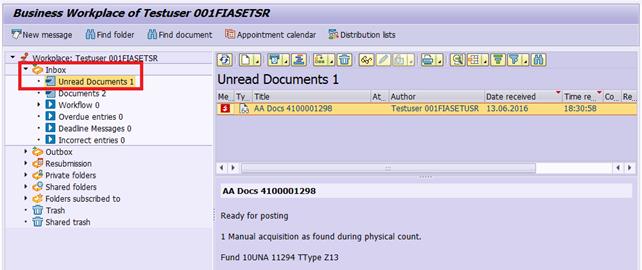
4.3.4 Review List of Parked AA Documents
TT. Steps to review list of parked AA documents / Transaction Code: FBV0
TT.1. Log in to Umoja ECC.
TT.2. Execute transaction code FBV0.
TT.3. Click on the Document list button.
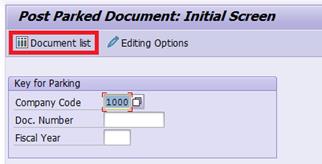
TT.4. From the List of Parked Documents screen, you can search for documents based on a wide variety of criteria.
· Document number and Fiscal year: If you know these already, you can enter them here
· Posting date and Document date: You can use these date fields to filter for specific date ranges
· Document type: AA (limits the list to just Asset Accounting documents)
· Entered by: The Umoja User ID of the Asset Accounting User who parked the document. This can be useful if you have a short list of Asset Accounting Users you work with
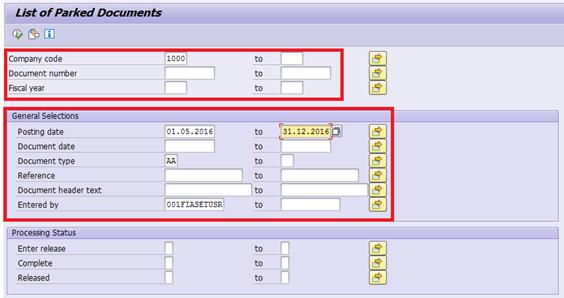
TT.5. Click on the Execute button to view the list of documents. You may double-click on each document number to open it.

4.3.5 Posting Parked Asset Acquisition Documents
UU. Steps to post parked asset acquisition document / Transaction Code: FBV0
This step to be performed by users with role FA.16 - Asset Accounting Senior User.
UU.1. Log in to Umoja ECC.
UU.2. Execute transaction code FBV0.
UU.3. If you know the Asset Acquisition document number to be reviewed and posted, enter it on this screen and press the Enter key.
If you do not know the document number, you may click on the Document list button and search for it.
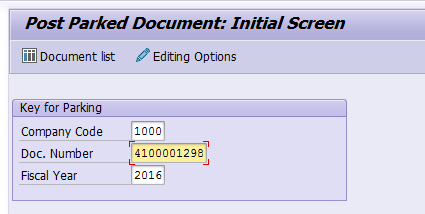
UU.4. Review the document for accuracy. Check the document header for correct dates, posting periods, and meaningful reference text. Review the line items at the summary level to ensure the correct asset and G/L accounts are being debited/credited.
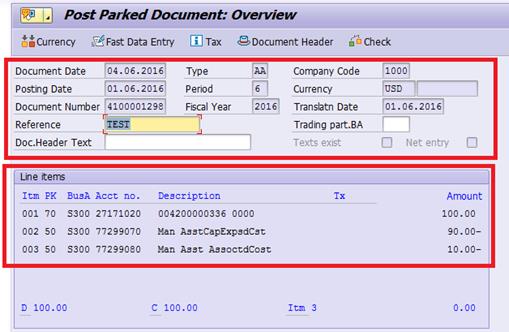
UU.5. To review each line item in more detail you can double-click on the item. Review the details, and use the navigation buttons at the top to return to the Overview screen, or to go to the previous or next line item.
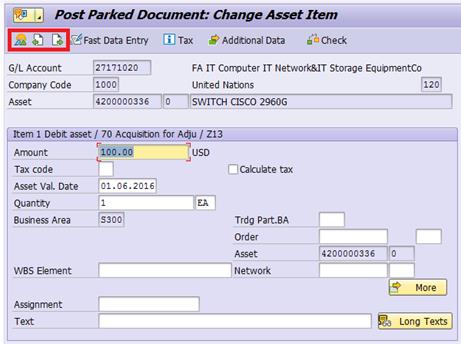
UU.6. If any changes are required to the parked document, please note that the Asset Accounting Senior User (FA.16) will be required to make those changes, and the Asset Accounting User (FA.15) does not have the authorization to modify the document at this stage. If necessary, changes are to be made directly within this transaction.
UU.7.
To post the document, click on the Post document
![]() icon.
icon.
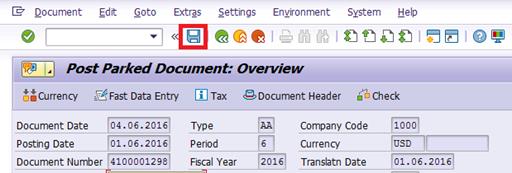
![]()
4.3.6 GL Accounts for Manual Acquisition
The following table contains the TType and GLs for cost associated cost to be credited when acquiring asset manually:
|
Reason for Manual Aquisition |
TType |
Cost |
Associated cost (4%)*** |
|
Assets added during ramp up |
X10 |
77299070 |
77299080 |
|
Assets found due to physical verification* |
Z13 |
77299070 |
77299080 |
|
Assets added due to
incorrect initial classification as expense i.e. wrong material number used |
Z14 |
77299070 |
77299080 |
|
Assets Donated to the UN (non-grants) |
Z10 |
61211010 to 61211510** |
NA (not relevant for donated assets) |
|
Donated right to use (DRTU) Finance Leases |
Z12 |
39101110 (CL Liability Right to Use) 49101114 (LT Liability Fin Lease Don Right to Use Manual) |
NA (not relevant for donated assets or finance leases) |
|
Commercial Finance Lease |
Z1L |
39101214 (CL Liability Commercial Finance Lease) 49101214 (LT Liability Commercial Finance Lease) |
NA (not applicable for finance leases) |
*Immaterial adjustments (if material liaise with accounts division).
**Please liaise with accounts colleagues (the income account to use is based on who donated the asset).
***Standard Associated cost is to be applied for all assets capitalized from the 1st of January 2015. It was set for entities NOT included Vol. 2 as 4% (i.e. Non-Peacekeeping).
4.4 Manual Acquisition of Assets - Prior Fiscal Years (Post - capitalization)
This section details the procedure for the manual acquisition of an asset - for assets acquired in prior fiscal years. These assets will be recognized at net book value for the first time in the current fiscal year (i.e. the capitalized cost of the asset and accumulated depreciation for prior fiscal years is recognized in the current fiscal year).
Assets would need to be manually created in the following instances:
1. During ramp up for assets acquired in prior years, but not included in collection files.
2. Where assets acquired in prior years are found only after conversion (not included in collection files or created during ramp up).
3. In prior-year cases where the wrong material number was used and no asset master was created (i.e. the item was expensed). NOTE: If the item was received into inventory and if not done already, the item should first be issued to consumption BEFORE the asset is created.
4. For assets that were donated to the UN in a prior fiscal year (and not previously recognized). NOTE: For assets donated under a grant please follow the process for PO in-kind.
Recognition of assets related to prior period is done in two steps:
1. The first step is to create the Asset Master record referencing the correct, prior fiscal year, capitalization date.
2. The second step is to post value to the Asset Master Record. The second step posts value to the asset and recognizes relevant accumulated depreciation related to the closed fiscal years.
Excluding intangible assets, new Fixed Assets will need to be linked to either an Equipment record or a Real Estate record.
· Equipment: The Property Custodian responsible for the equipment (Role SD10) should link the newly created Fixed Asset to the associated Equipment. A review of the cost centre should also be undertaken to ensure it aligns to the asset record.
Refer to the Services Delivery Job Aid: Equipment Creation Post Go-Live.
· Real Estate object: The Facilities Planner responsible for the Real Estate Object should link the newly created Fixed Asset to the associated Real Estate Usage Object.
Refer to the instructions in the Real Estate Portfolio Management training materials.
VV. Steps to record asset acquired in prior fiscal year / Transaction Code: ABNAN
VV.1. Log in to Umoja ECC.
VV.2. Execute transaction code ABNAN.
VV.3. In the Transaction data tab, fill in the following fields:
· Existing asset: Select this and set field value to the Asset Number for asset created with AS01
· Document Date: Set this to today's date
· Posting Date: Use the relevant posting date from current open posting periods
· Orig. val. date: Set the same date that you have used for Capitalization Date (Capitalized on) in corresponding AS01
· Amount posted: Enter Acquisition Value of the Asset
· Quantity: 1 EA
· Text: This is a free text field that should contain information about the asset acquisition transaction
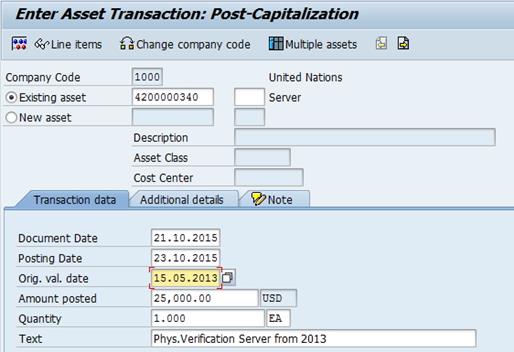
VV.4. Move to the Additional details tab, and enter the following:
· Posting Period: You can leave this blank, the system will derive it from the Posting Date
· Document Type: You can enter AA or leave this field blank, the system will automatically populate with AA
· Offsetting acct no.: GL Accounts for Manual Acquisition in Prior Periods (Post-capitalization) for GL Account to be used. Usually, 77299070 (material adjustments to financial balances must be discussed with the accounts division)
· Transaction Type: The following Transaction Types should be used:
o Z43 asset added due to physical verification
o Z44 asset added due to incorrect initial classification as expense
NOTE: If using Z44 and the item was procured into inventory, please ensure that the item has been issued to consumption before proceeding.
o Z4L prior year acquisition (finance lease)
· Reference: This is a free text field - record Reference Number or other text to identify this document
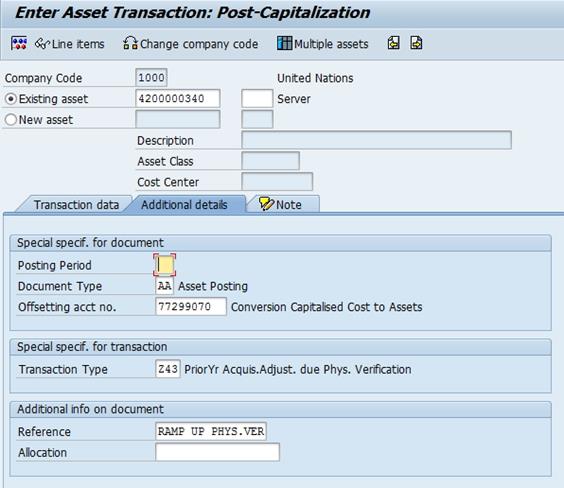
VV.5. After you have reviewed all entries on these two tabs, click on Simulate
![]() button in upper left corner of the window - or you can select Extras
àSimulate from the menu.
button in upper left corner of the window - or you can select Extras
àSimulate from the menu.
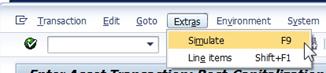
If you get a warning message about past date, press Enter to proceed.
VV.6. If the simulation is successful, you should be taken to the Display Overview screen and see a summary of the posting to be made.
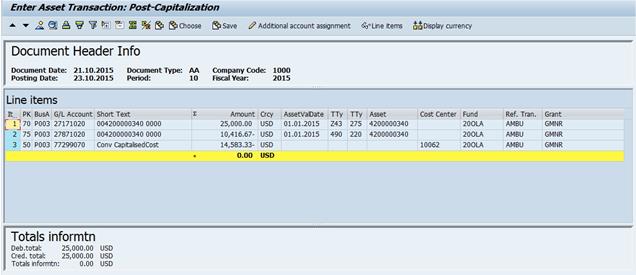
You should see three lines:
· Posting Key 70: Debit to asset, shows full Acquisition value posted against the Asset as of the first day of current fiscal year.
· Posting Key 75: Credit to asset, shows accumulated Ordinary Depreciation posted against the Asset as of the first day of current fiscal year.
· Posting Key 50: Net Book Value (NBV) posted against specified GL account.
Review the coding block account assignments are correct.
VV.7. If this asset does not pertain to a WBS Element or Internal Order (often referred only as Order in this function), you may skip to the next step.
If, however, the asset is to be capitalized against an WBS Element or an Internal Order, you'll need to add the WBS Element / Internal Order number to the posting manually.
The WBSE or IO must be added to the two line items with Posting Key 70 and Posting Key 50.
In order to see WBS Element and Internal Order, you may want to modify current report layout and show additional fields, as shown in the following screenshot (you can save the layout for future use, if you want to).
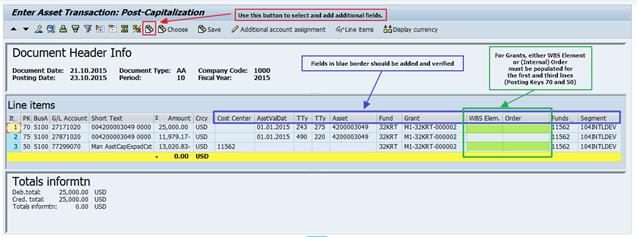
VV.7.1. To do this, click on the line with Posting Key 70 (usually Line #1), and then click on the Additional account assignment button.
VV.7.2. Fill in either the WBS Element or the Internal Order and then click on the Green Check.
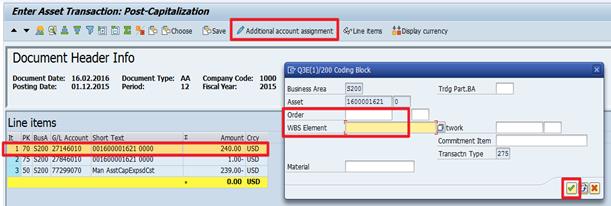
VV.7.3. Click on the line with Posting Key 50 (usually Line #3), and then click on the Additional account assignment button.
VV.7.4. Fill in the WBS Element or the Internal Order and then click on the Green Check.
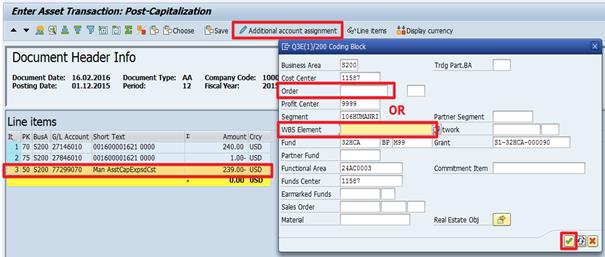
VV.7.5. In case of the WBS Element, this is how data should appear after the change:

VV.8. If the simulation looks correct, click on the Save icon at the top menu bar.
VV.9. Note the document for posted transaction in lower left corner of the window.
![]()
VV.10. If you double-click that notification, new window will open, from which you can copy the number of the document.
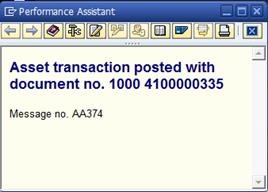
VV.11. Associated costs: Standard associated costs should be included in all new assets received from the 1st January 2015. The current rate of standard associated costs is 4% for volume 1.
If you also need to post Standard Associated Cost (4%) separately from the original Asset Cost, you can repeat the ABNAN capitalization, with all parameters the same, but using 4% of the amount, and using corresponding GL Account, in this case 77299080. Corresponding screens would then look as follows:
VV.11.1. In Transaction data tab - Amount is 4% of the Asset Cost:
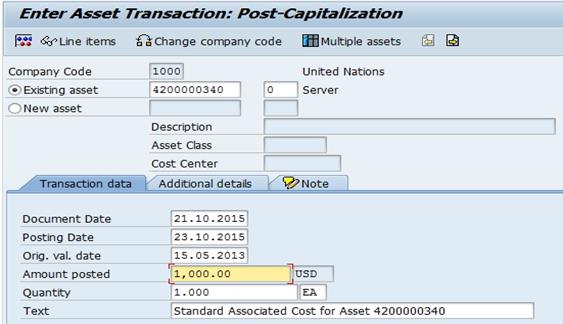
VV.11.2. In Additional details tab - Note the GL Account used:
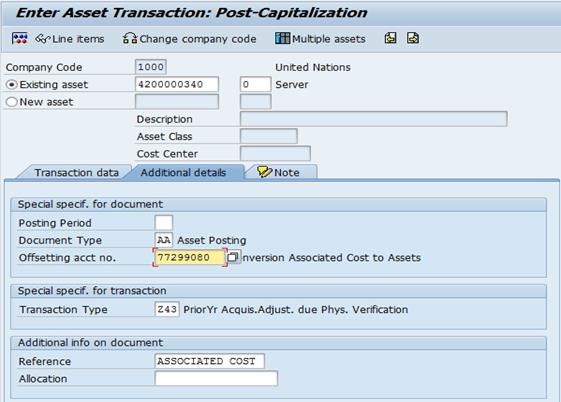
VV.11.3. Simulated posting will look as follows:
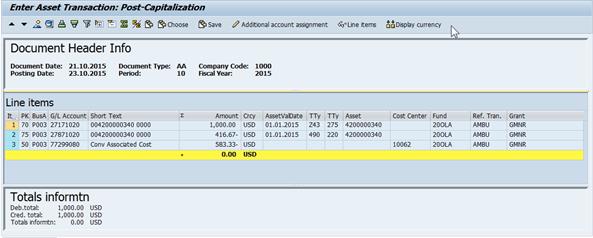
VV.11.4. If this asset pertains to a WBS Element or Internal Order, you will need to manually add the WBSE or IO to the Account Assignment of both the Posting Key 70 and Posting Key 50 line items (as done in the full example using Asset Cost).
VV.11.5. If simulated document looks OK, you should post this transaction and record document number (as done in full example using Asset Cost).
VV.12. As a result of these two postings Total Acquisition Value of the Asset will be the sum of these two amounts (original Asset Cost and Standard Associated Cost). Total Accumulated Ordinary Depreciation will also be the sum of the Original Asset Cost and Standard Associated Cost. Net Book Value will be calculated based on these Total Acquisition Value and Total Accumulated Ordinary Depreciation.
VV.13. Planned values tab of the Asset Explorer (AW01N) will show these total values and posted transactions for prior year acquisition using T-code ABNAN, with Asset Value Date of first day of current fiscal year.
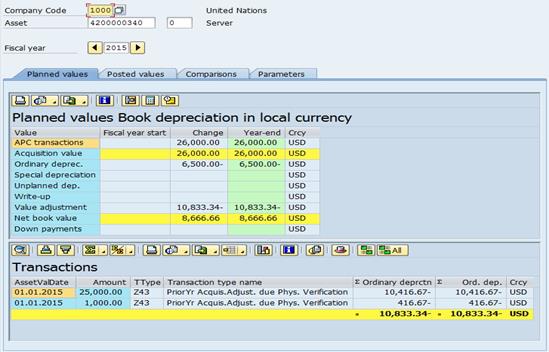
VV.14. Posted values tab will show Acquisition Value, Accumulated Ordinary Depreciation and Net Book Value as of the beginning of the fiscal year, and it will show ordinary depreciation by month, starting with the month corresponding to the ABNAN posting date (Note that planned depreciation will show as posted only after Depreciation Run).
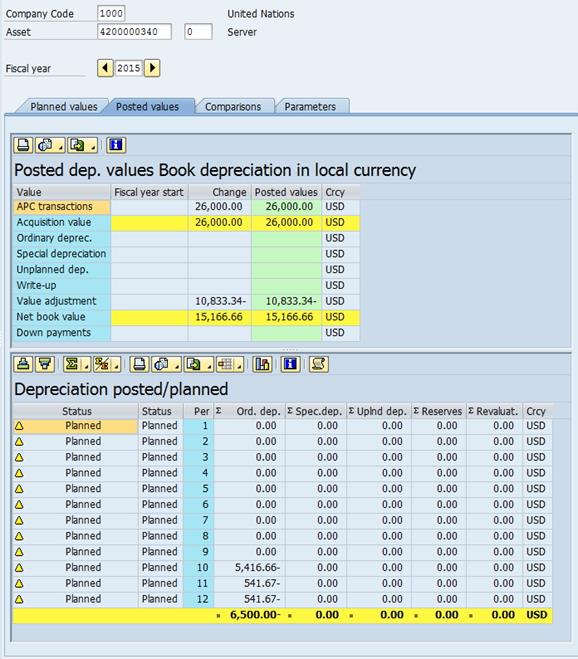
NOTE: If there is no Standard Associated Cost, only the Acquisition Cost will be processed and only one ABNAN posting will be necessary and shown.
4.4.1 GL Accounts for Manual Acquisition in Prior Periods (Post-capitalization)
The following table contains the TType and GLs for cost associated cost to be credited when acquiring asset manually:
|
Reason for Manual Aquisition |
TType |
Cost |
Associated cost (4%)*** |
|
Assets found due to physical verification* |
Z43 |
77299070 |
77299080 |
|
Assets added due to
incorrect initial classification as expense, i.e., wrong material number used |
Z44 |
77299070 |
77299080 |
|
Assets Donated to the UN (non-grants) |
· Z43 - Physical Verification · Z44 - Classif. as Expense |
61211010 to 61211510** |
N/A (not relevant for donated assets) |
|
Donated right to use (DRTU) Finance Leases |
Z4L |
39101110 (CL Liability Right to Use) 49101114 (LT Liability Fin Lease Don Right to Use Manual) |
NA (not relevant for donated assets or finance leases) |
|
Commercial Finance Lease |
Z4L |
39101214 (CL Liability Commercial Finance Lease) 49101214 (LT Liability Commercial Finance Lease) |
NA (not applicable for finance leases) |
*Immaterial adjustments (if material, you need to liaise with accounts division for the correct offsetting GL account).
**Please liaise with accounts colleagues (the income account to use is based on who donated the asset).
***Standard Associated cost is to be applied for all assets capitalized from the 1st of January 2015. It was set for entities NOT included Vol. 2 as 4% (i.e. Non-Peacekeeping).
4.5 Grant Funded Project Assets
4.5.1 Overview
This section outlines various considerations and processes related to Project Assets. These Assets are often exclusively Grant funded.
Grant funded assets can be purchased (using grant funds), donated as a part of the Grant, or Constructed (as a result of an Asset under Construction).
An important concept for Project assets is control. According the UN Policy Framework for IPSAS, control over assets arises when an entity can:
a. use or otherwise benefit from the asset in pursuit of its objectives; and
b. exclude or otherwise regulate the access of others to that benefit.
For further guidance that is important concerning project assets, please refer to:
· Section 13: UN Policy Framework for IPSAS;
· IPSAS Corporate Guidance - Property Plant and Equipment; and
· IPSAS Corporate Guidance - Funding Arrangements.
4.5.2 Assets Acquired Using Grant Funds
When an asset is acquired during the shopping cart process and it is a ZAST type material (that is the material was set up to be always capitalized based on the IPSAS capitalization thresholds), the asset will automatically be associated with the Grant and related Project (WBSE) or Internal Order. It is the actual cost of the asset that is charged to the Grant.
NOTE: Entities with lower capitalization thresholds of USD 5,000 for all items (including UNEP and UN-Habitat) are reminded that the users of the shopping carts need to manually select Account Assignment Category 'Asset' when the item is considered an asset for their entity. Refer to section 3.2.4 of Finance Manual Chapter on Expenses for the detail.
All other accounting actions, including depreciation, impairment and write off are statistical postings to the grant therefore they do not affect available budget.
If an item was purchased and it does not satisfy the criteria for control, that is it is not considered a UN asset, it should be manually derecognized.
4.5.3 Assets Donated to the Project by a Donor
Often assets are donated to a project by a Donor. If some of the items meet the criteria for capitalization of a UN Asset as explain earlier, these items need to be recognized.
Refer to section 4.3.5.4 of Finance Manual Chapter on Revenue from Non-Exchange Transactions: Processing of Goods In-Kind to ensure both the asset master, equipment master, and the income associated with this contribution in kind are recognized in timely manner.
NOTE: It is very important to ensure that any assets donated to the Grant (where the criteria of control are satisfied) are recorded as they are received.
The Inbound Receiver will only be able to 'post' the Goods Receipt in the current or prior month. This affects the capitalization date of the Asset (and as a result, depreciation calculation) as it is based on the posting date of the GR. NOTE: If assets are later discovered your Umoja Process Experts for Grants and Fixed Assets need to be consulted to ensure the asset is correctly recognized. Manually creating assets should only be considered where the effect on the depreciation calculation is material.
4.5.4 Assets Donated to Implementing Partners or End Beneficiaries at the End of a Project
At the end of a project if UN controlled assets are to be formally handed over to Implementing Partners, End Beneficiaries or other counterparts (so the items are no longer controlled by the UN under IPSAS), entities are reminded to follow procedures outlined in the Property Management Framework related to donation of equipment/assets. All retirement actions are tracked via using a Service Notification during which updates are made to the Equipment Master. For detail retirement process, refer to section 5.5.
4.5.5 Assets under Construction (AuC) - Substantive Capital Projects
Often the UN undertakes Projects to build an Asset, and often upon completion the item is donated/handed over. Examples of this are Police Stations or Prisons built by UNODC, or Housing Projects by UN-Habitat. These projects are mostly grant funded and they often satisfy the criteria for recognition as a UN Asset and as such are recognized as an Asset under Construction (AuC).
The AuC end to end process:
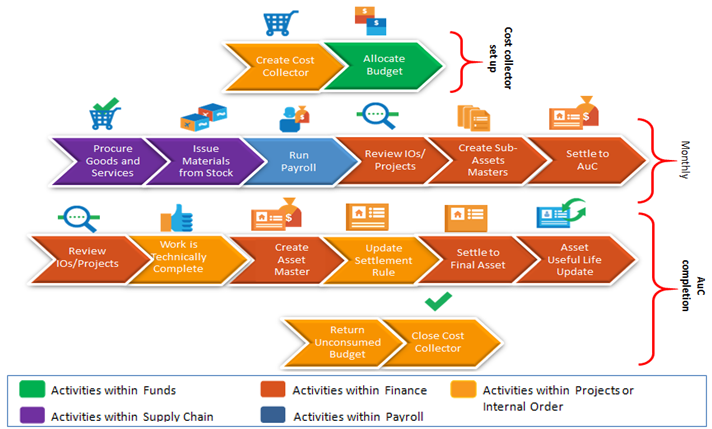
The AuC process is exactly the same as any other AuC projects and the Users are advised to follow sections under 4.2.
Note that the IDC batch will charge indirect costs on top of direct costs to the cost collector. This percentage is defined when the Grant is set up. These amounts are not capitalized into the cost of the final asset but are settled (statistically) to the cost center.
Note also that if the Project is closed before IDC is run, the IDC batch will fail. For this reason it is recommended that projects are only closed at the end of the month subsequent to the month with final charges. For example, if you have charges in March, then close the project only at the end of April.
If at the end of the project the AuC asset is immediately donated, then the final asset is created, the settlement rule is updated (with this asset number) and a settlement of the final asset is done, the project is marked TECO, the final asset is retired and an accounting adjustment is recorded.
In this case, there is no need to create sub-assets. Simply create one final asset and ensure on the depreciation tab the depreciation key is updated to Z000 to ensure that depreciation does not post before you retire the asset.
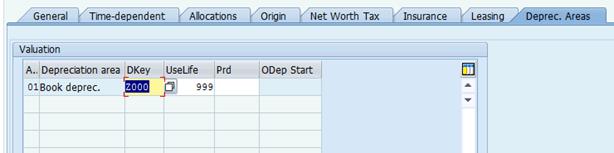
4.5.6 Reclassification of the Write Off to Donation Expense
1. Re-account the write off from GL 79671010 to GL 79691010 (Donation of Fixed Asset/Inventory to External Org) using a JV (FV50) IF APPLICABLE (i.e. where the amount should be accounted for as a donation rather than as a write off).
NOTE: Although this posting is statistical because this JV involves a Grant fund entities are reminded to use a valid WBSE to ensure that the Grant and Sponsored programme are correctly derived. Please select a WBSE in the AuC Project structure. Note if there are various Grants on the AuC the posting will be divided amongst the various WBSE.
2. In order to do this the user will need to revert the status of the WBSE from MEC to RAB, using T-code CJ20N.

3. Post a Journal voucher using FV50; Doc type: SF.
Note to ensure correct derivation of statistical Commitment items using SF doc type (and the GL accounts below).
· Posting date is ideally on the same date the retirement is posted:
· Debit: GL 79691010 Donation of Fixed Asset/Inventory to External Org
· Credit: GL 79671010 Write Off Fixed Asset Scrapping FM Stat
· Amount: The total amount of the donated Asset
· Enter the Fund and the WBSE
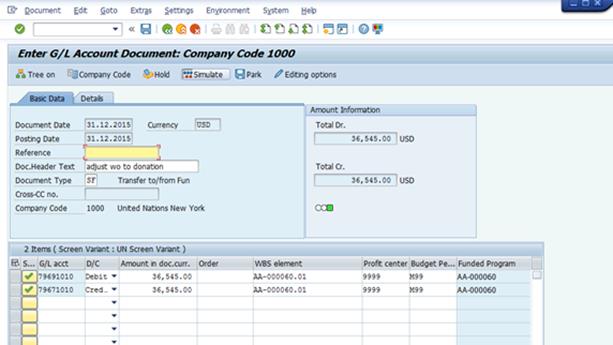
4. Simulate the posting and Post.
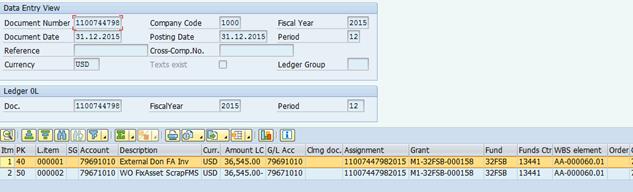
Note that if properly posted the Grant and Sponsored Programme will be derived but the posting will be statistical.

4.5.7 Asset Accounting Reports Useful for Project Assets
4.5.7.1 Finding Assets Related to a Grant or Project
WW. Steps to generate the report / Transaction Code: ZAAVALAS
WW.1. Execute transaction code ZAAVALAS.
WW.2. To run a report based on a Grant, simply enter the Grant ID into the Grant field.
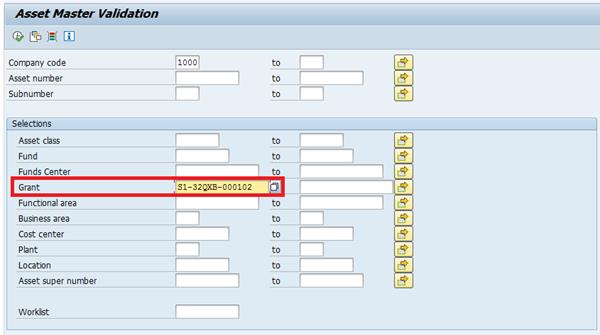
WW.3.
To run a report based on Project / WBS Element
or Investment Order, click on the Dynamic Selections button ![]() to open the list of additional selection fields.
to open the list of additional selection fields.
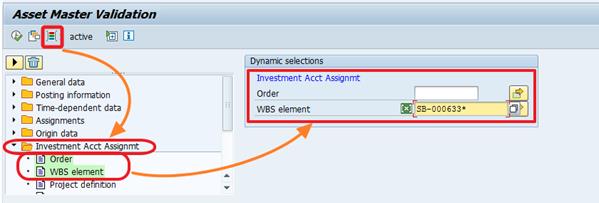
WW.4.
Press the Execute button ![]() to run the report.
to run the report.
4.5.7.2 Displaying Asset Balances by Grant or Project
XX. Steps to generate the report / Transaction Code: S_ALR_87011963
XX.1. Execute transaction code S_ALR_87011963.
XX.2.
Click on the Get Variant button ![]() in the toolbar.
in the toolbar.
XX.2.1.
In the Find Variant window that appears,
clear out the Created by field and click on the Execute button ![]() .
.
XX.2.2.
In the next window to appear, select an
appropriate variant based on what you would like to see, then click the Green
Check ![]() button.
button.
· Choose ZVAL_EQ_ASSET if you are looking for a report on Equipment Assets.
· Choose ZVAL_RE_ASSET if you are looking for a report on Real Estate Assets.
XX.3.
Click on the Dynamic Selections button ![]() to open the list of additional selection fields. These additional
fields are grouped under folders, and they can be enabled by double-clicking on
them. This allows them to be used as additional selection parameters.
to open the list of additional selection fields. These additional
fields are grouped under folders, and they can be enabled by double-clicking on
them. This allows them to be used as additional selection parameters.
XX.3.1. To select a report on assets by Grant:
Find the selection parameter named 'Grant' under folder Add.Acct.Assignments. Select the parameter and then enter the number into the field on the right-hand side.
There are two parameters named Grant in that folder. Be sure to use the one shown below.

XX.3.2. To select a report on assets by WBS Element or Order:
Find the selection parameters named Order and WBS element under folder Investment Acct Assignmnt. Select the parameter and then enter the number into the field on the right-hand side.
If you want to select from all WBS Elements from a project, enter the Level 1 WBS Element ID with an asterisk (*) at the end (as shown in the screenshot).
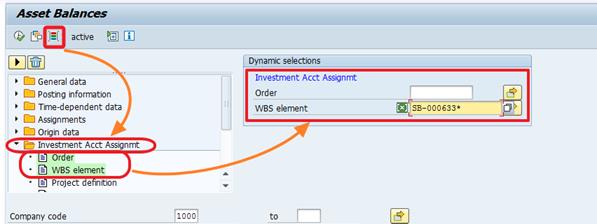
XX.4. Enter any other selection parameters like Business Area, Asset Class, etc.
XX.5.
Execute ![]() the report.
the report.
4.5.7.3 Display Asset History Sheet by Grant or Project
YY. Steps to generate the report / Transaction Code: S_ALR_87011990
YY.1. Execute transaction code S_ALR_87011990.
YY.2.
To select either Grant, WBS Element, or Internal
Order as a selection parameter, use the Dynamic Selections ![]() feature as described in the Asset Balances report instructions
above.
feature as described in the Asset Balances report instructions
above.
YY.3. Enter any other selection parameters like Business Area, Asset Class, etc.
YY.4.
Execute ![]() the report.
the report.
5 Asset Downstream Transaction Processing
5.1 Depreciation of Asset
After the acquisition of PP&E, the next step in the lifecycle is depreciation. The depreciable amount of an asset is allocated on a straight line basis over its useful life (see summary of IPSAS accounting policies section of this document).
The depreciable amount is the cost of the asset, or other amount substituted for cost, less its residual value.
The residual value of PP&E is the estimated amount that the UN would currently obtain from disposal of the asset, after deducting the estimated costs of disposal, if the asset were already of the age and in the condition expected at the end of its useful life. The residual value is nil unless residual value is likely to be significant. Assets under construction and land are not subject to depreciation.
Depreciation of an asset ceases when the asset is fully depreciated or derecognized as stipulated in the IPSAS Standard.
Refer to the Corporate Guidance on Infrastructure Assets and the Corporate Guidance on Property, Plant and Equipment (excluding infrastructure assets) for more details.
The depreciation of assets is mainly reliant on the data stored in the Asset Master record, which indicates which assets are to be depreciated and provides the calculation parameters such as useful life, scrap value and the Depreciation Key. The Depreciation Key stores important depreciation parameters such as the depreciation method (straight line), period controls (when to start or stop depreciation), and default scrap value or percentage. The Depreciation Run is a periodic process run in the background of Umoja, which posts depreciation charges and increases the accumulated depreciation for each asset.
Note: This procedure can be run only once each month (therefore it can be run 12 times).
The depreciation run is always performed at company code level, in UNHQ only. Entities are required to ensure that the fixed asset master record are complete and transactions are such as impairment, write offs etc. have been recorded before the depreciation run is performed.
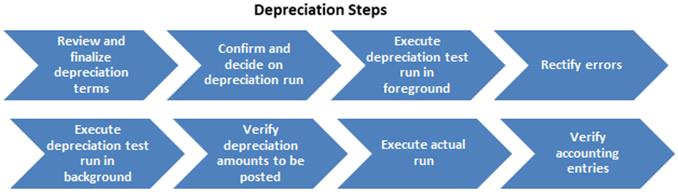
ZZ. The process for depreciation is as follows:
ZZ.1. Review and finalize any changes to the depreciation terms / Transaction Code: AS02
For any changes in the depreciation key, useful lives, or scrap values which impact depreciation, the changes must be done through asset master data before the depreciation run is performed.
ZZ.2. Confirm/decide on mode of depreciation run (planned ordinary, re-run, restart) / Transaction Code: AFAB
ZZ.2.1.
Start the transaction using the menu path below
or type AFAB in the T-code Command box and click ![]() to display the Depreciation Posting Run screen.
to display the Depreciation Posting Run screen.
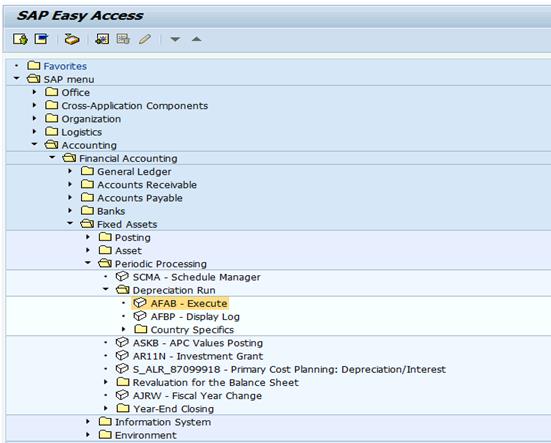
ZZ.2.2. Before executing the depreciation run, the User must decide on the period (month) and the depreciation run mode and enter these parameters on the selection screen of the Depreciation Run.
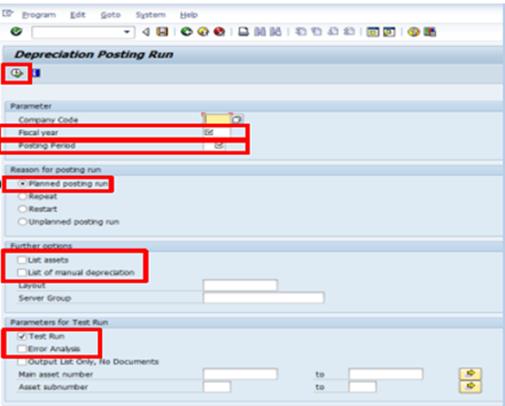
ZZ.2.3. The Depreciation Run can be performed in four modes:
• Planned posting run
• Re-Run
• Restart Run
• Unplanned posting run
ZZ.2.4. Complete/review the following fields and select the depreciation run mode:
|
Field |
Required/Optional/Conditional |
Description |
|
Fiscal Year |
Required |
Enter the year when the depreciation will be calculated. |
|
Posting period |
Required |
Enter the posting period (usually should be 1 to 12) this corresponds the month in which the depreciation will be calculated and posted. |
|
Planned Posting run |
Required |
Select this button if the depreciation run is to be performed only sequentially from month to month. |
|
Re-run |
Required |
Select this button to post the delta values of the assets that will impact depreciation for the last period executed. This is possible only on the last period of the depreciation just run, not possible in the previous period postings. |
|
Restart run |
Required |
This button must be selected when the system was stalled due to the errors in the update run. If errors occurred during an update run, the system will force the User to perform the depreciation run in the restart mode only. |
|
Unplanned Posting run |
Required |
Select this button if, for whatever reason, you want to skip over one or more posting periods, you can do this by specifying an unplanned posting run. The system then creates postings for all the periods that were skipped, as well as for the period entered. The posting period that you specify, however, must fit into the posting cycle. |
ZZ.3. Execute the depreciation test run in foreground processing / Transaction Code: AFAB
ZZ.3.1. The Depreciation Run is generally first executed in test run, in the system foreground. A foreground test run limits the number of assets being processed to only 1000 assets and provides immediate results to the user. Running the depreciation test run in the foreground will enable identification of any apparent errors that can be corrected immediately without waiting for the system to complete the process for all assets in background processing.
ZZ.3.2. Click the Execute button to perform a test run.

ZZ.3.3. The status of the depreciation run is then displayed. If there are errors in the depreciation run, a spool marked with red and status as 'Error' will be generated and an icon of this type will appear as shown in the screen shot below. Double click on this icon to see the detail of the error.
Note: Normally no error will be reported as Umoja will not allow documents to be posted which are not complete in all respects.
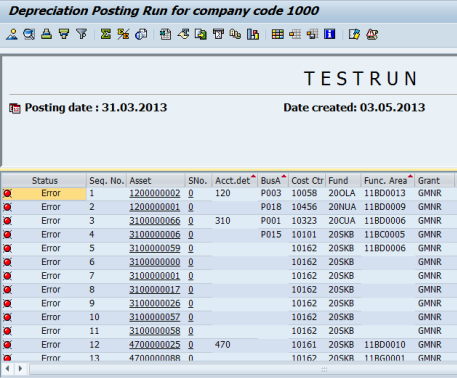
ZZ.3.4. If there are no errors, a clean test run report as shown below will be generated for readiness to run in the background.
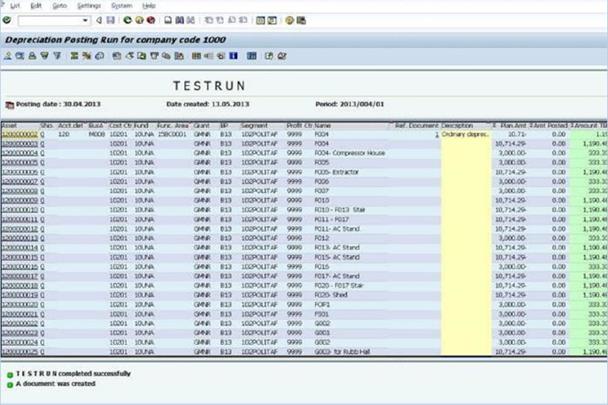
ZZ.4. Rectify the errors before starting to process depreciation run. / Transaction Code: AS02
If there are any errors identified in the foreground processing, the system will identify the cause of the error and the asset master data record that it pertains to. The User will be required to edit the asset master record to rectify the error before proceeding to the next test.
Note: Any other errors outside of the AS02 transaction code will need to be rectified using the relevant transactions.
ZZ.5. Execute depreciation run in test mode in background for all assets / Transaction Code: AFAB
ZZ.5.1. If there are no errors identified in the foreground processing or they have been rectified, the User will execute the test run for all assets in background processing.
ZZ.5.2. Click the Back button. To run it in the background, click the Program menu, and then Run in Background.
ZZ.5.3. Click the System menu. A popup window appears. Select LOCL as the Output Device and click OK.
ZZ.5.4. Click the Immediate button and the Save button.
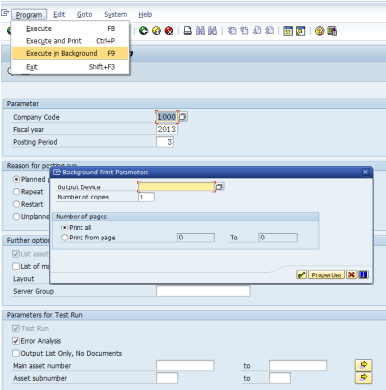
ZZ.6. Verify the depreciation amounts proposed to be posted / Transaction Code: AFAB
ZZ.6.1. Once the test mode for all assets is complete, verify that the amounts to be posted have been calculated properly.
ZZ.6.2. After the job is performed, check it by clicking the System menu and Own Jobs.
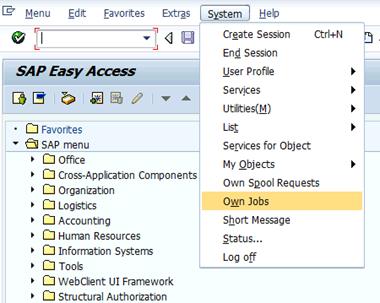
ZZ.6.3.
Then, click the Spool ![]() button.
button.
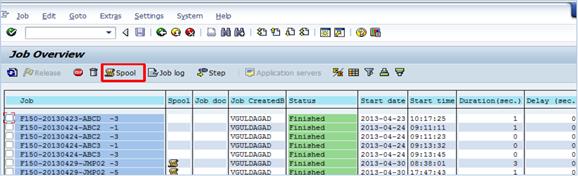
ZZ.6.4. Review the report in the Type column. Click the Job log button to view errors and description.
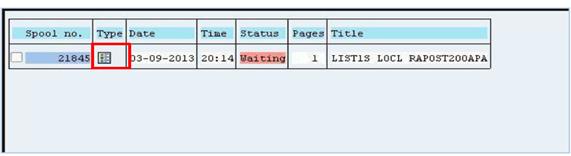
ZZ.7. Execute actual run / Transaction Code: AFAB
ZZ.7.1. After all checks are complete and no errors exist, click the Back button to go to the Depreciation Posting Run screen.
ZZ.7.2. Uncheck Test Run under Parameters for Test Run. Perform the same steps for the background run. Note: This will run as an actual posting.
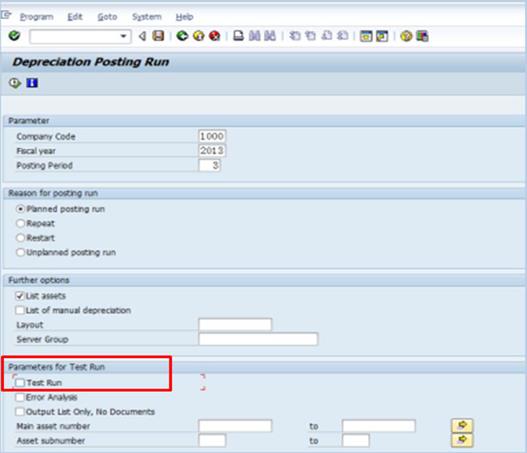
Based on the asset master records, the depreciation entries will be automatically determined. This will post the accounting entries in the financial accounting ledger as follows (example).
|
Date |
GL |
GL short description |
Debit |
Credit |
|
XXXX |
77842010 |
Depr Bldg Fix |
100,000 |
|
|
|
27842010 |
FA Bldg Fixed Dep |
|
100,000 |
ZZ.8. Verify posted depreciation accounting entries
ZZ.8.1. By going through the spool file (output list generated after background processing), verify that the documents and amounts are properly posted. If there are any corrections to be made, the User would perform them before processing the next depreciation run.

5.2 Impairment of Assets
Throughout and at year end, the organization should assess events and determine whether there is an indication of impairment of an asset. If any such indication exists, the organization will perform a detailed impairment test and recognize impairment lost. An impairment loss is recognized in the Statement of Financial Performance for the amount by which the asset's carrying amount exceeds its recoverable service amount. The recoverable service amount is the higher of an asset's fair value less costs to sell and value in use.
The organization will assess the need for impairment reviews for items of PP&E through three different processes:
· The recognition of impairments throughout the year triggered by certain events;
· An annual strategic assessment of high-level impairment indications; and
· A check of certain assets as part of the physical verification process.
It has been decided that an assessment of whether an indicator of impairment exists will only be performed for such PP&E with carrying values exceeding the following thresholds:
|
Asset class |
Threshold |
|
Computer and IT equipment, vehicles, machinery and equipment, furniture and fittings |
>USD 25,000 |
|
Land, buildings and infrastructure assets |
>USD 500,000 |
The details requirements and processes on impairment refer to the Corporate Guidance on Impairment and Property, Plant and Equipment.
5.2.1 Review Notifications for Impairment
Both the FA.15 and FA.16 roles can review and report on Notifications (IW59), however only the FA.15: Financial Accounting: Asset Accounting Users can post the actual impairment.
AAA. Steps to review notification for impairment / Transaction Code: IW59
AAA.1. Log in to Umoja ECC.
AAA.2. Execute transaction code IW59 to get the report on current Notifications in the system.
AAA.3. In the Notification status ensure Outstanding and In process are checked.
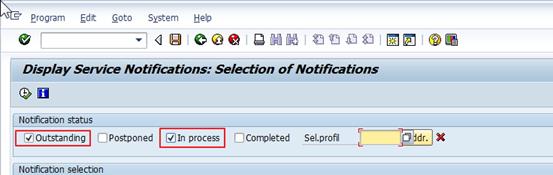
AAA.4. In Notification selection select Notification type PW and an appropriate Notification date range. Use the Functional Location field if you are looking for a specific functional location.

AAA.5. In General Data/Administrative Data select Coding UNWRTOFF, for Coding Code either leave blank (if you will filter later in report, or you want to see all Retirements) or use appropriate codes: UN09 or see table for reference.
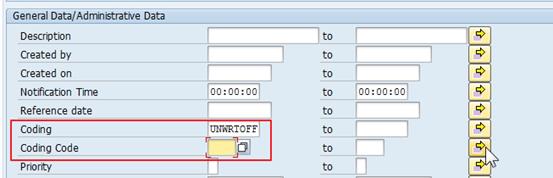
AAA.6. In Others, make sure Layout is /ASSETNOTIF.

AAA.7. You can, if necessary, in Location Data/… filter by Maintenance plant.
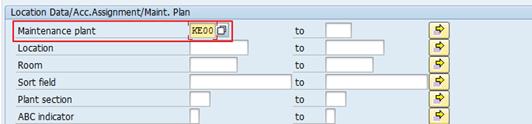
AAA.8. Alternatively, you can specify Equipment numbers, Asset numbers, or Notification numbers (if you know them) for selection.
AAA.9. Execute report.
AAA.10. Filter Notifications based on Type (if not identified in selection as PW) and Notification System status (NOPR and NOPT).

AAA.11. Filter Notifications based on Notification UserStatus (APPR).
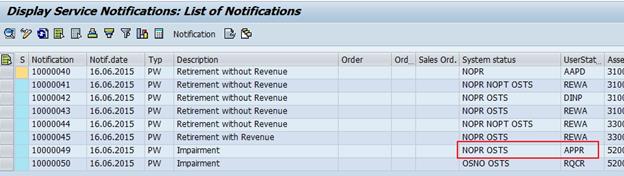
AAA.12. You can export report in Excel form if more convenient to use.
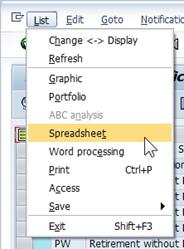
AAA.13. Review each approved (APPR, Impairment Approved) Notification to confirm all relevant documents (approvals) are included and information is sufficient to proceed with Impairment. You can view Notification with double-click on Notification Number.
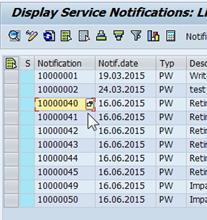
AAA.14. For any impairment related to a Building Component / Sub-asset (e.g. Foundation/Basement), make sure that the Notification contains both the Asset Sub-number and the full Functional Location of the sub-asset (e.g. 200412.002.EX.SS).
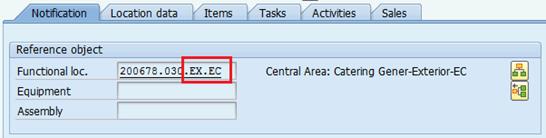
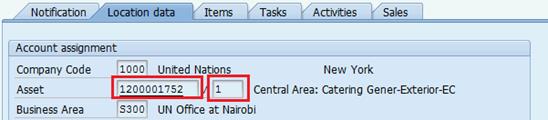
If the impairment is related to a Building Component and does NOT have both the Asset/Sub-asset and the functional location of the component, contact your PMU colleagues to have it updated.
AAA.15. Confirm Impairment Task has been created in the Notification, in Tasks tab, and assigned to Asset Accountant.
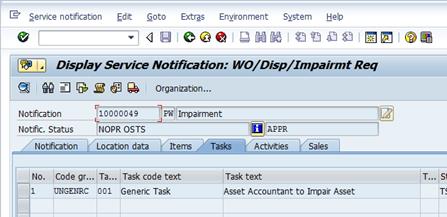
AAA.16. For all applicable Notifications, from the report itself, identify all Asset Numbers for Impairment, and corresponding Notification numbers. You can verify Asset number in Notification, in Location data tab.

5.2.2 Run the Equipment/Asset Reconciliation Report
BBB. Steps to run report for Equipment and Asset Reconciliation / Transaction Code: ZAAEQASREC
NOTE: The status of equipment will be EQAS (Equipment Assigned).
BBB.1. Execute transaction code ZAAEQASREC.
BBB.2.
Use Get Variant ![]() and select User Variant: ZEQAS. Expand All Selections
and select User Variant: ZEQAS. Expand All Selections
![]() to limit selection of Equipment/Assets.
to limit selection of Equipment/Assets.
BBB.3. You can restrict by Business area or other specific elements.

BBB.4. If you know Asset numbers (for example, from Notifications Report export), the easiest way is to copy them and paste in Multiple Selection, using Upload from clipboard.

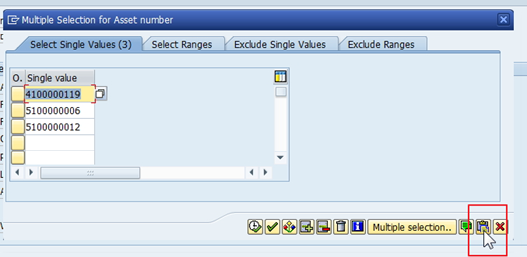
![]()
BBB.5. Look for codes and descriptions in Status Number in User Status List and in User Status Description.
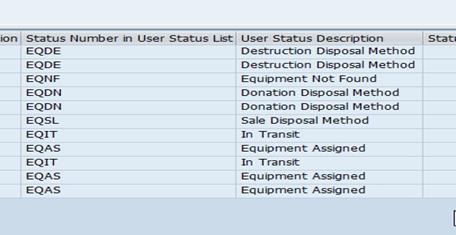
BBB.6. Codes relevant to Impairment are:
· EQAS: Equipment Assigned
· Any other code is acceptable as it is not relevant
5.2.3 Impairment of the Asset in Asset Accounting Module
Impairment of the Asset is done by users granted Enterprise Role of Financial Accounting: Asset Accounting User (FA.15).
CCC. Steps to post impairment of asset / Transaction Code: ABAA
CCC.1. Execute transaction code ABAA to start impairment of the asset.
CCC.2. On the Unplanned Depreciation initial screen, enter:
· Asset Number (and Subnumber if applicable)
· Document Date and Posting Date - Posting Period will be automatically assigned
· Transaction Type:
o Assets acquired in the prior year: 620
o Assets acquired in the current year: 630
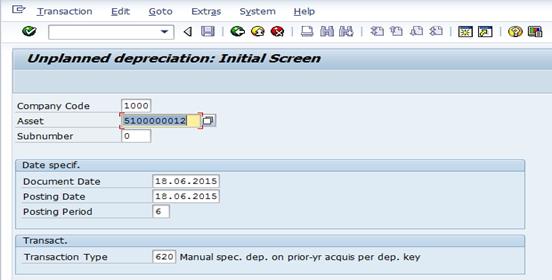
CCC.3. On the next screen, enter:
· Amount posted: The impairment amount.
· Enter effective date of impairment in the Asset Val. Date
· Enter description in Text and Reference for the Impairment

CCC.4. Post (Save) Impairment.

CCC.5. Note posted Asset Accounting (AA) Document Number

CCC.6. Review Asset using transaction code AW01N, by looking at Special depreciation and Transactions.
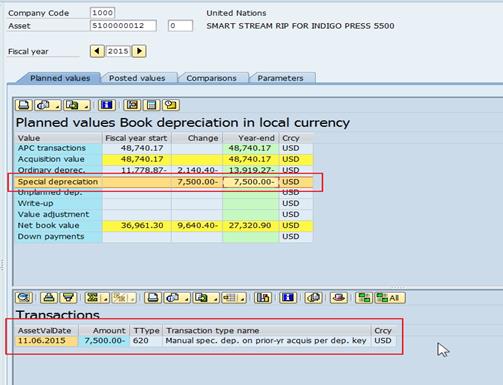
5.2.4 Adjust Useful Life of Asset (If necessary)
Adjustment of Useful Life is done by users granted Enterprise Role of Financial Accounting: Asset Accounting User (FA.15).
DDD. Steps to adjust useful useful life of asset / Transaction Code: AS02
DDD.1. Execute transaction code AS02 and go to Deprec. Areas tab - there, double click on depreciation row.
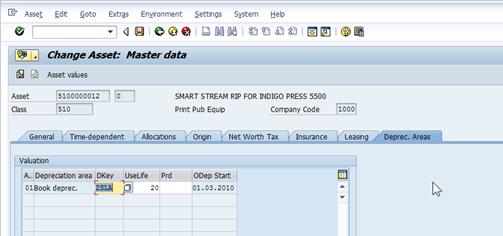
DDD.2. Click on More Intervals.
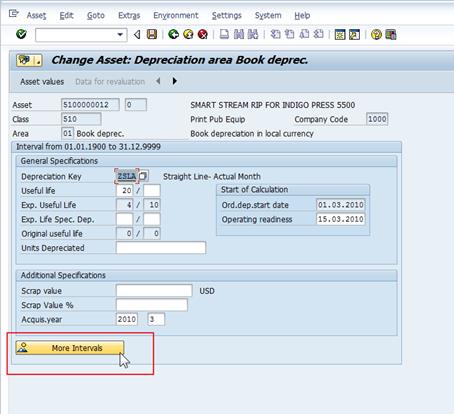
DDD.3. Click on Add Interval.
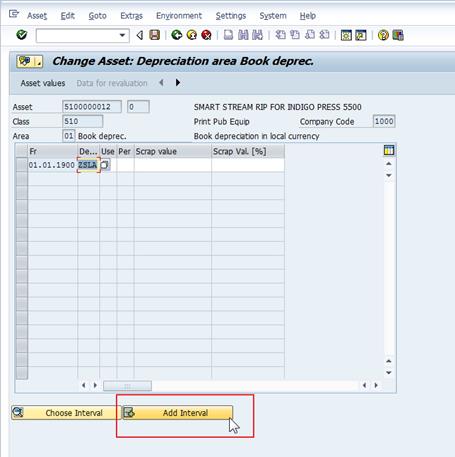
DDD.4. Set correct date for effective date of Impairment and change of useful life - note that the date must be the first day of the month.
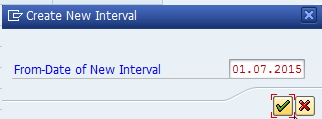
DDD.5. Set adjusted useful life in that row.
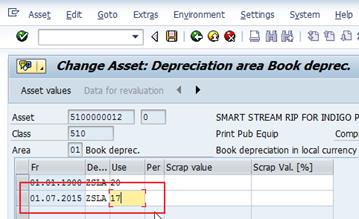
DDD.6. If necessary to define adjusted useful life using months, then record number of months (1-11) in Per field.

DDD.7. Save the record.
5.2.5 Update the Notification Status to 'Completed'
Notification updates can be done by users granted Enterprise Role of Financial Accounting: Asset Accounting User (FA.15).
EEE. Steps to updated notification status / Transaction Code: IW52
EEE.1. Execute transaction IW52 to start modifying Notification - use the same Notification number identified in IW59 above or run IW59 again to list available Notifications. Enter Notification number and press Enter.
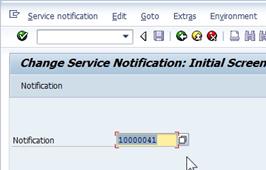
EEE.2. Start modifying the Notification, make sure to record comment 'Asset ## retired as of …., FI Document No' in Description in Notification tab.
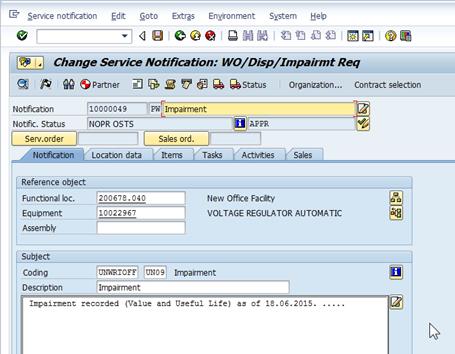
EEE.3. In Tasks tab identify Asset Retirement task, add any comments to it as required, select the task line and click on Complete Task Flag in the bottom of the screen to mark Asset Retirement task complete.
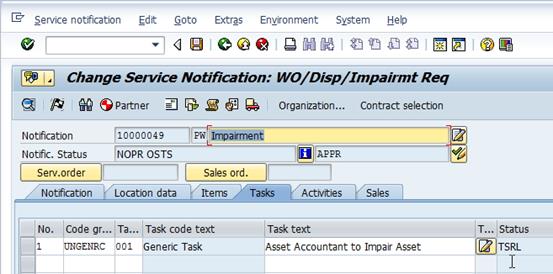
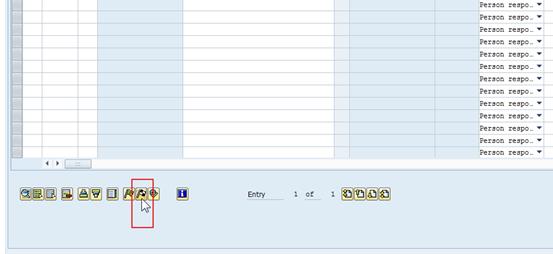
EEE.4. Save Notification and exit.
Appendix A: Notifications and Notifications Report
Sample of Notifications Report with various types of Notifications and Statuses:
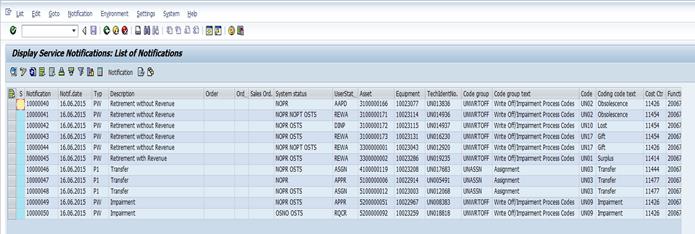
Sample of Notifications Report with various types of Notifications and Statuses extracted into Excel:
Example of different Notifications, in varying status and corresponding Asset Accounting activities:
5.3 Manual Adjustment to Accumulated Depreciation
This section details the procedure for the adjustments to accumulated depreciation in asset accounting. It covers both positive and negative adjustments to accumulated depreciation.
All entities requiring adjustments to accumulated depreciation must first obtain clearance from OPPBA Accounts Division in writing before running either transaction.
This process should not be followed in the cases where a minor adjustment to accumulated depreciation posted in the current year is required as a result of an adjustment of useful live (in this case the fixed asset accountant can simply adjust useful life, and check the planned depreciation adjustment).
Examples of where the process can be applied to adjust accumulated depreciation include:
· Year-end closing activities; to post adjustments to accumulated depreciation (reduce accumulated depreciation, i.e., post negative values). An example is write-back of accumulated depreciation due to a revaluation of remaining useful life which affects prior fiscal years. In this case the contra account for the posting to accumulated depreciation is the current year depreciation expense (due to immateriality).
· Posting depreciation manually; that is not using Umoja to calculate and automatically post depreciation when depreciation is run centrally. Entities can only use this method after approval of accounts division as Umoja has been set up to automatically post depreciation based on the useful life assigned to the IPSAS sub class of the asset. An application of this is the Vienna International Center (VIC), where UNIDO administer the building and provide lump sum postings to UNOV to recognize their portion of cost and accumulated depreciation for financial statement reporting purposes only.
Both procedures are performed by Financial_Accounting: Asset_Accounting_Senior_User (FA.16) enterprise role.
5.3.1 Reduce Accumulated Depreciation
FFF. Procedure for reducing the accumulated depreciation / Transaction Code: ABZU
FFF.1. Log in to Umoja ECC. This can be done only by Asset Accounting Senior User role (FA.16).
FFF.2. Execute transaction code ABZU to start the transaction.
FFF.3. In the Write-up: Initial Screen enter:
· Correct Asset number
· Enter current Document Date
· Enter current Posting Date (according to the fiscal year you need to post to)
· Enter or confirm Posting Period (must correspond to Posting Date)
· Enter or confirm Transaction Type 700 (Write-up ordinary and special depreciation)
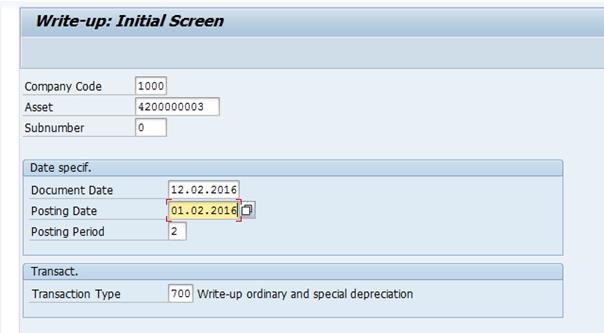
FFF.4. Press Enter to proceed to the next screen.
FFF.5. In Create Asset Transaction screen enter Asset Value Date (usually 1 January of current year), the adjustment value, and Text. Document Type must always be AA.
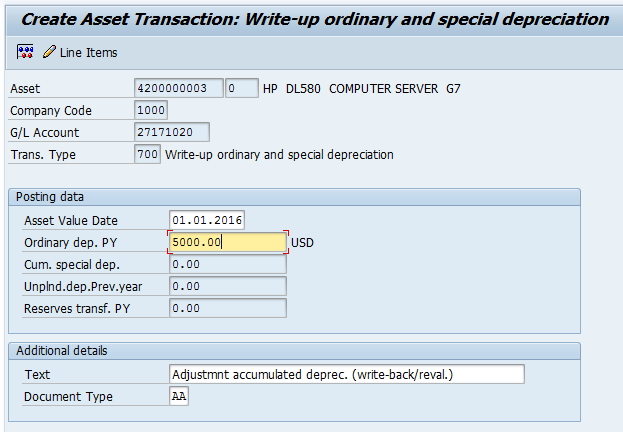
FFF.6.
Click on Simulate ![]() button, or chose Extras from the top menu, and then Simulate.
button, or chose Extras from the top menu, and then Simulate.
FFF.7. Review lines from simulated data for posting and confirm all OK. If applicable, select the button for Additional account assignment and populate any missing elements - see next step for details.
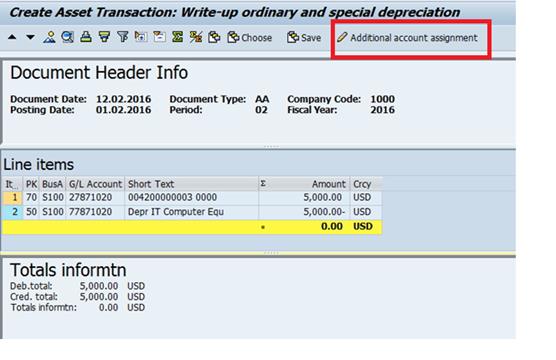
FFF.8. If this asset does not pertain to a WBS Element or Internal Order (often referred only as Order in this function), you may skip to the next step.
If, however, the asset was capitalized against an WBS Element or an Internal Order, you'll need to add the WBS Element / Internal Order number to the posting manually.
The WBS Element or Internal Order must be added to the two line items with Posting Key 70 and Posting Key 50.
In order to see WBS Element and Internal Order, you may want to modify current report layout and show additional fields, as shown in the following screenshot (you can save the layout for future use, if you want to).
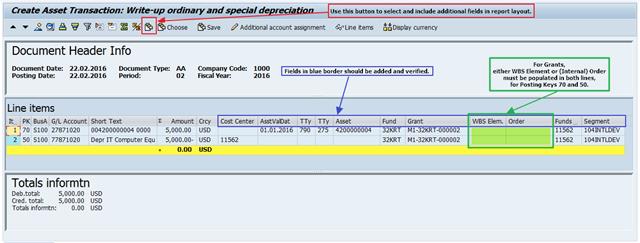
FFF.8.1. Click on the line with Posting Key 70 (usually Line #1), and then click on the Additional account assignment button.
FFF.8.2. Fill in either the WBS Element or the Internal Order and then click on the Green Check.
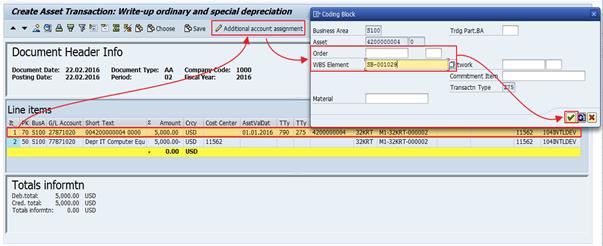
FFF.8.3. Click on the line with Posting Key 50 (usually Line #2), and then click on the Additional account assignment button.
FFF.8.4. Fill in either the WBS Element or the Internal Order and then click on the Green Check.
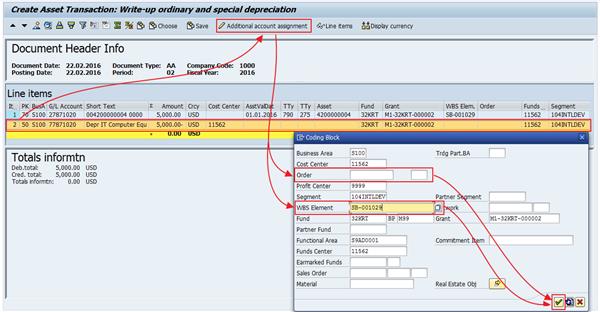
FFF.8.5. In case of the WBS Element, this is how data should show after the change:

FFF.9. Once you are satisfied with the simulated outcome, click on Save (Post) or select Transaction from the menu, and then Post.
FFF.10. If you need to make corrections, click on green Back button, and you can make changes directly on the screen. Note that contra-account posting is done automatically by the system.
Alternatively, you can click on Line Items. Then, you will see only one transaction line, and you can double-click it to modify the transaction. This will, however, allow you to modify only the amount.
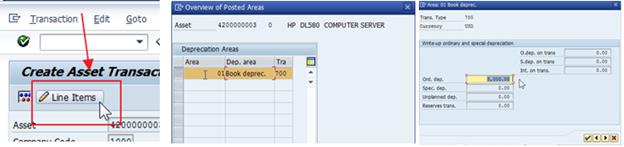
FFF.11. Once you have successfully posted the transaction, you will receive confirmation message with the Document Number in the lower left corner of the screen.

FFF.12. You can immediately see the adjustment in the Asset Explorer (AW01N) on the Write-up line and its effect on the Net book value.
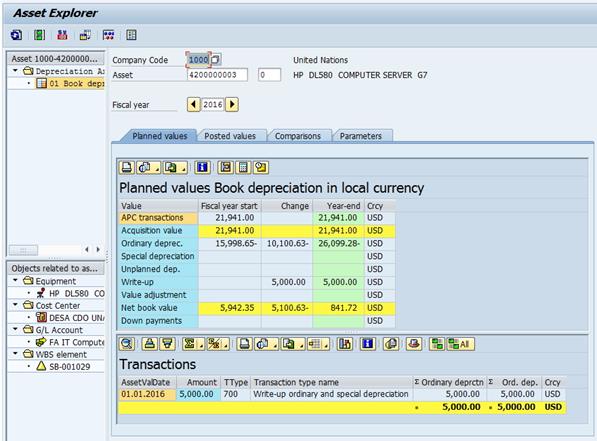
FFF.13. You can also see adjusted planned depreciation.
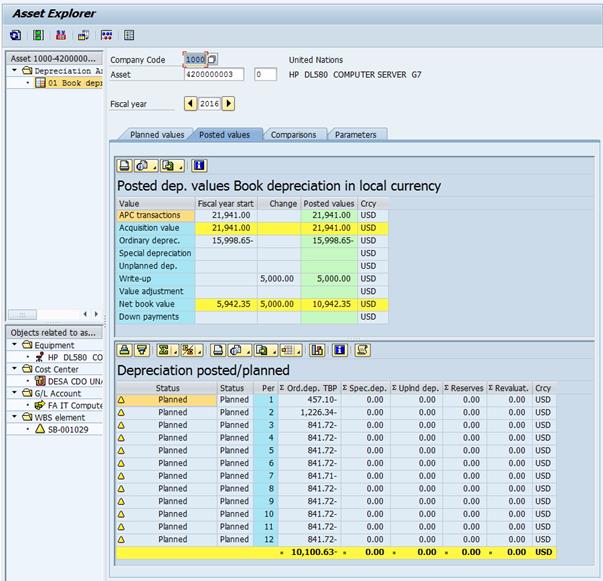
FFF.14. If you want to further review posted document, you can either double-click transaction shown in the first Asset Explorer screen, or invoke T-code FB03 and use Document Number recorded after posting the adjustment. Remember that from there, you can also see FM, Grant, and other relevant documents when selecting Environment from top menu, and then selecting Document Environment and then Accounting Documents.
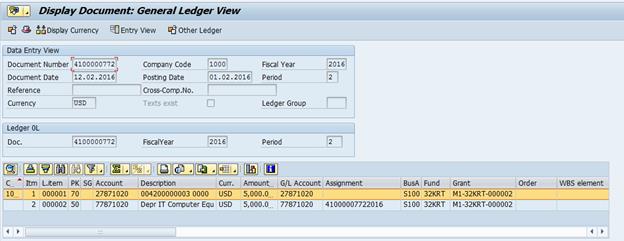
NOTE: If there is a requirement to adjust the Asset Useful Life, please follow standard procedure, as described in procedure for Asset Impairment, by maintaining Asset Master Record and creating new interval, and recording adjusted useful life.
5.3.2 Record Accumulated Depreciation Manually
This is the procedure for manual Recording of Accumulated Depreciation. In order for the system to be able to accept such posting, fixed asset being affected must not be subject to standard Straight Line Depreciation (ZSLA), but instead must be set to not be depreciated (Z000 - No Depreciation), from the acquisition/capitalization date.
· For fixed assets where accumulated depreciation is recorded only manually, they will be in continuous 'No Depreciation' status.
· For those fixed assets where this is one‑time adjustment and the depreciation method needs to be reverted to ZSLA, please raise an iNeed ticket requesting assistance for Adjustment of Accumulated Depreciation. It should be addressed to Asset Accounting / Fixed Assets. This kind of adjustment will be used in very limited circumstances.
Adjustment procedure is performed as follows:
1. Confirm Depreciation Key is Z000 - No Depreciation.
· Check Depreciation Areas tab using transaction AS03, and confirm that the Fixed Asset has Z000 set as Depreciation Key and that it is in correct Interval (from the acquisition/capitalization date or from date 01.01.1900).
· If Depreciation Key and Interval are correct proceed with Adjustment.
2. Adjustment: Post fixed amount of the accumulated depreciation for affected fixed asset, with specific value date. Use T-code ABMA - this has to be done by Asset Accounting Senior User role FA.16.
5.3.3 Review Depreciation Key
GGG. Steps to review depreciation key / Transaction Code: AS03
GGG.1. Log in to Umoja ECC, using Asset Accounting Senior User role (FA.16). Note that Asset Accounting User (FA.15) can review and correct.
GGG.2. Execute transaction code AS03 to review Asset Master Record.
GGG.3. In the Deprec Areas tab ensure Depreciation Key (DKey) is set to Z000 and that Depreciation Start (ODep Start) for Z000 is before effective date of Adjustment.

GGG.4. For more details, you can double click that line.

GGG.5. If everything is OK, proceed with the Adjustment. If Depreciation Key needs to be set, proceed with next steps.
5.3.4 Record Accumulated Depreciation Adjustment
HHH. Steps to record accumulated depreciation adjustment / Transaction Code: ABMA
HHH.1. Log in to Umoja ECC, using Asset Accounting Senior User role (FA.16).
HHH.2. Execute transaction code ABMA to enter data and record Accumulated Depreciation Adjustment.
HHH.3. On the first screen:
· Enter Asset number
· Enter current Document and Posting Dates
· You can enter correct Posting Period, if not the system will warn and change it during processing
· Enter Transaction Type:
o 600 - Manual ordinary depreciation on prior-yr acquis.: for assets acquired in prior years.
o 610 - Manual ordinary depreciation on current-yr acquis.: for assets acquired in current year.

HHH.4. If you are posting into prior year, you may get a warning from the system. This is only a warning and you can proceed by pressing Enter key.


HHH.5. On the second screen:
· Enter Amount posted - total amount of accumulated depreciation you want to post
· Enter Asset Val. Date - Effective date for Accumulated Depreciation. Note that Asset Value Date and Posting Date (from the first screen) must be in the same fiscal year.
· Enter additional details: Text and Reference.
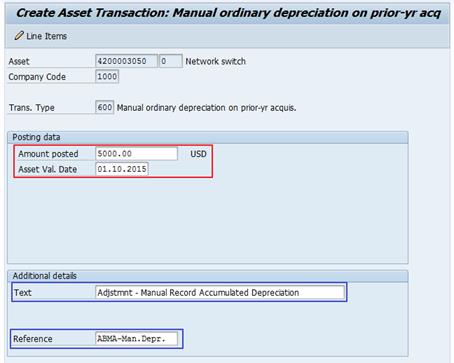
HHH.6. Click on Post button, or select Transaction and then Post.
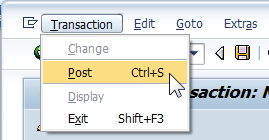
HHH.7. Upon successful posting, you will receive confirmation in the lower left screen corner. If you click on this message, you will see additional information, explaining that Asset Accounting transaction was posted, however, there was no Financial Accounting posting, as this will be posted during Depreciation Run.
![]()
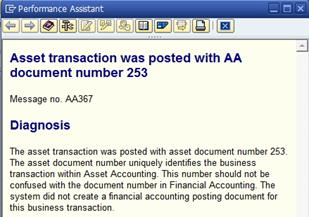
HHH.8. You can review Asset Accounting posting, using Asset Explorer transaction AW01N, Planned values tab for relevant Fiscal year.
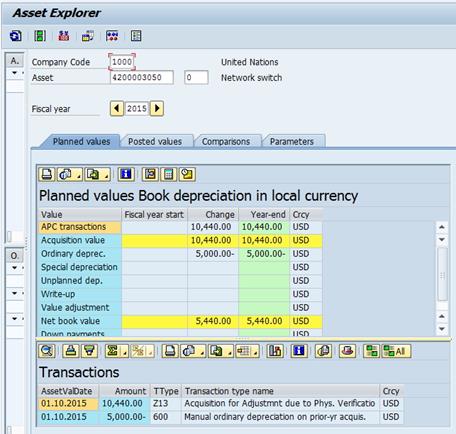
HHH.9. In the Posted values tab, you will see all values as planned, until the Depreciation Run is completed. This will complete and confirm the adjustment to accumulated depreciation procedure.
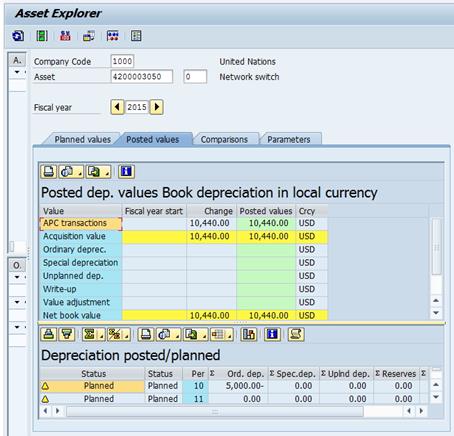
5.4 Asset Transfer
5.4.1 Overview
This section details the procedure for the transfer of an asset between account assignments as a result of internal sale or internal donation. (i.e. between FI balancing elements fund, grant, business area, segment).
Budget relevant transfers can also be thought of as Internal Sales of assets (the receiving office pays for the asset they are receiving).
Non-budget relevant transfers can also be thought of as an Internal Donation of assets (the receiving office does not pay for the asset they receive).
The Asset Transfer transaction is executed by the FA.16 User (Asset Accounting Senior User). Review of Notifications and preparation of Upload Spreadsheet are to be done by FA.15 User (Asset Accounting User).
Aside from the sales and donations scenarios, the transfer process is also used to transfer value from one asset master to another with no change needed in the account assignments of the asset. An example would be when the asset has been recorded against the wrong asset class and you want to associate the cost and accumulated depreciation to a new asset class (this will also transfer the equipment master link onto the final asset master). The same process applies if you are transferring a newly received asset to an existing asset as it should be part of an existing system, or you are simply replacing part of that system.
This procedure should be used for instances where an entity needs to associate an Asset with a different Umoja coding block; including changes in Business Area, Fund, Grant, Cost center, WBSE. The procedure and T-code is the same for Budget Relevant and Non-Budget Relevant Transfer (internal sale/donation), however, different Transfer Variants are to be utilized. The Business will decide the budget relevance of the posting to decide whether budget should be transferred or not.
Note 1: Before Actual Asset Transfer T-code is executed, it is necessary to create Funds Pre-Commitment and Funds Commitment. There should be a task defined in the Notification for this purpose. Communicate details to respective Finance Officer on the receiving side and mark task completed when Funds Commitment activities are successfully completed. You can proceed with Asset Transfer while Funds Commitment is in progress. However, all relevant document numbers so that you can refer to these transactions when recording the Revenue.
Note 2: After Asset Transfer is completed, it will be necessary to manually record the Revenue. Please communicate with the respective Finance Officer on the receiving side to ensure any relevant revenue postings are recorded and, if necessary, funds are transferred from Non-Spendable to Spendable accounts. Keep the related Task in Notification open, until this is completed.
Note on balancing postings: In the case where FI balancing elements are crossed (BA, Fund, Grant, Segment) the system generates a balancing posting:
· If only Segment (derived from Functional Area) or Business Area are crossed then the balancing posting is to cash (11001000 - Csh MAIN Pool).
· If fund and/or grant are crossed and it is non-budget relevant (internal Donation - Z2) the system generates a balancing posting to 19401010(AR Due from/to). These amounts will later be cleared through another posting (using T-code FV50) using SF Doc type.
· If fund and/or grant are crossed and it is budget relevant (internal Sale - Z4) the system generates a balancing posting to 19401010(AR Due from/to). A Funds Commitment to block the funds of the receiver is raised. These Funds Commitment will later be charged through another posting (using T-code FV50) using SF Doc type.
5.4.2 Review Notifications for Transfer
III. Steps to review notification for transfer / Transaction Code: IW59
III.1. Log in to Umoja ECC.
III.2. Execute transaction code IW59 to get the report on current Notifications in the system.
III.3. In the Notification status ensure Outstanding and In process are checked.

III.4. In Notification selection select Notification type PW and an appropriate Notification date range.
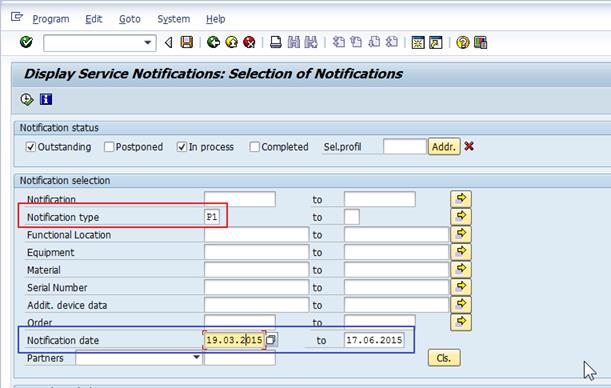
III.5. In General Data/Administrative Data select Coding UNASSN, for Coding Code either leave blank (if you will filter later in report, or you want to see all various Notifications) or use appropriate code: UN03.
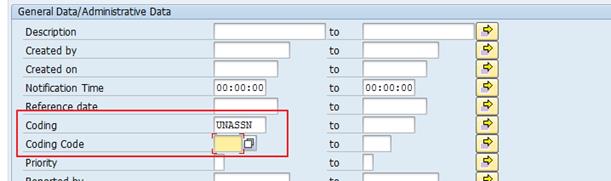
III.6. In Others, make sure Layout is /ASSETNOTIF.

III.7. You can, if necessary, in Location Data/… filter by Maintenance plant.

III.8. Alternatively, you can specify Equipment numbers, Asset numbers, or Notification numbers (if you know them) for selection.
III.9. Execute report.
III.10. Filter Notifications based on Type (if not identified in selection as PW) and Notification System status (NOPR and NOPT).
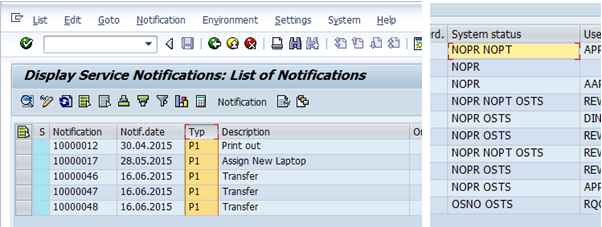
III.11. Filter Notifications based on Notification UserStatus (ASGN).
![]()
III.12. You can export report in Excel form if more convenient to use.

III.13. Review each approved (ASGN) Notification to confirm all relevant documents (approvals) are included and information is sufficient to proceed with Transfer. Coding block for receiving are should be either specified in the Description of the Notification, or included in the attached documents and approvals. You can view Notification with double-click on Notification Number.

III.14. Confirm Transfer Tasks has been created in the Notification, in Tasks tab, and assigned to Asset Accountant. Note that for Budget Relevant Transfer, there will be 3 tasks as in the screenshot. For Non-Budget Relevant Transfer, only Asset Transfer Task (Task No. 2) will be created.
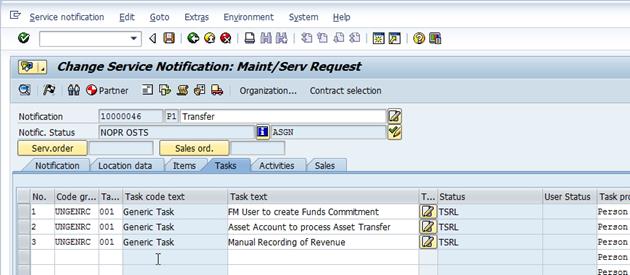
III.15. For all applicable Notifications, from the report itself, identify all Asset Numbers for Retirement, and corresponding Notification numbers and methods of retirement. You can verify Asset number in Notification, in Location data tab.
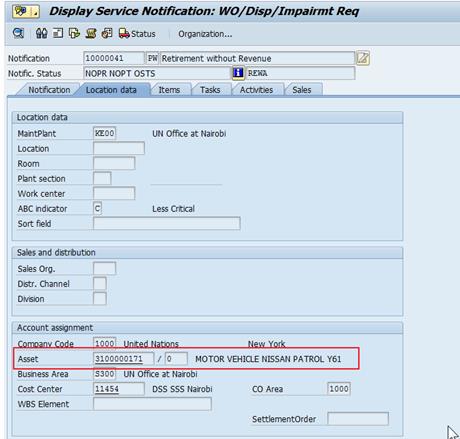
5.4.3 Run the Equipment Asset Report and Review the Status
JJJ. Steps to run the report / Transaction Code: ZAAEQASREC
JJJ.1.
Execute transaction code ZAAEQASREC to
run report for Equipment and Asset Reconciliation. Use User Variant ZEQAS
and Expand All Selections ![]() to limit selection of Equipment/Assets.
to limit selection of Equipment/Assets.
JJJ.2. You can restrict by Business area or other specific elements.
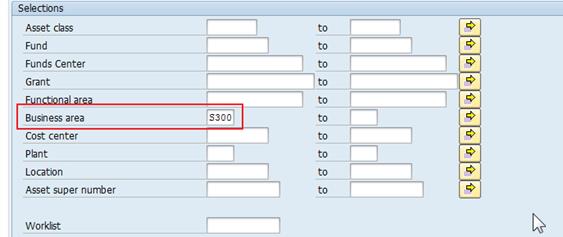
JJJ.3. If you know Asset numbers, the easiest is to copy them and paste in Multiple Selection, using Upload from clipboard.
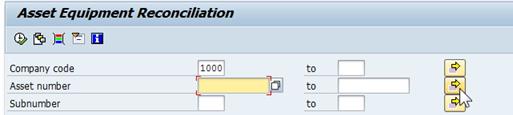
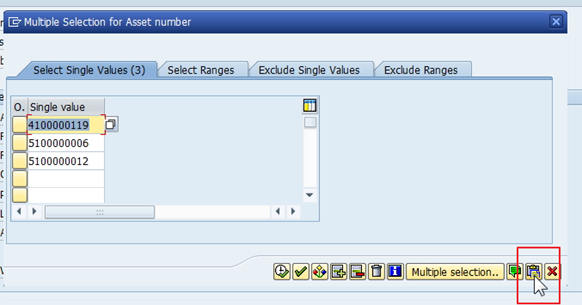
![]()
JJJ.4. Look for codes and descriptions in Status Number in User Status List and in User Status Description.
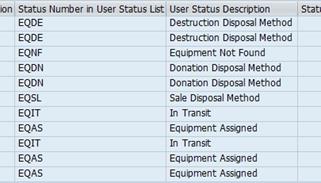
JJJ.5. Code relevant to Transfers is EQIT - Equipment in Transit. If receiving party is ready for Equipment data enrichment (ready to move Equipment and/or Notification to next status) and Asset Transfer has not been completed, this has to be communicated promptly between parties and Asset Transfer completed at the earliest.
5.4.4 Prepare Asset Mass Transfer Spreadsheet in Excel
KKK. Prepare list of Assets for Transfer in Microsoft Excel, using up-to-date version of Asset Mass Transfer Template, where in this template, each row represents one Asset:
KKK.1. Reference Asset (and Sub-Number, if applicable) is the Asset Number for original Asset being transferred
KKK.2. Populate values for receiving Asset (new asset to be created for receiving party): Cost Center, Fund, Grant, Investment Order, WBS Element
KKK.3. Populate Transfer Variant:
· Z2 if it is Non-Budget Relevant Transfer
· Z4 if it is Budget Relevant Transfer
KKK.4. Mark 'X' in Prior Year Acquisition or Current Year Acquisition, depending on when was the Asset originally acquired.
LLL. When all data is prepared for transfer, click on Save to Text File button in Excel. This will generate Text file for upload into Umoja (link to sample of generated text file is included in Appendix B).
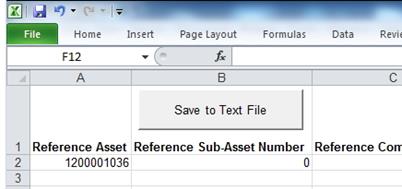
5.4.5 Asset Transfer in Asset Accounting Module
MMM. Steps to transfer asset in Umoja / Transaction Code: ZAA_MASS_TFR
MMM.1. Execute transaction code ZAA_MASS_TFR to start transfer of the asset. Make sure to check values as shown on screenshot (Execute in Foreground, Test Run, Text File) and select file from your local disk, then process the request.
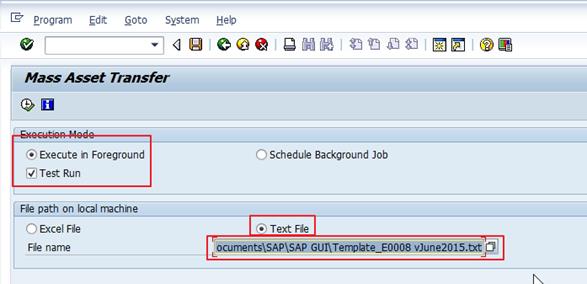
MMM.2. Review the report and make sure there are no errors.


MMM.3. In the above report, also note the Document Number for FI Posting, and using FB03 transaction, review posting documents.

MMM.4. Make sure to review all relevant Accounting Documents.
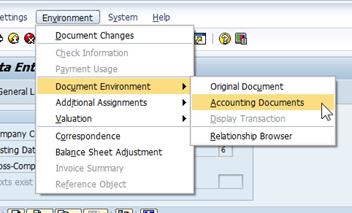
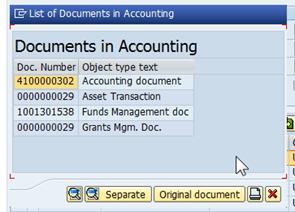
MMM.5. Note that posted documents for Non-Budget Relevant (Transfer Variant Z2) and for Budget Relevant (Transfer Variant Z4) Transfers will be the same. The difference will be in Transaction Types recorded for Asset Transaction and the fact that Budget Relevant Transfer requires Funds Commitment and manual recording of Revenue.
5.4.6 Update the Notification Status to 'Completed'
NNN. Steps to updated notification status / Transaction Code: IW52
NNN.1. Execute transaction IW52 to start modifying Notification - use the same Notification number identified in IW59 above or run IW59 again to list available Notifications. Enter Notification number and press Enter.

NNN.2. Start modifying the Notification, make sure to record comment 'Asset Transfer Completed as of 17.06.2015, FI Document No 4100000302' in Description in Notification tab.
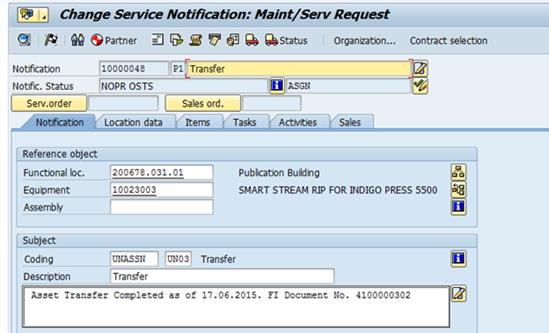
NNN.3. In Tasks tab identify Asset Transfer task that has been completed, add any comments to it as required, select the task line and click on Complete Task Flag in the bottom of the screen to mark these tasks as complete.

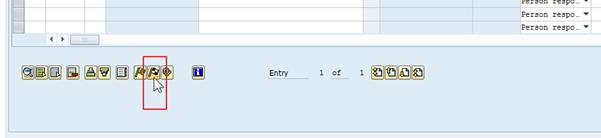
NNN.4. Save Notification and exit.
Appendix B: Notifications Report and Reference Table
Sample of Notifications Report with various types of Notifications and Statuses:
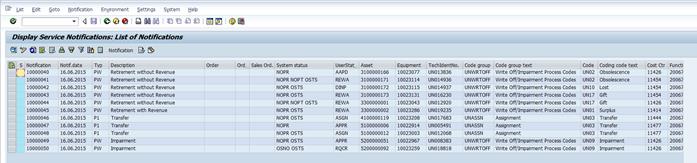
Reference Table for Asset Retirement, Impairment and Transfer is provided in the following file.

5.5 Asset Retirement
5.5.1 Overview
Retirement is the last life cycle in the management of an asset. The values (both cost and depreciation) should be derecognized from the Statement of Financial Position upon disposal of the asset. Upon disposal a gain or loss, representing the difference between the carrying amount of asset and the proceeds from disposal of the asset, if any, should be recognized in the Statement of Financial Performance.
This section details the procedure for the retirement of an asset. Depending if it is a Retirement with or without Revenue and depending on Retirement (Disposal) Method, we are using different procedures, T-codes and Transaction Types.
NOTE: Both the FA.15 and FA.16 roles can review, report on, and update Notifications (IW59) and run asset reports, however only the FA.15 Financial Accounting: Asset Accounting Users can post the actual impairment.
5.5.2 Retirement without Revenue
Methods of Retirements without Revenue can be:
· Write-Off (including scrapping)
· Donation
· Not Found
The procedure and T-codes are the same for all three methods, however, different Transaction Types are to be utilized. Equipment User Status will differ based on the Disposal Method (this information can be found within the equipment record).
NOTE: Tables with breakdown of Retirement Process, Notifications and Transaction Types are provided in Appendix A for your easier reference.
5.5.2.1 Review Notifications for Retirement
OOO. Steps to review notification for retirement of asset / Transaction Code: IW59
OOO.1. Log in to Umoja ECC.
OOO.2. Execute transaction code IW59 to get the report on current Notifications in the system.
OOO.3. In the Notification status ensure Outstanding and In process are checked.

OOO.4. In Notification selection select Notification type PW.
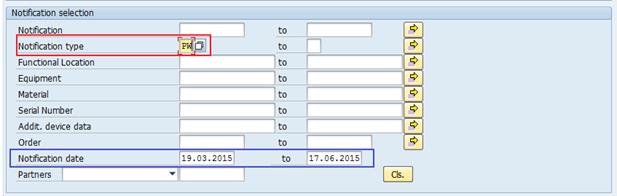
OOO.5. In General Data/Administrative Data select Coding UNWRTOFF. Coding Code either left blank (you can later filter within report) or use appropriate codes: UN01, UN02, UN10, UN17 (see table for reference).

OOO.6. You can, if necessary, in Location Data/… filter by Maintenance plant.

OOO.7. In Others, make sure Layout is /ASSETNOTIF.

OOO.8. Alternatively, you can specify Equipment numbers, Asset numbers, or Notification numbers (if you know them) for selection.
OOO.9. Execute report.
OOO.10. Filter Notifications based on Type (if not identified in selection as PW) and Notification System status (NOPR and NOPT).
OOO.11. Filter Notifications based on Notification UserStatus (REWA and DINP).
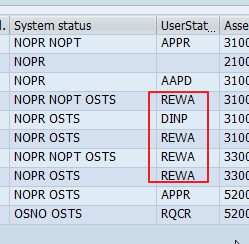
OOO.12. You can export report in Excel form if more convenient to use.
OOO.13. Review each approved (REWA - Review Approved; DINP - Disposal in Process). Review the notification to confirm all relevant documents (approvals) are included and information is sufficient. You can view Notification with double-click on Notification Number.
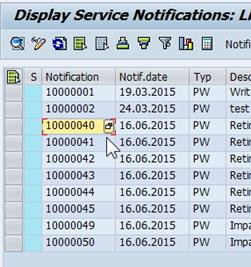
OOO.14. Confirm Retirement Task has been created in the Notification, in Tasks tab, and assigned to Asset Accountant.
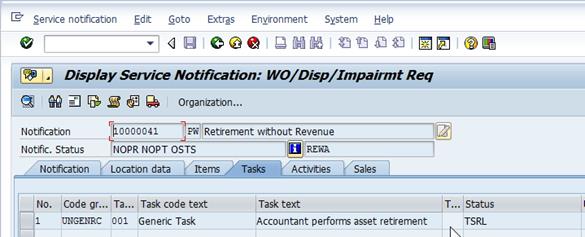
OOO.15. For all applicable Notifications, from the report itself, identify all Asset Numbers for Retirement, and corresponding Notification numbers and methods of retirement. You can verify Asset number in Notification, in Location data tab (note the asset number).
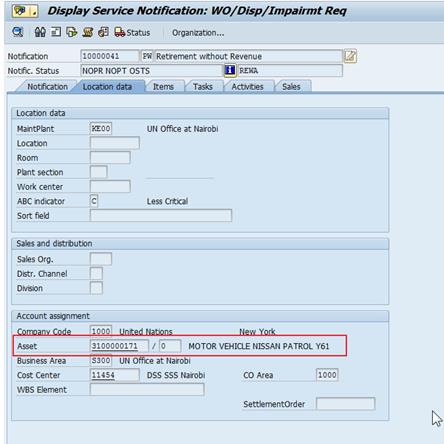
5.5.2.2 Run the Equipment Asset Report (Review the Status)
During this task the Users will run the equipment/asset report and review the status to ensure the status is relevant to retirement.
PPP. Steps to generate the report / Transaction Code: ZAAEQASREC
PPP.1. Execute transaction code ZAAEQASREC to run report for
Equipment and Asset Reconciliation. Use Get Variant ![]() and select User Variant ZEQAS.
and select User Variant ZEQAS.
PPP.2. Expand All Selections ![]() to limit selection of Equipment/Assets. You can also restrict by Business
area or other specific elements if required.
to limit selection of Equipment/Assets. You can also restrict by Business
area or other specific elements if required.
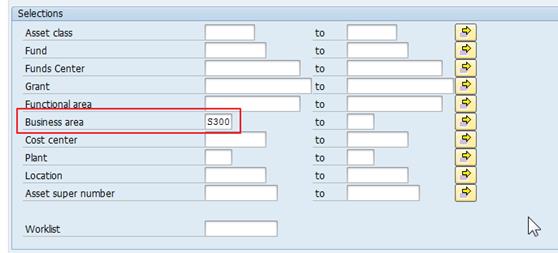
PPP.3. Alternatively: If you know Asset numbers (if you earlier exported from the notifications), the easiest way is to copy them and paste in Multiple Selection, using Upload from clipboard.
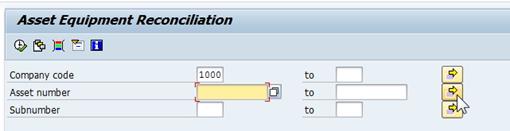

![]()
PPP.4. Look for codes and descriptions in Status Number in User Status List and in User Status Description.
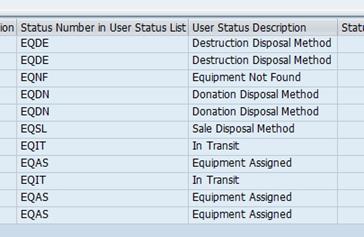
PPP.5. Ensure the equipment is appearing with a codes relevant to Retirement are as follows:
· EQDE: Write-Off - Scrapping
· EQNF: Write-Off - Not Found
· EQDN: Write-Off - Donation
· EQSL: Write-Off - Sale
5.5.2.3 Retirement of the Asset in Asset Module
Retirement of Assets can only be done by users granted the Enterprise Role of Financial Accounting: Asset Accounting User (FA.15).
QQQ. Steps to run retirement of an asset in Umoja / Transaction Code: ABAVN
QQQ.1. Execute transaction code ABAVN to start retirement of the asset.
QQQ.2. In the Header enter Asset number (and Sub-Number if applicable).
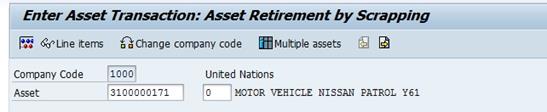
QQQ.3. In Transaction data tab:
• Enter current Document and Posting Dates
• Enter actual date of retirement in the Asset Value Date (this should have been in the notification status)
• Enter description and reference for the Retirement in the Text field
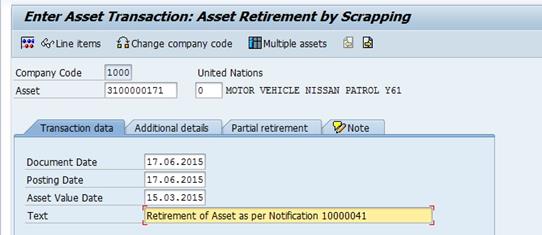
QQQ.4. In Additional details tab:
• Select correct Transaction Type, as per table below and reference table Notifications and Asset Accounting Elements in Appendix A and B.
• Enter Reference info (Notification Number, LPSB Case No.#)
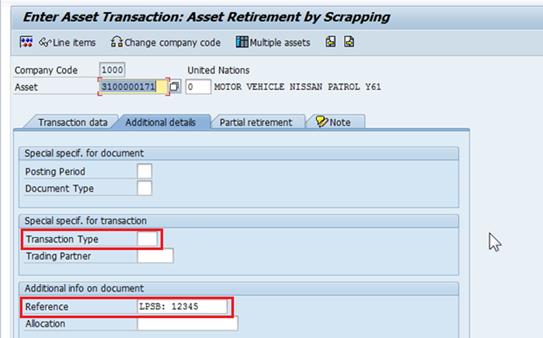
QQQ.5. In Partial retirement tab:
· If this asset was acquired in prior year, in Related to box select Prior-year acquis.
· If this asset was acquired in current year, in Related to box select From curr.-yr aquis.
· DO NOT enter anything else on this screen
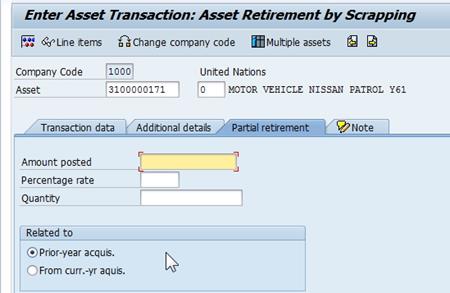
QQQ.6.
Click the Simulate ![]() button
and confirm values are correct.
button
and confirm values are correct.
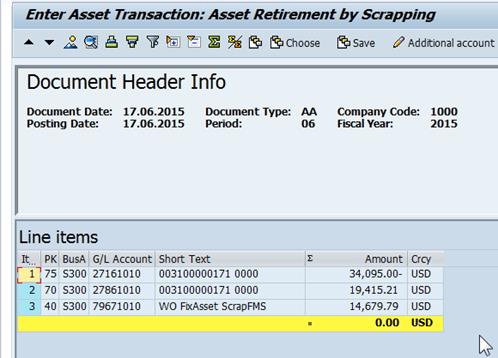
QQQ.7. Post (Save) Retirement and note the posted document number.
![]()
5.5.2.4 Update the Notification Status to 'Completed'
RRR. Steps to updated notification status / Transaction Code: IW52
RRR.1. Execute transaction IW52 to start modifying Notification - use the same Notification number identified in IW59. Enter Notification number and press Enter.

RRR.2. Start modifying the Notification, make sure to record comment 'Asset ## retired as of …., FI Document No' in Description in Notification tab.
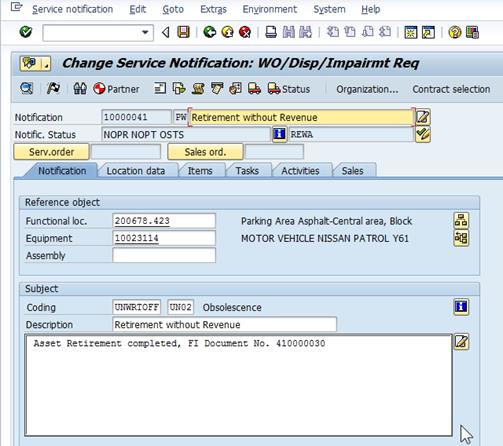
RRR.3. In Tasks tab identify Asset Retirement task, add any comments to it as required, select the task line and click on Complete Task Flag in the bottom of the screen to mark Asset Retirement task complete.
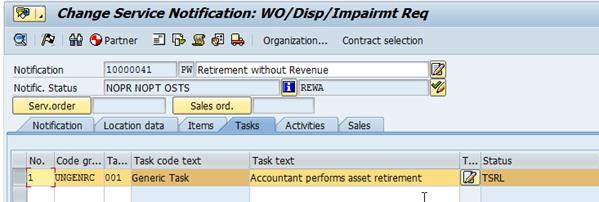
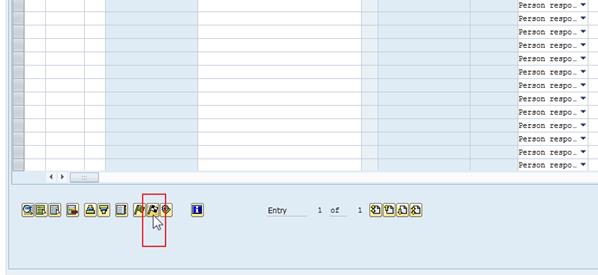
RRR.4. Save Notification and exit.
5.5.3 Retirement with Revenue (Sale)
There are two steps in FI:
1. ABAON (the asset accounting transaction, discussed below)
The Sales Order or if sold by UNDP recording a UJ document to clear the posting from the SCA. The FI posting of the Sales Order is DR Accounts Receivable (GL defined by customer type) CR 69101020. The FI Posting for ABAON is DR Accum. Depreciation CR Asset Cost DR/CR Loss on sale/Gain on Sale DR 69101020 (postings to 69101020 offset one another).
2. In the case where the asset is sold by UNDP and the funds from the sales will be received via the Service Clearing Account (SCA) NO Sales Order will be raised.
Also on service notification the UJ document from the SCA file should be included where possible in the description. Ensure the sales amount you are using is net of UNDP fees where applicable.
NOTE: Tables with breakdown of Retirement Process, Notifications and Transaction Types are provided in Appendix B for your easier reference.
5.5.3.1 Review Notification for Retirement
SSS. Steps to review notification for retirement of asset / Transaction Code: IW59
SSS.1. Log in to Umoja ECC.
SSS.2. Execute transaction code IW59 to get the report on current Notifications in the system.
SSS.3. In the Notification status ensure Outstanding and In process are checked.
SSS.4. In Notification selection select Notification type PW.

SSS.5. In General Data/Administrative Data select Coding UNWRTOFF. Coding Code either left blank (you can later filter within report) or use appropriate codes: UN01 (see table for reference).
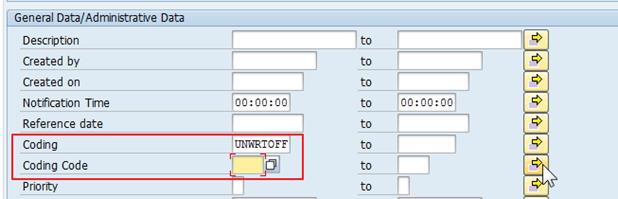
SSS.6. You can, if necessary, in Location Data/… filter by Maintenance plant.
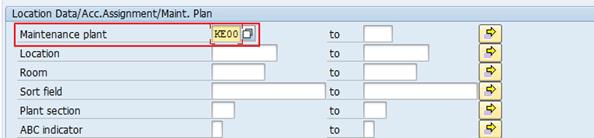
SSS.7. In Others, make sure Layout is /ASSETNOTIF.

SSS.8. Alternatively, you can specify Equipment numbers, Asset numbers, or Notification numbers (if you know them) for selection.
SSS.9. Execute report.
SSS.10. Filter Notifications based on Type (if not identified in selection as PW) and Notification System status (NOPR and NOPT).
SSS.11. Filter Notifications based on Notification UserStatus (REWA and DINP).
SSS.12. You can export report in Excel form if more convenient to use.
SSS.13. Review each approved (REWA - Review Approved; DINP - Disposal in Process). Review the notification to confirm all relevant documents (approvals) are included and information is sufficient. You can view Notification with double-click on Notification Number.
SSS.14. Confirm Retirement Task has been created in the Notification, in Tasks tab, and assigned to Asset Accountant.

SSS.15. For all applicable Notifications, from the report itself, identify all Asset Numbers for Retirement, and corresponding Notification numbers and methods of retirement. You can verify Asset number in Notification, in Location data tab (note the asset number).

5.5.3.2 Run the Equipment Asset Report (Review the Status)
TTT. Steps to generate the report / Transaction Code: ZAAEQASREC
TTT.1. Execute transaction code ZAAEQASREC to run report for
Equipment and Asset Reconciliation. Use Get Variant ![]() and select User Variant ZEQAS.
and select User Variant ZEQAS.
TTT.2. Expand All Selections ![]() to limit selection of Equipment/Assets. You can also restrict by Business
area or other specific elements if required.
to limit selection of Equipment/Assets. You can also restrict by Business
area or other specific elements if required.

TTT.3. Alternatively: If you know Asset numbers (if you earlier exported from the notifications), the easiest way is to copy them and paste in Multiple Selection, using Upload from clipboard.
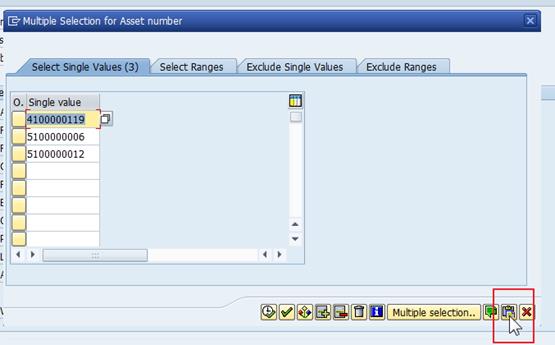
![]()
TTT.4. Look for codes and descriptions in Status Number in User Status List and in User Status Description.

TTT.5. The status relevant to retirement by sale is EQSL: Write-Off - Sale.
TTT.6. Find revenue for Asset Sale, on IW59 Report, locate Sales Order number and double-click on it.
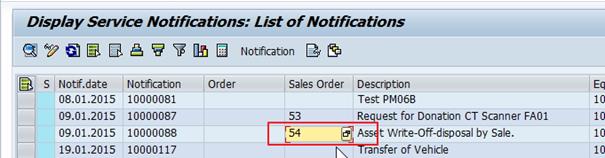
TTT.7. In the Sales Order header, locate Net value to be recorded in Asset Retirement as revenue.
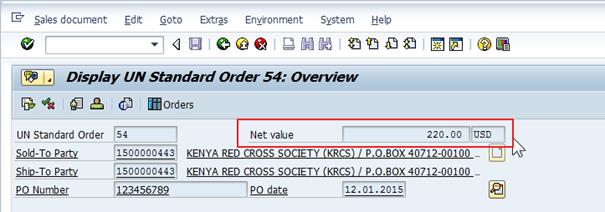
NOTE: As mentioned in the case where the sale proceeds are collected by UNDP there will be NO Sales Order. The Notification itself should have recorded, in the Sales area, corresponding UNDP Office Business Partner/Customer Number in the Sold-To Party field. The revenue to be used will not be shown in the Notifications Report, nor there will be associated Sales Order, instead the revenue should be based on the value in the UJ Document from the SCA file. The Senior Asset Accountant will reference however, the UJ Document from the SCA file in the Service Notification, if known, otherwise they should note in the description that the proceeds were collected by UNDP. The UJ document will be posted to offset the posting in GL 69101020. The FI posting of the UJ Document is DR 18105020 Advance UNDP Pay Agent Request CR 69101020. The FI Posting for ABAON is DR Accum. Depreciation, CR Asset Cost and DR/(CR) Loss on sale/(Gain on Sale) DR 69101020 (postings to 69101020 offset one another).
5.5.4 Retire the Asset in Asset Accounting Module
Retirement of Assets can only be done by users granted the Enterprise Role of Financial Accounting: Asset Accounting User (FA.15).
UUU. Steps to run the retirement of asset in Umoja / Transaction Code: ABAON
UUU.1. Execute transaction code ABAON to start retirement of the asset.
UUU.2. In the Header enter Asset number (and Sub-Number if applicable).

UUU.3. In Transaction data tab:
· Enter current Document and Posting Dates
· Enter actual date of retirement in the Asset Value Date
· Enter description and reference for the Retirement in the Text field
· Enter Manual Revenue value = Net value from Sales Order
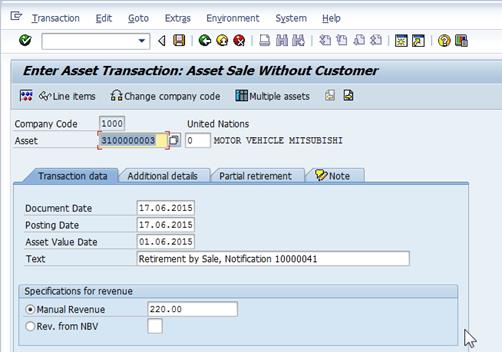
UUU.4. In Additional details tab:
· Select correct Transaction Type, as per table below and reference table Notifications and Asset Accounting Elements in Appendix A.
· Enter Reference info (Notification Number, LPSB Case, Sales Order as applicable)
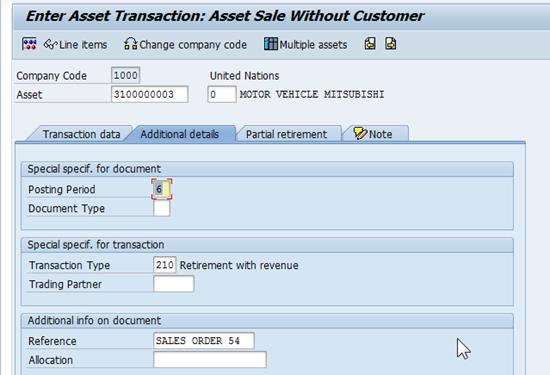
UUU.5. In Partial retirement tab:
· If this asset was acquired in prior year, in Related to box select Prior-year acquis.
· If this asset was acquired in current year, in Related to box select From curr.-yr aquis.
· DO NOT enter anything else on this screen
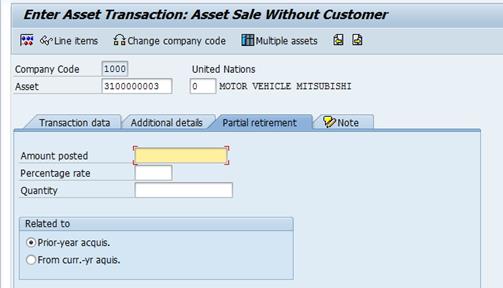
UUU.6. Click
the Simulate ![]() button
and confirm values are correct. The posting to 69101020
will be cleared by the FI posting generated by the Sales Order/UNDP UJ
Doc.
button
and confirm values are correct. The posting to 69101020
will be cleared by the FI posting generated by the Sales Order/UNDP UJ
Doc.
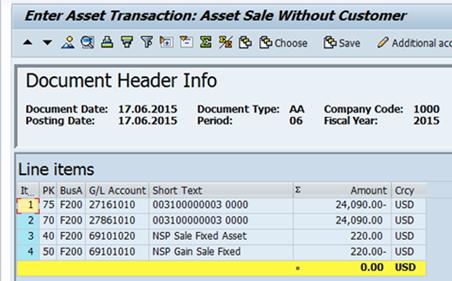
UUU.7. Post (Save) Retirement, note message and note posted document number.
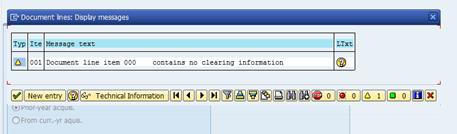
![]()
5.5.5 Update the Notification Status to 'Completed'
VVV. Steps to updated notification status / Transaction Code: IW52
VVV.1. Execute transaction IW52 to start modifying Notification - use the same Notification number identified in IW59 above or run IW59 again to list available Notifications. Enter Notification number and press Enter.
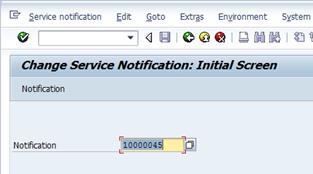
VVV.2. Start modifying the Notification, make sure to record comment 'Asset ## retired as of …., FI Document No' in Description in Notification tab.
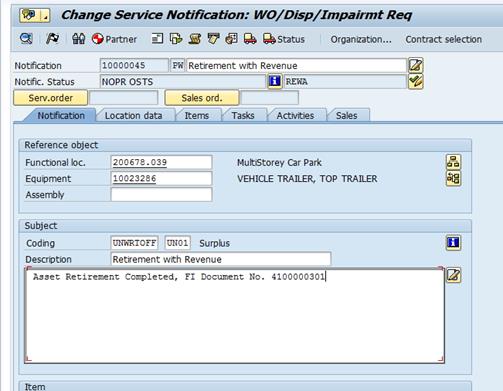
VVV.3. In Tasks tab identify Asset Retirement task, add any comments to it as required, select the task line and click on Complete Task Flag in the bottom of the screen to mark Asset Retirement task complete.
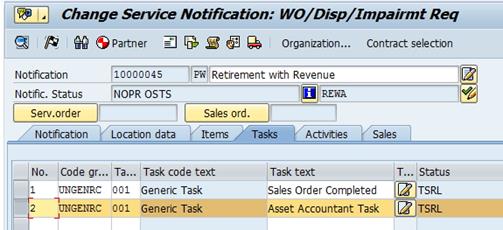
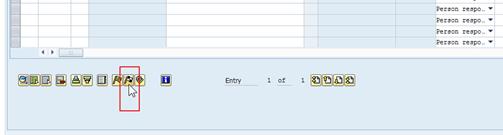
VVV.4. Save Notification and exit.
5.5.6 Reminder Record Receivable/Allot Funds
As mentioned the Receivable should be processed as well as a part of the process. In most cases (where the entity is receiving money from the customer directly) a Sales Order will be raised.
In the Case were UNDP sold the asset and the funds are received via the Service Clearing Account (SCA), a sales order is not raised. However a UJ document is posted to record the receivable and the offsetting account is 69101020 as earlier mentioned. Refer to section 3.2.5.5 of Finance Manual Chapter on Accounts Payable for UNDP advance and reconciliation processes.
When posting ABAON there would have been a posting to 69101010, (NSP Gain Sale Fixed Asset). If the revenue is however spendable, an FV50 document will need to be raised to move the amount from SP Gain Sale Fixed Asset 68001010. Please consult with FM colleagues (or the relevant Budget Office) to determine whether funds received are spendable or non-spendable.
Tasks should be open in the Service notification related to the sales order (or UJ document if UNDP collected the sales proceeds) and budget allocation (if relevant) to ensure no step is forgotten.
5.6 Physical Verification of PP&E
Physical verification is an important step that occurs throughout the lifecycle of PP&E. In line with IPSAS requirements, physical verification inspections shall be performed at regular intervals, at least once per fiscal year per item, in order to ensure proper controls.
A two way verification - meaning a comparison between the assets in the system and the assets physically identified, as well as a comparison between assets physically identified and those in the system - is required for a complete verification of assets. Staff conducting the physical verification shall be independent of those responsible for custody of the assets. Records shall be kept indicating which assets have been validated and the dates on which they were validated.
WWW. Steps to verify assets in Umoja / Transaction Code: ZAAVALAS
WWW.1. Launch the T-code from the Command field.

WWW.2. Select the Variant.
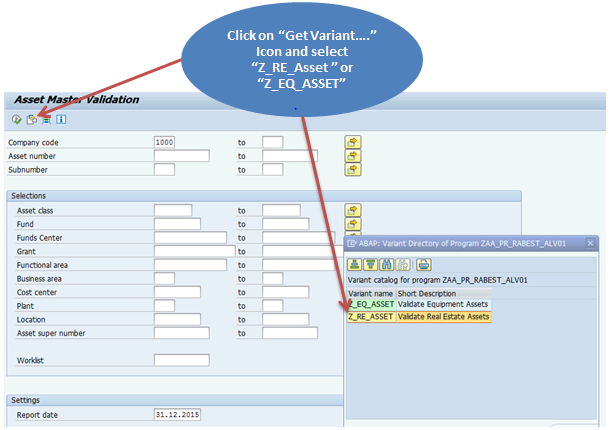
WWW.3. Click on All Selection icon to display all the available fields for entering the required parameters.
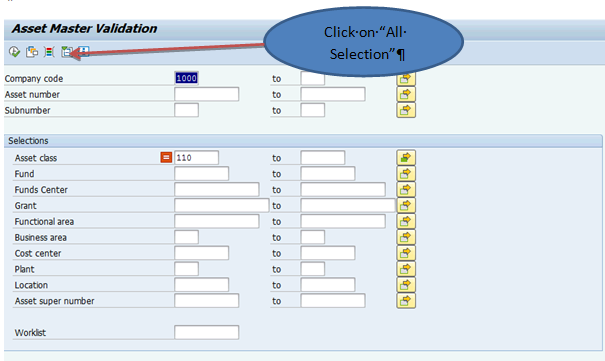
WWW.4. Populate the required parameters (Company code (1000), Asset class, Business area, Cost center and Report date). The Cost center is needed if you want the list for specific cost center, otherwise Business area is sufficient.

WWW.5. Press
Execute ![]() (F8)
to display the below report.
(F8)
to display the below report.
WWW.6. Select the layout /APV to get the required information to carry out physical.

WWW.7. The following report will be generated.

NOTE: Layout /APV is not displaying a parameter that you require such as Business area, Cost center etc., go to Change Layout icon and bring those parameters as needed. The report can be downloaded to Excel to prepare in the format of count sheet, print and use it for the count exercise. You can use the layout to add other parameters in the report.
WWW.8. Use T-code AS02 and enter the date of the physical inventory in the Asset Master Record in the Last inventory on field.

6 Asset Reporting
Umoja provides standard reports which will enable the user to display the asset master data specifications, extract/display data/information about the asset detail transactions for the given period of time and balances at specific date and movements for a given period. The following reports relate to the asset accounting module. The section of data chosen for each report can be set in the initial screen.
6.1 Asset Balances
This report displays the values of all assets in a depreciation area by different attributes such as by asset number, asset class, business area and cost center. The User can filter and customize this report based on how he or she would like to view assets.
XXX. Steps to generate the report / Transaction Code: S_ALR_87011963
XXX.1. To generate this report, start the transaction by double clicking the menu path below or by typing the transaction code in the Command box and pressing Enter.
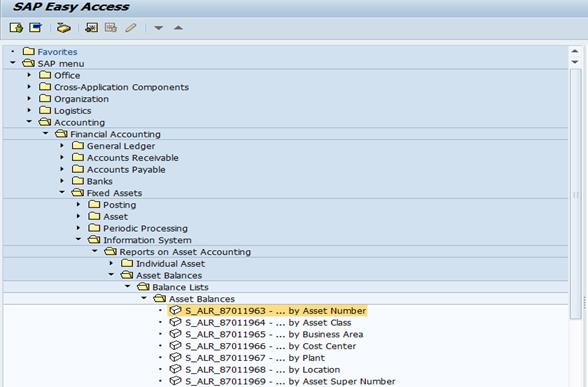
XXX.2. Press ![]() and fill in the required selection fields.
and fill in the required selection fields.
XXX.3. Click on the All Selections button to display more selection parameters.
XXX.4. Select the List assets button to display the report by asset list
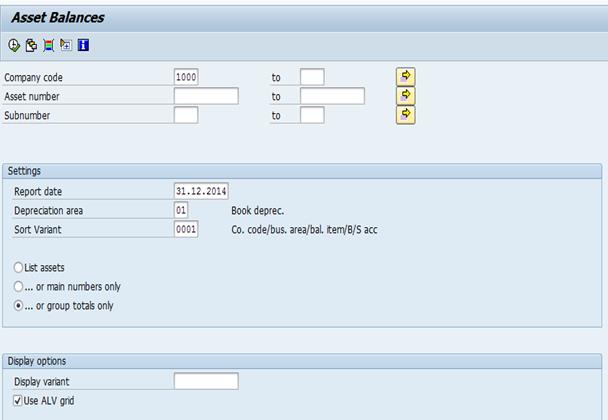
Additional selection parameters:


XXX.5. Fund - Enter the fund (Volume I or Volume II funds) using the Dynamic Selection functionality.
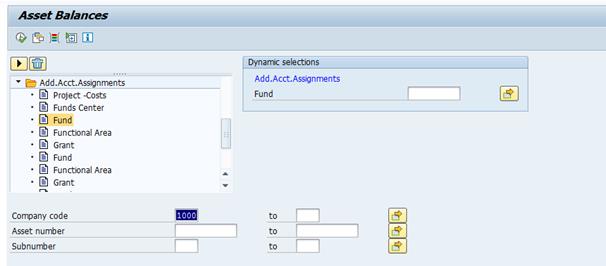
XXX.6. Execute ![]() (F8) to generate the report. The report will be generated in
the following format:
(F8) to generate the report. The report will be generated in
the following format:

Note that the user can filter, drill down and export to excel to view the report in a user friendly manner.
6.2 Asset History Sheet
This report is the most important and most comprehensive asset report for the year-end closing or for interim financial statements. It contains information from opening balances to the end of the year.
User role: FA.15: Financial_Accounting: Asset_Accounting_User and FA.16: Financial_Accounting: Asset_Accounting_Senior_User.
YYY. Steps to generate the report / Transaction Code: S_ALR_87011990
YYY.1. Start the transaction by double clicking the menu path below or by typing the transaction code in the Command box and pressing Enter.
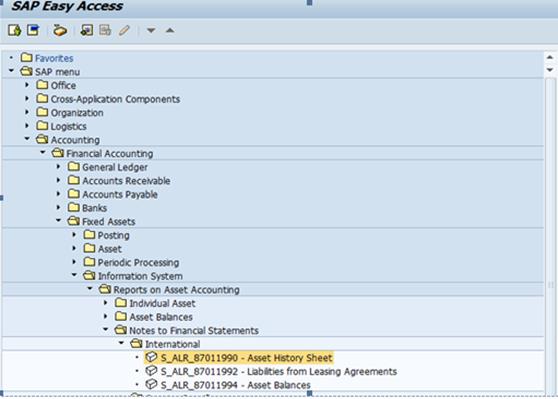
YYY.2. From
the Asset History Sheet screen, click on ![]() All
Selection to display all the fields for selection, setting and display
options and enter parameters as required.
All
Selection to display all the fields for selection, setting and display
options and enter parameters as required.
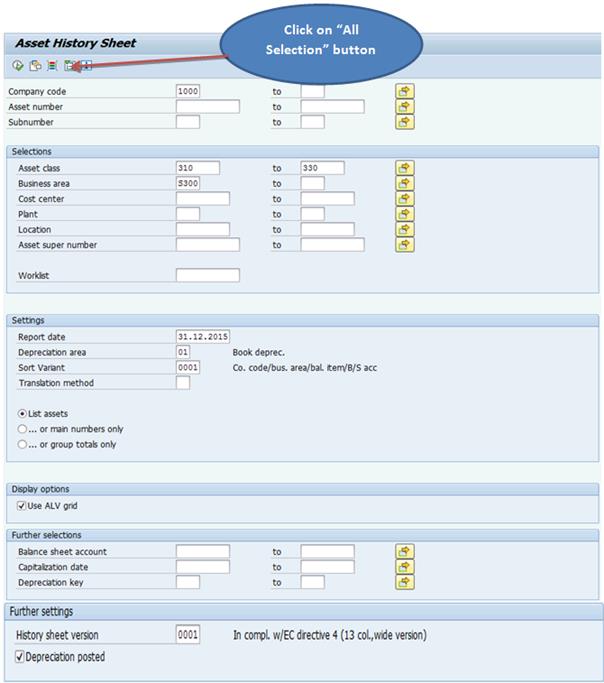
|
Field |
R/O/C |
Description |
|
Company code |
Required |
Always one company code Example: 1000 |
|
Asset number |
Optional |
Enter asset number if only certain asset history are required, otherwise leave blank to mean all. |
|
Sub-number |
optional |
Enter asset number if only certain asset history are required, otherwise leave blank to mean all. |
|
Asset Class |
Optional |
Enter the asset class you want to generate the asset history sheet, otherwise leave bank to mean all asset classes.. Example: 310 to 330 for Vehicle Asset Class. |
|
Business Area |
Required |
Enter your business area
Example:: S300: UNON |
|
Cost Center |
optional |
Enter cost center if you want to extract assets under a given cost center, otherwise leave blank for all. |
|
Other selection fields |
Optional |
Enter as required or leave blank |
|
Report date |
Required |
The report date is in the past or in the current fiscal year Example: 31.12.2015. Use this date to generate the data for 2015 financial statement. |
|
Depreciation Area |
Required |
Always 01: Book depreciation |
|
Sort Variant |
Required |
Enter 0001 |
|
List Assets/Main Number only/Group totals only |
Required |
Select one of the three radio button. Check the 'list Asset' to generate the detailed list of assets. |
|
Use ALV grid |
Optional |
Check the radio button to report in ALV layout which is much better as it displays the different transaction types in columns. |
|
History sheet version |
Required |
Enter 0001 |
|
Depreciation posted |
optional |
Check the 'Depreciation posted' radio button in order to generate only posted depreciation amounts. Otherwise, the depreciation including the planned one will be included. |
YYY.3. Fund - Enter the fund (Volume I or Volume II funds) using the Dynamic Selection functionality.

YYY.4. Execute ![]() (F8) to generate the report as shown below and use
report layout ASSET_HISTORY. This layout is set as a default and hence
there is no need for selection.
(F8) to generate the report as shown below and use
report layout ASSET_HISTORY. This layout is set as a default and hence
there is no need for selection.

YYY.5. You can download to Excel and do the necessary summary totals necessary report requirements for year-end reporting.
6.3 Ordinary Depreciation
This report displays the value of ordinary depreciation of assets for a fiscal year.
ZZZ. Steps to generate the report / Transaction Code: S_ALR_87012006
ZZZ.1. Start the transaction by double clicking the menu path below or by typing the transaction code in the Command box and pressing Enter.
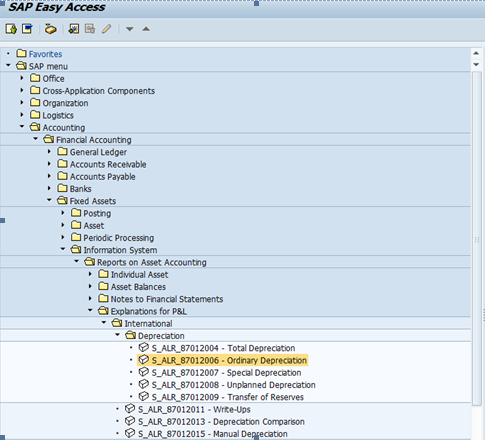
ZZZ.2. Press ![]() and fill in the required selection fields.
and fill in the required selection fields.
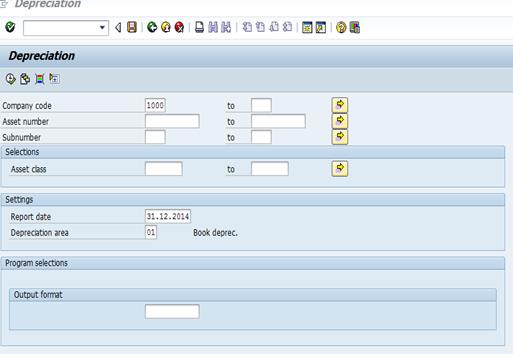
ZZZ.3. Execute ![]() (F8) to generate the report.
(F8) to generate the report.
ZZZ.4. The report will be generated in the following format for a given business area by asset class and asset number/description.

6.4 Unplanned Depreciation
This report displays the value of unplanned depreciation (impairment) of assets for a fiscal year.
AAAA. Steps to generate the report / Transaction Code: S_ALR_87012008
AAAA.1. Start the transaction by double clicking the menu path below or by typing the transaction code in the Command box and pressing Enter.

AAAA.2. Press ![]() and fill in the required selection fields.
and fill in the required selection fields.

AAAA.3. Execute ![]() (F8) to generate the report.
(F8) to generate the report.
AAAA.4. The report will be generated in the following format for a given business area by asset class and asset number/description.
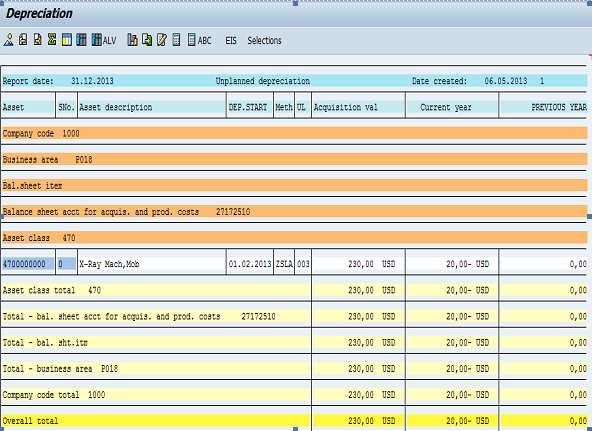
6.5 Asset Acquisitions, Retirements, Transfers and Transactions
BBBB. Steps to generate the reports:
BBBB.1. Use the following transaction codes/or menu paths to generate asset reports.
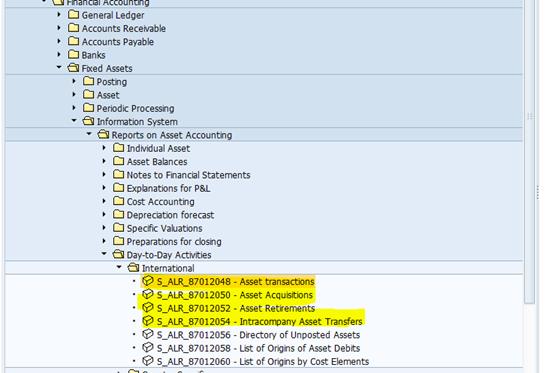
BBBB.2. Complete the selection fields for company code, business area, cost center, etc.
BBBB.2.1. All Asset Transactions / Transaction Code: S_ALR_87012048
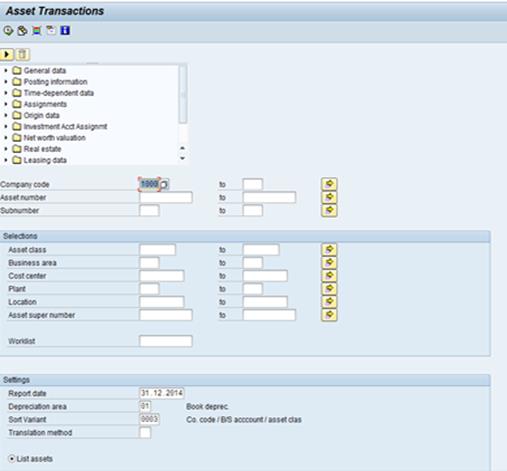
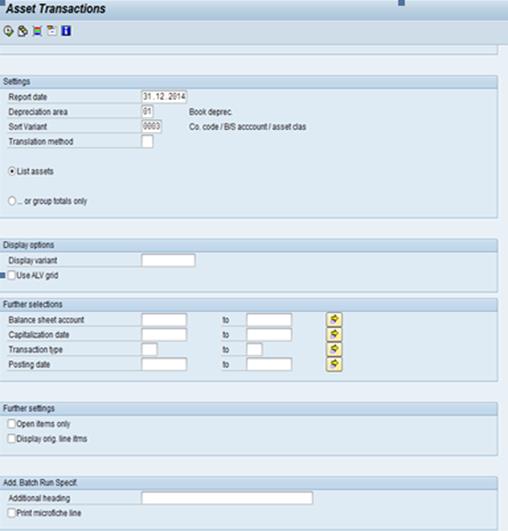
BBBB.2.2. Asset Acquisitions / Transaction Code: S_ALR_87012050
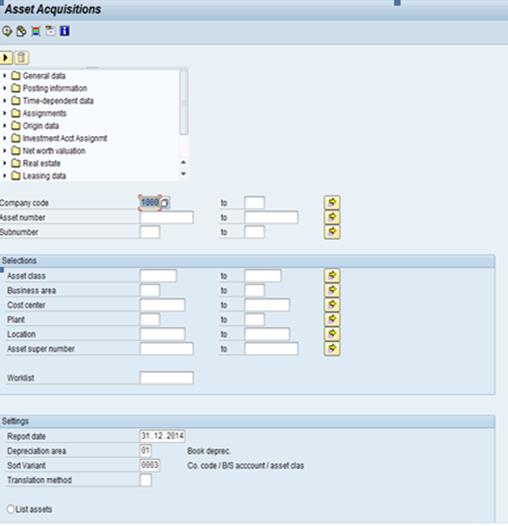
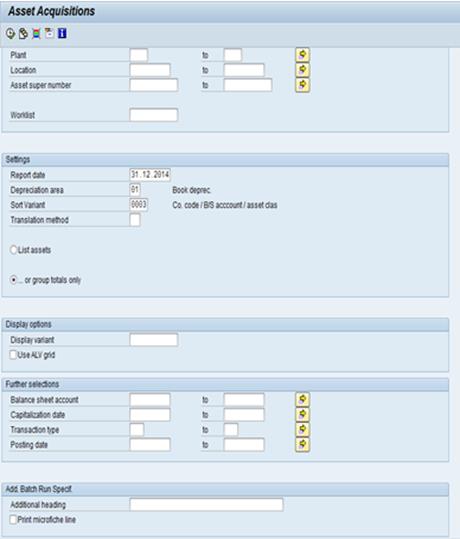
BBBB.2.3. Asset Retirements / Transaction Code: S_ALR_87012052

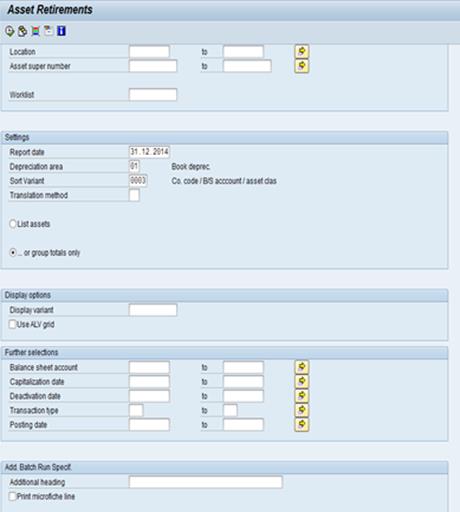
BBBB.2.4. Asset Transfers / Transaction code: S_ALR_87012054
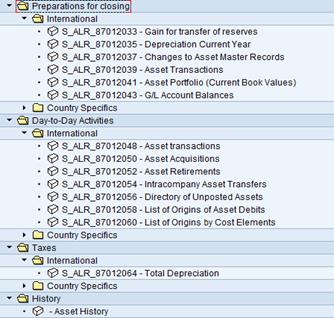
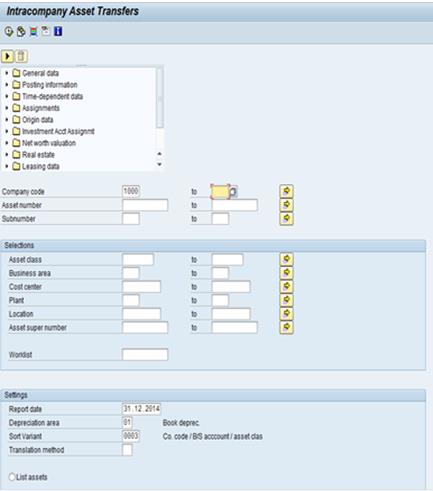
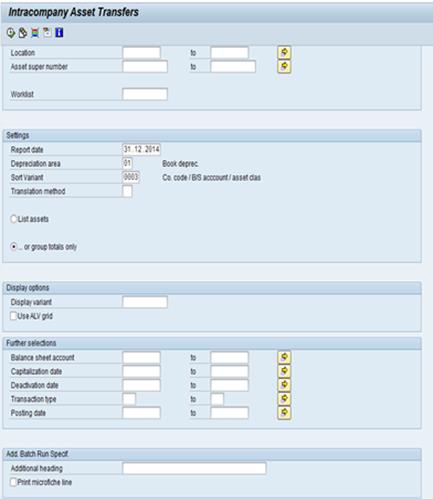
BBBB.3. Asset Master Validation / Transaction Code: ZAAVALAS
To view all UN assets in the Umoja ECC system, open the Asset Master Validation Report using the T-code ZAAVALAS. This displays all relevant asset master fields, including linkages to real estate objects for validation.
BBBB.3.1. Start the transaction by typing the transaction code ZAAVALAS in the T-code Command box.
BBBB.3.2. Press ![]() and fill in the required selection fields.
and fill in the required selection fields.

BBBB.3.3. Execute ![]() (F8) to generate the report.
(F8) to generate the report.
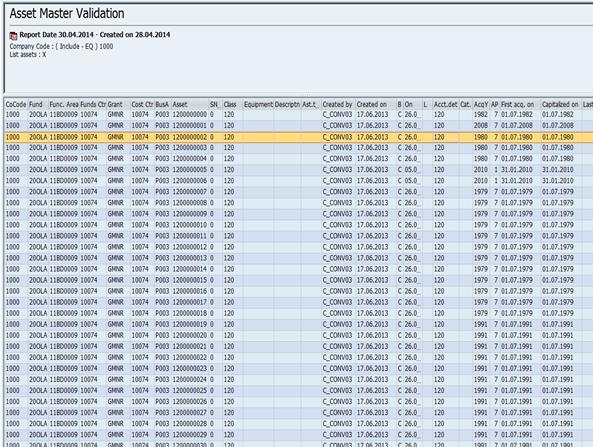
7 Asset Class and GL Mapping
|
IPSAS Asset Class |
Umoja GL |
Description |
Umoja Asset Class |
|
Land |
27141010 |
Land |
110 |
|
Building |
27142010 |
FA Building Fixed Cost |
|
|
27143010 |
FA Building Mobile Cost |
|
|
|
27143050 |
A PreFab Cost |
|
|
|
27842010 |
FA Building Fixed Accumulated Accum Dep |
120 |
|
|
27843010 |
FA Building Temporary and Mobile Accumulated Depr |
130 |
|
|
27843050 |
FA PreFab Accumulated Depreciation |
135 |
|
|
27442010 |
FA Building Fixed Accumulated Impairment |
|
|
|
27443010 |
FA Building Temporary and Mobile Acc Impair |
|
|
|
27443050 |
FA Prefab Impairment |
|
|
|
Infrastructure |
27146010 |
FA Infrastructure Cost |
|
|
27446010 |
FA Infrastructure assets Accumulated Impairment |
160 |
|
|
27846010 |
FA Infrastructure assets Accumulated Depr |
|
|
|
Furniture and Fittings |
27151010 |
FA Office Equipment Cost |
|
|
27152010 |
FA Furniture Cost |
|
|
|
27156010 |
FA Fixture and Fitting Cost |
210 |
|
|
27851010 |
FA Office Equipment Accumulated Depreciation |
220 |
|
|
27852010 |
FA Furniture Accumulated Depreciation |
230 |
|
|
27856010 |
FA Fixture and Fitting Accumulated Depreciation |
|
|
|
27451010 |
FA Office Equipment Accumulated Impairment |
|
|
|
27452010 |
FA Furniture Accumulated Impairment |
|
|
|
27456010 |
FA Fixture and Fitting Accumulated Impairment |
|
|
|
Vehicles |
27161010 |
FA Vehicle Light Wheeled Cost |
|
|
27162010 |
FA Heavy Wheeled Accumulated Impairment |
|
|
|
27163010 |
FA Vehicle Specialzd and AttachmntCost |
|
|
|
27166010 |
FA Vessel Cost |
|
|
|
27861010 |
FA Vehicle Light Wheeled Accumulated Depreciation |
310 |
|
|
27862010 |
FA Vehicle Heavy Wheeled Accumulated Depreciation |
320 |
|
|
27863010 |
FA Vehicle Specialized Accumulated Depreciation |
330 |
|
|
27866010 |
FA Vessel Accumulated Depreciation |
340 |
|
|
27461010 |
FA Vehicle Light Wheeled Accumulated Impairment |
|
|
|
27462010 |
FA Heavy Wheeled Accumulated Impairment |
|
|
|
27463010 |
FA Vehicle Specialized Accumulated Impairment |
|
|
|
27466010 |
FA Vessel Accumulated Impairment |
|
|
|
Communication and IT Equipment |
27171010 |
FA IT End User Equipment Cost |
|
|
27171020 |
FA IT Computer IT Network&IT Storage EquipmentCost |
|
|
|
27171510 |
FA Communication and Network Equipment Cost |
|
|
|
27172010 |
FA Audio Visual Equipment Cost |
|
|
|
27871010 |
FA IT End User Equipment Accumul Depreciation |
410 |
|
|
27871020 |
FA IT Computer IT Network&IT StorageEquipment Depr |
420 |
|
|
27871510 |
FA Communication and Network Equip Accum Depreciat |
430 |
|
|
27872010 |
FA Audio Visual Equipment Accumul Depreciation |
440 |
|
|
27471010 |
FA IT End User Equipment Accumul Impairment |
|
|
|
27471020 |
FA IT Computer IT Network&IT StorageEquipment Imp |
|
|
|
27471510 |
FA Communication and Network Equipm Accum Impairm |
|
|
|
27472010 |
FA Audio Visual Equipment Accum Impairm |
|
|
|
Machinery and Equipment |
27172510 |
FA Medical Equipment Cost |
|
|
27173010 |
FA Security and Safety Equipment Cost |
|
|
|
27173510 |
FA Mine Detection and Clearing Equip Cost |
|
|
|
27174010 |
FA Accomod and Retrigger Equip Cost |
|
|
|
27174510 |
FA Printing Equipment Cost |
|
|
|
27175010 |
FA Engineer andConstructLightEquipCost |
|
|
|
27175510 |
FA Engineer andConstructHeavyEquipCost |
470 |
|
|
27176010 |
FA WaterTreatandFuelDistribEquipCost |
480 |
|
|
27177010 |
FA Transportation Ground Equip Cost |
490 |
|
|
27872510 |
FA Medical Equipment Accumulated Depreciation |
500 |
|
|
27873010 |
FA Security and Safety Equipment Accum Depreciat |
510 |
|
|
27873510 |
FA Mine Detection and Clearing Equip Accum Deprec |
520 |
|
|
27874010 |
FA Accomod and Retrigger Equip Accum Depreciation |
530 |
|
|
27874510 |
FA Printing Equipment Accumul Depreciation |
540 |
|
|
27875010 |
FA Engineer and Construct Light Equip Accum Deprec |
550 |
|
|
27875510 |
FA Engineer and Construct Heavy Equip Accum Deprec |
|
|
|
27876010 |
FA Water Treat and Fuel Distrib Equipment Acc Depr |
|
|
|
27877010 |
FA Transport Ground Equip Accum Depn |
|
|
|
27472510 |
FA Medical Equipment Accum Impairm |
|
|
|
27473010 |
FA Security and Safety Equip Accum Impairm |
|
|
|
27473510 |
FA Mine Detection and Clearing Equip Accum Impairm |
|
|
|
27474010 |
FA Mine Detection and Clearing Equip Accum Impairm |
|
|
|
27474510 |
FA Printing Equipment Acc Impairm |
|
|
|
27475010 |
FA Engineer and Construct Light Equip Acc Impairm |
|
|
|
27475510 |
FA Engineer and Construct Heavy Equip Acc Impairm |
|
|
|
27476010 |
FA Water Treat and Fuel Distrib Equip Acc Impairm |
|
|
|
27477010 |
FA Transportation Ground Equip Accum Impairm |
|
|
|
Leasehold Improvements |
27144010 |
FA Leasehold Improvement Fixture Cost |
|
|
27145010 |
FA Leasehold Improvement Minor Work Cost |
|
|
|
27844010 |
FA Lease Improv Fixture and Fitting Accumul Depr |
140 |
|
|
27845010 |
FA Lease Improvt Minor Works Accumulated Depr |
150 |
|
|
27444010 |
FA Lease Improv Fixture and Fitting Accum Impair |
|
|
|
27445010 |
FA Lease Improvt Minor Works Accum Impair |
|
|
|
Asset Under Construction |
27191010 |
FA Asset under Construction Building Cost Man |
|
|
27195010 |
FA Asset under Construction Infrastructure Cost |
|
|
|
27194010 |
FA Asset under Construction Leasehold Improvement |
610 |
|
|
27299010 |
Intang Asset in Develop Software Cost |
620 |
|
|
27491010 |
FA Asset Construction Building Accum Impairment |
630 |
|
|
27495010 |
FA Asset Construction Infrastructure Accum Impairment |
840 |
|
|
27494010 |
FA Asset Construction Leasehold Accum Impairment |
|
|
|
27591010 |
Intang Asset in Development Accumul Impairment |
|
December, 2016