
1 Objective
Revenues received by the United Nations Secretariat arise both from exchange and non-exchange transactions. A significant portion of the United Nations (UN) operations is financed from non-exchange transactions, including assessed contributions from Member States and voluntary contributions in cash and in kind from Member States, business organizations or the community at large.
The UN also provides funds to an intermediary implementing partner or to an end beneficiary in the process of achieving its aims of facilitating cooperation in international law, international security, economic development, social progress, human rights, and achievement of world peace.
The arrangements of receiving funds (grants in) are referred to as donor agreements, while providing funds to implementing partners or end beneficiaries (grants out) are generally referred to as funding agreements. The objective of this chapter is to give a brief overview of the accounting lifecycle and relevant guidance on the accounting treatment of these arrangements. It details how an end user, based on the involved Umoja user profiles, should perform roles and responsibilities related to accounting of these arrangements.
Accounting of revenue from assessed contributions is primarily performed within the Accounts Receivable module of Umoja and accounting of revenue from voluntary contributions and related costs is primarily performed within the Grants Management module of Umoja.
This chapter is based on guidance under IPSAS 23: Revenue from non-exchange transactions (Taxes and Transfers), which deals with issues that need to be considered in recognizing, measuring and presenting revenue from non-exchange transactions.
2 Summary of IPSAS Accounting Policy
2.1 Grants in - Revenue
A non-exchange transaction is a transaction that is not an exchange transaction. In a non-exchange transaction, the UN either receives value from another entity without directly giving approximately equal value in exchange, or gives value to another entity without directly receiving approximately equal value in exchange.
Revenue recognition is based on an assessment of whether an asset or a liability has been created.
An inflow of resources from a non-exchange transaction that is recognized as an asset should be recognized as revenue, except to the extent that a liability is also recognized in respect of the same inflow. If the transaction has stipulations that amount to conditions attached, then a liability for these conditions is recognized.
Revenue = Asset - Liability
2.1.1 Assessed Contributions
For the regular budget and the international tribunals, contributions are assessed for the related biennial budgets over a two consecutive year budget period, beginning with an even-numbered year. Following the approval of the biennial budget, the amount of these contributions is apportioned between the two years for invoicing and payment. Assessed contributions are recognized as revenue at the beginning of the apportioned year in the relevant two year budget period.
For peacekeeping operations, contributions are assessed for each operation for the annual period (1 July - 30 June), or for the portion of the annual period for which the operation has a valid mandate. Following legislative action on appropriations and mandates, assessed contributions are recognized as revenue at the beginning of the apportioned period.
2.1.2 Voluntary Contributions
Voluntary contributions and other transfers, which are supported by legally enforceable agreements, are recognized as revenue at the time the agreement becomes binding, which is the point when the UN is deemed to acquire control of the asset, unless where resources provided are subject to specific conditions if above the threshold of USD 50,000 or when contributions are explicitly given for a specific year such as under the framework agreements for Junior Professional Officer services. Recognition of revenue is deferred until the start of those services or until those conditions have been satisfied.
Voluntary pledges and other promised donations that are not supported by legally enforceable agreements, with offer and acceptance conditions, are recognized as revenue when the arrangement becomes binding (upon acceptance of contribution letter, upon receipt of cash together with the contribution letter). Pledges and promised donations, as well as agreements not yet formalized by acceptance, are to be disclosed in the notes to the financial statements. Revenue is also recognized for voluntary contributions where cash receipt is formalized by acceptance or where cash disbursement is authorized for proceeds of fundraising activity conducted by another party over which the UN does not have control. In such cases, any outstanding balances will be disclosed in the notes to the financial statements.
Stipulations imposed by donors on the use of contributions are classified as either conditions or restrictions. For a stipulation to be a condition, it must include both a performance obligation to use the donation in a specified manner and an enforceable return obligation, by legal or administrative means, to return the donation if it is not used in the specified manner.
2.1.2.1 Return of Unused Funds
Return of unused funds to the donor is presented net of revenue in current period regardless of the period in which the funds were initially recognized.
2.1.2.2 Goods and Services In-Kind
In-kind contributions of goods, above recognition threshold of USD 20,000 for Volumes I & II (USD 5,000 for other UN Secretariat entities) per discrete contribution, are recognized as assets and revenue once it is probable that future economic benefits or service potential will flow to the UN and the fair value of those assets can be measured reliably.
In-kind contributions of service, above recognition threshold of USD 20,000 for Volumes I & II (USD 5,000 for other UN Secretariat entities) per discrete contribution, are not recognized however disclosed in the notes to the financial statements.
Contributions in kind are initially measured at their fair value at the date of receipt determined by reference to observable market values or by independent appraisals.
2.1.3 Disclosure of Voluntary Contributions
An item that possesses the essential characteristics of an asset but fails to satisfy the criteria for recognition may warrant disclosure in the notes as a contingent asset.
Voluntary contribution arrangements which are not binding (offer and acceptance) at the reporting date should be disclosed in the notes to the financial statements if measurable and probable. These may include:
· Agreements in the process of negotiation at the year-end;
· Agreements not signed by both parties;
· A pledge letter from donor received but not accepted by the UN;
· Verbal pledges at pledge conference supported by minutes; or
· The remaining outstanding balances of fundraising activities, which the UN has no control over (such as the United Nations Foundation contributions to the United Nations Fund for International Partnerships).
2.1.4 Programme Support Cost (PSC)
The UN refers to the charge that it collects on trust fund (or 'extra-budgetary'') expenditure as Programme Support Cost (PSC). This charge is intended to ensure that the additional costs of supporting activities financed from extra-budgetary contributions are not borne by assessed funds and /or other core resources that are central to the budget process at the UN Secretariat. The PSC charge agreed with the donor is included as part of voluntary contributions. It is expressed as a percentage of direct costs (actual expenditure and unliquidated obligations).
2.2 Grants out - Expenses
Certain program activities are implemented by executing entities/implementing partners. Executing entities/implementing partners typically include Governments, NGO's and the UN agencies. The UN advances funds to these implementing partners based on cash projections. Advances to implementing partners that are not expensed during the year (remain outstanding at the end of the year), are reported as an asset in the statement of financial position (except for Volume I where all advances to implementing partners where control is no longer with the UN are expensed upfront at the time of disbursement of the funds).
Executing entities/implementing partners provide the UN with certified expense reports documenting their use of resources, which are the basis for recording releasing the asset in the statement of financial position and recording program/project expenses in the statement of financial performance.
Where a transfer of funds is deemed to be an outright grant i.e. quick-impact projects, an expense is recognized at the point when the UN has a binding obligation to pay, which is generally upon signature/confirmation of the arrangement.
2.3 References
For more details on the IPSAS requirements regarding revenue from non-exchange transactions, refer to:
· The UN IPSAS Policy Framework
· The UN IPSAS Corporate Guidance - Funding Arrangements
· IPSAS 23 - Revenue from Non-Exchange Transactions (Taxes and Transfers)
3 Assessed Contributions
Assessed contributions refer to the appropriations, voted by the General Assembly to cover activities that are approved for funding from the main fund (also known as the regular budget), for peacekeeping operations, the international tribunals and the capital master plan.
3.1 Recognition Principle for Assessed Contributions
Revenue from non-exchange transactions is recognized by the UN to the extent that the transaction creates an asset without a corresponding liability.
Since there is no specific condition (liability) attached to assessed contributions it must be determined when assessed contributions meet the criteria for recognition of an asset, i.e. at the beginning of the period when the UN has right to claim the assessed contributions and it is probable that the UN will receive funds.
3.2 Umoja Overview
Assessments to Member States are included in the AR process area which is comprised of all business processes related to recording and tracking receivables. In Umoja, sub-ledger functionality is used for AR transactions arising from assessments to the Member States. It means AR transactions are posted to Business Partner (BP) accounts of the Member States first and the equivalent GL reconciliation accounts are automatically updated. All assessment contribution transactions are assigned with special GL indicator 'M' and configured to be defaulted at all BP (customer) line items to segregate the transactions from other AR transactions. The special GL indicator 'M' will call and update alternate reconciliation accounts; AR Assessed Member State 13101010 for Member States and AR Assessed Gov't Non Member State 13101110 for non-member States.
In Umoja Foundation, the assessment to Member States starts with interface of uploaded file which summarizes the calculation of the Member States assessments for a) the working capital fund, b) the regular budget (RB), c) the peacekeeping operations (PK), d) the international tribunals and e) the capital master plan (CMP), to record invoices and credit memos and to prepare assessment letters with attachments to the Member States.
The assessment process starts after the adoption of the RB & PK scales and budgeted amounts for RB, PK, Tribunals and CMP. After the adoption, the appropriated amounts (gross, staff assessment credits and net assessments) are apportioned using the applicable scale of assessments. The apportioned amounts (gross, staff assessment and net components) will be interfaced from the excel spreadsheets processed through the Assessed Contributions Management System to Umoja to post the assessments and the credits from peacekeeping operations to Member States AR accounts.
An assessment cockpit was custom developed to enable recognition of all transactions related to assessed contributions. For this development object, the assessment cockpit is designed to provide the capability to upload, approve, reverse, apply credits, generate reports and issue letter of assessments.
The preparation of assessment letters to Member States is governed by the financial rules and regulations of the UN. Once the invoices and related credits are approved for posting, the system will also post automatic entries by recognizing the revenue and receivables or credits in the FI - AR module.
The assessments are classified into different assessment types, and each of them is represented as a three character field with specific Umoja document type assigned:
|
Umoja Document Type |
Assessment Type |
Description |
|
YR |
RBU |
Regular Budget |
|
YA |
PKA |
Peacekeeping Assessments |
|
YT |
TPK |
Tribunals - Peacekeeping Assessments |
|
YP |
PKC |
Peacekeeping Credits |
|
YM |
CMP |
Capital Master Plan |
|
YB |
TRB |
Tribunals - Regular Budget |
|
YN |
NME |
Non-member States |
|
YW |
WCA |
Working Capital |
|
YH |
AHO* |
Ad Hoc |
*AHO Assessment Type is typically used for one-time type of assessment and cannot be classified under the established assessment types.
For incoming receipts from Member States, official receipt vouchers will be issued acknowledging the receipt and detailing the application of the cash to various invoices due for payment.
In the event of late payments, a dunning process creates reminders or notices automatically in Umoja. The dunning process involves review of AR open items and the periodical preparation of the dunning proposal, analysis of the dunning proposal with the purpose of selecting the Member States to whom the dunning letters will be sent, and creating and sending dunning letters to those customers (BP).
3.3 Umoja Process
This section explains the Umoja process steps applicable to recognition of revenue from assessed contributions, followed by an example with screenshots of accounting records generated from assessed contributions upload program in Umoja for regular budget.
A. The following process steps are applicable to recognition of revenue from assessed contributions.
The assessment to Member States starts with interface of uploaded file summarizing the calculation of the Member States assessments from the Assessed Contributions Management System (ACMS) to the Member States Assessment Cockpit.
A.1. Upload a document
A.1.1. Export the assessments worksheet from the Assessed Contributions Management System (ACMS) for upload to the Member States Assessment Cockpit.
Go to ACMS and select assessment to be uploaded, e.g. Type PKA.

A.1.2. Click Submit to Umoja.
A.1.3. When actions box pops up, click Save document.
![]()
A.1.4. Once download is complete, go to excel and open the file from downloads.
![]()
Note: The file is downloaded as a PKA file.
A.1.5. Once the file has been selected, click Open.
A.1.6. Select Delimited of Wizard then click Next.
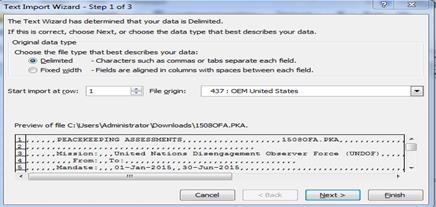
A.1.7. Ensure only Comma is selected and click Next.

A.1.8. Ensure General is selected. Then click Finish.
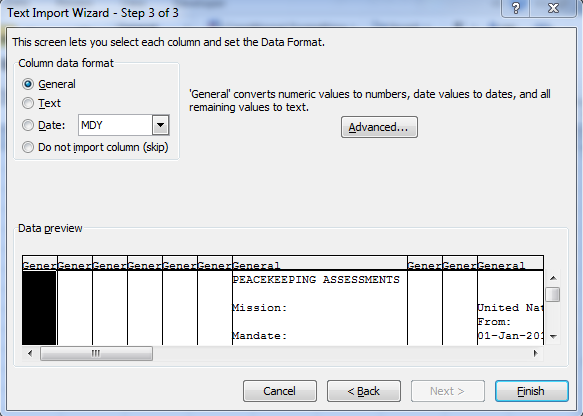
A.1.9. File opens as below.
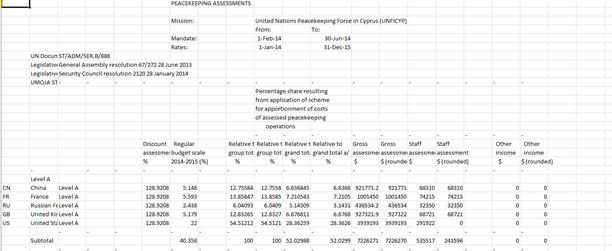
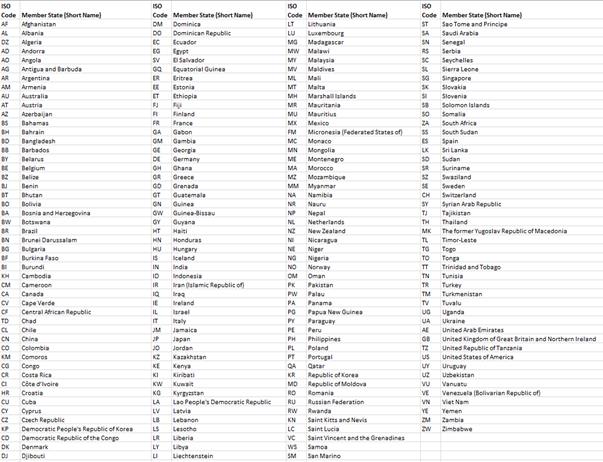
In Cell B10, add the word 'Reference'. In Cell C10, add the reference to be included with the assessment in the format 1/YY/XX where YY is the year and the XX refers to the # of the assessment. Insert ISO code, e.g. WS for Samoa and TL for Timor Leste. Remove the value that is in A263.
ISO codes for assessments:
A.1.10. Go to File > click Save As. Change name of file to format 'YYMMFFFFF.PKA.CSV', save type to CSV (Comma delimited) and save to C:\IAIS\data directory. Close file.
In files related to additional assessments, the word 'additional' should not be bracketed.
Note: Any word/character entered in this cell will be accepted during the upload. Besides, there is a validation built into the system. If an attempt is made to load a file with the same name for the same mandate period but the word additional is not included, then the upload will fail as the system will interpret this file as a duplicate file.
A.1.11. All files which are to be uploaded to the Member States Assessment Cockpit must meet requirements related to the file type and name format.
The following file types have been configures for use in Umoja.
|
Assessment Type |
Assessment Description |
Filename format |
Filename example |
|
RBU |
Regular Budget |
YYYY + '.' + Assess_Type |
2014.RBU |
|
NME |
Non-member States |
YYYY + '.' + Assess_Type |
2014.NME |
|
WCA |
Working Capital |
YYYY + '.' + Assess_Type |
2014.WCA |
|
CMP |
Capital Master Plan |
YYYY + '.' + Assess_Type |
2014.CMP |
|
TRB |
Tribunals - RB |
YYYY FFFFF+ '.' + Assess_Type |
201420CUA.TRB |
|
AHO |
Ad Hoc |
YYMMPPPP +'.' + Assess_Type |
1408PPPP.AHO |
|
PKA |
Peacekeeping Assessments |
YYMMFFFFF +'.' + Assess_Type |
140820CUA.PKA |
|
TPK |
Tribunals PKA |
YYMMFFFFF +'.' + Assess_Type |
140160RMT.TPK |
|
PKC |
Peacekeeping Credits |
YYMMFFFFFAA + '.' + Assess_Type |
140620CUAGG.PKC |
A.1.12. Go to Assessment Cockpit - the T-code to access the Member States Assessment Cockpit is ZARASSESS to upload, approve, reverse as indicated below.
Enter the T-code is ZARASSESS in the Command Field.
![]()
Click the Enter icon ![]() . The Member Assessment Credits screen is
displayed.
. The Member Assessment Credits screen is
displayed.

The AR processor will select Upload to upload interface file.
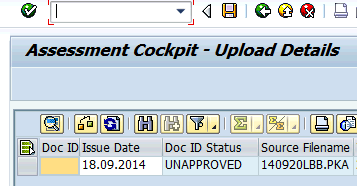
A.1.13. Enter the selection criteria
The AR processor will enter values in selection screen:
· Document Date - enter the date of the document to be uploaded. This can be the same as the current date.
· Posting Date - defaults to the current date, but may be defined as the date the assessment is posted to the system.
·
File Location - the file to be uploaded is selected by clicking on the
icon ![]() .
.
· Variant
Once file has been selected, click the Execute button
![]() .
.
A.1.14. Run in test mode
The system performs the business validations e.g. no duplicate file is uploaded twice. The AR processor reviews error messages provided and/or the line items from upload file.
Once upload has been successful, all entries should be verified to match the uploaded file, including header information. Issue date can be modified at this stage to match the actual issue date of the assessment.
A.1.15. Save the upload in Assessment Cockpit
Once details of the upload have been confirmed, click the
save button at the top of the screen to post the uploaded assessment ![]() .
Once saved, the system will generate a Y* document number .The system sends
notification message to the AR Approver based on workflow table.
.
Once saved, the system will generate a Y* document number .The system sends
notification message to the AR Approver based on workflow table.
A.2. Approving uploaded documents
A.2.1. Go to Assessment Cockpit - T-code ZARASSESS.
The AR Approver will go to Assessment Cockpit and select Approve to review the uploaded file.
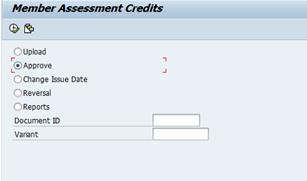
Within the Document ID tab, select
the document to be approved. Click Execute![]() .
.
A.2.2. The new screen Assessment Cockpit-Approve/Reject Details is displayed. At this stage, the document can either be approved (posted) or canceled (deleted).

A.2.2.1. To approve, select Approve (F8) and the system prompts for confirmation to confirm the approval of the document.

Click the ![]() for yes and the
for yes and the ![]() for no. The approval process may take a few minutes. If no is
selected, the system returns to the selection screen and the document needs to
be selected again.
for no. The approval process may take a few minutes. If no is
selected, the system returns to the selection screen and the document needs to
be selected again.
If approved, documents will be posted in Umoja and Assessment tables will be updated.
A.2.2.2. If Cancel is selected, the system requests confirmation if the uploaded records are to be deleted.

Click the ![]() for yes and the
for yes and the ![]() for no. If the
for no. If the ![]() is selected, the document is deleted and the user receives a
message confirmation.
is selected, the document is deleted and the user receives a
message confirmation.
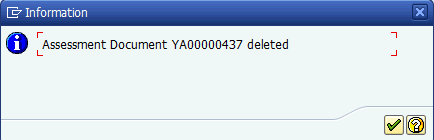
If rejected, a notification message will be sent to the AR processor to make the necessary corrections and repeat the process steps.
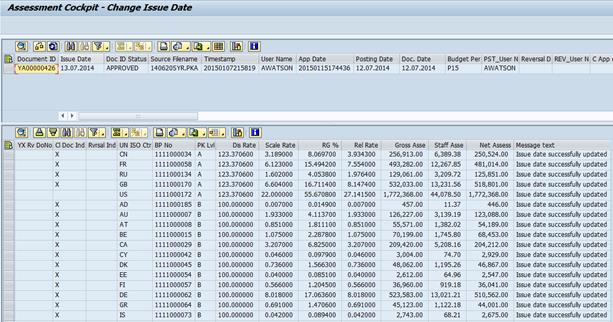
A.3. Change issue date after document has been approved
After a document has been approved, it is possible to change the issue date of the approved documents. This will have an impact on the ageing of the related AR document.
A.3.1. Go to Assessment Cockpit - T-code ZARASSESS.
The AR Approver will go to Assessment Cockpit and select Change Issue Date to review the upload file.
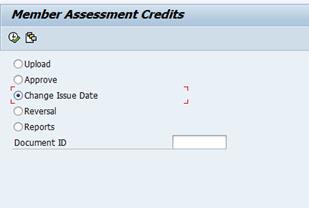
The correct document is selected either
by typing the document number in or by clicking the icon ![]() to
select the document.
to
select the document.
A.3.2.
Once the document has been selected, click the Execute
button ![]() .
The issue date can now be manually changed and the save button should be
clicked to confirm the change.
.
The issue date can now be manually changed and the save button should be
clicked to confirm the change.
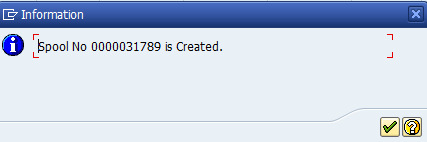
A.3.3.
Once the ![]() is
selected, an information box is displayed indicating that a spool has been
created and the message 'Issue date has been updated' is visible by line item.
is
selected, an information box is displayed indicating that a spool has been
created and the message 'Issue date has been updated' is visible by line item.
A.4. Reversal
If an approved document needs to be reversed, a process exists to reverse documents either in their entirety or not at all.
A.4.1. Go to Assessment Cockpit - T-code ZARASSESS.
The AR Approver will go to Assessment Cockpit and select Reversal to reverse all posted documents per upload file.
Select the document to be reversed and
click the Execute button ![]() .
.
A.4.2. The Assessment Cockpit - Reverse Details screen appears. The screen contains the option to reverse.
A.4.3. Enter the selection criteria
The AR Approver will enter values in selection screen.
A.4.4. Run in test mode
The system triggers business validations e.g. reversal is not allowed for open items with incoming payments applied. If any if the related AR documents have a payment or credit applied against it, this must be undone before the reversal occurs. The AR Approver reviews any error messages provided and/or the line items subject for reversal.
A.4.5. Run in actual mode
Upon clicking reverse, the confirmation box pops up. Clicking the green tick confirms that the reversal should proceed.
Note: the reversal process takes time as it needs to reset and reverse each clearing document, reverse each credit memo and then reverse each AR document.
The system reverses all documents originally posted from upload process and creates reversal documents. Umoja and Assessment tables are updated.
A.4.6. Generate the log report
When complete, document status changes to Reversed and the relevant reversal document numbers are indicated.
Additional information on the reversal process:
The clearing document generated in the cockpit acts as a knot between the credit memo and the account receivable. During the reversal process, this knot must first be undone (reset) before the clearing document can be reversed. This reset and reversal process of the clearing memo is independent of the status of the credit memo and account receivable entry, and cannot be undone once it has begun.
The system is configured as an all or nothing system. Therefore, if for any reason the credit memo or accounts receivable cannot be reversed, the status will not reverse the existing entries until the hindrance is removed.
A.5. Generate Reports
Based on the current design, documents can be in the status of Approved, Unapproved, Creditsapp (Credits Applied), Reversed, Deleted or Revinprog (reversal in progress).
Approved: Document which has been uploaded has passed the validations for approval and has generated the relevant accounting documents - Accounts Receivable, Credit Memo and Clearing Document (for Staff Assessment portion of the assessment).
Unapproved: Assessment worksheet has successfully passed the built in validations for uploading and has been uploaded and saved.
Creditsapp: Used to indicate that the credits have been applied for the particular fund. Credits are loaded using as a PKC assessment.
Reversed: Indicates that all documents generated by the approval process in the cockpit have been reversed. Documents can only be reversed if all subordinate documents can be reversed as no follow-on transactions have been processed against these documents.
Deleted: After a document has been uploaded and saved, it is possible to delete the document prior to approval. In this case, the system maintains a record of the header information related to the document uploaded, but there is no line item view available.
Revinprog: This relates to the reversal process. When the reversal process has begun, the system first reverses the clearing document that has been generated. It then tries to reverse the credit memo against the account receivable document which has been created. If for any reason, the credit memo is unable to be cleared against the receivable document, the reversal process will halt, advise of an error and cannot be restarted until the problem has been resolved.
A.5.1. Go to Assessment Cockpit - T-code ZARASSESS
The AR processor will go to Assessment Cockpit and select Reports available for uploaded records, posted records, reversed records and by document ID status.
A.5.2.
Click the Execute button ![]() and
the selection criteria screen opens.
and
the selection criteria screen opens.

The AR Processor will enter values in selection screen, and this screen can be narrowed according to the selected criteria:
· Document ID
· Issue Date
· Posting Date in the Document
· Fund
· Source Filename
· Assessment Type
It is also possible to do a free search by simply clicking the Execute button without selecting any criteria.
A.5.3. Run in test mode
A.5.3.1. The system triggers business validations. The AR processor reviews the line items in report. Results returned indicate the following fields:
· Document ID
· Issue Date
· Document ID Status
· Source Filename
· Timestamp
· User Name
· Approval Date (if applicable)
· Posting Date
· Posting User
· Reversal User (if applicable)
· Posting Period
· Fiscal Year
A.5.3.2. In order to see the line details related to a particular document ID, double click on the document ID and the details are displayed in the screen preview below.
A.5.3.3. In order to approve the document, the document ID number should be copied /noted. Click the Back button in order to go back to Approval section.
A.5.4. Run in actual mode
The AR processor generates a report. Umoja has a spool report format which maintains a record of all files processed in the cockpit. If an error is generated during the upload, approval, change issue date or reversal process, the system generates a report which is similar to an audit trail. This report can be reviewed and saved to excel (for example).
To view the report in detail, click on the icon in the column Type for additional details.

A.6. Issue assessment letter
The AR processor generates assessment letters in Umoja for the regular budget, peacekeeping operations, the international tribunals, peacekeeping credits for inactive funds and non-member states.
The T-code to access the Custom Assessment Letter Print Program is ZARASSESSLTR.
A.6.1. Assess the Custom Assessment Letter Print Program - enter the T-code ZARASSESSLTR in the Command Field.
![]()
A.6.2.
Click the Enter icon ![]() .
The Custom Assessment Letter Print Program is displayed.
.
The Custom Assessment Letter Print Program is displayed.
A.6.3.
In the Letter Type field, enter the letter type to the assessment
which needs to be prepared. Current options are shown below and can be accessed
by clicking the icon ![]() .
.

Note: All three tribunals (ICTY, ICTR and IRMCT) are available using the ICT letter type.
A.6.4. Enter the selection criteria. Once letter type has been selected, hit Enter.
The AR Processor will enter values in selection screen:
· Letter type
· Reference - reference field is what ties different assessments together e.g. the regular budget and adjustment to working capital. The reference is determined outside of the system and must be communicated prior to the preparation of the assessment letters. Within the reference selection, Umoja will provide a list of all uploaded files which relate to the assessment type chosen.
· Fund - should populate and this should be validated against the assessment being printed.
· Member State
There are enhancements by the letter type chosen.
A.6.4.1. Letter type RBU
If RBU is chosen, the screen changes to allow for local currency requirements and the working capital if applicable.
In the case of the regular budget assessment letter to be issued, once the RBU letter type is selected, hit the Enter button. An additional selection screen pops up with local currency requirements and working capital applicable.
The local currency requirements should be used for those Member States who are allowed to make their contributions to the regular budget in their local currency. These member states can be selected as a single value or multiple values.
In the year where there is an adjustment for the working capital, the check box next to Working Capital Applicable must be selected and the biennium years must be filled in. e.g. 2016 to 2017.

If there is no working capital adjustment, this box does not need to be checked.
A.6.4.2. Letter type PKA
In the case of the peacekeeping assessment letter to be issued, once the PKA letter type is selected, hit the Enter button. An additional selection is displayed for the translation template.
The fields to be modified are:
· Language
· Reference - the unique identifier which links the related assessment schedules together
· Legislative Basis - updated based on the assessment being issued
· Security Council Resolution - updated based on the assessment being issued
· Mandate Beginning - Mandate End - updated based on the assessment being issued
· Additional - the logic in Umoja takes this word from the uploaded document. Therefore, this must not be modified or removed from the translation template.
Once the template has been finalized, select all from the word Language - across and down, copy, open Notepad and paste to notepad. Save the file and close.
Return to Umoja, and in the translation template field, click on the translation template field, then select and search for the location of the .txt file. Choose the file and then click on the Execute button.
A.6.4.3. Letter type ICT
In the case of the international tribunals, the ICT assessment letter type is to be used.
As of September 2015, there are three criminal tribunals - the International Criminal Tribunal for Yugoslavia (ICTY), the International Criminal Tribunal for Rwanda (ICTR) and the International Residual Mechanisms Criminal Tribunal (IRMCT).
Once the ICT letter type is selected, hit the Enter button. An additional selection is displayed for the translation template and the type of tribunal.
Due to the option of the Member States to pay their contributions to the ICTY in Euros to a Euro-currency denominated account, there is a separate letter version used for ICTY.
A.6.4.4. Letter type PKC
Letter type PKC is used when credits are being returned to the Member States related to inactive/closed operations and when there is no accompanying assessment. Once the letter type is selected, hit Enter.
Follow the steps above to select the reference and validate the fund. Upload translation template and execute.
A.6.4.5. Letter type NME
The letter type NME is to be used for letters related to non-member state assessments for the regular budget.
A.6.4.6. Variants
The Member State Assessment Letter screen also allows the issuer to issue letters for a specific Member State or group of Member States. There is also a variant which is customized according to the areas of responsibility of the Contributions Service User.
This level of specification will generate letters only for those under the specified area of responsibility.
A.6.5.
Once all parameters have been included, click the Execute
button ![]() .
.
Depending on the number of assessment letters being generated, it may take a few moments. Once the letters are generated, enter 'pdf!' in the Command bar to obtain a pdf view of the letters generated.

A.6.6. Review assessment letter/Inquire Member State account balances.
Review letters to confirm outstanding balance match accounting records.
Note: The balance shown will include the new assessment and all credits. If verifying by column, review member state account balance and include/exclude new assessment as appropriate.
A.6.7. Assess the Custom Assessment Letter Print Program - enter the T-code ZARFBL5N in the Command Field.
![]()
A.6.8.
Click the Enter icon ![]() .
The Selection Parameter screen is displayed.
.
The Selection Parameter screen is displayed.
A.6.9. Enter the selection criteria:
· Customer Account - enter the customer account number (BP number) enquired. If running for all Member States, either should be left blank or the range 1111000000 to 1111000194 (and 1200000000 for the Holy See) is entered.
· Special G/L indicator
· Fund
· Line Item Selection - select Open Items and remove the Open at key date if it automatically gets populated. If the status as of a particular date is enquired, the date is included as the system defaults to the current date.
·
Type - ensure that Special G/L Transactions is
checked. The icon ![]() allows
the user to enter multiple selections in any of the fields.
allows
the user to enter multiple selections in any of the fields.


A.6.10.
Variant - to access the variant, when the T-code opens,
click the icon ![]() .
.
A.6.11. The new screen Find Variant is displayed.
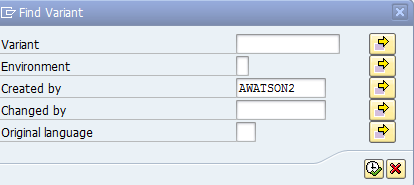
If the user has more than one variant, double click on the one that has the variant name enquired. The variant can be pulled up by typing the variant name in the Variant filed and executing.
A.6.12. Save / Print assessment letter.
If all information is accurate, pdf-files are saved in shared location and letters are printed for signing.
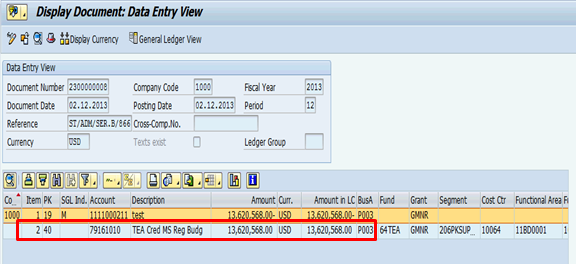
Example: Revenue recognition for assessed contributions
On 27 December 2014 under the General Assembly resolution, assessed contribution of XYZ (Member State with staff assessment) was determined. Additional facts:
· The UN has a right to receive USD 131,975,525 from country XYZ and Staff assessment credit amounted to USD 13,620,568.
· The UN receives first installment of USD 1,000,000 from country XYZ.
· Country XYZ has historically transferred agreed upon funds to the UN without default.
Accounting entry on recognition of revenue:
|
Date |
GL |
GL short description |
Debit |
Credit |
|
1 Jan 2015 |
1111XXXXXX* |
AR Assess MembSt |
131,975,525 |
|
|
|
79161010 |
TEA Credit Given to Member State Regular Budget |
13,620,568 |
|
|
|
61101010** |
Con Assess Gov MS |
|
145,596,093 |
* This is a reconciliation account. Using the sub-ledger functionality, postings will go directly to BP (customer) #.
** Assessed contributions from non-member States will be presented as part of Assessed Contributions Receivable on the statement of financial position and the scheme of accounting entry will be similar to above, however GL code for statement of financial performance should be 69241110.
· AR document type YR is for Regular Budget.
o Special GL indicator M is assigned to customer line items.
o Data entry view requires the BP customer account number which calls the alternate reconciliation account 13101010 for Member States.
o Assessed contributions are recorded at Gross; Assessment (line1) + Staff assessment credits (line 2) for Member States with assessments.
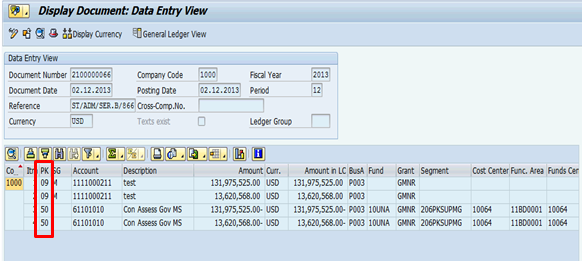
· Credit Memo document type YC is automatically created from interface program to reduce the AR balance by staff assessment credit component.
o Staff assessment credit is charged to Tax Equalization Account (TEA) account 79161010 for regular budget.
o Net assessed contributions receivable from Member State is USD 131,975,525 while total revenue from assessed contributions is USD 145,596,093 as summarized in GL account Contribution Assessed Gov't 61101010. The GL account is maintained as auto posting only, it means it is only through the upload program that the account can be posted.
Accounting entry on receipt of funds from Member State:
|
Date |
GL |
GL short description |
Debit |
Credit |
|
Date of receipt |
11011010 |
Csh HQ USD Nominal |
1,000,000 |
|
|
|
1111XXXXXX* |
AR Assess MembSt |
|
1,000,000 |
* This is a reconciliation account. Using the sub-ledger functionality, postings will go directly to BP (customer) #.
· Incoming Payment received against document type YR document is processed through automatic upload of bank statements. Refer to section 3.3.2 of Chapter on Cash Management for further guidance on incoming payments.
o Outstanding receivable from the Member State is reduced by incoming payment received of USD 1,000,000.

o The receipt of incoming payment will go to Treasury Fund 64VQA, the transaction will cross business areas that will trigger creation of another accounting document (document # 1700032548) to balance the funds at both business areas and funds.
· Display Sub-ledger account details of Member State using transaction code FBL5N or ZARFBL5N. For detailed steps refer to section 3.2.3 of Chapter on Accounts Receivable.
o Partial incoming payment of USD 1,000,000 from document type DZ was posted. Staff assessment credit from document type YR is offset against credit memo from document type YS.
o Net outstanding receivable from Member State is USD 130,975,525.

For guidance on allowances for estimated irrecoverable receivables refer to section 3.3 of Chapter on Accounts Receivable.
4 Voluntary Contributions
In addition to the program work financed from assessed contributions (regular budget, peacekeeping, tribunals), additional activities are carried out by the UN in connection with those areas of work that are financed from voluntary contributions. These are extra budgetary resources that generally support or supplement the substantive work program of the UN, provide humanitarian and/or other relief assistance, and provide technical assistance to developing countries either through multilateral arrangements or through the UN System.
4.1 Recognition Principle for Voluntary Contributions
The basic revenue recognition principle remains the same as explained above. Revenue recognition is based on asset recognition, when the United Nations gains control over an asset, unless there are corresponding conditions that would require the recognition of a liability if above the threshold of USD 50,000.
Compared to assessed contributions, where the UN has control over the manner in which the funds are managed, voluntary contributions usually have certain stipulations with regard to the usage of the funds / transferred assets.
From an accounting perspective, it is very critical that all the stipulations are identified and further assessed to determine whether the stipulation is a condition or restriction on the transferred asset. This is critical because a liability should be recorded for all conditions on the transferred assets above the threshold of USD 50,000, but not for restrictions on the transferred assets.
Restrictions are stipulations that limit or direct the purposes for which a transferred asset may be used, but do not specify that future economic benefits or service potential is required to be returned to the transferor if not deployed as specified. For a stipulation to be a condition, it must include both a performance obligation to use the donation in a specified manner and an enforceable return obligation, by legal or administrative means, to return the donation if it is not used in the specified manner.
For fundraising activities conducted by another party over which the United Nations does not have control (such as the United Nations Foundation contributions to the United Nations Fund for International Partnerships), revenue is recognized at the time of receipt of the Cash Disbursement Authorization, which indicates exactly the amount to be contributed. The remaining portion of the funding will be disclosed in the notes to the financial statement.
4.1.1 Voluntary Contributions - Non-Conditional
Similar to assessed contributions, there is no specific condition (liability) attached to non-conditional voluntary contributions, it must be determined when non-conditional voluntary contributions meet the criteria for recognition of an asset.
4.1.2 Voluntary Contributions - Conditional
Initial recognition
The following is recognized for conditional funding agreements at initial recognition:
a) An asset measured at its fair value as at the date of acquisition;
b) A liability for the conditions attached to the agreement measured at the best estimate of the amount required to settle the obligation at the reporting date. In most arrangements at the UN where conditions exist, the liability will approximate to the fair value of the corresponding asset at initial recognition; and
c) Revenue to the extent that a liability is not recognized.
Revenue is recognized for all conditional arrangements up to the threshold of USD 50,000.
Subsequent recognition
As the UN satisfies an obligation recognized as a liability (i.e. as the condition is satisfied) in respect of a conditional funding agreement, there will be a reduction in the carrying amount of the liability and recognition of revenue equal to the amount of reduction in liability.
The timing of subsequent revenue recognition is determined by the nature of the conditions and their settlement. For example, if a liability was initially recognized for a condition that specifies that the UN is to provide specific goods or services to third parties, then revenue is recognized as those specific goods or services are provided.
All European Commission (EC) agreements under the Financial and Administrative Framework Agreement are examples of conditional arrangement because the EC has requested refunds in the past where the funds were not used in accordance with the agreement.
4.1.3 Multi-Year Voluntary Contributions
Multi‐year voluntary contributions include arrangements in which the undertaking to provide funding is spread across more than one accounting period. Revenue is recognized upfront only if funding is not linked / earmarked to a specific year such as under the framework agreements for Junior Professional Officer services and there are no conditions in the arrangement. For more guidance on accounting for multi-year voluntary contributions refer to Corporate Guidance on Funding Arrangements.
4.1.4 In-Kind Voluntary Contributions
IPSAS 23 provides the following guidance for the classification of 'goods in kind' and 'services in kind':
· Goods in kind are tangible assets transferred to the organization in a non-exchange transaction.
· Services in kind are services provided to the organization in a non-exchange transaction.
Further IPSAS 31 provides examples of certain assets to be classified as 'Intangible assets' and IPSAS 23 covers assets received under donated 'right-to-use' arrangement, i.e. through non-exchange transaction.
Since IPSAS guidance is very generic, professional judgment should be applied to determine how the gift or donation should be classified. For more guidance on accounting treatment of Revenue from non-exchange transactions refer to Corporate Guidance on Funding Arrangements.
4.1.4.1 Recognition and Measurement of Goods In-Kind
The principle of recognizing revenue for 'goods in-kind' is consistent with guidance for non-exchange transactions. The assets acquired through non-exchange transactions should be measured at their fair value as at the date of acquisition.
A threshold of USD 20,000 for Volumes I and II (USD 5,000 for other UN reporting entities) per discrete contribution is in place regarding the recognition of goods in kind, except for the following commodity groups for which the lower threshold of USD 5,000 is applicable: a) Vehicles; b) Prefabricated buildings; c) Satellite communication systems; d) Generators; and e) Network equipment.
Refer to section 4.3.5.4 for processing goods in kind in Umoja.
4.1.4.2 Disclosure for Services In-Kind
The UN does not recognize services in-kind. However, the disclosure of the nature and type of services in kind received during the reporting period is required if they are material. The disclosure in the notes to the financial statements should include information about services in-kind with a value above USD 20,000 for Volume I and II (USD 5,000 for other UN reporting entities), per discrete contribution, measured at fair value.
4.2 Grants Management Module Overview
Voluntary contributions are managed and recorded in Umoja Grants Management (GM) module.
The Business Model consists of two parts:
· Grantee Management to cover the management of the contributions (both monetary and contributions in kind) from the Donors (Sponsors). In Grantee Management, the UN acts as a Grantee and its Donors play a Grantor role.
· Grantor Management to cover the part of the business where resources, both monetary and in kind, are provided by the UN to its Grantees. In this case, the UN acts as a Grantor.
With regard to the means of financing, Grantee Management covers only voluntary contributions. Grantor Management covers the distribution of funds not only received through voluntary contributions but also through assessed contributions.
The above end-to-end Grantee and Grantor Management business model consists of following process:
· Signing Donor Agreements;
· Funding Program and Project Activities;
· Release Spending Authority;
· Grant execution;
· Grant closure.
4.2.1 GM Module - Key Terms
· Fund is a separate and distinct accounting object containing a self-balancing set of accounts used to identify the source and use of funding from voluntary contributions. It is established for the purpose of financing wholly or in part the cost of program and project activities consistent with the UN's aims and policies.
· Grant is an object that is used to maintain the terms and conditions of the Grantor's contributions.
o In cases where the UN is a Grantee, that is the UN receives contributions from Donors, the Grant or a group of grants represent the Donor's Agreement. A Sponsor (a donor), is a government, institution or individual that provides funding to the UN.
o In cases where the UN is a Grantor, that is the UN gives money to an Implementing Partner, the Grant or a group of grants represent the Funding Agreement.
o Grants can be grouped for reporting purposes.
Grant is a 'central' element of the Grants Management process which ties together all the Grants Management Master Data objects, e.g. Fund, Sponsor, Sponsored Program, Sponsored Classes, Grant Budget Rules.
The Grant Type is a key master data element that allows management of Grants to meet both the donor's requirements and the financial recording and reporting requirements of the UN. Grant type is used to define Grant's controls and behavior. Once the Grant is saved, the Grant Type cannot be changed.
The four grant types that exist in Umoja are as follows:
· A Simple (S1) grant is used when a single donor contributes and the UN is required to report on the specific donor contribution, no comingling of expenditures with other donor's contributions.
· A Resource Mobilization (RM / R1) grant is used when a donor contributes to a funding pool. The R1 grant will only record revenue and not expenditures.
· A Main Implementation (MIG / M1) grant is created to provide funding to program and project activities within the UN. The M1 grant will be logically linked to multiple R1 grants which collect revenues while the M1 grant will be used to record pooled expenditures.
· A Passthrough (P1) grant is created to support activities where the UN has a responsibility to report both the UN and non-UN related expenditures to the donor. The grant represents Funding Agreement between the UN and a UN Grantee (i.e. Implementing Partner) and is used to record the UN Grantee's expenditure.
· Business Partner is an organization or an individual that has a business interest with the UN. A Business Partner can be a sponsor who provides voluntary contribution to the UN.
· Sponsored Program identifies a program of the Sponsor. It identifies the purpose of the Sponsor's contribution. Sponsored Programs are defined by the organization to reflect the reporting structure required by the donor as well as to reflect and enforce any restrictions imposed on the funds by the donor. Sponsored Program is a GM Master Data Object that is derived and cannot be manually entered. Sponsored Program can be created for a specific project, an activity on the project, a group of projects, non-project related activity, material, service, program/subprogram objective, associated experts and so on, according to the specific donor requirements.
· Sponsored Class is a GM Master Data object that summarizes the GL accounts of the organization, facilitating reporting to the donor and enforcing donor restrictions. It represents the view that the sponsor wants reported back to them. It also represents the level at which the sponsor requires the processes to be controlled.
Although sponsored program and sponsored class do not have any accounting implications they are important from the perspective of donor reporting.
· Internal Order is a GM Master object that collects costs and revenues of a specific event or simple project that has defined start and end dates. It is usually temporary (unique) in nature and the costs are segregated from other events or on-going operations to enable more detailed monitoring.
· Work Breakdown Structure Element (WBSE) is a GM Master object that represents a project with its structure.
4.2.2 Grants Frameworks
Important in the Grants Management process is choosing the framework that would be applicable to the Grant creation based on the facts of the grant which is primarily driven by donor requirements.
There are two frameworks in the UN Grants Management environment based on the requirements for donor reporting:
Framework 1: Donor requires UN to report specifically on its contribution.
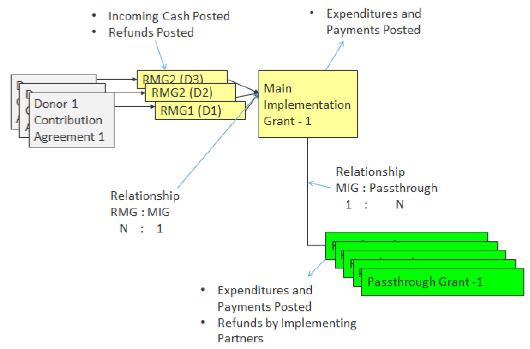
The donor (Donor Agreement) is represented by one grant which is typically a Simple (S1) grant. A Passthrough (P1) grant is used to represent the Funding Agreement while a Sponsored Program will represent the purpose of the contribution in which it might be shared with other grants.
In this framework, Programme Support Cost (PSC) is unique to the Donor Agreement. Return of Interest and unspent balance may be a requirement by the donor and budget is created against the S1 grant. USD is the expected currency for S1 grant and associated P1 grants. Nevertheless, R1 and M1 grants can be used in Framework 1 when the contribution currency (S1) and the currency of grant expenditures (P1) are different.
The layout of a typical Framework 1 grant is displayed in the diagram below:
Framework 2: Donor requires UN to report on 'pooled' expenditures.
Each donor (Donor Agreement) is represented by a separate R1 grant. These R1 grants represent donors' total contributions to the grant's fund. The R1 grants are linked through a relationship to the M1 grant that represents the 'pooled' expenditures. A Passthrough (P1) grant represents the Funding Agreement while a Sponsored Program represents the purpose of the contribution, which is the same for all donors participating in the 'pool' and can be shared with other grants.
In this type of framework, Programme Support Cost rates should be consistent for all participating donors with budget set against the M1 grant. While the donors (represented by R1 grants) can provide funding in multiple currencies, the currency of M1 grant and associated P1 grants must always be USD.
The layout of a typical Framework 2 is displayed in the diagram below:
Exception
By Umoja design, cases where the reporting requirements of the donor fall within the Framework 1, and the Donor Agreement is signed in a currency other than USD currency, the Framework 2 has to be used. In this case there will be a one-to-one relationship between the R1 and M1 grants. The Resource Mobilization grant and Main Implementation grant will both have the same donor.
4.3 Grants Management Process
The following flow chart depicts high-level overview of Grantee Management process within GM module of Umoja.
Grants Framework 1 process steps:
1. Display/Maintain grant-related Master data
· Verify Business Partner Data
· Create Sponsored Program
2. Create Simple grant
· Create S1 grant master data
· Change Status of grant to 'Approved by UN'
3. Create Revenue Internal Order
4. Link Revenue Internal Order to grant
5. Change Status of grant to 'Award/Operational'
6. Perform Billing
· Maintain Billing
· Verify sales order
· Remove Billing Block from Billing Plan
· Simulate and Bill grant
· Display FI document
7. Create Unreleased Budget
8. Approve Unreleased Budget via Workflow
9. Create Project/Internal Order for expenses
10. Update Sponsored Program
11. Receipt of Funds/Clearing of Receivables
12. Create Released Budget
13. Approve Released Budget via Workflow
14. Post Indirect Costs
15. Close grant
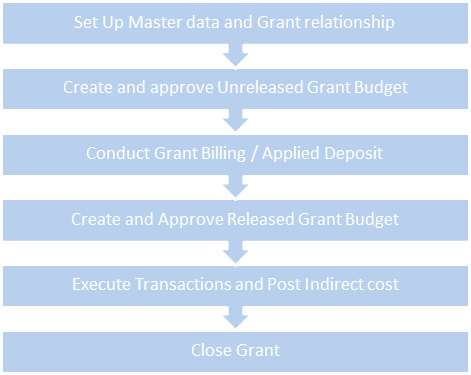
Grants Framework 2 process steps:
1. Display/Maintain Master data
· Verify Business Partner Data
· Create Sponsored Program
2. Create Resource Mobilization Grant
· Create R1 grant master data
· Change Status of grant to 'Approved by UN'
3. Create Revenue Internal Order
4. Link Revenue Internal Order to grant
5. Change Status of grant to 'Award/Operational'
6. Perform Billing
· Maintain Billing
· Verify sales order
· Remove Billing Block from Billing Plan
· Simulate and Bill grant
· Display FI document
7. Create Implementation Grant
· Create M1 grant master data
· Change Status of Grant (to Award/Operational)
· Link R1 grant to M1 grant
8. Create Unreleased Budget (M1 grant)
9. Approve Unreleased Budget (M1 grant) via Workflow
10. Create Project/Internal Order for expenses
11. Update Sponsored Program
12. Receipt of Funds/Clearing of Receivables
13. Create Released Budget (M1 grant)
14. Approve Released Budget (M1 grant)
15. Create Passthrough Grant
· Create P1 grant master data
· Change Status of Grant (to Award/Operational)
· Link P1 grant to M1 grant
· Map objects from M1 to P1 grant
· Transfer Budget to Passthrough grant (P1 grant)
16. Approve Released Passthrough Grant Budget (P1 grant) via workflow
17. Post indirect costs
18. Close grant
The following example has been used to explain the steps to navigate the entire Grants management process along with the accounting entries generated within each step.
Example - Unconditional grant
A project is funded by three unconditional donor agreements. Two donor Member States contribute USD 1 million in funding and one NGO donor contributes USD 2 million, allotted upfront, inclusive of 13% IDC (the UN portion on expenditure incurred by the UN) on M1 grant, 7% IDC (Implementing Partners portion on expenditure incurred by Implementing Partners), and 6% (the UN portion on expenditure incurred by Implementing Partners) on Passthrough grant. The Passthrough grant to Implementing Partner is USD 1.5 million. Final financial and substantive reports are provided to the donors at the end of the project. Interest earned if any on the unused funds should be returned back to donors in proportion of their contributions.
Donor agreements were signed on 1 July 2014. Cash was received from Donors 1 and 2 on 1 July 2014 and on 2 July 2014 from Donor 3. Advance to Implementing Partner was paid on 15 July 2014. All the direct expenses were incurred and paid prior to completion of project on 30 November 2014. The UN earned interest revenue of USD 12,000 by investing unused donor funds. Balance amount was refunded to donors on 15 December 2014. Expenditure pertaining to the grant is as follows:
|
The UN (USD) |
Implementing Partner (USD) |
Total (USD) |
|
|
Direct expenditure |
|||
|
Employee cost |
750,000 |
500,000 |
1,250,000 |
|
Travel |
200,000 |
100,000 |
300,000 |
|
Equipment |
60,000 |
- |
60,000 |
|
Supplies |
1,202,389 |
672,727 |
1,875,116 |
|
Indirect expenses |
|||
|
PSC - 13% |
287,611 |
- |
287,611 |
|
PSC - 7% |
- |
89,091 |
89,091 |
|
PSC - 6% |
- |
76,364 |
76,364 |
|
Total |
2,500,000 |
1,438,182 |
3,938,182 |
4.3.1 Set Up Master Data and Grant Relationship
Setting up master data and grant relationships include the following steps:

While completion of these steps do not trigger any accounting entries, it is important to realize that inputs while setting up master data and grant relationships will be the basis for accounting entries posted during the life-cycle of GM. Further it is important to contemporaneously set up master data and grant even if the agreement is not signed by both parties, so that the data can be used for contingent asset disclosure as per section 2.1.3.
Umoja processes
|
Process |
Umoja Role |
Explanation |
For steps refer |
|
Confirm Business Partner |
GM Account User |
Confirm whether the donors and Implementing Partners are Business Partners. If not then Business Partners should be created before the user moves on to the next step |
|
|
Create Sponsored Program |
GM Account User / GM Grant Creator |
Sponsored Program needs to be created so that the donor can be provided with a view of Grant data that they are expecting. |
|
|
Create Grant |
GM Account User / GM Grant Creator |
Since donors require reporting on pooled basis; framework 2 type of a set up will be required. This will involve creating · 3 Resource Mobilization grants representing 3 donors · 1 Main Implementation grant to report entire project on pooled basis · 1 Passthrough grant representing Implementing Partner |
|
|
Link Internal Order / WBSE |
GM Account User / GM Grant Creator |
Since grant activities are executed through Internal Order / project WBSE, it is necessary to link grants and related Sponsored Programs to corresponding Internal Orders / WBS Elements. |
4.3.1.1 Confirm Business Partner
Business Partners are set up in Umoja by the Central Master Data (CMDT) team. As a result, a Grants User will only be responsible for viewing the sponsor's business partner profile to confirm that the sponsor has been entered in the system correctly.
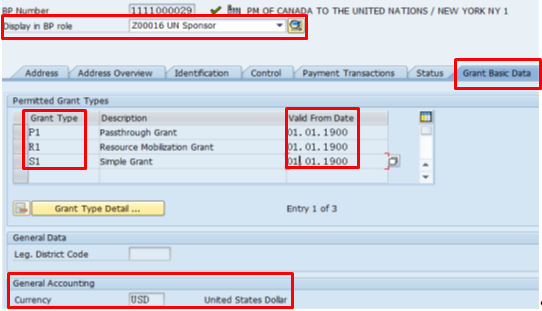
B. Steps to confirm the business partner / Transaction Code: BP
B.1. Enter BP in the Command field and click the Enter icon.
B.2. Search for the sponsor using the BP Number, click Start. Review the general role information.

B.3. Select UN Sponsor from the Display in BP role drop-down list.
B.4. Click the Grant Basic Data tab. Review sponsor-specific information:
· Grant Type: The grant type that can be used for this sponsor. M1 for MIG grant, P1 for Passthrough Grant, R1 for RM grant and S1 for Simple grant.
· Valid From Date: The day the grant is valid.
· Currency: The currency associated with the BP.
B.5. Click the Sales and Distribution menu bar button and check that the following details in the Sales Area section have already been entered:
· Distribution Channel field is 06.
· Division field is 00.

B.6. Click the Billing tab. Scroll down to Accounting.
Review the details in the AcctAssgGr field for the type of sponsor:
|
Account Group |
Sponsor Type |
|
Z1 |
Govt Member St |
|
Z2 |
Govt Non Member St |
|
Z3 |
Inter and Local Gov |
|
Z4 |
NGO and Public |
|
Z5 |
UN Agency FuProg |
|
Z6 |
Commercial Customer |
Check appropriate classification of sponsor (Z1 for Member State).
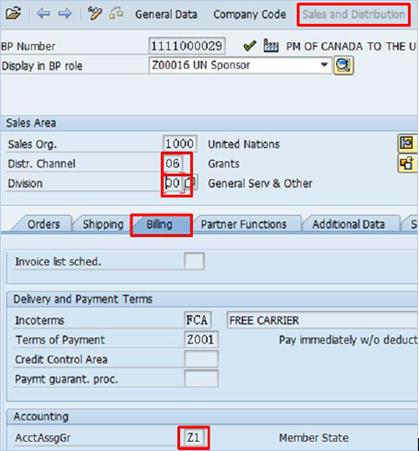
B.7. Exit using the Back button.
4.3.1.2 Create Sponsored Program
As soon as negotiation with the donor starts, the initial Master Data elements need to be set up in Umoja. If a Sponsored Program has not been set up, it needs to be done at this time. The Sponsored Program identifies a specific program for which the sponsor has contributed money and links to a Work Breakdown Structure Element (WBSE) through the funded program.
A Sponsored Program can be assigned individually to a grant, or it could be assigned to many grants depending on the agreement. For example, it can have one to many relationships with grants if the purpose of the agreements with many donors is the same.
The Sponsored Program can specify the level of earmarking of funds. There should be at least one level of earmarking on the Sponsored Program. Some examples are:
· The purpose of the Voluntary Contribution Fund and/or Fund Group (example: purpose of the program or sub-program).
· The purpose of the Functional Area and/or Functional Area Group.
· The purpose of the Project or Internal Order.
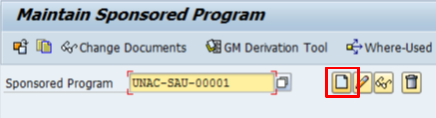
C. Steps to create a new Sponsored Program / Transaction Code: GMPROGRAM
C.1. Enter GMPROGRAM in the Command field.

C.2. Click the Enter icon à the Maintain Sponsored Program screen displays.
C.3. Enter name of the Sponsored Program (e.g UNAC-SAU-00001) in the Sponsored Program field and press Enter.
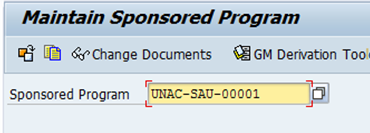
C.4. The following Sponsored Program naming convention should be followed:
· First 1 to 10: Name of Mission/Office (max 10 characters)
· Next: Dash
· Next: Fund Code (3 alpha characters)
· Next: Dash
· Next: 5 digit sequential number 00001 to 99999
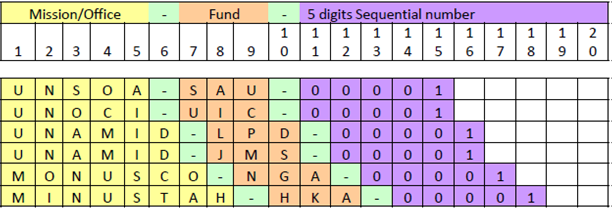
Note: The Sponsored Program name should be entered manually by the user as per the naming convention explained above.
C.5. Click the Create icon.
C.6. Click the Basic Data tab.
C.7. Enter the details in the following fields:
· Program Description field.
This field can define the purpose of the contribution.
· If the donor is contributing to a specific project, the description field can contain the name of the project.
· If the donor contributes to a group of projects, for example a 'cluster', the description can be the same as the name of the 'cluster'.
· If the donor contribution is in support of on-going activities, the description should reflect this. For example, 'in support of DPA activities'.
· Authorization Group field: PK missions will use 0001. SPMs will use 0002.
C.8. Select the Validate Budget Transfer Object check box.
This verifies that the FM budget transfer objects used in budgeting exists in the FM objects list maintained in the Sponsored Program Master Data.
C.9. Click the Budget Transfer tab.
To be able to transfer or to release budget from GM to FM, populate the following fields:
· Enter 1000 in the FM Area field.
· Enter the funds center in the Funds Center field.
· Enter the functional area in the Functional Area field.
· Enter the Funded Program field.
· Select the Default check box. If there are multiple lines, the user can check multiple lines. This identifies all FM objects to be considered as default entries at the time the GM budget document is created.
C.10. Click the Additional Data tab.
Enter the details in the following fields:
C.10.1. SP Type (Sponsored Program Type): identifies either the Grants Management Framework(s) associated with the Sponsored Program or whether it is a Structural Sponsored Program that is used across the board on all Grants.
There are four main Sponsored Program types:
· 100 - Programmatic Sponsored Program used only in Grants Framework 1
· 200 - Programmatic Sponsored Program used only in Grants Framework 2
· 300 - Programmatic Sponsored Program used in both Grants Framework 1 and 2
· 999 - Structural Sponsored Program; required to support postings in FI.
C.10.2. SP Classification (Sponsored Program Classification): provides the major programmatic areas fir which the donor provides funding.
C.10.3. Select the relevant check boxes from the Level of Earmarking to area in accordance to the Donor Agreement. At least one level of earmarking has to be checked otherwise Sponsored Program cannot be saved.
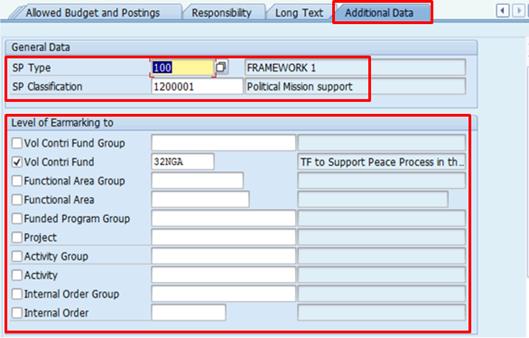
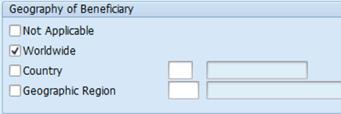
C.10.4. Select the relevant check box from the Geography of Beneficiary area. If Country or Geographic Region check box is checked, choose specific Country or Region.
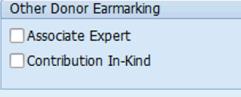
C.10.5. If applicable, select the relevant check box from the Other Donor Earmarking.
C.11. Click the Save icon.
4.3.1.3 Create, Link and Change Grant Status
This section explains the Umoja process steps to create grant, link grant to the appropriate grant to insure that all applicable funding is allocated to the correct program and subsequently map different object classes between S1 or M1 grant and P1 grants as well as the process steps to change grant status.
4.3.1.3.1 Create Grant
Grants are created at the negotiation stage and tracked in the system until expiry date. The creation of grant is similar for all types of grants. However, the type of grant defines grant layout and therefore there are difference in a number of tabs and fields on the grant's screen depending on the grant type.
Note: If a single contribution is both monetary and in kind, two grants will need to be created in Umoja - one grant for the monetary portion of the contribution and one grant for the in-kind portion of the contribution.
D. Steps to create grant (S1, R1, M1 and P1) / Transaction Code: GMGRANT
D.1. Enter GMGRANT in the Command field.

D.2. Click the Enter icon à The Display Grant Master screen is displayed.
D.3. Click the Create icon.
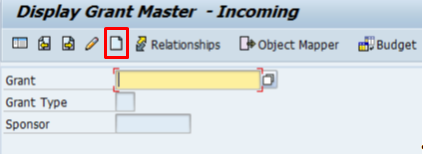
D.4. Populate data in the following fields:
|
Grant |
Grant ID comprises of the Grant Type and the Fund to which the Grant is linked. Example: R1-32SAU- , M1-32SAU-, S1-32SAU |
|
Grant Type |
The grant type describes a grant and controls its behavior. R1 / M1 / S1 / P1 |
|
Sponsor |
· Not applicable for P1. · For S1, R1 and M1 (in Framework 1): BP in BP role Z00016 (UN Sponsor). · For M1 (in Framework 2): enter group sponsor number (a dummy group number) or sponsor for Exception as per section 4.2.2 |
|
Copied from |
To copy all the information from an existing grant. Enter the grant number here. |
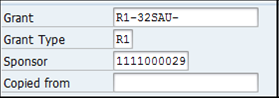
D.5. Press the Enter key on the keyboard.
D.6. Click the General Data tab, available in all grant types:
D.6.1. In the Basic Data section, enter the required details in the following fields:
|
Company Code |
This value is defaulted to 1000 |
||||||||
|
Authorization Group |
Authorization groups for grants are a means of grouping Grants objects together for the purpose of authorization checking for security. Only users with appropriate roles assigned to a particular authorization group will be able to create or change grants for this authorization group. Example: PK missions will use 0001 and SPMs will use 0002. |
||||||||
|
Award Type |
Indicates how the grant is originated. For S1, R1 and M1 grants, award type is a type of legal framework for business relationship between Sponsor (Donor) and the United Nations, which is used for classification and reporting purpose.
For P1 grants, award type is a type of legal framework for business relationship between Grantor (the UN) and Grantee (Implementing Partner), which is used for classification and reporting purposes. |
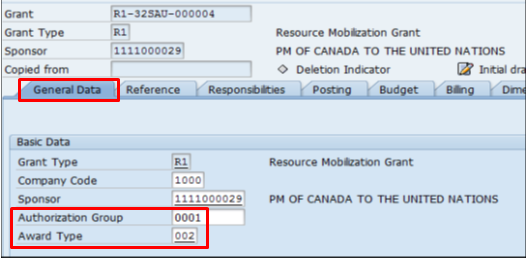
D.6.2. In the Description section, enter details to the following fields:
|
Name |
Short description of the grant. The 20-character short description of the grant is text used by various reports to identify the grant. Use capital letter for consistency. |
|
Description |
80-character long text description of the grant (not case-sensitive). This description will be printed on the Receipt Voucher. Use capital letter for consistency. Example: Grant by Denmark to support Demining activity in North Afganistan |

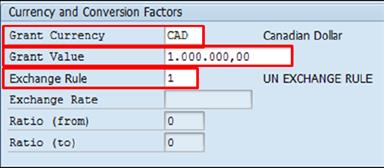
D.6.3. Populate the required details in the Currency and Conversion Factors section:
|
Grant Currency |
Currency as stated in the agreement. Valid Grant currency must be input depending on the Grant type: · R1 can be in any currency. · S1 M1 and P1 must be in USD. |
|
Grant Value |
The total value of the grant in the currency defined in Grant Currency as per Donor Agreement, including both direct and indirect costs. Note: The total of the M1 grant will continue to change as additional R1 grants are linked to it. The value of the grant must always represent the current consolidated value of the R grants linked to the M grant. |
|
Grant Value in USD |
· For R1 Grant: USD equivalent of the donor agreement at the UN exchange rate on the date of signing the agreement. · For S1 and P1 Grants: Equals Grant value as expressed in USD on General Data Tab. · For M1 Grant: USD equivalent of all donor agreements represented by corresponding Resource Mobilization Grants at the UN exchange |
|
Exchange Rule |
The exchange rule field will always be 1 which represents UN Exchange rule. |
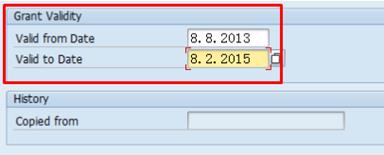
D.6.4. Populate the required details in the Grant Validity section:
|
Valid from Date |
Represents Grant start date, start of negotiations for the grant. Starting on this date, use of the grant by any transactions is allowed in Umoja. Format: DD/MM/YYYY |
|
Valid to Date |
The end date of the grant is the financial closing date. After this date no transactions is allowed using this Grant. Format: DD/MM/YYYY |
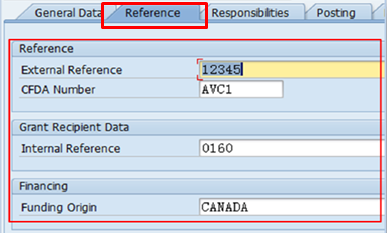
D.7. Click the Reference tab, available in all grant types:
D.7.1. In the Reference section, enter the required details in the following fields:
|
External Reference |
· For S1 and R1: Donor Agreement ID assigned by the donor, reports sent to the donor include this number · For P1: Funding Agreement ID assigned by the grantee · For M1: Not applicable |
||||||||||||
|
CFDA Number |
· Only applicable for S1 and M1. · Defines the level of GM budgetary control. If the budget is to be controlled at Fund and Grant level without Sponsored Class and time slice, choose AVC4 which is the most relaxed budgetary control. If the budget is to be controlled at each grant element, choose AVC1 which is the strictest budgetary control.
|
D.7.2. In the Grant Recipient Data section, in the Internal Reference field enter:
· For S1 and R1: Donor Agreement ID assigned by the UN
· For P1: Funding Agreement ID assigned by the UN
· For M1: Not applicable
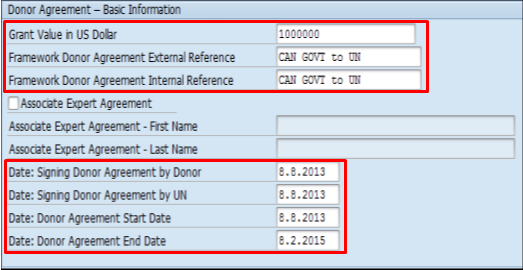
D.7.3. In the Donor Agreement - Basic Information section, populate the following fields:
|
Grant Value in US Dollar |
· For S1, R1 and P1: USD equivalent at UN Exchange Rate on the date of signing of the agreement · For M1: USD equivalent of all donor agreements at the UN Exchange rate on the date of signing each Donor Agreement. |
|
Framework Donor Agreement External Reference |
· Framework Donor Agreement ID assigned by the donor · Only applicable for S1 and R1 |
|
Framework Donor Agreement Internal Reference |
· Framework Donor Agreement ID assigned by the UN · Only applicable for S1 and R1 |
|
Associate Expert (check box) |
· Has to be checked at any times whether or not the agreement relates to an Associate Expert. · Not applicable for P1 |
|
Associate Expert Agreement - First Name |
If the Donor Agreement is not for Associate Experts, input 'NA'. |
|
Associate Expert Agreement - Last Name |
If the Donor Agreement is not for Associate Experts, input 'NA'. |
|
Date: Signing Donor Agreement by Donor |
· For S1 and R1: Signature date of the agreement by donor · For M1: First date the Donor Agreement is signed by one of the donors · For P1: Not applicable |
|
Date: Signing Donor Agreement by UN |
· For S1 and R1: Signature date of the agreement by the UN · For M1: First date the Donor Agreement is signed by the UN · For P1: Not applicable |
|
Date: Donor Agreement Start Date |
· For S1 and R1: Operational start date when the UN can start incurring expenditures against the grant. Note: If not specified, enter the date of signing agreement by Donor or by the UN, whichever the later. · For M1: The earliest operational start date when the UN can start incurring expenditures against the grant. Note: If multiple R1 grants fund an M1 grant, enter the earliest date reflected on the related R1 grants. · For P1: Not applicable |
|
Date: Donor Agreement End Date |
· For S1 and R1: Operational end date in which as of this date the UN cannot create new obligations against the grant. · For M1: The operational end date as indicated in the related R1 grant(s) in which the UN cannot incur expenditures against the grant. Note: If multiple R1 grants fund an M1 grant, enter the latest end date reflected on the related R1 grants. · For P1: Not applicable |
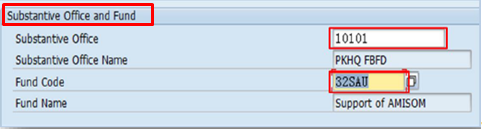
D.7.4. In the Substantive Office and Fund section, enter the required details in the following fields:
|
Substantive Office |
Cost Center / Fund Center which manages the grant |
|
Fund Code |
This should be the same as the ID of the Fund incorporated in the ID/name of the grant. Example: The Fund Code for grant S1-32JMS-000013 should be 32JMS |
D.7.5. In the Funding Agreement - Basic Information section, applicable only to P1 grant, populate the following fields:
|
UN Grantee |
Choose the UN Grantee (Implementing Partner) from list of vendors |
|
Funding Framework Agreement External Reference |
Funding Framework Agreement ID assigned by the Implementing Partner
|
|
Funding Framework Agreement Internal Reference |
Funding Framework Agreement ID assigned by the UN
|
|
Date: Signing Funding Agreement by UN Grantee |
Date of signing Funding Agreement by Implementing Partner |
|
Date: Signing Funding Agreement by UN |
Date of signing Funding Agreement by the UN |
|
Date: Funding Agreement Start Date |
Operational start date of the agreement when the UN starts transferring funds to the Implementing Partner. Note: If not specified, enter the date of signing agreement by Implementing Partner or by the UN, whichever is later. |
|
Date: Funding Agreement End Date |
Operational end date when no new commitments or obligations can be created against the grant. |
D.8. Click the Responsibilities tab, available in all grant types.
The enterprise roles that have access for the grant are listed. This includes the user's role and ID. The information is defaulted by the system for values 0005 - Budget Approver Unreleased and 0007 - Budget Approver Released. These two values are necessary to support Grants Management Budget workflows for unreleased and released budgets.
Completion of this tab is not required however, adding user information to this table will assist other users in identifying who to contact in the event that questions regarding the grant arise.

D.9. Click the Posting tab, available in all grant types.
|
Block All Postings (check box) |
Block all posting on the grant. Note: Ensure that the box in unchecked prior to Billing process. |
|
Allow Pre-Award Postings |
Not used by Umoja. |
|
Allow in and Allow to |
Used during closure if the grant to allow processing of required transaction. |
D.10. Click the Budget tab, available in all grant types. Populate the required details in the Budget Validity section:
|
Grant FY variant |
K4 (defaulted) |
|
Company Code FY Variant |
K4 (defaulted) |
|
Splitting Rule |
· 0001 for the life of the grant. Define the GM budget for the whole life if the grant. · 0003 for spilling by the UN fiscal year. Define or present budget and actuals by UN fiscal year. · 0002 for conversion purposes only. |
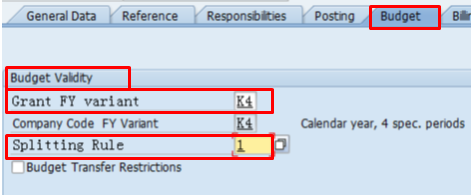
D.11. Click the Billing tab, available in R1, S1 and M1 grant types.
D.11.1. In the Billing Rule section, enter the required details in the Billing Rule field. This field specifies whether a grant is conditional or unconditional, and cash or in-kind. The user must select from the following options:
· 20: unconditional, cash contribution, SD integrated billing and applicable for S1 and R1 grants.
· 22: unconditional, in-kind contribution for goods, SD integrated billing and applicable for S1 and R1 grants.
· 50: conditional, cash contribution, SD integrated billing and applicable for S1 and R1 grants.
· 52: conditional, in-kind contribution for goods, SD integrated billing and applicable for S1 and R1 grants.
· 99: Not applicable for Billing. Applicable for M1 grant.
· 7: Manual Billing through T-code FV70. Applicable for M1 grant. To be used if the non-sponsor customer has to be billed against the grant and can also be used for converted grants.
It is very critical that this rule is set appropriately based on detailed analysis of the contractual terms as this will have significant impact on recognition of revenue. The Account Approver determines if the agreement has IPSAS restriction and/or conditions and enters the appropriate information prior to the Billing process.
For guidance on how to determine whether the arrangement is conditional please refer to Corporate Guidance on Funding Arrangements.
The following example explains the accounting entry generated based on billing rule.
Example - Cash contribution
A national government (donor) transfers USD 1,000,000 to a UN reporting entity to buy 20 trucks in country X for the establishment of a humanitarian center on 1 July 2014. The transfer agreement dated 1 July 2014 specifies that the trucks are to be used for a humanitarian center, but does not specify that the cash should be returned if not used for that purpose.
If the analysis is that the arrangement is non-conditional (Billing Rule 20, Unconditional -Cash) the initial entry to recognize contribution will be as follows:
|
Date |
GL |
GL short description |
Debit |
Credit |
|
1 July 2014 |
11011010 |
Csh HQ USD Nominal |
1,000,000 |
|
|
|
61201010* |
Con Vol Gov MS |
|
1,000,000 |
If the analysis is that the arrangement is conditional (Billing Rule 50, Conditional - Cash) the initial entry to recognize contribution will be as follows:
|
Date |
GL |
GL short description |
Debit |
Credit |
|
1 July 2014 |
11011010 |
Csh HQ USD Nominal |
1,000,000 |
|
|
|
38101010* |
Cond Liab Memb State |
|
1,000,000 |
Example - Non-cash contribution
A national government (donor) transfers to a UN reporting entity the title of 20 trucks in country X for the establishment of a humanitarian center on 1 July 2014. The transfer agreement dated 1 July 2014 specifies that the trucks are to be used for a humanitarian center, but does not specify that the trucks are to be returned if not used for that purpose. The trucks have a fair value of USD 1,000,000 on 1 July 2014.
If the analysis is that the arrangement is non-conditional (Billing Rule 22, Unconditional - Goods inKind) the initial entry to recognize contribution will be as follows:
|
Date |
GL |
GL short description |
Debit |
Credit |
|
1 July 2014 |
27177010 |
FA Transp Grnd Cst |
1,000,000 |
|
|
|
61211010* |
Con Kind Good Gov MS |
|
1,000,000 |
If the analysis is that the arrangement is conditional (Billing Rule 52, Conditional - Goods inKind) the initial entry to recognize contribution will be as follows:
|
Date |
GL |
GL short description |
Debit |
Credit |
|
1 July 2014 |
27177010 |
FA Transp Grnd Cst |
1,000,000 |
|
|
|
38101010* |
Cond Liab Memb State |
|
1,000,000 |
*GL assigned based on customer group and types are as follows:
|
BP Group |
Customer Type |
Reconciliation account |
Revenue account |
Classification |
|
Z1 |
Member State |
14101010 |
61201010 |
Unconditional |
|
|
|
|
38101010 |
Conditional |
|
Z2 |
Non Member State |
14101110 |
61201110 |
Unconditional |
|
|
|
|
38101110 |
Conditional |
|
Z3 |
Govt and Local auth. |
14101210 |
61201210 |
Unconditional |
|
|
|
|
38101210 |
Conditional |
|
Z4 |
NGO and Inter Govt |
14101410 |
61201410 |
Unconditional |
|
|
|
|
38101410 |
Conditional |
|
Z5 |
UN Agency FundProg |
14101310 |
61401310 |
Unconditional |
|
|
|
|
38101310 |
Conditional |
|
Z6 |
Commercial Customer |
14101510 |
61201510 |
Unconditional |
|
|
|
|
38101510 |
Conditional |
D.11.2. Verify the required details in the Sales Order section, applicable for S1 and R1 and not applicable for M1 and P1:
|
Sales Document |
Populated by the system automatically when the grant is moved to Award/Operational status |
|
Sales Organization |
1000 (defaulted from BP) |
|
Distribution Channel |
06 (defaulted from BP) |
|
Division |
00 (defaulted from BP) |
D.11.3. In the Billing Data section, enter details in the following fields:
|
Order |
Internal Order used for billing to record revenue and receivables. Note: Internal Order has to be created upfront and linked to the grant before the Award/Operational status. |
|
WBS Element |
Not currently used for billing |
|
Total Billing Amount |
Total billing amount in currency of the agreement. Applicable for S1 and R1 and not applicable for M1. |

D.11.4. In the Payment Due Date section, enter the date the payment is due in the Payment Due Date field as per the Donor Agreement for S1 and R1 grant types. This section is not applicable for M1 grant.
D.12. Click the Dimensions tab, available in all grant types.
D.12.1. In the Financing Sources section, enter the following details in the Fund field:
· For S1 or M1 grant: At least two funds are required, External Fund (32 Fund type) and Internal Fund (62 Fund type). If there is an Implementing Partner where P1 grant is used the Auxiliary Fund (33 Fund type) is also required.
· For R1 grant: only External Fund (32 Fund type) is required.
· For P1 grant: only Auxiliary Fund (33 Fund type) is required
Select the IDC Recovery check box next to the relevant funds.
D.12.2. In the Sponsored Programs section, enter details in the Sponsored Program field.
For grants that involve the usage of equipment, inventory and fixed assets, the following Structural Sponsored Programs are defaulted and should not be deleted.
· ADB-Program: interest allocation
· CO-Settlement: cost allocation
· FI-Assets: asset depreciation
Enter the Sponsored Program created earlier following the defaulted Structural Sponsored Programs.

D.12.3. In the Sponsored Class Series section, choose corresponding Sponsored Class Series ID based on the level of details, type of grant and standard, e.g. AS1 where A - high level of details, S - Simple grant, 1 - Finance Budget Network standard.
Note: Choose the Sponsored Class Series ID corresponding to the grant type. For example:
AS1 - for Simple grant
AP1 - for Passthrough grant
BP1 - for Passthrough grant (itemized budget/expenses)

D.12.4. In the Sponsored Classes section, all relevant Sponsored Classes are defaulted once the Sponsored Class Series ID is inserted.
Example of sponsored classes for Simple grant is as follows:
|
Sponsored Class |
Description |
|
Revenue |
|
|
AS1-VC-CASH |
Contribution in Cash |
|
AS1-VC-GOODS VC |
Goods in-Kind |
|
AS1-VC-SERVICES |
VC in Services |
|
AS1-INTEREST-INCOME |
Interest Revenue |
|
AS1-MISC-INCOME |
Misc Revenue |
|
Expenditures |
|
|
AS1-STAFF-PERSONNEL |
Staff and other personnel cost |
|
AS1-SUPPL-COM-MATER |
Supply, Commodity, Material |
|
AS1-EQUIP-VEH-FURNIT |
Equip, Vehicles and Furniture |
|
AS1-CONTRACT-SERVICE |
Contractual Services |
|
AS1-TRAVEL |
Travel |
|
AS1-OPER-OTHER-COSTS |
Operating & Other Direct Cost |
|
AS1-GRANTS-OUT |
Grant Out Expenditure without PT |
|
AS1-TRANSFER-IP |
Transfers to IPs with PT |
|
PSC-EXP-UN |
PSC UN |
Note:
· For M1 and S1 grants, select the indirect cost (IDC) Relevant check box for the Sponsored Classes that the UN earns Program support cost (PSC) on. This rate is entered on the Overhead Costs tab. The PSC classes are added automatically.
· In-kind contributions in general do not include a PSC portion thus no IDC Relevant boxes are ticked.
D.12.5. In the Budget Availability Control section, select 1000 from the Tolerance Profile dropdown menu.

D.13. Click the Supported Objects tab, available in all grant types.
· For R1 grants: Uncheck all rows in the Budgeting Allowed column. Planning and budgeting are managed on the M1 grant.
· For M1 and S1 grants: In the Budgeting Allowed column, select the Sponsored Program created earlier and other boxes that are applicable for budgeting.
· For S1, R1, P1 and M1 grants:
o Planning Allowed column is not applicable. It is being defaulted by the system.
o Actuals Allowed is filled by default as posting are allowed against the grant.
D.14. Click the Overhead Costs tab, only available in M1 and S1 grant types.
|
IDC Rule |
Select 1 PSC Actuals and Commitments |
|
Valid from Date and Valid to Date |
Defaulted from the Grant Validity section of the General Data tab. |
|
Indirect Rate |
Percentage of the Indirect Cost for the combination of the Sponsored Program, Sponsored Class and time slice defined by valid from date and valid to date. |
D.15. Click the Overhead Cost Limits tab, available in S1, M1 and P1 grant types.
Information in the Used field is generated by the system when the Indirect Cost is posted against specified Sponsored Program, Sponsored Class and time slice defined by valid from and valid to date.
D.16. Click the Overhead Cost Records tab, available only in P1 grant type.
|
IDC Rule |
There is no IDC Rule on P1 grant. |
|
Valid from Date and Valid to Date |
Defaulted from the Grant Validity section of the General Data tab. |
|
Indirect Rate |
Percentage of the Indirect Cost for the combination of the Sponsored Program, Sponsored Class and time slice defined by valid from date and valid to date.
Note: Indirect Rate can be entered only after the Object Mapper is established: 1. Established Object Mapper (refer to 4.3.1.3.3) 2. Go to Passthrough Grant in Change Mode and confirm that the incoming Sponsored Program and Sponsored Class are populated in the table. 3. Enter the Indirect Rate. This rate is used for posting actuals for PSC for UN on the portion implemented by Implementing Partner. |
D.17. Click the Recipient: Overhead Cost Rcrds tab, available only in P1 grant type. Enter the Implementing Partner Program Support Cost rate in the Indirect Rate field.
D.18. Click the Terms and Conditions tab.
D.18.1. Fields available in S1, R1 and M1 grant types:
|
IPSAS Conditionality |
As per Donor Agreement.
|
|
Treatment of Interest |
As per Donor Agreement.
|
|
Treatment of Unspent Balance |
As per Donor Agreement.
|
|
Donor Restrictions Exist (check box) |
Check if the donor restrictions exist. |
|
Donor Restrictions |
If exist, enter text describing donor restrictions. |
|
Report Type |
As per Donor Agreement.
Multiple options can be selected and if required, enter the Report Due Date for report selected. |

D.18.2. Fields available in P1 grant type:
|
Treatment of Interest |
As per Funding Agreement.
|
|
Treatment of Unspent Balance |
As per Funding Agreement.
|
|
UN Restrictions Exist (check box) |
Check if the UN restrictions exist. |
|
UN Restrictions |
If exist, enter text describing UN restrictions. |
|
Report Type |
As per Funding Agreement.
Multiple options can be selected and if required, enter the Report Due Date for report selected. |


D.19. Click the Save icon.
D.20. Click the Green Check icon in the pop up message. The system creates a new grant with a grant number showing at the bottom of the screen.
![]()
The grant has now been created. The status of the grant is Initial Draft. The Master Data saved for this grant can continue to be updated. As negotiations continue, the status of the grant has to be changed to reflect this progress.
4.3.1.3.2 Link Grants
Once the grant has been created, it must be linked to the appropriate grant to ensure that all applicable funding is allocated to the correct program and subsequently map different object classes for P1 grant type.
The grant relationships require that only a single 'parent' grant (M1 or S1 grant) exists for each R1 or P1 grant. All relationship creation originates from the 'parent' grant type either M1 or S1. Many R1 or P1 grants can have the same parent grant, but relationships for R1 grants are only created to the M1 parent grant.
E. Steps to link grants / Transactions Code: GMGRANT
E.1. Enter GMGRANT in the Command field and press Enter à Display Grant Master - Incoming screen displays.
E.2. Enter the appropriate M1 or S1 grant number in the Grant field. Press the Enter key. The grant's Master Data appears.
E.3.
Click the Change ![]() button.
button.
E.4.
Click the Relationships ![]() button.
button.
E.5. Click the Grants tab
E.6. Enter the information in the following fields:
· Relationship:
o ZRM for R1 and M1 grants relationship, being set up from the M1 grant
o ZPT for P1, S1 and M1 grants relationship, being set up from S1 or M1 grant
· Grant: grant number of grant being linked (R1 or P1 grant)
· Valid from
· Valid To
E.7. Click the Create button.

E.8. Click the Save icon.
4.3.1.3.3 Map Objects of P1 Grant
An Object Mapper is used to map different object classes between the S1 or M1 grant and P1 grants. This ensures that when the budget is transferred from the S1 or M1 grant to the P1 grant, the user can link the specific Sponsored Classes.
F. Steps to map object classes between P1 grant and S1 or M1 grant / Transaction Code: GMGRANT
F.1. Enter GMGRANT in the Command field and press Enter.
F.2. Enter the required S1 or M1 grant (parent grant) number in the Grant field.
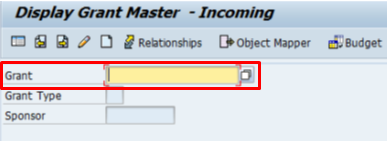
F.3. Click the Dimensions tab.
F.4. Review the Fund and Sponsored Classes details.
F.5. Edit the parent grant to include appropriate Implementing Partner (IP) Sponsored Classes, if the parent grant does not have a Sponsored Class that allows for IP's. The Sponsored Classes are added to the parent grant. The IP Direct and IP Indirect Sponsored Classes must be on the parent grant.
F.6. Click the Object Mapper button.
F.7. Enter the required parent grant number in the Incoming Grant field.
F.8. Enter the required P1 grant number in the Outgoing Grant field.
F.9. Click the Enter icon.
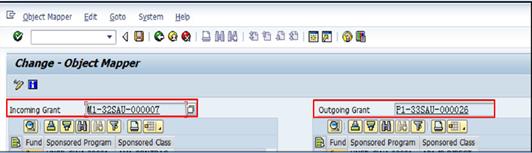
F.10. Select a Sponsored Class from each side to link the object classes, for example, AM1-IP-Direct to AP1-IP-Direct. The user can sort all the classes by fund using the Sort in Ascending Order button.
F.11. Click the Connect icon.
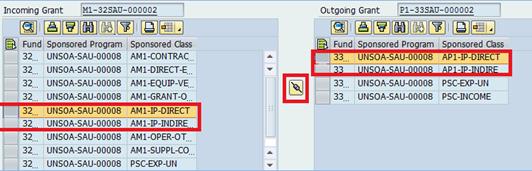
Note: The parent grant should only have the IP-Direct and IP-Indirect classes mapped. The Passthrough grant Sponsored Class series can be AP1 or BP1, but not both. The Program Support Cost (PSC) will not be mapped.
After the relationship has been established, the Passthrough grant becomes fully functional and can be budgeted. The user can view the status of the budgets for each grant (unreleased vs. released) in the P1 grant's Budget tab.
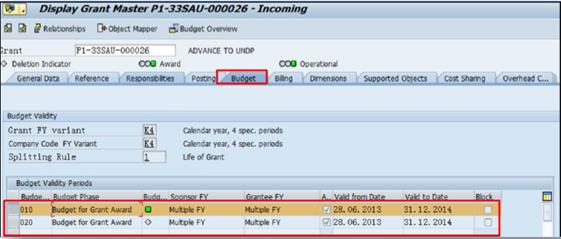
F.12. Go to the Overhead Cost Records tab of the P1 grant and press Enter. The UN Indirect Cost rate (IDC) will be updated automatically by the system.

4.3.1.3.4 Change Grant Status
A grant life status represents various stages of a grant during its full life cycle. There are two types of grant status:
1. Life Cycle Status - delivered by SAP standard; and
2. User Status - created by user
Each life status of the grant is associated with only allowable transactions during the full life cycle of the grant.
Below is the table of grant life cycle statutes for different grant type.
|
Grant life cycle status |
S1 |
R1 |
M1 |
P1 |
|
Initial Draft |
X |
X |
X |
X |
|
Application |
X |
X |
|
X |
|
Award |
X |
X |
X |
X |
|
Closing |
X |
X |
X |
X |
|
Closed |
X |
X |
X |
X |
|
Cancelled |
X |
X |
X |
X |
Unlike S1 and R1 grants, the status of a M1 grant can only change once from Initial Draft directly to Award / Operational. The reason for this is because the terms of the grant set forth by the donor are handled on the R1 grant. As a result, the terms of a M1 grant do not need to be negotiated between the donor and the UN.
Note: Budget can be released and financial transactions recorded against the grant when it reaches the status of 'Award/Operational'.
G. Steps to change grant status / Transaction Code: GMGRANT
G.1. Enter GMGRANT in the Command field and press Enter.
G.2. Enter the grant number in the Grant field and press Enter.
G.3. Click the Change icon.

G.4. Click the Change Status button and choose the next appropriate grant status.
G.5. Click the Green Check icon and note that the grant status has changed.
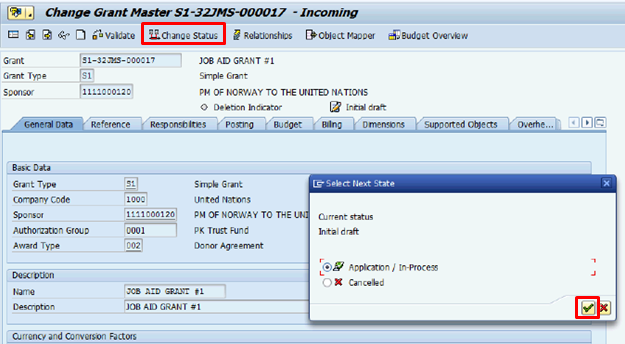
G.6. Click the Save icon.
G.7. Click the Green Check icon in the pop up message à Grant is moved to the next status.

Note: Required fields have to be entered to save grant successfully for each life cycle status of the grant.
G.8. Repeat the steps to move grant to the next status
Note: Before the grant is set to the Award/Operational status, ensure that the appropriate internal order (IO) has been created and linked to the grant. No financial postings can occur until the grant is set to this status. Once the grant is changed to Award/Operational, the Standard Order is created automatically.
4.3.1.4 Link Internal Order (IO) / Work Breakdown Structure Element (WBSE)
All grants need to be linked to a cost object, which records financial transactions such as revenue and expenses, depending on the type of grant.
R1 grants are always linked to Internal Order whereas M1 grants can be linked to an Internal Order or a WBSE, depending on the nature of the project. The use of an Internal Order vs. a WBSE is a decision that is made by the organization:
Collection of costs using Internal Order:
· Group of activities, no need to track individually;
· Implemented by one responsible cost center;
· Funded by one grant;
· Addressing one functional area.
Collection of costs using a project with WBSE:
· Complex set of activities that need to be tracked individually;
· Implemented by multiple responsible cost centers;
· Funded by multiple grants;
· Addressing multiple functional areas.
A WBSE provides more detailed cost estimating and suitable guidance for project-specific schedule development. It allows to monitor project components, costs and milestones at a more granular and defined level.
For grant billing purposes, either an Internal Order or a WBSE will be created. The creation of IO or WBSE is to be done by designated users with the following Umoja roles:
· Project Management User
· Project Management Approver
· Asset Accounting User
· Asset Accounting Senior User
4.3.1.4.1 Create and Link Internal Order (IO)
To link a grant to an Internal Order, the Grant and Sponsored Program must be documented in the UN Assignments tab of the appropriate Internal Order.
H. Create Internal Order (IO) / Transaction Code: KO01
H.1. Enter KO01 in the Command field and press Enter.
H.2.
Enter the Order Type in the initial screen and press Enter.
Use the Matchcode ![]() icon
to open up the selection window.
icon
to open up the selection window.
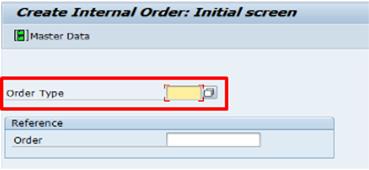
H.3. The Create Internal Order: Master data screen is displayed. Enter the following in the Assignments tab:
· Description
· Business Area (derived from Cost Center)
· Functional Area (derived from Cost Center)
· Profit Center
· Responsible CCtr: Cost Center that the Internal Order is linked to
· Work Start: This should match the grant start date
· End of Work: This should match the grant end date

H.4. The UN Assignments tab links the Internal Order to the grant. Under this tab, populate the following fields:
· Grant Assignment section - Grant and Sponsored Program: This has to be populated on the IO before the grant status can be set to Award/Operational.
· Geography of Beneficiary section - Country and Geographic Region, as applicable.

· Other Assignments section - Budget Control Internal Order field: Enter FPNR. This step is important because the system will generate a Funds Management error if it is not done.

H.5. Save the Internal Order when completed and note the Internal Order number created showing in the message at the bottom of the screen.
![]()
I. Link Internal Order (IO) to a grant for billing purpose / Transaction Code: GMGRANT
Below steps are to be conducted before the grant is set to Award/Operational status.
I.1. Enter GMGRANT in the Command field and press Enter.
I.2. Enter the grant ID to be linked in the Grant field and press Enter.
I.3.
Click on the Change ![]() icon.
icon.
I.4. Go to the Billing tab and add the Internal Order number to be linked to the grant in the Order field in the Billing Data section.
I.5. Click the Save icon.
J. Link Internal Order (IO) to Sponsored Program for budgeting purpose / Transaction Code: GMPROGRAM
J.1. Enter GMPROGRAM in the Command field and press Enter.
J.2. Enter the Sponsored Program ID to be linked in the Sponsored Program field and press Enter.
J.3.
Click on the Change ![]() icon.
icon.
J.4. Go to the Budget Transfer tab and populate details in to the following fields:
· FM Area: 1000
· Fund Center
· Functional Area
· Funded Program: IO ID(s)
· Select the Default check box
If there are multiple funded programs, the user can check multiple lines. This identifies all FM objects to be considered as default entries at the time the GM budget document is created.
J.5. Click the Save icon.
4.3.1.4.2 Create and Link Work Breakdown Structure Element (WBSE)
To link a grant to a project, the grant and Sponsored Program must be documented in the UN Assignments tab of the appropriate WBSE.
The WBSE is created by users in Project Management using transaction code CJ20N. Users in GM can view projects and WBSE's using transaction code CJ03.
K. Create a project with WBSE / Transaction Code: CJ20N
K.1. Enter CJ20N in the Command field and press Enter. Project Builder: User-specific options screen is displayed.

Note: The Project Builder: User-specific options screen is displayed only the first time this transaction code is accessed. Close the screen to proceed.
K.2. Click on the Create icon. The Create drop-down list opens.
K.3. Select Project to open up the Create Project window. Give project a description in the Project Def. field. System automatically Defaults to the Control tab.
K.4. Select an appropriate option from the Project Profile drop-down list.
K.5. Enter appropriate data in the fields of the Basic data tab:
· Pers.Resp.No: Role of the person in charge of the project administration
· Applicant no.: The Applicant determines the themes applicable to the project
· Start date
· Finish date
· Business area
· Functional Area
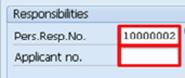
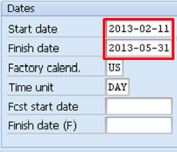
K.6. Click Enter icon. The project is created. Once the Save icon is selected, the project builder will close out the Project Definition details from the right-hand part of the screen.

K.7. Once the project definition is successfully saved and created, a confirmation displays in the lower left hand portion of the status bar. The project definition will also display in the Last Project Processed list within the Worklist and Templates component of the Project Builder.
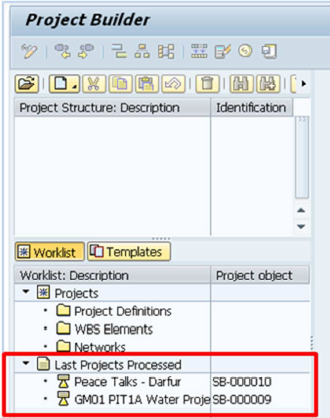
K.8. To create a WBSE, enter CJ20N in the Command field and press Enter. The Project Builder screen is displayed. Click the Open icon.
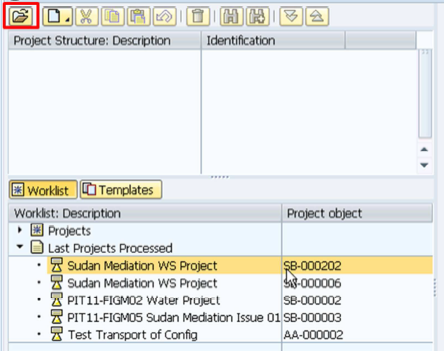
K.9. Enter the Project Definition ID of the project to be opened.
K.10. Click the Templates button available above the Worklist section of the screen. Click Expand.
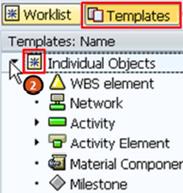
K.11.
Click the WBS element icon ![]() and
hold the mouse click button down. Without releasing the mouse click button,
drag the selected item to the Project Definition section of the Project
Structure area.
and
hold the mouse click button down. Without releasing the mouse click button,
drag the selected item to the Project Definition section of the Project
Structure area.

When a Plus sign is visible in
the Project Structure area of the screen, release the mouse click button
to drop the WBS element ![]() icon.
icon.
K.12. In the Basic data tab, validate that the WBSE ID matches the Project Definition ID.
K.13. Enter appropriate description in the WBSE Description field.
![]()
K.14. Select appropriate option from the Proj. Type dropdown list.
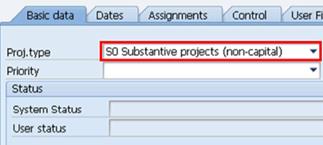
K.15. Populate the fields: Resp. cost cntr and Req. cost center.
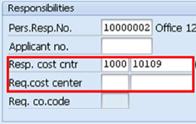
K.16. In the Operative indicators section select:
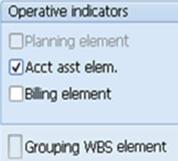
Note: Typically, a WBSE is created to include the Acct asst elem.
K.17. Click enter Enter icon. The WBSE ID is automatically created and matches the Project Definition ID. The WBSE and its relevant description are displayed in the Project Structure section.
L. Verify the information on the UN Assignments tab of the WBSE / Transaction Code: CJ03
Similar to IO's, the grant information has to be populated before the grant status can be set to Award/Operational.
L.1. Enter CJ03 in the Command field and press Enter.
L.2. In the initial screen, enter the WBSE ID to be linked in the WBS Element field and press Enter.

L.3. Go to the UN Assignments tab and verify the information in the following fields:
· Grant Assignment section:
o Grant: Grant to be linked to WBSE. Only one grant may be associated to each WBSE.
o Sponsored Program: Sponsored Program related to the selected grant that is to be linked to WBSE.
· Geography of the Beneficiary section:
o County and Geographic Region: as applicable.
· Other assignments section:
o Budget Control WBSE: populated if the WBSE is created to permit financial postings. It will be blank if the Acct.asst.elem on the Basic Data tab is unchecked and WBSE is only created for reporting purposes.
![]() Note:
After the System Status 'REL' (Released) was assigned, the Grant,
Sponsored Program and budget Control WBSE fields can only be
maintained by users with FM / GM Enterprise roles who have a budgeting
function. Use transaction code CJ02 to update details of WBSE.
Note:
After the System Status 'REL' (Released) was assigned, the Grant,
Sponsored Program and budget Control WBSE fields can only be
maintained by users with FM / GM Enterprise roles who have a budgeting
function. Use transaction code CJ02 to update details of WBSE.
L.4. On the Basic Data tab of the WBSE, the Operative Indicators area informs the user of its billing options. If the Acct asst elem option is checked, the WBSE is used for budgeting and recording of actual expenditure. If the Billing element option is checked, the WBSE is used for revenue billing.
Note: Both options cannot be checked.
M. Link WBSE to a grant for billing purpose/ Transaction Code: GMGRANT
Below steps are to be conducted before the grant is set to Award/Operational status.
M.1. Enter GMGRANT in the Command field and press Enter.
M.2. Enter the grant ID to be linked in the Grant field and press Enter.
M.3.
Click on the Change ![]() icon.
icon.
M.4. Go to the grant's Billing tab and in the Billing Data section add the WBSE number to be linked to the Grant in the WBS Element field.
![]()
M.5. Click the Save icon.
N. Link WBSE to Sponsored Program for budgeting (to transfer budget from GM to FM) and recording actual expenditure / Transaction Code: GMPROGRAM
N.1. Enter GMPROGRAM in the Command field and press Enter.
N.2. Enter the Sponsored Program ID to be linked in the Sponsored Program field and press Enter.
N.3.
Click on the Change ![]() icon.
icon.
N.4. Go to the Budget Transfer tab and populate details in to the following fields:
· FM Area: 1000
· Fund Center
· Functional Area
· Funded Program: WBSE ID(s)
· Select the Default check box
If there are multiple funded programs, the user can check multiple lines. This identifies all FM objects to be considered as default entries at the time the GM budget document is created.
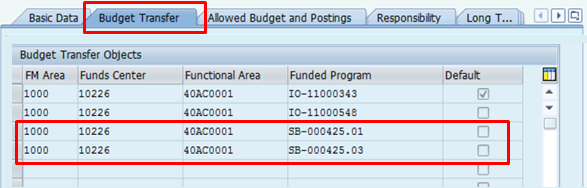
N.5. Click the Save icon.
4.3.2 Create and Approve Unreleased Grant Budget
After the grant is created, the next step is to create and approve an unreleased grant budget. To do this, each grant must be linked to a fund and the status of the grant has to be set to Award/Operational before the unreleased budget can be created.

Continuing with the example of unconditional grant in section 4.3 above following steps explain the Umoja process that should be followed to navigate the process of creating and approving unreleased grant budget. While this process does not create any accounting entry, billing cannot be completed unless it happens.
Umoja processes
|
Process |
Umoja Role |
Explanation |
For steps refer |
|
Create unreleased grant budget |
GM Budget User Unreleased |
Create unreleased grant budget for all the 3 donors and send for approval. |
|
|
Approve unreleased grant budget |
GM Budget Approver Unreleased |
Unreleased grant budget for all the 3 donors should be approved prior to billing. |
4.3.2.1 Create Unreleased Grant Budget
O. Steps to create an unreleased grant budget / Transaction Code: GM_CREATE_BUDGET
O.1. Enter GM_CREATE_BUDGET in the Command field.
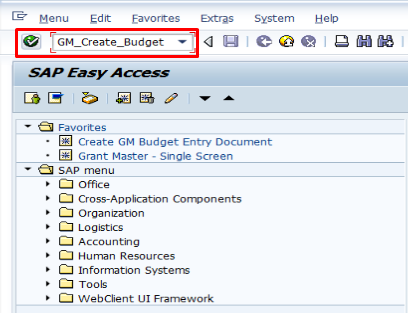
O.2. Click the Enter icon à the GM Budget - Create Document screen appears next.
O.3. Select ENTR Enter from the Process drop-down menu.
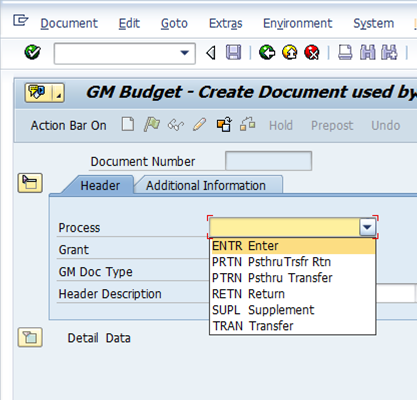
The descriptions for the options in the Process drop-down menu are as follows:
· ENTR Enter: Original budget created based on the Donor Agreement.
· RETN Return: To reduce the budget.
· SUPL Supplement: To increase the budget for subsequent budgeting, e.g. in case of amendments.
· TRAN Transfer: Transfer within a grant, from one sponsored class to another sponsored class.
O.4. Enter the grant name in the Grant field.
O.5. Enter EU in the GM Doc Type field (EU: Unreleased Budget).
O.6. Enter the description in the Header Description field.
O.7. Enter 0 in the Budget Version field - this value should always be 0 - and click Enter icon.

O.8. Based on the Cost Plan developed by the program manager, the user has to budget how the money is spent. There are two methods to enter the budget:
· Total Amount: The Total Amount method is used when the sponsor's donation is inclusive of the indirect costs. In this case, the amount to budget is entered in the Total Amount column. When the user presses the Propose IDC button, the PSC line and the Net Amount and Total Awarded columns are automatically updated.
· Net Amount: The Net Amount method is used when the sponsor's donation does not include the indirect costs. In this case, the amount to budget has to be calculated by the user and entered directly in the Net Amount column.
To switch between the methods, click the Extras menu and select Workbench settings. Then, select the method from the Amount Type drop-down.
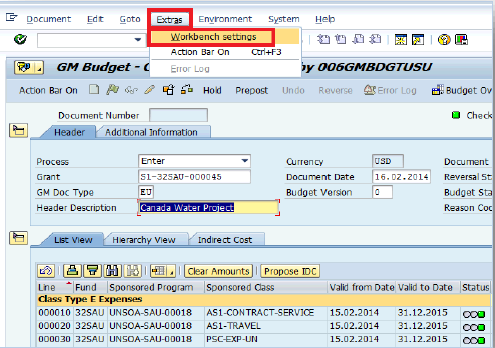
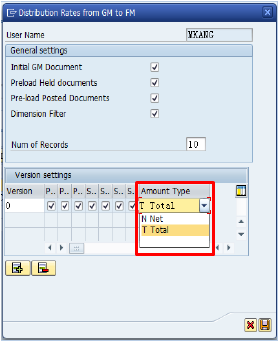
O.9. Using the Total Amount method, enter an appropriate budget for each line item in the Total Amount fields.
O.10. Click the Propose IDC button in order for the IDC to be generated.
The Net Amount and Total Awarded columns are updated automatically and the PSC class captures the IDC value depending on the rate set up on the grant Master Data.
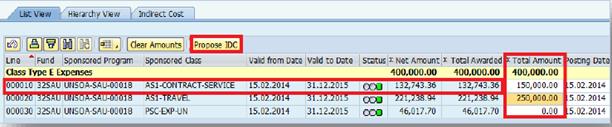
O.11. Click the Save icon.
O.12. Click the Prepost button.
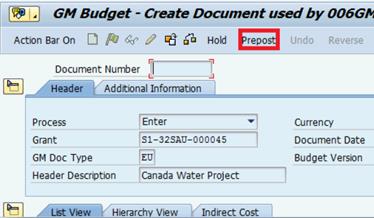
O.13. A message 'Document xxxxxxxxxx can be only displayed because it is in a workflow process' displays in the screen. Click the Continue icon to prepost the document.
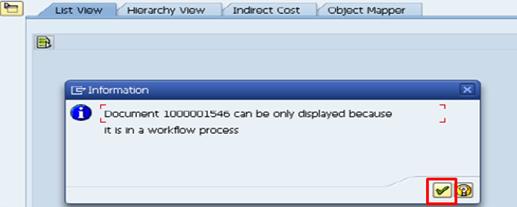
O.14. A message 'Document xxxxxxxxxx has been preposted successfully' displays in the screen. Click the Continue button to release the document to the workflow for approval.
4.3.2.2 Approve Unreleased Grant Budget
When the Budget Unreleased User creates an unreleased budget document and preposts it, a message is sent through the Umoja Business Workplace to the Approver that a document is ready for approval.
P. Approving unreleased grant budget / Transaction Code: SBWP
P.1.
Enter SBWP in the Command field and press Enter or
click the Business Workplace ![]() icon.
icon.
P.2. In the Umoja Business Workplace, navigate to Inbox > Workflow > Grouped according to task > GM Document Approval Process.
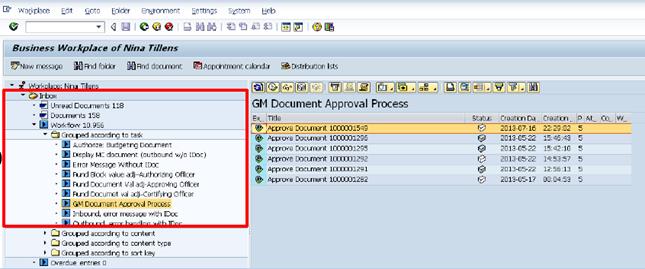
Note: GM Document Approval Process appears only when there are documents to be approved.
P.3. Click on the document to be approved.
P.4. When the budget document appears, select one of the following options:

· Approve Document
· Reject Document
· Decide Later
Note: If the Approver approves or rejects the document, it is removed from the list of documents for approval. The approved or rejected document will appear in the Budget Creator's folder with the notification that the document was approved or rejected.
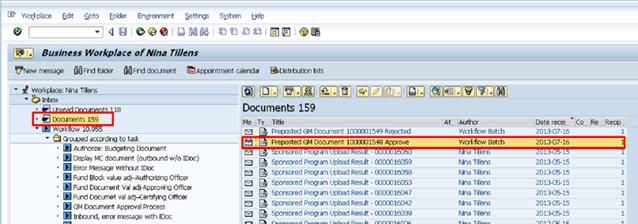
If the Approver decides to approve the document later, the document remains in the Approver's inbox in the list of documents for approval but the status of the document changes from Ready to In Process.
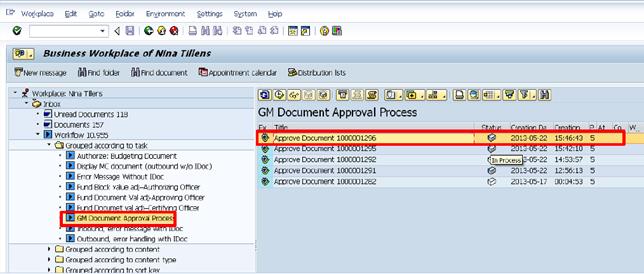
Q. View the users (agents) assigned to approve a budget document / Transaction Code: GM_DISPLAY_BUDGET
Q.1. Enter GM_DISPLAY_BUDGET in the Command field and click Enter icon à the GM Budget - Display Preposted Document screen appears.
Q.2. Enter the document number and press Enter.
Q.3.
Once the document appears, click the Services for Object ![]() icon
and select Workflow > Workflow overview.
icon
and select Workflow > Workflow overview.
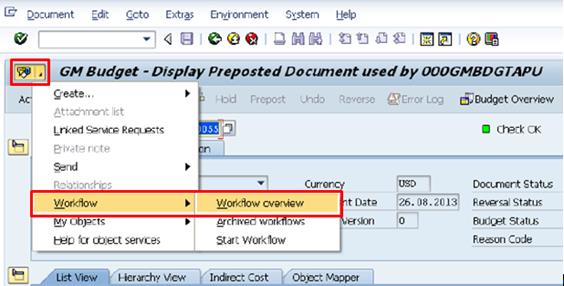
Q.4.
Click the Display workflow log ![]() icon.
icon.

Q.5. Click the Agents icon.
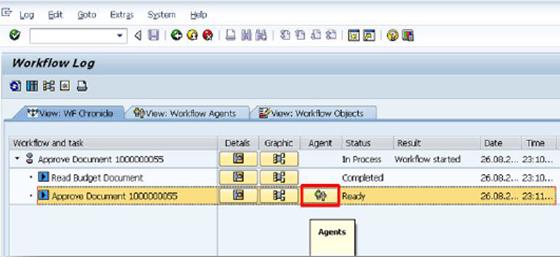
Q.6. In the pop up window, click on Agents button to display agents who with the authority to approve the budget document.
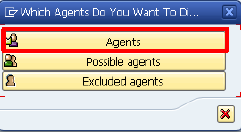

4.3.3 Conduct Grant Billing / Applied Deposit
After the Donor agreement or amendment is signed, scanned and uploaded into Umoja, the Grant Billing process is performed. The process of generating the revenue accounting entries in the Grants Management module is referred to as Billing and the process of recording the revenue accounting entries directly in the Accounts Receivable module is referred to as Manual Billing.
For monetary contributions, appropriate revenue and Account Receivables are recorded based on the recognition criteria and in compliance with the IPSAS requirements. For contributions in kind, the Fair Market Value (FMV) is recorded as revenue.
It is important to note that the grant must be in Award/Operational status before billing process can take place. This status enables the system to generate the sales order to facilitate the recording of the accounting entry.
Steps in the Grant Billing process are as follows:

Umoja processes
|
Process |
Umoja role |
Explanation |
For steps refer |
|
Verify Standard Order |
GM Account Approver |
When the grant status is set to 'Award/Operational' the integration of GM and SD (Sales and Distribution) modules create the Standard Order automatically. In this step we verify and make sure that the parameters of the Standard Order are in alignment with other grant related parameters |
|
|
Maintain billing plan |
GM Account Approver |
Billing Plan contains the details: the billing type, billing schedule along with the amounts to be billed, payment due date, its start date etc. |
|
|
Remove billing block |
GM Account Approver |
Billing block is removed for line items that are ready to be billed |
|
|
Perform grant billing |
GM Account Approver |
The billing program is executed which create invoices |
|
|
Verify invoice |
GM Account Approver |
The created invoices are verified for appropriate details |
|
|
Check customer account |
GM Account Approver |
This is an additional step to verify the customer details in a summarized fashion |
|
|
Process payment |
GM Account Approver |
Unless the payment is received, spending authority cannot be approved for this grant |
4.3.3.1 Verify Standard Order Information
When a grant status is set to Award/Operational, the integration of the GM and SD modules automatically creates a Standard Order.
R. Steps to verify the Standard Order information / Transaction Code: GMGRANT
R.1. Enter GMGRANT in the Command field and press Enter.
R.2. Enter the grant number and press Enter.
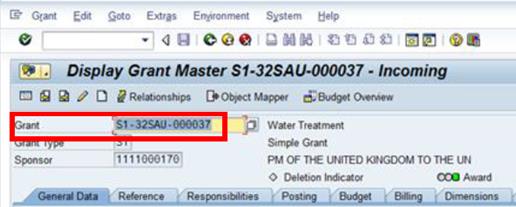
R.3.
Click the Change ![]() icon.
icon.
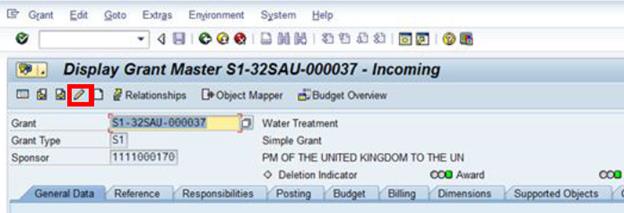
R.4. On the Billing tab, double-click the Sales document number to check the account assignment of the sales order.
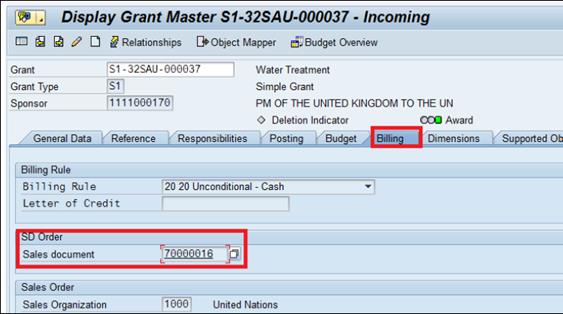
R.5. In the opening screen, on the Sales tab, double click the material number in the Material field.
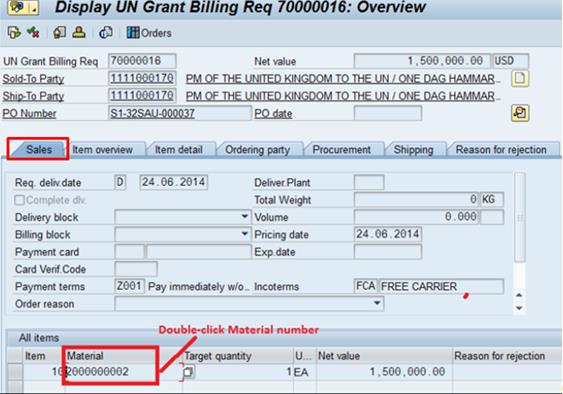
R.6. Click the Account assignment tab and verify the following information:
· Business Area matches the Cost Object (WBS Element or Internal Order).
· WBS Element or Order (IO) number matches the number listed on the grant.
R.7.
Click the FM AccAssignt ![]() button.
button.
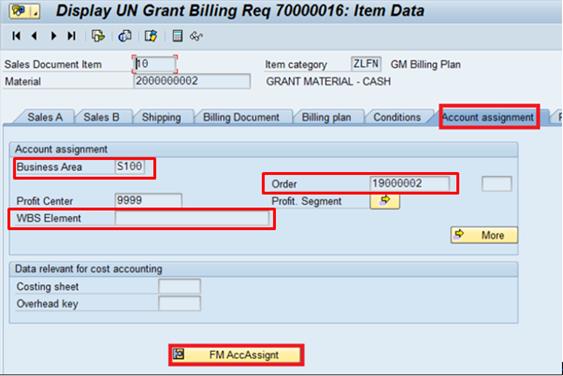
R.8. In the pop window showing FM dimensions, verify that the following information matches the information reflected in the corresponding Internal Order or WBSE.
· Funds Center
· Fund
· Functional Area
· Funded Program
· Grant
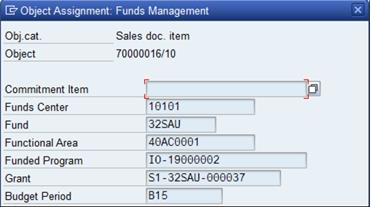
Note: Use transaction code KO03 to display Internal Order and verify the information.
R.9. Click the Enter icon to exit the pop up window.
4.3.3.2 Maintain Billing Plan
This process consists of updating Billing Dates in Billing Plan and Payment Due date on the Billing tab of the grant master data. Following the previous process (verifying standard order information), this process is to be performed in the Change mode.
S. Maintain billing plan / Transaction Code: GMGRANT
S.1. Enter GMGRANT in the Command field.
S.2. Click the Enter icon.
S.3. Open the grant for which billing is needed in the Change mode and select Billing Plan from the Environment menu.

S.4. On the next screen (Change Dates for Billing Plan) enter the revenue recognition date on the Start date field of the Billing plan section. Following the equation below, the same date should be entered in the Billing Date field.
Donor Agreement Date = Revenue Recognition / Conditional Liability Date = Billing Date
Note: The system defaults Billing Plan Start date to current date. This needs to be changed to the revenue recognition date. No billing document will be created when the Billing Date precedes the Start date.
S.5. Enter the amount to be billed in the Bill value field.

Note: Each line is equivalent to one billing document. Billing can be handled as one document for the entire amount or multiple documents that bill in several installments over time. Refer to section 4.3.3.2.1 for different billing scenarios of unconditional agreement, including billing in installments.
S.6.
Click the Enter ![]() button
à the system automatically places
the Billing Block.
button
à the system automatically places
the Billing Block.
S.7. Once the entries are validated, hit the Back button.
S.8. Click Yes from the pop up window that appears.

S.9. Back in the grant master data screen, click the Billing tab.
S.10. In the Payment Due Date section, enter the Payment Due Date.
The payment due date will become the Baseline Date of the Customer Accounts Receivable document and will be used in conjunction with the payment terms to calculate Due Date of accounts receivable aging document.
Note: The system has automatically entered the code '02' under the Block column.
S.11.
Click the Enter ![]() button
to validate and then Save the document.
button
to validate and then Save the document.
4.3.3.2.1 Grant Billing for Unconditional Donor Agreement
The UN IPSAS policy does not differentiate unconditional multi-year funding agreements where donor specifies in which period funds will be used against those agreements where there is to specification. For both types of unconditional agreements, the revenue is recorder or recognized upfront.
Following are possible scenarios for unconditional grants billing.
|
Scenario |
For steps refer |
|
Single year - One payment tranche |
|
|
Single year - Multiple payment tranches |
|
|
Multiple year funding - One payment tranche due in first year |
|
|
Multiple year funding - Multiple payment tranches over several years |
T. Scenario 1: Single year - One payment tranche
Donor agreed to fund a UN project with a lump sum contribution of USD 1 million. The stipulations in the Donor Agreement do not impose a condition.
T.1. In this case, the total USD 1 million is recognized in full, upfront on the date the agreement is signed (Donor Agreement date) which will be the Billing Date and the Start date recorded/entered in the grant master data 'Change Dates for Billing Plan' screen.
T.2. Enter the Payment Due Date on the Payment Due Date section of the Billing tab in the grant master data.

T.3. The general ledger of the accounting entry:
U. Scenario 2: Single year - Multiple payment tranches
A donor entered into an unconditional agreement to build a water system for a contribution of three payment tranches:
10.07.2014 - USD 1,000,000
01.09.2014 - USD 600,000
01.12.2014 - USD 400,000
U.1. In accordance with UN IPSAS policy, revenue for all three tranches is recorded at the date of signing of the Donor Agreement. Therefore, three billing line items should be entered in the Change Dates for Billing Plan screen with the same revenue recognition dates as the Billing Dates.
U.2. Back to the grant master data enter the Payment Due Date as stated in the agreement on the Payment Due Date section of the Billing tab.

Note: It is important to enter the correct Payment Due Date as the due dates are considered in the aging process that determines the allowance for bad debt.
U.3. Accounting entries:
First instalment
Second instalment
Third instalment
V. Scenario 3: Multiple year funding - One payment tranche due in first year
An unconditional binding agreement signed on 15 July 2014 includes a USD 4,000,000 contribution due immediately. The donor stipulated that the funds should be used over three years as follows:
Year agreement is signed - USD 1,000,000
01.01.2015 - USD 1,000,000
01.01.2016 - USD 2,000,000
V.1. As revenue is recognized when the agreement becomes binding, unless there is 'conditionality', the full amount is recorded as revenue on the date the agreement is signed. In this case, the billing process is the same as scenario 1 (T) where only one billing document is created and the Start date and Billing Date will have the same date as the signed agreement.
W. Scenario 4: Multiple year funding - Multiple payment tranches over several years
An unconditional binding agreement signed on 15 July 2014 includes a USD 4,000,000 contribution with three payment tranches due as follows:
Upon signing of agreement - USD 1,000,000
01.01.2015 - USD 1,000,000
01.01.2016 - USD 2,000,000
W.1. In this scenario, the full amount relating to the unconditional multiyear agreement is recognized as revenue when the agreement is signed even though the donor is paying over three years.
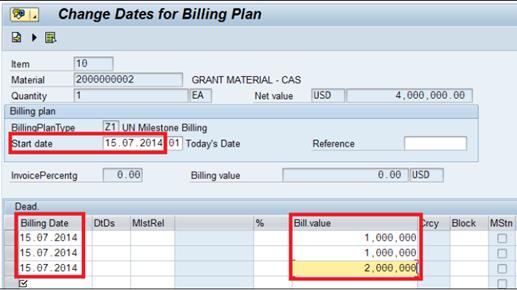
W.2. The billing process follows the same process as scenario 2 except that the Payment Due Dates in the Billing tab of the grant master data are in different years.

W.3. Accounting entries:
First instalment
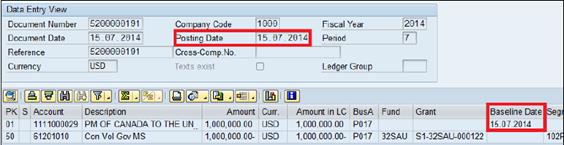
Second instalment
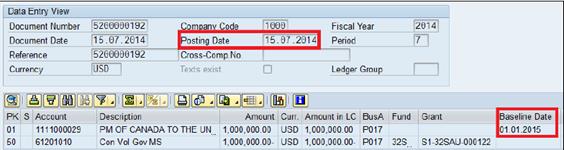
Third instalment
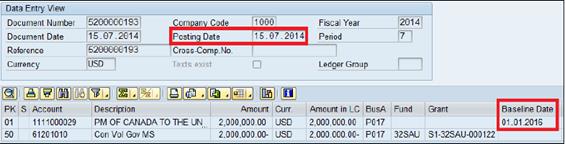
4.3.3.2.2 Grant Billing for Conditional Donor Agreement
As per UN IPSAS policy, all agreements with the European Commission under Financial and Administrative Framework Agreement (FAFA) are considered to be conditional. The agreements specify conditions the UN must satisfy before the revenue in respect can be recognized. These arrangements would require the recognition of a liability if above the threshold of USD 50,000.
The billing process for this particular case is similar to those of unconditional billing scenarios except for the applicable Billing Rule for conditional contribution agreement is 'Conditional - Cash' and the associated general ledger accounts are 3810XXXX to record the conditional liability.
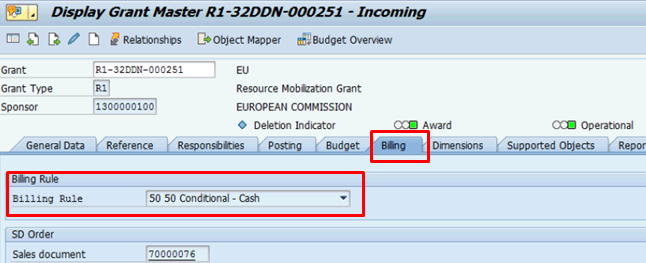
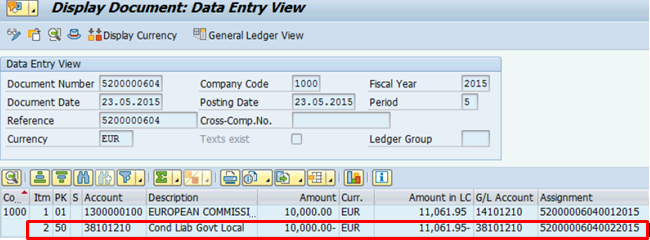
4.3.3.3 Remove Billing Block from Billing Plan
The billing block is a code (02) that the system puts in place automatically when the billing plan is saved. It gives the GM Account Approver the discretion when to process billing.
After review of the grant master data and the billing process, the GM Account Approver removes the billing block to allow the recording of the accounting entry in the system. This process is first done via test run to ensure accuracy. The activity is then repeated without a test run.
X. Steps to remove the billing block / Transaction Code: GM_BILL_PLAN_STATUS
X.1. Enter GM_BILL_PLAN_STATUS in the Command field.
X.2. Click the Enter icon.

X.3. Populate appropriate data in the following fields to search for the grant and the specific billing block:
· Grant
· Sponsor
· Billing Date
· Billing block: 02
X.4. Make sure that the Test Run box is checked and that the Unblock more than one item check box is unchecked then click the Execute icon.
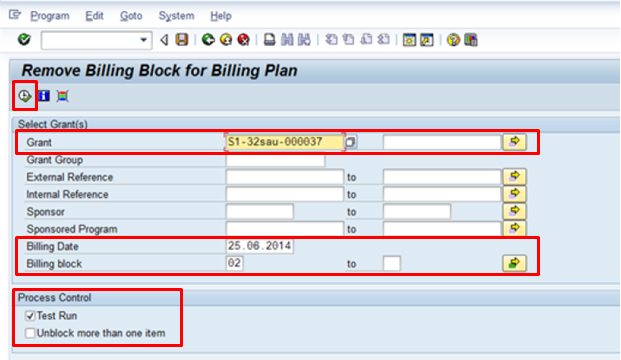
X.5. On the next screen, confirm that the grant information is accurate.
· Note the green light (status) on the left side of the grant number.
· Scroll to the right and note the code 02 (billing block) is shown under the BBD column.

X.6.
Click the Back ![]() icon
to return to the initial screen.
icon
to return to the initial screen.
X.7. Clear the Test Run check box and click the Execute icon.
X.8. Confirm that the status is displayed without an 'x' in the Test Mode column and the code 02 in the BBD (Billing Block) column. The absence of both indicates that the billing block has been successfully removed.
X.9.
Click the Back ![]() icon
to exit.
icon
to exit.
4.3.3.4 Perform Grant Billing
The system runs a batch program automatically every day and posts the accounting entry when the billing block has been removed. The Accounts staff will review the output report of the batch program and the GM Account Approver can post the accounting entry of the billing document manually when necessary. It is important to review the documents posted by the batch program as it is possible that billing documents are generated without corresponding accounting entries.
Y. Steps to manually post accounting entry of the billing document / Transaction Code: GM-MLST
Y.1. Enter GM_MLST in the Command field.
Y.2. Click the Enter icon.
Y.3. On the opening screen, enter the billing date range and specific grant/grants to be billed.
Y.4. Click the Execute icon.
Y.5. Select the appropriate line item and click the Simulate billing button. Confirm that a green checkmark appears in the Status column.
Note: If the green checkmark does not appear, exit and review if the billing steps were properly followed and that the account assignment in the sales order has the FM dimensions.
Y.6.
Now that the grant billing has been validated, the accounting
entry can be posted. Click the Bill Grants ![]() button.
button.
Y.7.
Click the Log for Billing doc. ![]() button.
button.

Y.8. The next screen shows two green boxes indicate that the posting was successful. The first green box means that the accounting entry was generated successfully and the second green box means that the billing document was also generated successfully.
If a red circle appears on the first line instead of a green box, it means that the system was not successful in generating the accounting entry. In most cases, the error is due to an inconsistency between the billing start date and the billing date on the billing plan. The followings are steps to correct the error:
Y.8.1. Cancel the billing document / Transaction Code: VF02
Y.8.1.1. Enter VF02 in the Command field and press Enter.
Y.8.1.2. Enter the Billing document number and press Enter.
Y.8.1.3. On the next screen, click on the Billing document from the top navigation menu and select Cancel à the system will generate another billing document for the cancelation of this document.
Y.8.1.4. Click the Save icon à a message will appear at the bottom of the screen with the document number created to reverse the original billing document.
![]()
Y.8.2. Correct the billing date in the corresponding Sales Order document / Transaction Code: VA02
Y.8.2.1. Enter VA02 in the Command field and press Enter.
Y.8.2.2. On the initial screen, enter the Sales Order number and press Enter.
Y.8.2.3. Click the Header button showing on the next screen.
Y.8.2.4. Locate the Billing Document tab and change the Billing Date to reflect the revenue recognition date.
Y.8.2.5. Click the Save icon.
Y.8.3. The system will now allow the user to enter new/corrected dates in the Billing Plan of the grant master data. Refer to section 4.3.3.2 for detailed steps.
Y.9.
Note the billing document number (52XXXXXXXX). Click the Back ![]() icon
to exit.
icon
to exit.
4.3.3.5 Verify Accounting Entries, Invoice and Grant Information
Continuing with the example of unconditional grant in section 4.3 above, when the billing process is completed the system will automatically generate the following accounting entries depending on the parameters maintained in the Sales Order / billing section:
Accounting entry on recognition of revenue
|
Date |
GL |
GL short description |
Debit |
Credit |
|
1-Jul-14 |
14101010 |
AR Volunt Mmbr St |
1,000,000 |
|
|
|
14101010 |
AR Volunt Mmbr St |
1,000,000 |
|
|
|
14101410 |
AR Volunt Intergovernment NGO |
2,000,000 |
|
|
|
61201010 |
Contrib Volunt Cash Govt Member St |
|
2,000,000 |
|
61201410 |
Contrib Volunt Cash Intergovernment NGO |
|
2,000,000 |
Accounting entries of individual billing document can be verified using transaction code FB03 and the invoice and grant information can be verified using a Grants Management: Line Item Display report.
Z. Verify accounting entries of a billing document / Transaction Code: FB03
Z.1. Enter FB03 in the Command field and click the Enter icon.
Z.2. Enter the billing document number in the Document Number field and the Company Code then click the Execute button.
Z.3. The next screen shows the Data Entry View of the accounting entry.
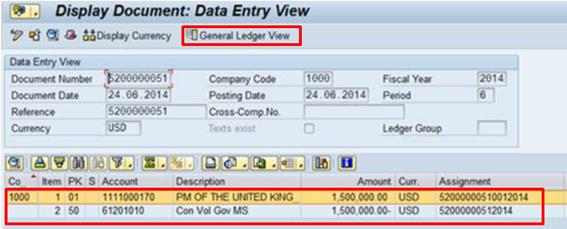
Z.4. Click on the General Ledger View button to show the reconciliation account replacing the BP donor showing in the previous Data Entry View.

Z.5. Click the Back icon to exit.
AA. Verify invoice and grant information / Transaction Code: S_PLN_16000269
AA.1. Enter S_PLN_1600269 in the Command field and press Enter.
AA.2. To verify grant information, enter the grant number and click the Execute icon to run the report.
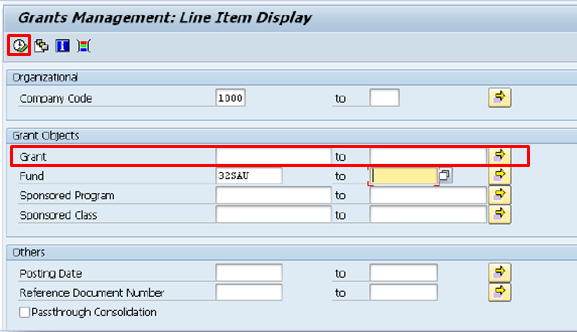
AA.3. The report generated will show detailed grant information, such as Sponsored Class, Fund, Reference Document/Invoice Number, Posting Date, GL accounts, etc.

4.3.3.6 Check Customer Account
In addition, the sponsor accounts can be checked to view outstanding receivables.
BB. Steps to check the customer account / Transaction Code: FBL5N
BB.1. Enter FBL5N in the Command field.
BB.2. Click the Enter icon.
BB.3. Enter the Customer account number and click the Execute icon.
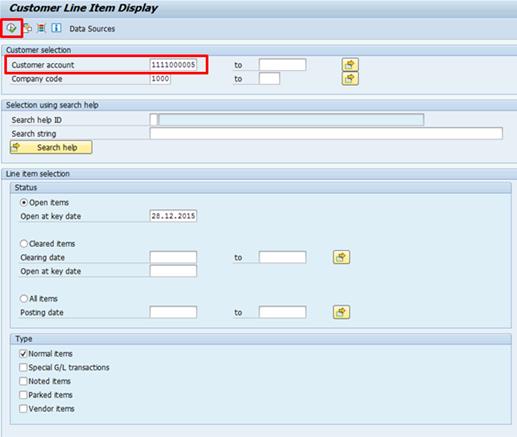
BB.4. Review the customer account information.
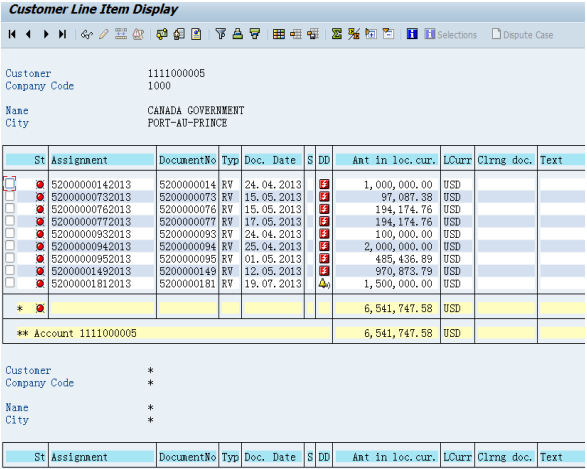
4.3.3.7 Process Payments
After the grant billing has been completed, the incoming grant payments are processed and cleared (T-codes FEBAN, F-28). This process is done by Accounts Division with assistance from the Treasury, as required. The deposit from a donor can be made towards one or several donor agreements. Each agreement can be represented by one grant or a group of grants.
Each grant representing a Donor Agreement might have several line items on the billing plan. Each line item corresponds to the customer invoice. Thus, the deposit transferred by the donor might represent payments against several invoices against the same grant or different grants. It might also represent partial payment against one particular invoice or partial payment against one grant (several invoices against the same grant where some of them are cleared and some will be still outstanding).
The Bank Statement is uploaded through T-code FF.5 - creating the bank reconciliation document. The T-code FEBAN is used to apply the deposits. As a result of cash clearing through FEBAN, the clearing document (incoming payment document type DZ) is created in the system. The clearance through FEBAN can be done using residual or partial receipt. It will support the following major scenarios:
· Partial receipt of funds (using only Partial Payment Method) or receipt of the full amount;
· Receipt of funds to the USD account in currency different than USD;
· Receipt of funds in non-USD currency on non-USD account;
· Funds deposited against several Donor Agreements.
If the deposits are not applied during the month using T-code FEBAN, at the month-end the receipts are moved to unapplied receipts GL 39201010 (AP Unapplied Cash). Currently it is done manually.
To clear unapplied receipts the T-code F-28 is used, and this creates the FI clearing document (DZ Type). Refer to section 3.2.2 of Chapters on Accounts Receivable and section 3.4.1.4 of Chapter on Cash Management for detailed steps to process incoming payments.
Once cleared in the system, the receipt of funds is formalized by an acceptance letter, notifying the donor that the contribution was received for the purposes specified by the donor. Cash Receipt Voucher is a supporting document that the UN sends together with the official correspondence.
CC. Steps to generate Cash Receipt Voucher in Umoja:
CC.1. Access the Receipt Voucher - T-code ZTR_DISP_CRV
Enter the T-code ZTR_DISP_CRV in the Command field or access through SAP Easy Access.
CC.2. The Receipt Voucher Form screen is displayed.

CC.3. Enter Clearing Document Number.
The receipt voucher can be searched by
individual values or ranges of selection criteria as well as multiple criteria
for each section, by clicking icon ![]() .
.
Note: Clearing Document Number is a required fields, however, the * sign can be entered for all clearing documents in the system and limit the criteria by other selection criteria.
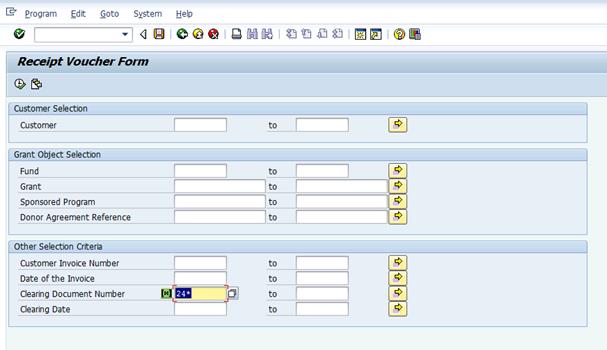
CC.4. Click
the Execute icon![]() .
.
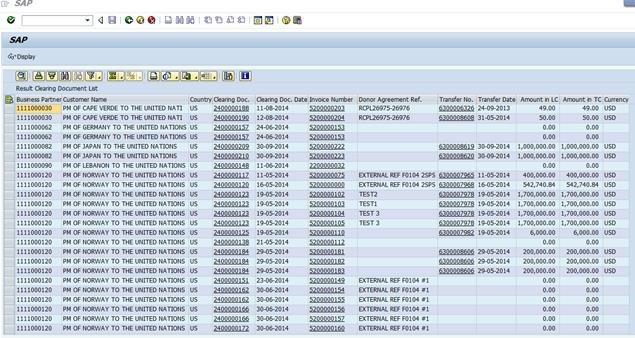
Note: There might be several lines corresponding to one clearing document as there might be several invoices against the same clearing document. Regardless if the user select all relevant lines or only one, the system will generate the Receipt Voucher Form.
CC.5. Hold Ctrl key and select the rows by clicking on the grey button at the beginning of each row.
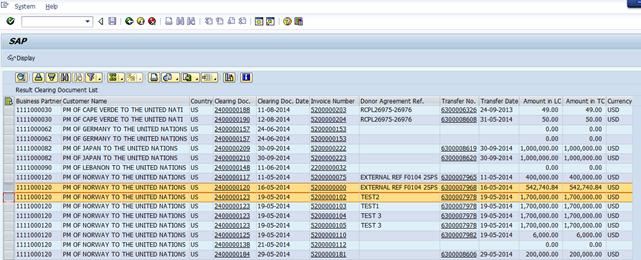
CC.6. Click the Display button.
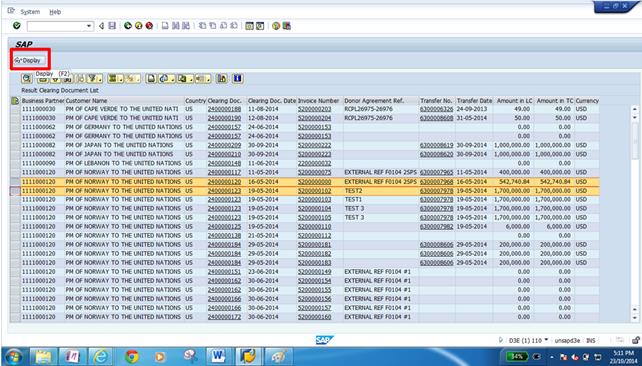
CC.7. Review the Receipt Voucher Form.
CC.7.1. For drilling in clearing document, bank reconciliation document and customer invoice document, click the document number.
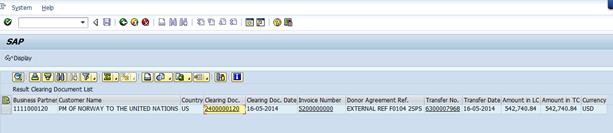
CC.7.2. The new screen is open - Display Document: Initial Screen for General Ledger View.
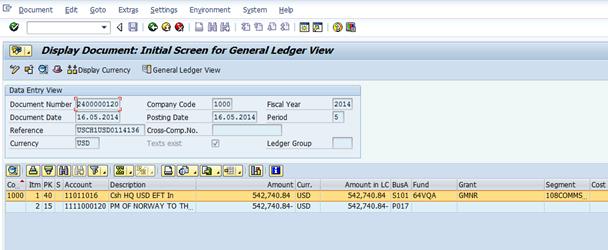
CC.7.3. Entry view can be changed to General View by clicking on General Ledger View icon.

CC.7.4. Other documents can be viewed including grant document via Environment:
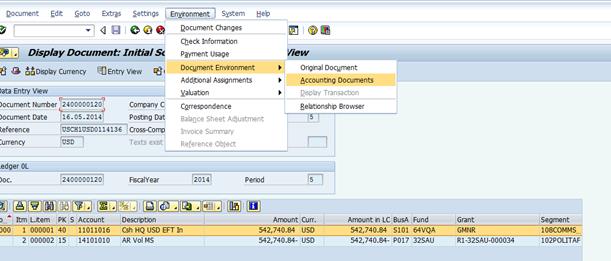
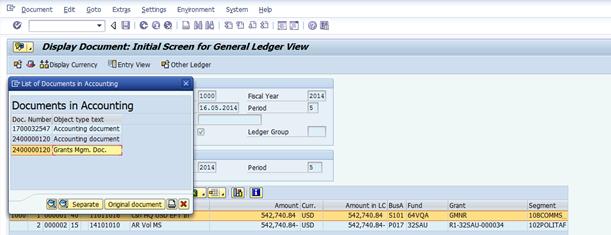
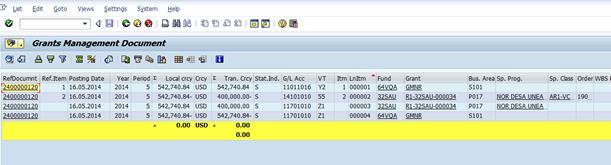
CC.7.5. For the pdf review click Goto.

CC.8. Save the document. At this point the document can also be printed.
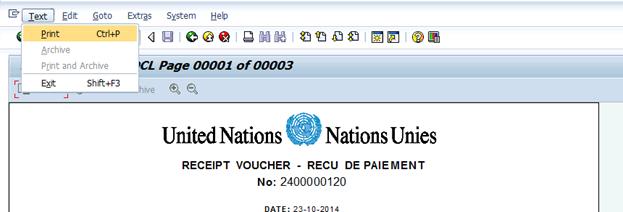
CC.9. Save variants of the search.
CC.9.1. Click Goto > Variants to save variants of the search.
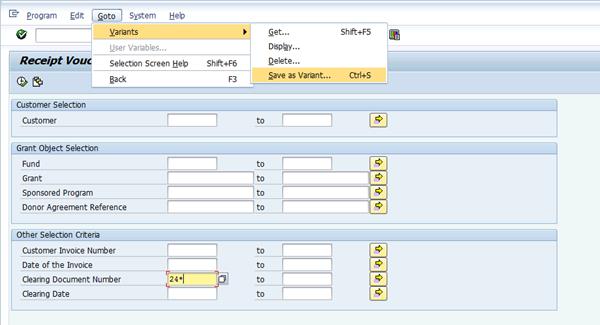
CC.9.2. Fill in the Variant Name and Description and save.

CC.9.3. Re-enter the T-code ZTR_DISP_CRV and click the Variant icon.
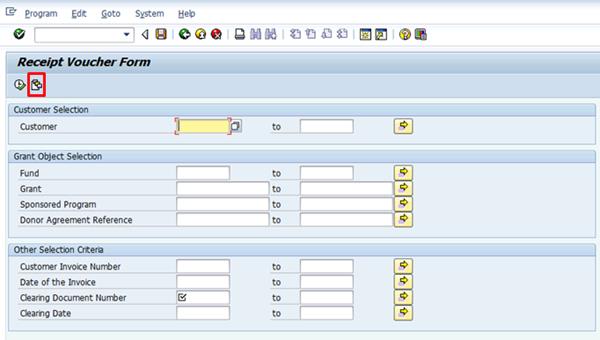
CC.9.4. The new screen ABAP: Variant Directory of Program ZTR_PR_CRV_FROM is displayed.
CC.9.5. Select the variant. Criteria 24* is saved.
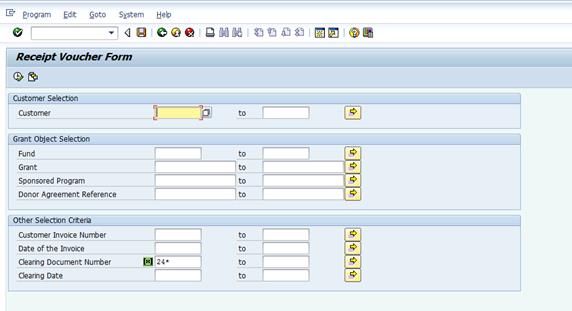
CC.10.Add Remarks to the Cash Receipt Voucher
CC.10.1.Go to the T-code ZTR_DISP_CRV and search by Clearing Document Number.
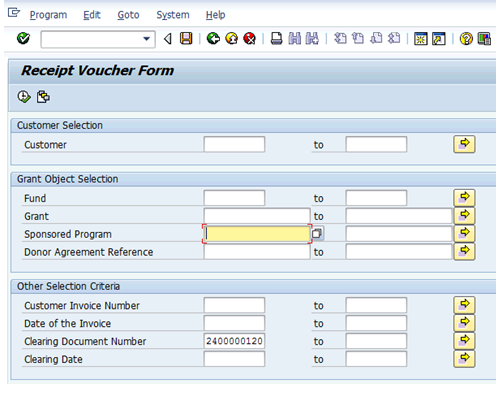
CC.10.2.Click Execute
icon ![]() .
.
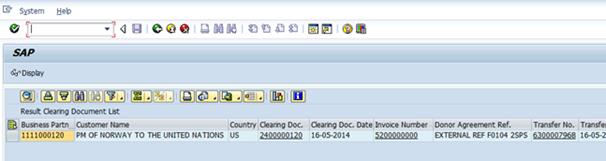
CC.10.3.Drill in the Clearing Document by clicking on it.
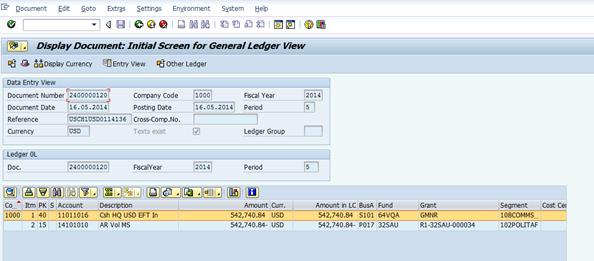
CC.10.4.Change Enter View to General Ledger View by clicking on General Ledger View icon
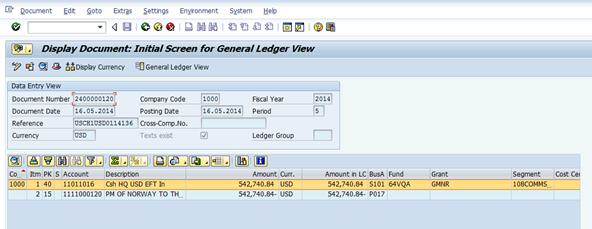
CC.10.5.Go to Document > Display-Change on the tool bar to go to change mode.
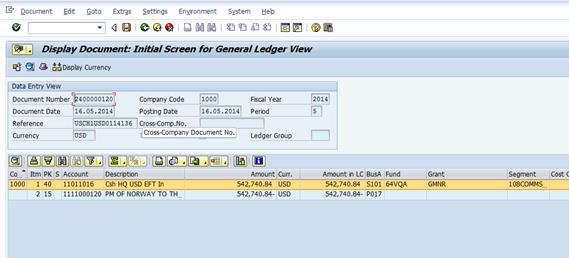
CC.10.6.Once in a change mode, go to Extras > Texts.
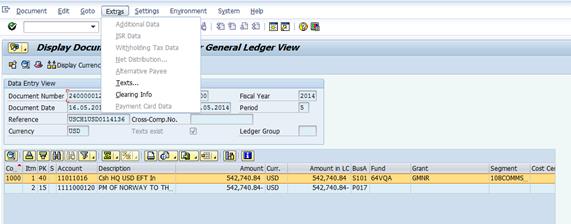
CC.10.7.In the pop-up window see 'Receipt Voucher Remarks'
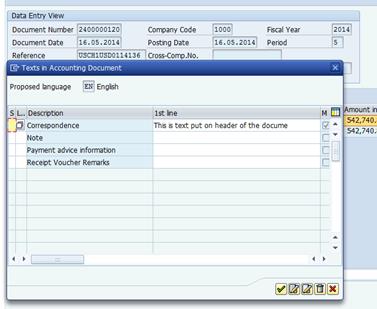
CC.10.8.Double click on the Receipt Voucher Remarks.

CC.10.9.Insert the text
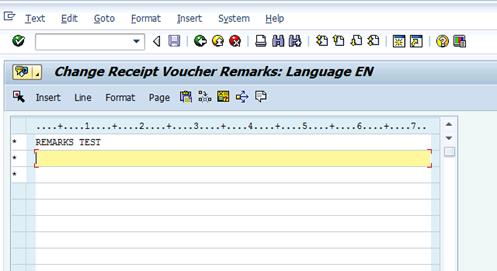
CC.10.10. Green check the pop-up document for Texts and Accounting Document.

CC.10.11. Save the document. The system will bring back to the selected clearing document screen.

CC.10.12. Display the Receipt Voucher and note the text in the remarks field.
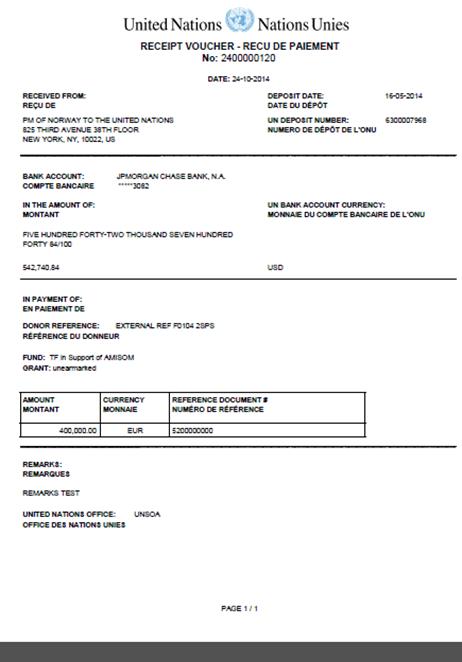
CC.11.Receipt Voucher Legend.
To faciliate understanding of the fields, below is the explanation of the fields of the Receipt Voucher where each field is marked with the number. The fileds are groups by numbers to explain the purpose and origin of the fields in the table below.
|
Field Numbers |
Purpose |
Origin |
|
1, 2, 3, 4, 5, 7, 9, 11, 13, 15, 18, 21, 23, 24, 26, 28, 30, 32, 34, 36 and 38 |
Logo and Texts |
Hard Corded text and images |
|
6 |
Receipt Voucher Number |
Is a Clearing Document Number |
|
8 |
Date of Generation of Receipt Voucher |
Date when the Voucher was generated. This date is generated by the system. |
|
10 |
Name and address details of the Business Partner (Donor) |
Values originated from Business Partner (Donor) used on the Grant |
|
12, 14, 16, 17, 19, 20, 22 |
Bank related information: Name of the bank (16), four digits of the bank account (17), date of creation of the bank reconciliation document (12), its number (14), amount of the funds transferred (19 and 20), currency of the bank account (22) |
Coming from the reconciliation bank document that is created as a result of the upload of the Bank Statement via FEBAN |
|
25 |
Donor's Reference |
Coming from the External Symbol on the Grant Master Data on the Reference Tab |
|
27 |
Fund Name |
Coming from the long description of the Fund Master Data Object. This fund is an external fund on the Grant that was originally billed. |
|
29 |
Grant Name |
Coming from the long description of the Grant |
|
31, 33, 35 |
Customer Invoice Related information: Amount, Currency, document # |
Coming from Customer Invoice. Cleared Amount (in the Donor Agreement Currency). In case of clearing full amount show the customer invoice amount in the currency of the transaction (donor agreement). In case of partial payment (partial clearing), show the cleared amount in the Donor Agreement Currency at the UN exchange rate. |
|
37 |
Remarks, explanations and clarifications recorded on the clearing document |
Coming from the text on the clearing document |
CC.12.Impact of the changes in process.
It is also important to understand that changes in the processes and other dependencies listed below might result in errors or misrepresentation of the receipt voucher form.
· Change in FI processes for receipt and clearing/application of deposits
· Change in billing process (if any changes the form logic for billing the form has to be revisited)
· Change in the Treasury design, bank statement upload, etc.
· Change in structure of BP
· Change in the bank statement upload process, bank account structure.
· The fields on Master Data Objects for Fund, Grant, Sponsored Program and Business Partner, Business Area should be properly maintained
· Text on the clearing document has to be properly maintained. Dependencies on the user to correctly reference bank reconciliation document in the clearing documents in the scenario with GL 39201010 unapplied/suspense account
From the example of unconditional grant in section 4.3 when the payment is received, the following accounting entries will be generated depending on the nature of the transaction being processed, for example advance payment received, payment for invoice.
Accounting entry on receipt of cash from donors
|
Date |
GL |
GL short description |
Debit |
Credit |
|
1-Jul-14 |
11701010 |
Cash Held in UNHQ Main Pool |
2,000,000 |
|
|
|
14101010 |
AR Volunt Mmbr St |
|
1,000,000 |
|
|
14101010 |
AR Volunt Mmbr St |
|
1,000,000 |
|
Date |
GL |
GL short description |
Debit |
Credit |
|
2-Jul-14 |
11701010 |
Cash Held in UNHQ Main Pool |
2,000,000 |
|
|
|
14101410 |
AR Volunt Intergovernment NGO |
|
2,000,000 |
4.3.3.8 Special Grant Billing Scenarios
Following are some possible scenarios of grants billing which requires different processing.
4.3.3.8.1 Small Contributions Received in Cash or Cheque
The UN receives small contribution without donor agreements from one time donors, unknown donors or the public in the form of cash or cheques. These contributions do not require the creation of an individual grant and there is no billing process. For these types of donations, each entity will create one R1 grant what will capture the revenue and one M1 grant for the budgeting and recording of expenses. The sponsor on the R1 grant is a generic sponsor for 'UN Public Donations' (1400000825).
Since Cashiers receive the cash or cheques, the recording of the corresponding revenues will be through the cash journal using transaction code FBCJ processed by Cashier and no receivable balance is being created. The budget will be released against the M1 grant based on the cash balance.
Refer to section 3.3.2.4 of Chapter on Cash Management for detailed steps in processing cash or cheques received.
4.3.3.8.2 Grant Billing with Multiple Sponsored Programs
A three-step process is to be followed for cases where a donor signs a grant agreement to fund multiple Sponsored Programs.
DD.Process billing in the GM against one Sponsored Program
Follow the steps of the grant billing process in section 4.3.3.
EE. Create IOs for the additional Sponsored Programs / Transaction Code: KO01
Creation of IOs will enable the recording of revenue for the additional Sponsored Programs against the same grant. Follow the steps in section 4.3.1.4.1 (H) to create the IOs. This is a prerequisite step before a manual billing can be processed.
FF. Process manual billing for the additional Sponsored Programs / Transaction Code: FV70
The purpose of this step is to record revenue and receivable for the Sponsored Programs against the same grant. When payment is received, it will be applied against the respective Sponsored Programs.
FF.1. Enter FV70 in the Command field and press Enter.
FF.2. In the Basic data tab, fill in the following fields:
· Customer
· SGL Ind (Special GL Indicator): V (AR Voluntary Contribution) - must be used to ensure GL account 141X is derived by the system.

· Invoice date
· Posting Date: defaulted to current date.
· Document Type: DB (UN Grantee Billing)
Note: If the field was hidden,
click on the Editing options ![]() button
and in the opening screen, select Display with short name from the drop
down list of the Doc.type option field. Click the Back icon to
return to the initial screen.
button
and in the opening screen, select Display with short name from the drop
down list of the Doc.type option field. Click the Back icon to
return to the initial screen.
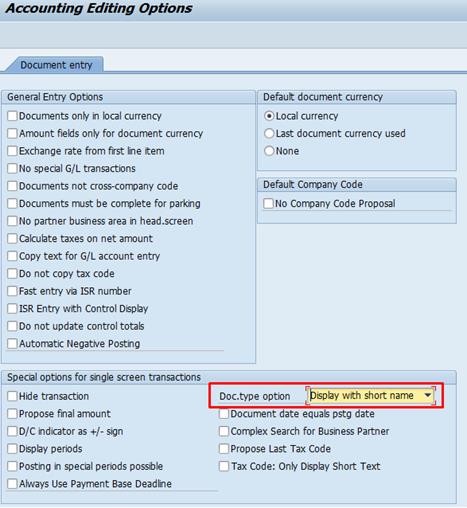
· Amount
· Currency: USD
· Text
FF.3. In the Items section, enter information in the following columns:
· G/L acct: 612XXXXX (Revenue account for unconditional transactions) or 3810XXXX (Liability account for conditional transactions)
· Order: IO number created in previous step (CC)
FF.4. Press Enter to derive Fund, Business Area, Grant, Segment, Functional Area and Fund Center.
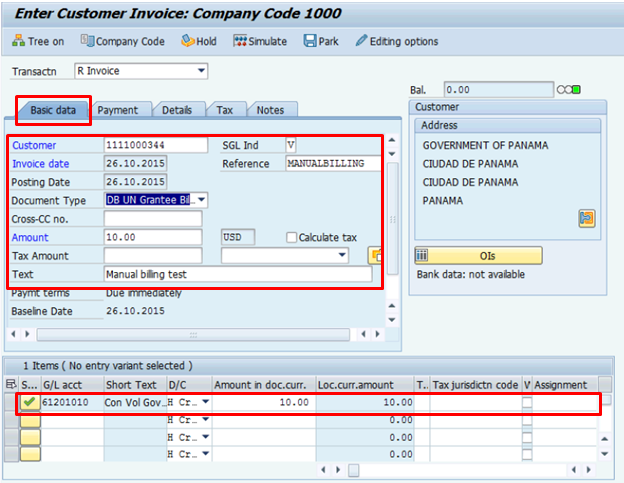
FF.5. In the Payment tab, enter due date as per the Donor Agreement in the Bline Date field.
FF.6.
Click the Simulate ![]() icon
to verify the transaction.
icon
to verify the transaction.
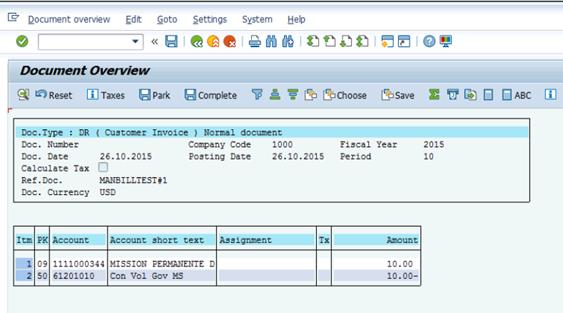
FF.7. Click on the Back icon to return to the initial screen.
FF.8. From the top navigation menu, click on Document and select Simulate General Ledger to review the coding block.
FF.9. Click the Back icon to return to the initial screen and click the Save as Completed icon. Note the document number at the bottom of the screen.
![]()
4.3.4 Create and Approve Released Grant Budget
Releasing a grant involves establishing the grant spending authority and releasing the grant to the FM module for spending.

If the Implementing Partner executes the program and project activities, then the spending authority is released from the Passthrough grant via budget transfer. The released budget is displayed on the grant and represents the spending authority amount.
The main purpose of releasing a grant budget is to ensure that spending is effected in accordance with the donor requirements and restrictions. In Umoja, the process of releasing a budget provides a basis for budgetary control from a donor's perspective (GM) and also from an organizational perspective (FM).
Billing is completed before the budget is released as this release cannot take place without the receipt of cash. If the budgeting changes, the user needs to go back to the unreleased budget and change the amount.
Continuing with the example of unconditional grant in section 4.3, the following steps explain the Umoja process that should be followed to navigate the creation and approval of released grant budgets. This process does not create any accounting entry however expenditure cannot be incurred unless this process is completed.
Umoja processes
|
Process |
Umoja Role |
Explanation |
For steps refer |
|
Create and approve released grant budget |
GM Budget User / Approver Released |
Creation of released grant budget is important from overall management and control of grant funds and acts as a check that funds are not spend unless approved. |
|
|
Transfer budget to Passthrough grant and approve released Passthrough grant |
GM Budget User / Approver Released |
Unless the released budget is transfer to P1 grant amount cannot be paid to the Implementing Partner. |
4.3.4.1 Create Released Grant Budget
The user creates the released grant budget for the M1 or S1 grant. This step must be taken before the budget is transferred from the M1 or S1 grant to the P1 grant. There is no unreleased budget created for a P1 grant. Funding has to be released from an M1 or S1 grant before it can be transferred to a P1 grant.
GG. Create released grant budget for M1 or S1 grant / Transaction Code: GM_BDGT_RELEASE
GG.1. Enter GM_BDGT_RELEASE in the Command field and click the Enter icon.
GG.2. In the Header tab of the GM Budget - Create Released Document screen, enter the following information in the required fields:
· Process: Enter
· Grant: M1 or S1 grant number
· GM Doc Type: ER (Released Budget)
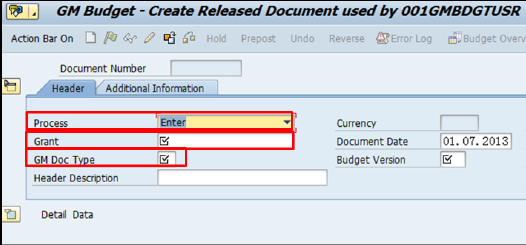
· Header Description
· Budget Version: 0 -this value should always be 0.
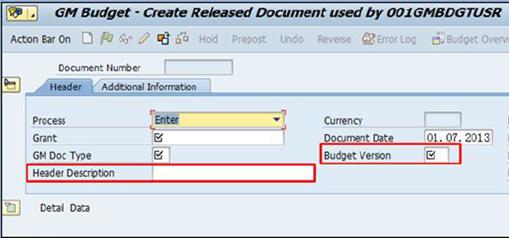
GG.3. Click the Enter icon.
GG.4. The List View tab in the Detail Data section displays the Sponsored Classes contained in the grant's master data as well as the commitment items associated with each Sponsored Class. The top table represents the budget in the GM module, while the bottom table provides a view of the FM objects and defines how funds should be transferred to FM.
GG.5. Each Sponsored Class listed in the GM table corresponds to multiple commitment items displayed in the FM table. If a commitment item spans across more than one budget period, the commitment item will be listed for each budget period. However, amounts can only be released for the current budget period.
Note: To view
commitment item listed in the FM table for a specific Sponsored Class in the GM
table, select the appropriate Sponsored Class line item in the Bdgt Line
dropdown menu ![]() and
press the Enter key.
and
press the Enter key.
GG.6. The GM table displays financial information for each Sponsored Class listed on the grant, including:
· Funding amount available for release.
· Funding amount already released.
· Total amount to be released through this transaction.
· Posting date for the upcoming release of funds.

GG.7. Identify the appropriate Sponsored Class and enter the amount to be release in the ∑ Total Amount field.
GG.8. Enter the posting date for the release of the funds entered in the Posting Date field.
GG.9. Click the Propose IDC button to add indirect costs to the total and press the Enter key.
GG.10. The ∑ Net Amount, ∑ Total Awarded, ∑ Total Amount fields are updated displaying the amount to be released.

Note: The status of the Sponsored Class line item changes from Ok (green) to Error (red). The Sponsored Class's status will revert back to 'Ok' once the amount has been disbursed to the appropriate commitment items in the FM table.
Ensure that the correct commitment items corresponding to the Sponsored Class holding the amount to be released are displayed in the FM table.
GG.11. Enter the amount to be allocated to each commitment item in the corresponding ∑ Amount field of that commitment item's line in the FM table and update the Distribution Key for each commitment item receiving budget.
GG.12. Note: The entry in the Distribution Key field should match Posting Period of the GM table, for example: August is Z008; September is Z009.Press the Enter key to update the status of Sponsored Class then click the Prepost button.
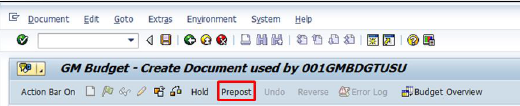
GG.13. A message 'Document xxxxxxxxxx can be only displayed because it is in a workflow process' displays in the screen. Click the Continue icon to post the document.
GG.14. A message 'Document xxxxxxxxxx has been preposted successfully' displays in the screen. Click the Continue button to release the document to the workflow for approval.
Note: If not successful, click the Reverse button to reverse an erroneous transaction.
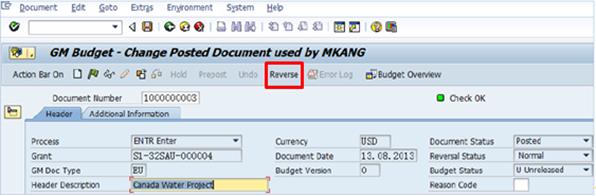
4.3.4.2 Transfer Budget to Passthrough Grant
If components of a project are being executed by an Implementing Partner, then the budget for those activities must be transferred to the P1 grant setup for that Implementing Partner.
HH.Transfer budget to the Passthrough grant / Transaction Code: GM_BDGT_RELEASE
HH.1.Enter GM_Bdgt_Release in the Command field and click the Enter icon.
HH.2.In the Header tab of the GM Budget - Create Released Document screen, enter the following details in the required fields:
· Process: Psthru Transfer
· Grant: M1 or S1 grant number
· GM Doc Type: PT
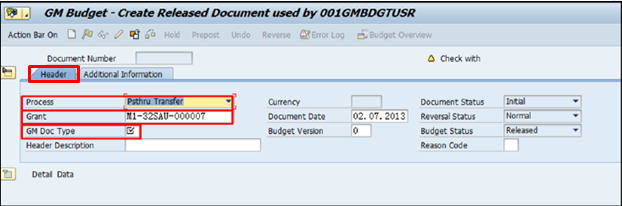
· Header Description
· Budget Version: 0

HH.3.Execute the transaction.
HH.4.The Detail Data section lists the Sponsored Classes of the M1 or S1 grant. The Bdgt Line lists the funded programs of the P1 grant.
HH.5.In the Detail Data section, select the appropriate Sponsored Class to release and update the Posting Date column, as required.
HH.6.Change the Bdgt Line to the appropriate line and ensure that the Distribution Key matches the posting month.
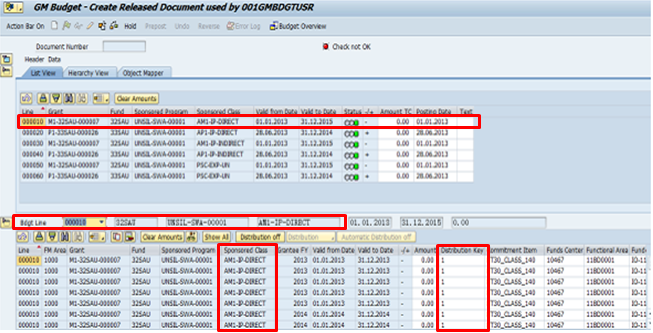
HH.7.Click the Prepost button.
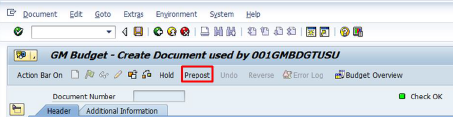
HH.8.A message 'Document xxxxxxxxxx can be only displayed because it is in a workflow process' displays in the screen. Click the Continue icon to post the document.
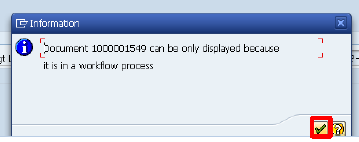
HH.9.A message 'Document xxxxxxxxxx has been preposted successfully' displays in the screen. Click the Continue button to release the document to the workflow for approval.
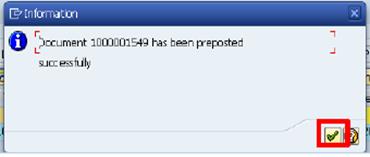
4.3.4.3 Approve Released Grant Budget
When the GM Budget User creates a released grant budget or released Passthrough grant and preposts it, a message is sent through the Umoja Business Workplace to the Approver that the document is ready for approval. The GM Budget Approver Released uses the Umoja Business Workplace to approve the posting.
The steps to approve the released grant budget and released P1 grant are as follows:
II. View the available balances / Transaction Code: ZGMRBUDACT
The Approver runs an Available Balance by Grant report to make sure that the budget has been moved to the correct Sponsored Class. In this report, the Approver can review the output of the report using four different options below:
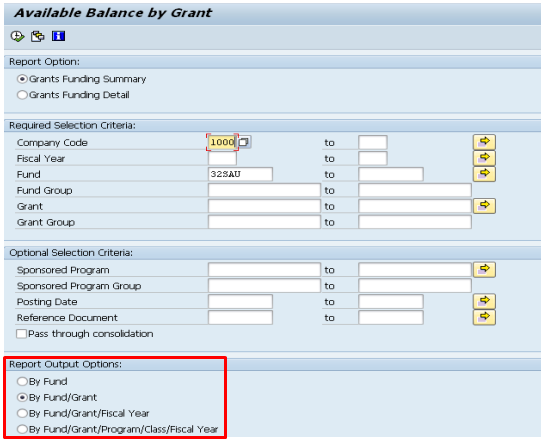
This report is an overview for a funded grant at the aggregate level. It shows the unreleased, released and total budget by Fund, Grant, Fiscal Year and Sponsored Program/Class. Within the report, the detailed breakdown of expenditure is available.

JJ. Check cash balances / Transaction Code: ZGMBUDGET_REL
Before a budget can be released, the GM Account Approver needs to check that cash is available. Use the T-code ZGMBUDGET_REL to run the report by Fund or Grant.
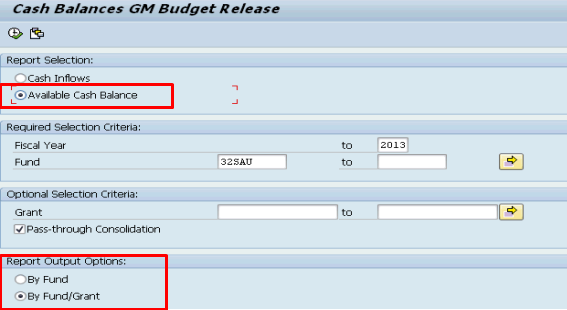
This report allows the Approver to view various columns including available cash.
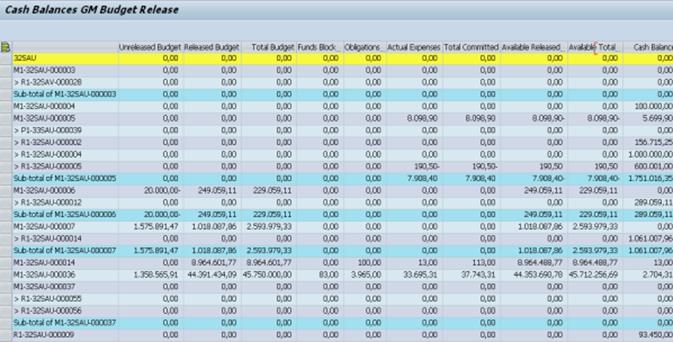
KK. Approving released budget in Umoja Business Workplace / Transaction Code: SBWP
Steps are similar to approving the unreleased grant budget. Refer to section 4.3.2.2 for detailed steps.
4.3.5 Execute Transactions and Post Indirect Costs
After the budget has been released, users within and outside of GM module can execute financial transactions which consume grants budget. These transactions include creating Purchase Orders (PO), Journal Vouchers (JV) and IDC batch.
Continuing with the example of unconditional grant in section 4.3 above this section explains the Umoja process for following type transactions:
· Direct expenses incurred by the UN - Refer section 4.3.5.1.
· Expense incurred by and advance to Implementing Partner - Refer section 4.3.5.1.1.
· PSC / IDC - Refer section 4.3.5.2.
· Interest revenue - Refer section 4.3.5.3.
Before navigating Umoja process for expense recognition section 4.3.5.1 summarizes the IPSAS accounting policy for recognition of grant expenses.
4.3.5.1 Expense Recognition under Funding Agreements
Expenses are decreases in the economic benefits or service potential during the reporting period in the form of outflows or consumption of assets or incurrence of liabilities that result in decreases in Net Assets.
If project expenditure needs to be capitalized as Property, Plant and Equipment (PP&E), it is important to assess, based on the determination of who controls those assets, whether the project assets will be capitalized as PP&E in the books of the UN, the implementing agency or the end beneficiary. Project assets should be capitalized in the books of the entity that controls the asset.
Control over assets arises when an entity can:
· Use or otherwise benefit from the asset in pursuit of its objectives; AND
· Exclude or otherwise regulate the access of others to that benefit.
In addition to the 'control' criterion, all of the following conditions must be met to capitalize an asset:
· The asset has a useful life of more than one year;
· The asset meets the minimum established cost threshold of USD 20,000 or USD 5,000 per unit depending on the reporting entity's reporting size and the assurance that a good majority of assets are reliably captured by applying the elected threshold;
· For certain assets such as Vehicles, Prefabricated buildings, Satellite communication systems, Generators and Network equipment, the United Nations will seek to set the threshold at a lower value.
Professional judgment should be applied to determine whether the UN has control over the project asset. Assessment of control is based on an evaluation of related facts and circumstances. Please also refer to the UN IPSAS Corporate Guidance on Property, Plant and Equipment for capitalization when the assets are controlled by the UN.
Expense recognition with regards to funding agreements will vary based on the purpose and type of recipient i.e. Implementing Partners or end beneficiary.
Financial transactions to record expenses or project assets occur outside of the GM module. Refer to the Chapters on Expenses, Property, Plant and Equipment (section 4.5) and Inventory for further guidance on steps to record expenses or project assets.
Continuing with the example in section 4.3, once the expenditure has been confirmed as related to the grant, following accounting entries will be posted.
Accounting entry- Direct expenses incurred by the UN
|
Date |
GL |
GL short description |
Debit |
Credit |
|
15-Jul-14 |
71101110 |
SB Post Professional Gross Salary |
750,000 |
|
|
|
71101210 |
SB Post Professional Ed Grant Travel |
200,000 |
|
|
|
27161010 |
FA Vehicle Light Wheeled Cost |
60,000 |
|
|
|
77001010 |
Consum Sanitary and Cleaning Supply |
1,202,389 |
|
|
|
35101510 |
AP Commercial Vendor |
|
10,000 |
|
|
11701010 |
Cash Held in UNHQ Main Pool |
|
2,202,389 |
4.3.5.1.1 Funding Agreements with Implementing Partners
The UN reporting entities advance funds to Implementing Partners (governments, NGOs, other UN System Organizations) in order to allow the Implementing Partners to provide services for the UN programs.
Expenses related to transfers to Implementing Partners should be recognized when the Implementing Partner delivers the agreed services as evidenced in the financial reports from them, except for Volume I where all advances to implementing partners where control is no longer with the UN are expensed upfront at the time of disbursement of the funds.
Financial transactions to record expenses occur outside of the GM module. Refer to Chapters on Expenses and Accounts Payable for further guidance on steps to record expenses.
From the example in section 4.3, the following accounting entries will be posted for an advance paid to the Implementing Partner and expenses incurred (with evidence via reporting) by the Implementing Partner.
Accounting entry- Advance paid to Implementing Partner
|
Date |
GL |
GL short description |
Debit |
Credit |
|
15-Jul-14 |
18101410 |
Advance Government NGO |
1,500,000 |
|
|
|
11701010 |
Cash Held in UNHQ Main Pool |
|
1,500,000 |
|
Accounting entry- Implementing Partner expense |
||||
|
Date |
GL |
GL short description |
Debit |
Credit |
|
30-Nov-14 |
78101010 |
Implementing Partner Staff and Personnel Cost |
500,000 |
|
|
|
78102010 |
Implementing Partner Travel |
100,000 |
|
|
|
78101000 |
Implementing Partner Direct Expense |
672,727 |
|
|
|
78108010 |
Implementing Partner Indirect Support Cost |
89,091 |
|
|
|
18101410 |
Advance Government NGO |
|
1,361,818 |
The following shows processes that need to be followed in Umoja starting from setting up the grants to executing the transactions in relation to agreement with Implementing Partner.
LL. In the GM module, the following are required before an advance to an Implementing Partner is processed:
· S1 or M1 grant must be in Award/Operational status
· P1 grant must be in Award/Operational status
· WBSE in Released and Budgeted status
· Released Budget in S1 or M1 grant
· Relationship between S1 or M1 grant and P1 grant is established
· Object mapper in S1 or M1 grant is established
Note: Refer to previous sections (section 4.3.1 to 4.3.4) for detailed steps.
MM. Process an advance to Implementing Partner
MM.1. Create Purchase Order (PO) in SRM
MM.1.1. On the initial screen, select Purchasing, then Purchase order (below Create Documents) to start the process.
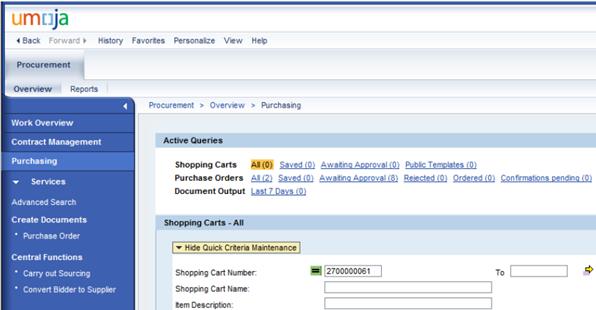
MM.1.2. Select the appropriate Purchase Order type.
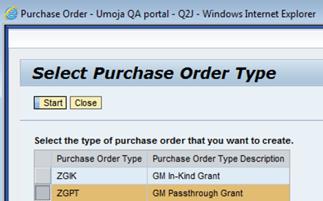
MM.1.3. Add the following mandatory information.
Note: All fields with * require an input before the system allows you to move ahead.
· Supplier - the Implementing Partner BP number (vendor)
· Requester - the requesting project manager (use the drop-down and search by name)
· Recipient - the requesting project manager (use the drop-down and search by name
· Location - UN program/office
· Purchasing Organization (use the drop-down and search by name)
· Purchasing Group - appropriate UN program/office(use the drop-down and search by name)
MM.1.4. On the Item Overview screen below, select Service as the Item Type.

MM.1.5. Move to the field for Product ID and select the appropriate service material(s). Each service material is linked to a commitment item in Funds Management. Select the appropriate service based on the funding agreement.
Note: If the budget was created and approved earlier using the sponsored class for AP-1 (direct and indirect costs), the system will not check the limit for each service line item as long as total of all line items is within the amount approved for AP1-Direct cost. If the budget was created using BP1 sponsored classes, each individual sponsored class was approved with a specific amount that cannot be exceeded when creating each service line item in the PO.
MM.1.6. When entering the quantity, enter the amount that you intend to transfer to the IP. For example, enter 10,000 in the quantity if you are transferring USD 10,000 for Travel. In the Gross Price field, enter USD 1. Multiply your quantity of 10,000 and gross price of USD 1 will give you the amount USD 10,000. This process allows you to be more flexible when processing the settlement (the service entry sheet) in the downstream process.
MM.1.7. Scroll to the right and locate the Account Assignment column. Select either Order or WBS element. This would depend on the cost object that was used when the budget for the Pass-through grant (P1) was processed. Enter the number on the next field. Note: A Center (CC) should not be entered for GM funds.

MM.1.8. Click the Header tab and move your cursor to the drop-down icon of the Financial Rules field. Note that this is a mandatory field. Select NA from the drop-down list and click OK.
MM.1.9. From the screen above, go to the Details of the service line item by first moving to back to the tab Overview, highlighting the specific line item and then clicking Details.
MM.1.10. Locate the tab General Data and the field Required and enter the date of delivery. This is a mandatory field in SRM, although not as important for the grants process. On the field where Between is defaulted, select 'On' from the drop-down list and enter current date.

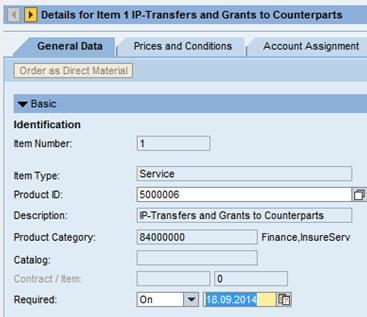
MM.1.11. To define the spending tolerance level, locate the Underdelivery/Overdelivery Tolerance fields on the right side of the screen on the same tab (General Data). Enter the tolerance percentage on the field for Overdelivery if applicable. If the IP is allowed 100% tolerance in the different service lines of the PO, tick the Unlimited box.
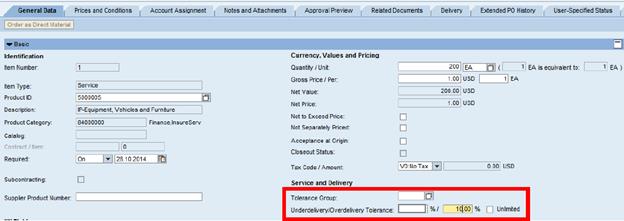

Note: The tolerance level allows the amount entered in the service entry sheet (see Settlement Process) to exceed the advance amount based on the percentage defined in the PO. This is allowed by line item only.
MM.1.12. Repeat steps for additional service line items stated in the funding agreement.
MM.1.13. When all the service line items are entered, click Check to validate the entries. If there are no errors, the system generates a message that the PO is correct.
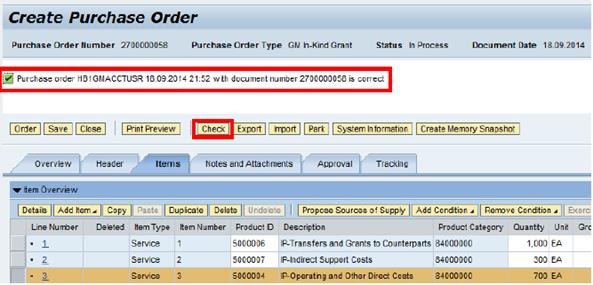
MM.1.14. Click Order to save the PO. This action automatically routes the PO to the workflow inbox of the GM Approver. Note the PO number before exiting the screen. Click Close to exit.

MM.2. Approve PO in SRM workflow
MM.2.1. Find the PO for approval. You may have to 'refresh' after you've logged in. In rare cases you may have to search for the PO using the PO number.
MM.2.2. Once you have located the PO, review the document. Click Approve to release the PO. Close this window and log out.

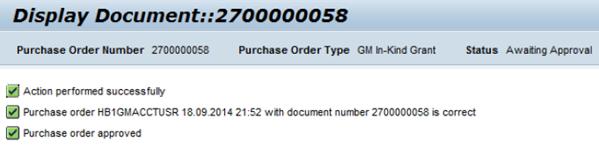
Once approved in SRM portal, the PO is automatically reflected in ECC. To display a PO, enter the T-code ME23N.
MM.2.3. No changes can be made to the PO in the ECC system; however, you will be able to monitor the PO history for the advances (down-payment requests and down payment), the service entry sheets and the invoices (settlement).
MM.3. Create Down Payment request / Transaction Code: F-47
To process an advance for an Implementing Partner, the UN uses the down-payment request/down-payment functionality of SAP. The down-payment request is a noted item or a memo entry.
MM.3.1. Enter the T-code F-47. On the screen below, enter the appropriate document and posting date. Leave the default document type as KA. Enter the appropriate currency.
The vendor number of the Implementing Partner is required to proceed. Indicate the special GL indicator Y to direct the entry from the default reconciliation account to the Advance to IP reconciliation account. Click Enter.
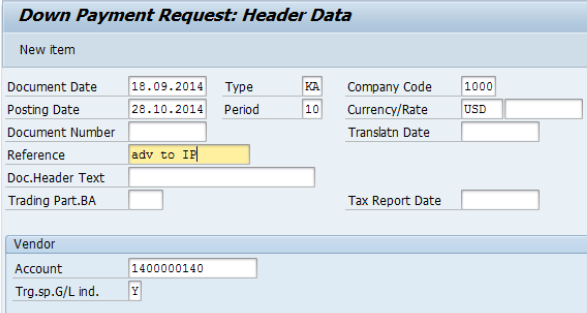
MM.3.2. On the next screen, enter the following required information:
· Amount
· Due date
· Payment method
· Purchasing document/Line item no.
The PO derives the full account assignment so it is not necessary to enter the Order/WBS element, grant, functional area.
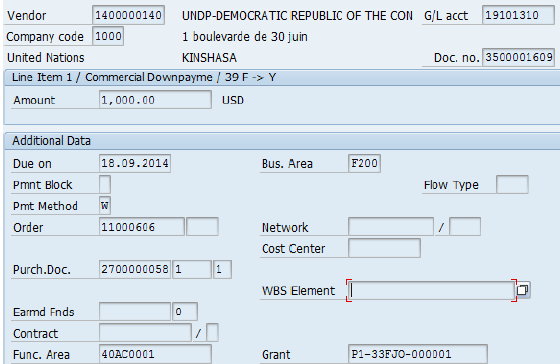
MM.3.3. Click the button Additional Data to enter the Partner Bank.
This is mandatory information to be provided by the user. This step will allow the system to direct the deposit to the correct bank account especially if the payee has several bank accounts.

MM.3.4. Repeat steps above for the next line items if there are several line items to be created for the advance.
MM.4. Approve Down Payment request in workflow
MM.4.1.
Selects the Workflow icon ![]() from the main screen.
from the main screen.
Note: there are two levels of approval.
MM.4.2. On the Inbox, select Workflow>Grouped according to Task>Down-payment - Approving Agent
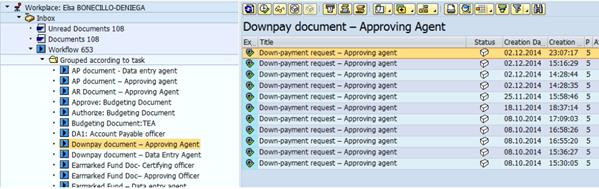
Select the document number and click Approve.
MM.4.3. Following the approval, the system generates a noted item. This document does not update the account balance and is considered a memo entry with only one line entry. The system generates the FI document debiting the Advance account only when the funds are disbursed during the Treasury payment run.
MM.4.4. Use ME23N to display the PO.

Note the existence of the down-payment request in the PO History.
MM.5. Process payment / Transaction Code: F110 and FPR_LIST
After the down-payment request is approved through the workflow, the system picks it automatically in the payment run (F110) for the disbursement process. The Cashier reviews the payment list (FPRL_LIST) and submits it to the Approving Officers to release the payments.
Refer to section 3.2.1.5 of Chapters on Accounts Payable and section 3.3.1 of Chapter on Cash Management for details
The accounting entry once the payment is processed is as follows.
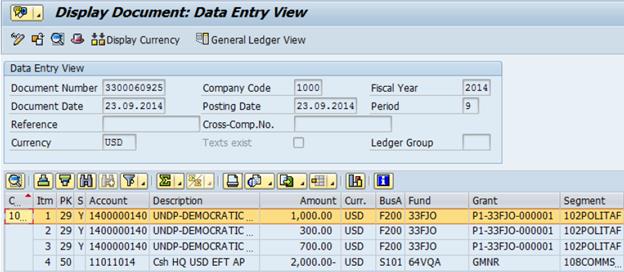
Note the debit to the advance GL account and the credit to Bank-EFT In.
MM.6. Review Cash Balance Report / Transaction Code: ZGMBUDGET_REL
MM.6.1. On the initial screen, enter both external and internal funds (32xxx and 33xxx) and the parent grant (not the pass through grant).
MM.6.2. On Report Selection, choose radio button 'available cash balance'.
Note: Selecting 'cash inflows' will provide cash forecast rather than available cash balance.
MM.6.3. On Report Output Options, select 'By fund/grant'.

MM.6.4. Click Execute.
MM.6.5. In the example below, note that cash has been reduced by USD 2,000 and it's posted against the Pass through grant.

MM.6.6. View the GM doc by double clicking on the amount.
NN. Process settlement from Implementing Partner:
NN.1. Create Service Entry Sheet (SES) upon receipt of Implementing Partner report / Transaction Code: ML81N- Refer to section 3.2.7.2.1 of Chapter on Expenses for details.
GM Account User creates and approves a service entry sheet to record expenses reported by the Implementing Partner regarding the execution of program activities. The expenses outlined in the report are recorded as services provided to the UN.
NN.1.1. On the initial screen, click Other Purchase Order number. When the pop-up box appears, enter the PO number.
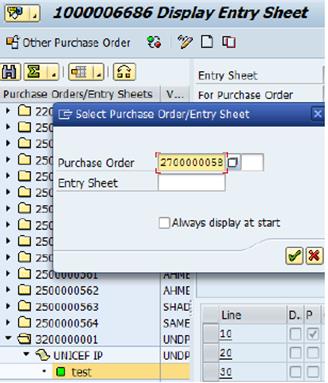
NN.1.2. Click Create Entry Sheet.
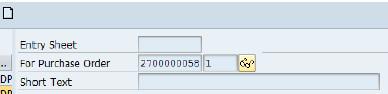
NN.1.3. Insert a short text

NN.1.4. On the bottom on the screen, locate Service Sel. and click button.
![]()
NN.1.5. Click Enter.
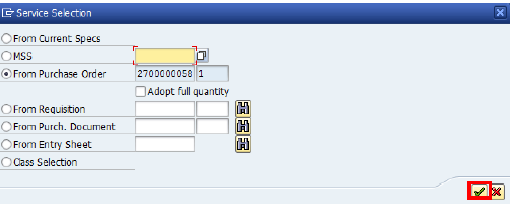
NN.1.6. Highlight the lines as appropriate and then click Services icon.
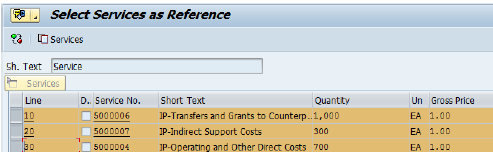
NN.1.7. Change the quantities to reflect the IP's expenditure report. If the expenditure report is 100% in line with the advance then leave the quantities as is.
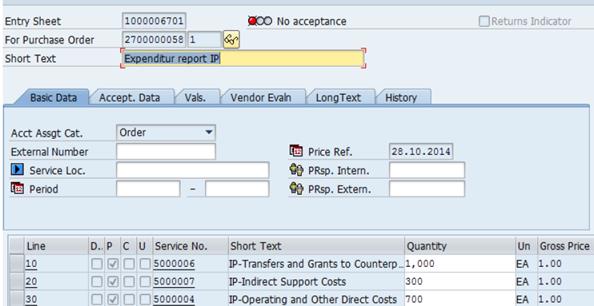
Note: The quantity field is used to enter the expense amounts.
NN.1.8. There is no workflow in SES. The GM Account User or Creator also approves the service entry sheet by clicking the icon Accept.
NN.2. Accept / approve SES / Transaction Code: SBWP
NN.2.1. Note the message 'Will be accepted'
![]()
NN.2.2. Save the SES.
NN.2.3. View the PO history using the T-code ME23N. The service entry sheet number is now displayed. At the same time, a goods receipt (GR) document is generated by the system. The corresponding accounting entries are reflected against the GR document, not against the SES document.
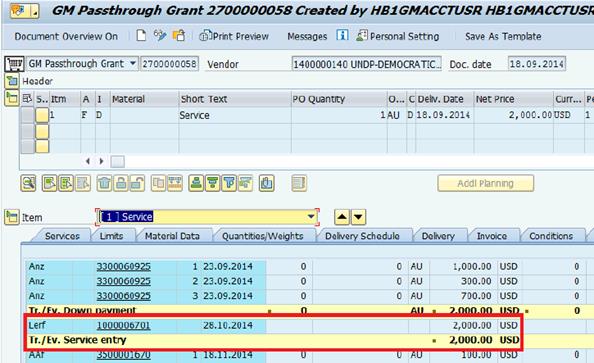
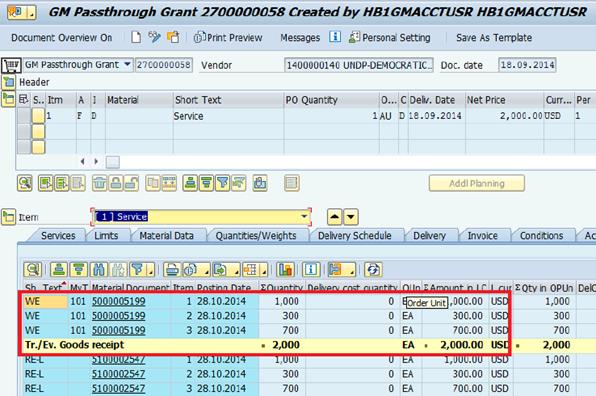
NN.2.4. To locate the accounting entries, click the GR document number and look for the Doc info tab, then click the button FI Documents.

NN.2.5. The pop-up box shows two accounting entry documents. The first one is for the settlement of the advance and the second one is for the expense.
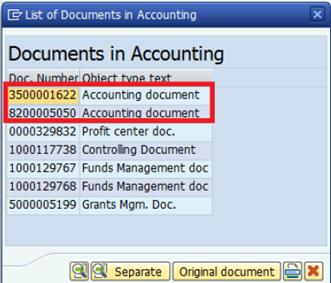
NN.2.6. The accounting entry below shows a debit to AP UN Family and the credit is to Advance UN Family.
NN.2.7. On the data entry view, click the advance line item (credit), the system automatically created the Payment Block A in order to prevent further processing of this advance.
NN.2.8. Likewise, the system creates Payment Block G on the AP UN Family to prevent further processing of this debit to AP.

NN.2.9. The payment block is the system control to prevent including these line items in the payment run.
Note: Do not remove these payment blocks
NN.2.10. The GR document shows the accounting entry that debits the IP expense and credits AP-Goods Receipt.

NN.3. Create Evaluated Receipt Settlement (ERS) / Transaction Code: MRRL or MIR7- Refer to section 3.2.1.7 of Chapter on Accounts Payable for details.
The settlement of the advance process is not complete without the invoice process. The invoice debits AP Ex Goods Receipt and credits AP UN Family (the account that was debited earlier in the goods receipt when the advance was settled).
For this process, we use the Evaluated Receipt Settlement (MRRL) to simplify the steps. Alternatively, the manual invoice processing (MIR7) can be used.
NN.3.1. In order to process this transaction, it is necessary to first check if the information is updated in the Business Partner profile of the Implementing Partner. To do this, the user should change the BP role display to Z00011 UN vendor role.

NN.3.2. Select the Purchasing button from the toolbar and click on the Purchasing Data tab. Scroll down to locate Control data. The last three radio buttons are relevant to Evaluated Receipt Settlement and should be turned on.
NN.3.3. T-code MRRL (self-invoicing) is used to automatically generate the invoice document.
On the initial screen, enter the PO number. Initially, run the process in test run mode. You should see the vendor, PO number and reference number on the screen. This allows the user to verify the PO number and the SES number. Click the Back button. Remove the Test Run mode for production run and click Execute.
NN.3.4. On the next screen, the FI document (invoice number) is generated based on the service entry sheet.

NN.3.5. Double click the FI document to see the accounting entry. The system debits AP Exch Goods Receipt and credits AP UN Family.
NN.3.6. In addition, the system automatically creates a payment block in the credit line item to prevent inadvertent processing of this account in the payment run.
Note: Do not remove this payment block.
NN.3.7. In the payment history of the PO, locate the invoice by double-clicking on the document number.

NN.3.8. On the next screen, click the button Follow-On Documents.
NN.3.9. The pop-up box for the documents will appear. Click the Accounting and GM documents.

NN.4. Process additional payment / Transaction Code: F110 - Refer to section 3.2.7.2 of Chapter on Accounts Payable and section 3.3.1.1 of Chapters on Cash Management for details
NN.5. Clear vendor entries / Transaction Code: F110 / FPRL_LIST.
4.3.5.1.2 Funding Agreements with End Beneficiaries
The UN also provides grants or donations directly to end beneficiaries.
Where a transfer is deemed to be an outright grant - with payment made directly to the end beneficiary and reporting is not required, the full amount shall be recognized as an expense upon the authorization and disbursement of the grant. Fellowships and Donations to Quick-Impact-Projects (QIP) are examples of payments made by the UN directly to end beneficiaries.
The following shows processes that need to be followed in Umoja starting from setting up the grant(s) to executing the transactions in relation to agreement with end beneficiaries.
OO. Pre-requisite processes in the GM module prior to processing a PO to end beneficiaries:
· S1 or M1 in Award/Operational status
· WBSE in Released and Budgeted status
· Released Budget against Sponsored Classed 'Grants Out direct' and 'Grants Out indirect' (if applicable) in S1 or M1 grant
Note: Refer to previous sections (section 4.3.1 to 4.3.4) for detailed steps.
PP. Process Purchase Order (PO) for end beneficiaries:
PP.1. Create PO in SRM - Refer to section 3.2.5.1 of Chapter on Expenses for details of creating a Purchase Order (example of creating a Low Value Acquisition in SRM).
A shopping cart is not required to create a purchase order for grants.
PP.1.1. On the initial screen, select Purchasing, then Purchase Order (below Create Documents) to start the process.
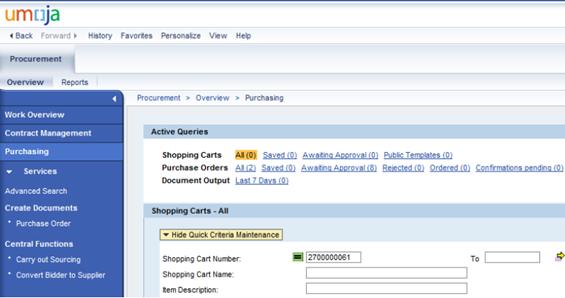
PP.1.2. Select the appropriate Purchase Order Type.
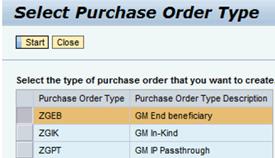
PP.1.3. Add the following mandatory information.
· Supplier - the implementing partner BP number (vendor)
· Requester - the requesting project manager (use the drop-down and search by name)
· Recipient - the requesting project manager (use the drop-down and search by name)
· Location - UN program/office (use the drop-down and search by name)
· Purchasing Organization - UN Purchasing Organization (use the drop-down and search by name)
· Purchasing Group - appropriate UN program/office (use the drop-down and search by name)
Note: All fields with * require an input before the system allows you to move ahead. By using the drop down menu next to the field, you can search for the data. For example if you want to search for a supplier enter the name within asterisks (e.g. *UNDP*)
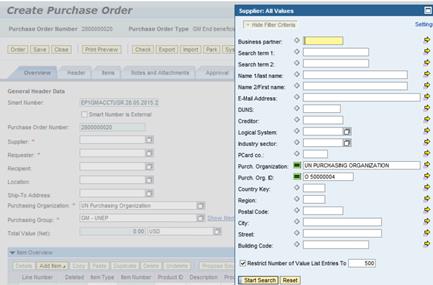
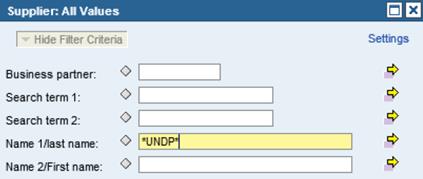
PP.1.4. Press the Start Search button.

Choose the correct supplier.
PP.1.5. The search function is applicable to all fields.
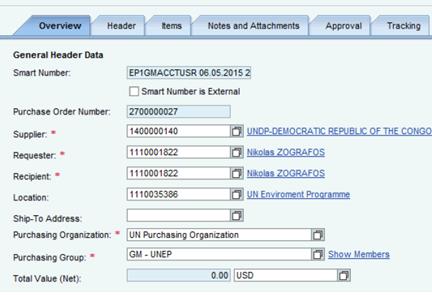
PP.1.6. On the screen below, select 'Service' as the Item Type.
Move to the field for Product ID and select the appropriate service material(s). Service materials are used to identify the 'Sponsored Classes' agreed with the Funding Agreement. Each service material is linked to a commitment item in Funds Management. Select the appropriate 'services' based on the funding agreement. The product ID range for the different Grant Out services is 5000008-17.
Search function:
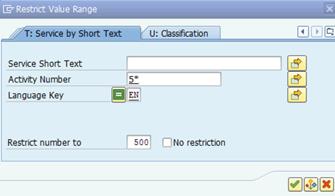
Result:
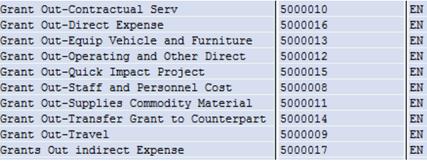

PP.1.7. Scroll to the right and locate the Account Assignment column. Select either Order or WBS element. This will depend on the cost object that was used when the budget for the end-beneficiary was released. Enter the number on the next field. Note: A Center (CC) should not be entered for GM funds.
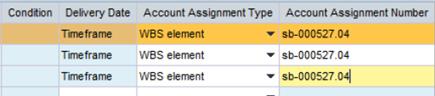
PP.1.8. Click the Header tab and move your cursor to the drop-down icon of the Financial Rules field. Note that this is a mandatory field. Select NA from the drop-down list and click OK.

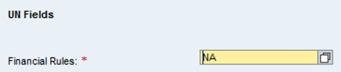
PP.1.9. From the screen above, go to the Details of the service line item by first moving back to the Overview tab, highlighting the specific line item and then clicking Details. Locate the General Data tab and the field Required and enter the date of delivery. This is a mandatory field in SRM, although not applicable for the grants process.
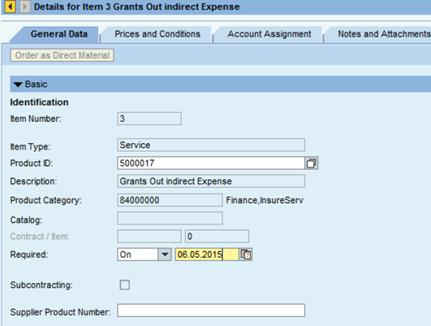
PP.1.10. Under the Related Documents tab remove the tick for Goods Receipt as a Goods receipt or Service Entry Sheet is not required in this process.
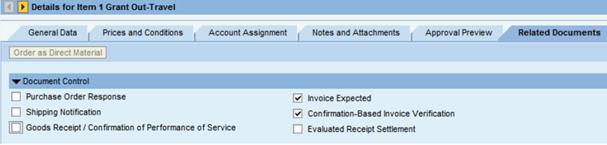
PP.1.11. Repeat steps above for all additional service line items created in the Purchase Order.
PP.1.12. When all the service line items are entered, click Check to validate the entries. If there are no errors, the system generates a message that the PO is correct.

PP.1.13. Click Edit then click Order to save the PO. This action automatically routes the PO to the workflow inbox of the GM Approver. Note the PO number before exiting the screen. Click Close to exit.

PP.2. Approve PO in SRM workflow
PP.2.1. Find the PO for approval, 'refresh' after log in. In rare cases, PO maybe searched by using the PO number.
PP.2.2. Once the PO has located, review the document. Click Approve to release the PO.
PP.2.3. Close this window and log out.
PP.2.4. Once approved in SRM portal, the PO is automatically reflected in ECC. To display a PO, enter the T-code ME23N.
PP.2.5. No changes can be made to the PO in the ECC system; however, you will be able to monitor the PO history in ECC. Any further changes to the PO are made in SRM by the GMACCTUSR or CREATOR and then routed through the workflow to the GMACCTAPR.
PP.3. Monitor PO history / Transaction Code: ME23N
QQ. Process payment for end beneficiaries:
QQ.1. Create invoice / Transaction Code: MIR7
QQ.1.1. Enter the invoice date, amount and a reference. Enter the PO number.
QQ.1.2. Press enter and ensure that the vendor and amount is correct.
QQ.1.3.
Save as Completed
![]()
QQ.1.4. The invoice is reviewed through the FI workflow [FI Accounts Payable Senior User]
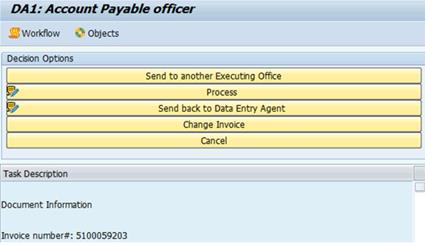
QQ.2. Approve invoice in workflow
The invoice is routed through the FI workflow for approval of FI Accounts Payable Approver. For a more detailed invoice process in Umoja, refer to section 3.2 of Chapter on Accounts Payable.

QQ.3. Process payment / Transaction Code: F110 and FPRL_LIST
After the invoice is approved in the workflow, the system picks it automatically in the payment run (F110) for the disbursement process. The cashier reviews the payment list (FPRL_LIST) and submits it to the Approver to release the payment. For detailed steps, please refer to section 3.3.1 of Chapter on Cash Management for details.
4.3.5.2 Indirect Costs under Funding Agreements
The PSC charge / Indirect Costs (IDC) represent the application of the agreed percentage to amounts inspected - representing the value of goods/services actually received - and/or on resources committed for extra-budgetary funded substantive activities, projects or programs. The charge is accounted for as a part of the total activity/project/program cost which progressively utilizes the voluntary contributions as agreed with the donor(s).
The rules for IDC calculation are defined in the grant record. The UN has only one IDC calculation rule, that is, IDC is calculated on actuals and commitments i.e. unliquidated obligations plus expenditures.
RR. Post indirect costs / Transaction Code: GMIDCPOST
The IDC costs are posted against the grant. The rules for IDC calculation are defined in the grant record by marking Sponsored Classes as IDC-relevant. The steps to post indirect costs in Umoja are not performed by every end user. These steps will be done centrally through a batch and only when necessary that this program is run manually.
The steps to post indirect costs in the Umoja system are as follows:
RR.1. Enter GMIDCPOST in the Command field and click the Enter icon à the Post Indirect Costs screen will display.
RR.2. Enter following:
· Company Code: 1000
· Grant: range of grant numbers
· Cutoff Date:
· Document Type: SI.
· Text:
· Document Date:
· Posting Date:
RR.3. Select the Test Run check box and click Execute icon à the GM Indirect Cost Application Log Display appears.
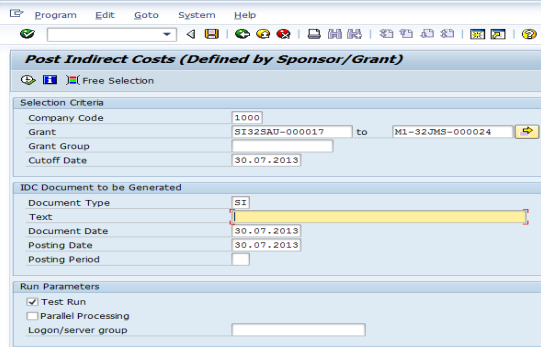
RR.4. Under the Processed Grants column, select the appropriate grant.
RR.5. Click the IDC Line Items button to view the IDC-Relevant Line Items.
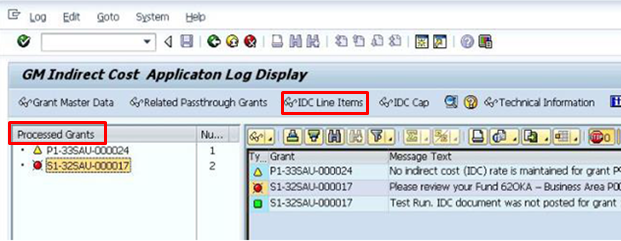
RR.6. Click the Back icon twice to reach the initial screen.
RR.7. Clear the Test Run check box and Execute the program to post the indirect costs.
RR.8. The following accounting entries will be posted for PSC Cost.
|
Date |
GL |
GL short description |
Fund |
Debit |
Credit |
|
30-Nov-14 |
78201010 |
PSC UN Portion |
|
287,611 |
|
|
|
78201010 |
PSC UN Portion |
|
38,182 |
|
|
|
63501010 |
PSC Revenue |
|
|
325,793 |
4.3.5.3 Interest
During the period that voluntary contributions are made available for use by a particular implementing / executing office of the UN, interest revenue may accrue on any unutilized portion of the funds that were received from donor. The interest revenue will be recognized as follows:
· Where the UN has the right to manage and direct the use of the interest revenue: Interest revenue is recognized;
o Where the Donor retains the right to the interest revenue, the interest revenue should be considered as additional contribution under the direction of the donor accounted for as follows:
Where the Donor arrangement is classified as a 'conditional' arrangement: Recognize interest as conditional liability;
Where the Donor arrangement is classified as a 'non-conditional' arrangement: Recognize interest as revenue for the period;
o Where the interest revenue can be used only after approval of donor: Recognize interest as payable to the donor until approval is obtained;
· Where the interest revenue must be paid back to donor: Recognize interest as payable to donor.
The following accounting entries will be posted for interest received and refundable to donor for the example in section 4.3.
Accounting entry -Interest revenue refundable to donors
|
Date |
GL |
GL short description |
Debit |
Credit |
|
30-Nov-14 |
11701010 |
Cash Held in UNHQ Main Pool - Mmbr St 1 portion |
3,000 |
|
|
|
11701010 |
Cash Held in UNHQ Main Pool - Mmbr St 2 portion |
3,000 |
|
|
|
11701010 |
Cash Held in UNHQ Main Pool - NGO portion |
6,000 |
|
|
|
64001010 |
Main Cash Pool Participation Revenue |
|
12,000 |
4.3.5.4 Processing of Goods In Kind in Umoja
When the UN receives voluntary goods in-kind from donors, this type of agreement is captured through a Grant Management process. The followings are steps in Umoja to process voluntary goods in-kind.
SS. Pre-requisite processes in the GM module before a PO for goods in-kind can be raised:
· Specific in-kind S1 grant in Award/Operational status
· Regular in-kind billing is set up
· WBSE is Released and Budgeted status
· Released Budget against S1 grant.
Note: Refer to previous sections (section 4.3.1 to 4.3.4) for detailed steps.
TT. Create Purchase Order (PO) / SRM
TT.1. GM Account User to log in to the Supplier Relationship Management (SRM) portal through the Umoja dashboard.
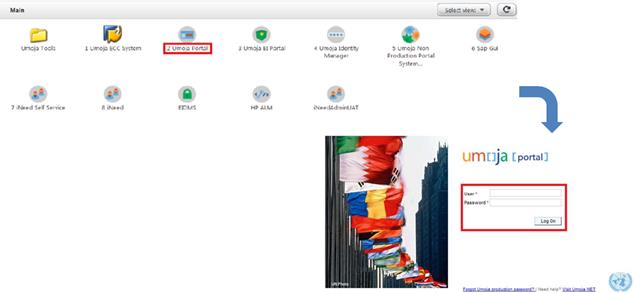
TT.2. On the initial screen, select Purchasing, then Purchase Order from the left menu to start the process.
TT.3. From the Select Purchase Order Type screen, select ZGIK (GM In-Kind).
TT.4. In the Overview tab of the next screen that opens, enter the following information in the fields. Fields with (*) marks are mandatory.
· Supplier: Sponsor/Donor (customer/vendor)
· Requester: the requesting project manager
· Recepient: the requesting project manager
· Location: UN program/office
· Purchasing Organization: UN purchasing organization
· Purchasing Group: appropriate UN program/office
TT.5. In the Item Overview section, enter information in the following fields:
· Item Type: Material.
· Product ID: search and select the appropriate 'material' based on the contribution agreement. Note: Each 'material' is linked to a commitment item in Funds Management.
· Quantity: as per donor agreement.
· Gross Price: as per donor agreement.

· Account Assignment Type and Account Assignment Number: select either 'Order' or 'WBS element' depending on the cost object that created for the Grant.
TT.6. In the Header tab, select 'NA' from the drop down list of the Financial Rules field and click OK.
Note: Financial Rules field is a mandatory field. However, it is not applicable for goods in-kind.
TT.7. From the Item Overview section in the Overview tab, highlight the specific line item and click the Details button.

TT.8. In the General Data tab, enter the Delivery Date.
TT.9. When all data have been entered, click the Check button to validate the entries. If there are no errors, the system will generate a message that the Purchase Order is correct.
TT.10. Click the Order button to save the PO and automatically route the PO to the GM Approver inbox in the workflow. Do not forget to note the PO number before exiting the screen.
![]()
UU. Approve Purchase Order (PO) / SRM
UU.1. GM Account Approver to log in to the SRM portal.
UU.2. Select Work Over view from the left menu in the initial screen and click on the PO document for approval.

UU.3. Review the document and click the Approve button to release the PO to Umoja ECC.
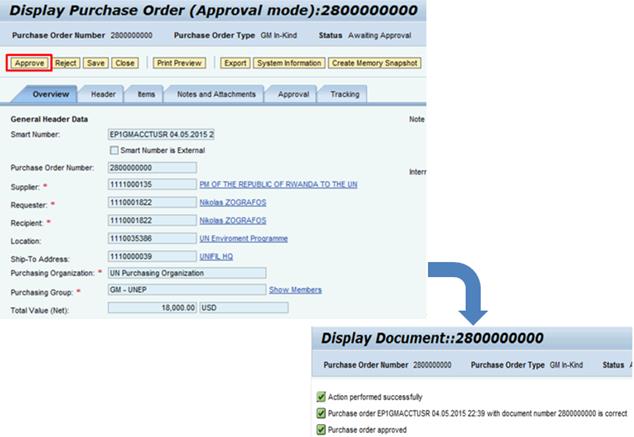
Note: Use transaction code ME23N to display the PO in Umoja ECC. No changes can be made to the PO in Umoja ECC.
VV. Create Goods Receipt (GR) / Transaction Code: MIGO
Note: The GR is created once the UN has received the in-kind goods.
VV.1. Enter MIGO in the Command field and press Enter.
VV.2. Enter the PO number and click Enter.
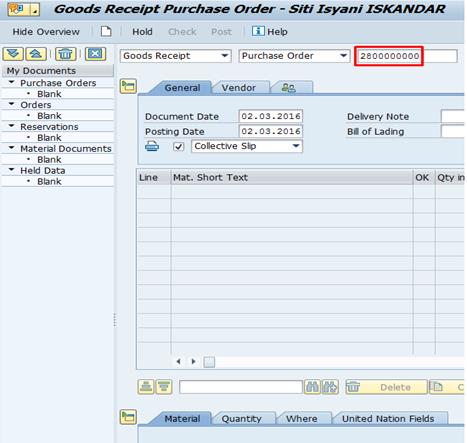
VV.3. When all the data have been populated, under the Material tab tick the 'Item OK' box.
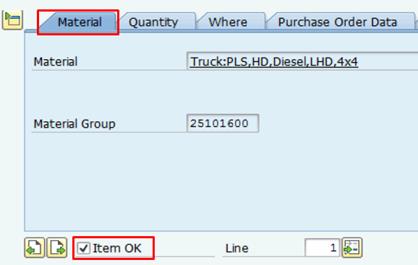
VV.4. In the Serial Numbers tab, tick the Create Serial Nos Automatically box.
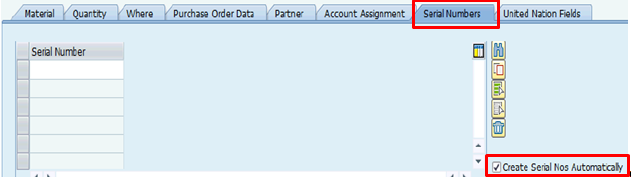
VV.5. In the Where tab, select 'A000' from the drop down menu of the Storage Location field.
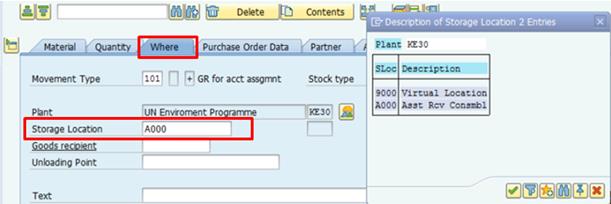
VV.6. Click the Post button.
![]()
WW. Create invoice / Transaction Code: MIR7
WW.1. FI Accounts Payable User to enter MIR7 in the Command field and press Enter.
WW.2. In the Park Incoming Invoice screen, enter:
In the Basic data tab:
· Invoice date
· Posting Date
· Amount
· Reference
In the PO Reference tab:
· Purchase Order/Scheduling Agreement: PO number
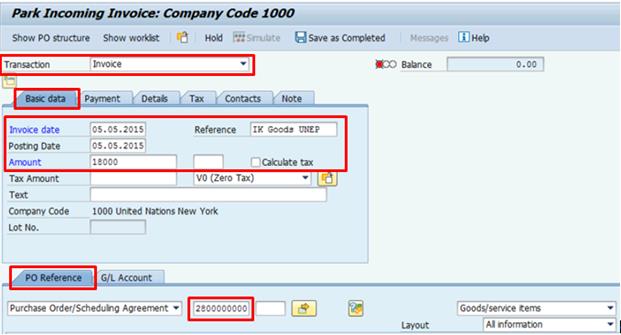
WW.3. Press Enter.
WW.4. In the Payment tab, change the Pmnt Block from 'Free for payment' to 'Locked for payment'.
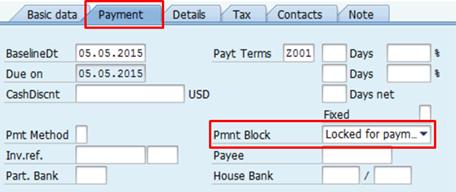
WW.5.
Click the Save as Completed ![]() button
to release the document to the workflow for review by the FI Accounts Payable
Senior User.
button
to release the document to the workflow for review by the FI Accounts Payable
Senior User.
XX. Review and approve invoice / Transaction Code: SBWP
XX.1. FI Accounts Payable Senior User to enter SBWP in the Command field and press Enter.
XX.1.1. Locate and open the document to review from the workflow inbox.
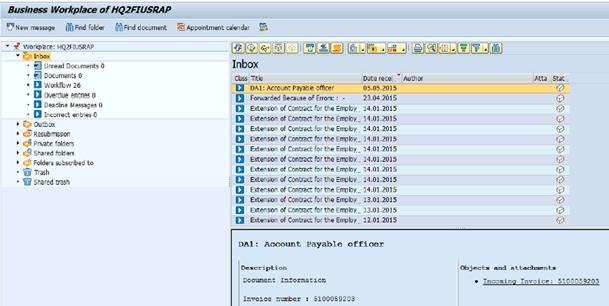
XX.1.2. Review the document and select Process from the Decision Options to send the document to the Approver workflow inbox.
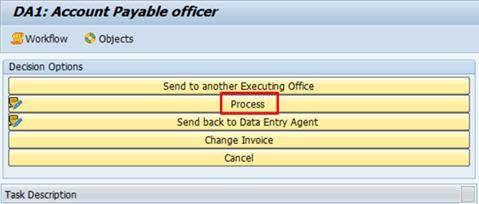
XX.2. FI Accounts Payable Approver to enter SBWP in the Command field and press Enter.
XX.2.1. Locate and open the document to approve from the workflow inbox.
XX.2.2. Review the document and select Approve Invoice from the Decision Options.
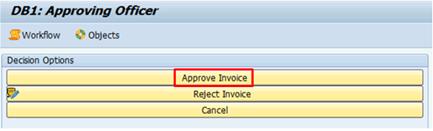
YY. Clear open item / Transaction Code: F-44
YY.1. FI Accounts Payable Senior User to enter F-44 in the Command field and press Enter.
YY.2. Enter the vendor account number in the Account field and click the Process open items button.
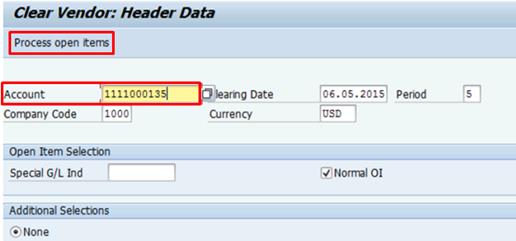
YY.3.
Deactivate all items by clicking Deactivate Items ![]() button.
button.
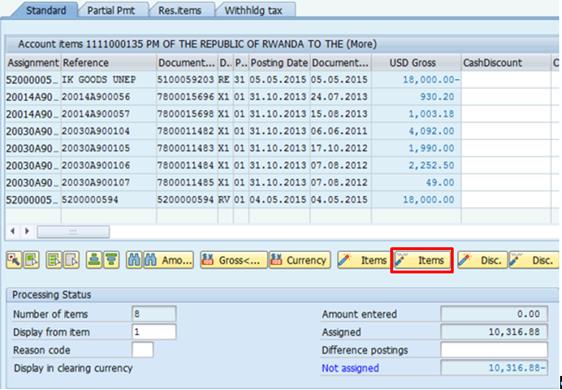
Note: The font color in the USD Gross column will turn to black to indicate that all items are deactivated.
YY.4. Select the customer invoice (document type RV) and the vendor invoice (document type RE).
YY.5. Click the Save button to post the document.
![]()
4.3.6 Close Grant
Continuing with the example of unconditional grant in section 4.3 above, the following transactions are to be performed prior to closing the Grant:
· Refund any balance funds to the donors
· Pay any outstanding liabilities to vendors/Implementing Partners
Following accounting entries should be posted prior to setting the Grant status to Closed. This process is done by the Accounts Division with assistance from the Treasury, as required. Refer to section 3.2.7.2 of Chapter on Accounts Payable and section 3.3.2 of Chapter on Cash Management for steps to process incoming grant payments.
Accounting entry - Balance refunded by Implementing Partner
|
Date |
GL |
GL short description |
Debit |
Credit |
|
30-Nov-14 |
11701010 |
Cash Held in UNHQ Main Pool |
138,182* |
|
|
|
18101410 |
Advance Government NGO |
|
138,182* |
Accounting entry - Balanced (unused funds and interest revenue) refunded to donors
|
Date |
GL |
GL short description |
Debit |
Credit |
|
30-Nov-14 |
61291010 |
Refund Voluntary Contributions to Donors - Member States portion |
36,909* |
|
|
|
61291410 |
Refund Voluntary Contribution to Donors - NGO portion |
36,909* |
|
|
|
35701220** |
TP Inter and Local Govt Man Adj - Mmbr St 1 |
|
18,454.50 |
|
|
35701220** |
TP Inter and Local Govt Man Adj - Mmbr St 2 |
|
18,454.50 |
|
|
35701420** |
TP NGO and Public Man Adj |
|
36,909 |
|
Date |
GL |
GL short description |
Debit |
Credit |
|
15-Dec-14 |
35701220 |
TP Inter and Local Govt Man Adj - Mmbr St 1 |
18,454.50 |
|
|
|
35701220 |
TP Inter and Local Govt Man Adj - Mmbr St 2 |
18,454.50 |
|
|
|
35701420 |
TP Inter and Local Govt Man Adj |
36,909 |
|
|
|
11701010 |
Cash Held in UNHQ Main Pool |
|
73,818* |
*Represents unspent funds and interest revenue refundable to donor.
**Accrual made at year end
Accounting entry - Balance paid to vendor
|
Date |
GL |
GL short description |
Debit |
Credit |
|
15-Dec-14 |
35101510 |
AP Commercial Vendor |
10,000 |
|
|
|
11701010 |
Cash Held in UNHQ Main Pool |
|
10,000 |
4.3.6.1 Grant Closing Status
The following is an overview of Grant User closing statuses, timeline and their respective processes and procedures.

4.3.6.1.1 Operational Closing
Auto Grant Closure Program changes a grant status automatically from Award/Operational to Closing/Operational Closing. This change is triggered by the Donor Agreement End Date or Funding Agreement End Date. Nevertheless, this program can be overridden by GM Account Approver who can set a grant status manually.
In the Operational Closing status, no new pre-commitments (fund reservation, fund block, pre-commitment and purchase requisition) and commitments (purchase order, business trip commitment and fund commitment) can be created or posted in the system. Existing pre-commitments and commitments are liquidated and other financial transactions i.e. expenses, payables, receivables and budget transfers can still be posted. Ensure that WBSE and/or Internal Order are closed before the status is changed to the next phase.
Prior to Operational Closing, a transitional status called 'Ready for Closing' can be briefly set up manually by the GM Account Approver. This status signals that the Grant has officially moved into 'Closing' status. In this status, no postings are allowed against the Grant.
Table below summarizes closing activities to be conducted prior to the Operational Closing status.
|
User Status |
Prior to 'Ready for Closing' and 'Operational Closing' |
Throughout Operational Closing |
Set to Operational Closing |
|
|
Offices |
Substantive Offices |
Accounts Office |
Substantive Offices |
Substantive Offices |
|
Activities |
1 Decide whether to close or extend the grant: i. Grant to be extended - upon signing agreement amendment for extension with donor or the IP: · Extend Grant Validity To Date and update Donor Agreement End Date and/or Funding Agreement End Date; · Proceed with budget changes in case of value changes in the grant agreement amendment. ii. Grant to be closed - prior to Donor (Funding) Agreement End Date: · All existing Earmarked Funds (funds reservations, funds blocks, funds pre-commitments, purchase requisition) must be reviewed and liquidated in the system; · All commitments (business trip commitments, fund commitments and POs) must be reviewed and approved in the system; · All staff commitments must be raised and approved in the system. 2 Set the Grant User Status to 'Ready for Closing' and inform the Accounts Office to proceed and set the Grant User Status to 'Operational Closing'. |
· To extract list of grants whereby the grant User Status has been changed to 'Operational Closing' by Grant Closure Program (refer to section 4.3.6.2); · To verify if all existing funds reservations, funds blocks, funds pre-commitments and purchased requisitions are closed. If not, inform the Substantive Offices to take appropriate actions; · To coordinate grant closure process by providing guidance. |
· To continue to close open items, i.e. liquidate existing commitments, recover Down Payments, clear open GR/IRs and take appropriate action to close open Payables and Receivables; · To perform budget adjustments; · To reverse and correct posting errors if any; · To perform payroll postings; · To perform CO settlements; · Identify the new grant which will receive benefit of the asset/equipment from the closing grant; · To transfer asset/equipment (applicable to M1 and S1 grants but not P1 grant). |
· No new pre-commitments and commitments are allowed to be recorded; · Increase of existing fund commitments, business trip commitments and PO values in no longer possible; · Decrease or set to 'Delivery Completed' are allowed; · Good Receipt note, Service Entry Sheer (SES), Logistic Invoice Verification (LIV) against the existing fund commitments and POs are still allowed.
Note: Upon appropriate approval, GM Account Approver can overridden the restriction to create new pre-commitments and commitments by setting Allow from and Allow to date for the specific transactions in grant master data Posting tab (refer to section 4.3.1.3.1 - D.9) |
4.3.6.1.2 Financial Closing
This status is manually set by the designated GM Account Approver after all Operational Closing activities are completed. All Balance Sheet items must be cleared prior to setting the grant this status. At this stage, the grant will allow no further transactions except refund to donor and transfer of unspent balance of closing grant and record of final cash receipt for reimbursable grant from donors.
Below is the list of activities that should have been undertaken by GM Account User, GM Account Approver, GM Budget User Released, GM Budget Approver Released, FI Users and Approvers prior to grant status set to Financial Closing.
|
User Status |
Prior to Financial Closing |
Set to Financial Closing |
|
Offices |
Substantive, Budget and Accounts Offices |
Substantive, Budget and Accounts Offices |
|
Activities |
· All outstanding commitments must be liquidated; · All Open Items must be cleared, including: Down Payments, open Payables, open Receivables and GR/IRs balance; · Fixed assets funded from the closing grant must be transferred, retired, donated, sold or scrapped; · Repayment of loans and borrowings must be completed; · VAT clearing must be completed; · IDC calculation must be executed after all commitments are actualized and cleared; · Batch jobs in the FI Month End process must be executed; · Unspent released budget must be returned; · Final expenditure and unspent balances determined to process the final Financial Report to Donors; · Final Financial Report submitted; · Refund/transfer of unspent balances (with interest) completed; · Cash received from donors recorded. |
No posting including is allowed EXCEPT FI transactions related to implementing the donor's decision on unspent balance, i.e. refund, transfer and final cash receipt from donors.
Note: Upon appropriate approval, GM Account Approver can overridden the restriction to create new pre-commitments and commitments by setting Allow from and Allow to date for the specific transactions in grant master data Posting tab (refer to section 4.3.1.3.1 - D.9) |
4.3.6.1.3 Closed
The GM Account Approver manually sets the grant User status to Closed after refunds to donors, transfer of unspent balances and final cash receipt from donors are recorded. When the grant is set to this status all types of transactions against the grant will be blocked.
Followings are grant closing activities prior to setting the grant status to Closed.
|
Status |
Prior to Closed |
Set to Closed |
|
Offices |
Accounts Division |
All Offices |
|
Activities |
· To submit final Financial Report; · To refund/transfer/reprogram unspent balances (with interest) if stipulated in the Donor's Agreement; · To record cash receipt from donors. |
No further posting is allowed. |
4.3.6.2 Automatic Closure Program
This automated program changes the grant Life Cycle status and User status in the grant master data from Award/Operational to Closing/Operational Closing. The program is scheduled to run in a batch mode and the results report can be accessed through transaction code ZGMGRTCLS.
A Grant Closure Program results report is sent to the spool request each time the program is executed. The report contains list of grants whose Life Cycle and User status have been changed to Closing/Operational Closing, comments on changes to the status and corresponding reasons.
4.3.6.3 Manual Closure Process
In the grant closing procedures, the GM Accounts Approver can manually change the grant Life Cycle and User status through transaction code GMGRANT and select the appropriate statutes.
ZZ. Steps to manually close a grant / Transaction Code: GMGRANT
ZZ.1. Enter GMGRANT in the Command field à the Display Grant Master screen appears.
ZZ.2. Enter the grant name in the Grant field and press Enter.
ZZ.3. Click the Pencil icon to edit the grant.
ZZ.4. Click the Change Status button.

ZZ.5. Select the appropriate status:
· Award / Ready for Closing.
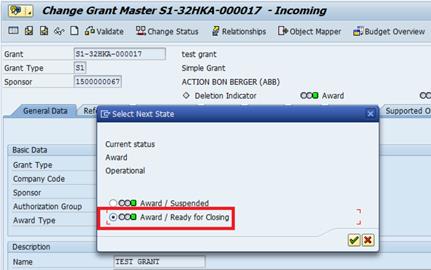
· Closing / Operational Closing.
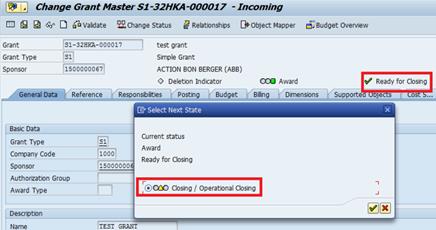
· Closing / Financial Closing.

· Closed.
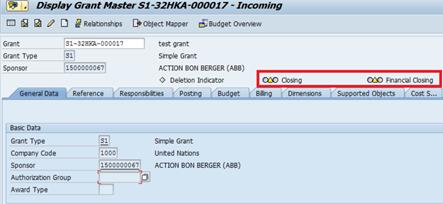
ZZ.6. Click the Save icon.
AAA. Reactivating a Closing Grant
Following the same steps, the GM Account Approver can manually reactivate closed grant, i.e. changing the grant status from Closed to Closing/Financial Closing, Closing/Operational Closing, Award/Ready for Closing, Award/Operational.
BBB. Posting exceptional financial transactions in blocked period
Exceptionally, the GM Account User can override the default posting block indicator thus allowing exceptional financial transactions e.g. to create a new Purchase Order after the grant has been moved to operationally closed.
BBB.1. The following grant is in the Status of Closing/Operational Closing. The Default Posting Block Indicators for Value Types 50, 51, 52, 64, 65, 80, 81 is ticked, which means new postings against these value types is disallowed.
An attempt to create a new PO will fail due to the posting control for the Value Type 51 (Purchase Order).
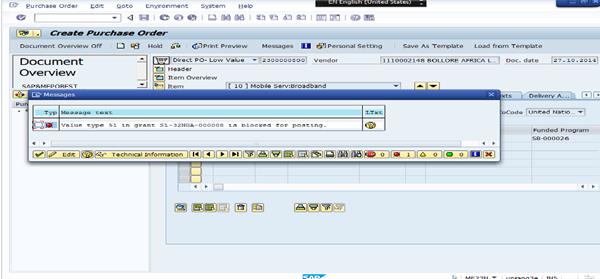
BBB.2. To override the posting control, the GM Account Approver can insert Allow From and Allow To date against the Value Types he or she wants to override the default posting block indicator allowing exceptional transactions.
The example in below is to override the default posting block for the Value Type 51 Purchase Order. The posting of exceptional transactions is allowed within the indicated period of Allow From (27.10.2014) and Allow To (28.10.2014).
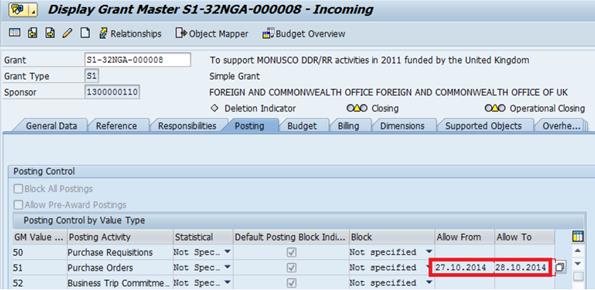
BBB.3. An attempt to create a new PO is now successful.
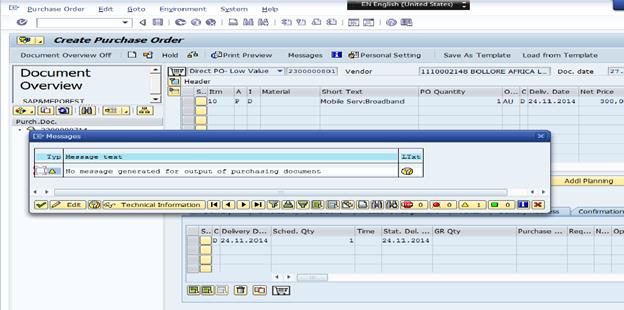
December, 2016