
1 Objective
The objective of this chapter is to give an overview of the accounting lifecycle for expenses incurred by the UN in relation to goods and services within the Umoja environment. It details how an end user, based on the involved Umoja user profiles, should perform its roles and responsibilities related to accounting of expenses relating to goods and services.
There is no specific IPSAS standard relating purely to expenses, however the recognition of expenses is a concept that crosses over almost every IPSAS standard. There are consequently many categories of expenses that are covered in different chapters of the Finance Manual, which are listed in the table below. This chapter will focus on the core procurement process of requisitioning, purchase order creation and receipting for goods and services through the SRM (Supplier Relationship Management) system and Fund Commitments and specific topics on processing travel expenses.
Categories of expenses:
|
Expense |
Chapter /Section where addressed |
|
Employee benefits, including education grant, home leave, staff on-boarding, ex-gratia payments, etc. |
Employee Benefits |
|
Consultant / Individual Contractor Services |
Section 3.2.7 below |
|
Non-employee compensation and allowances |
Section 3.2.7 below |
|
UN Volunteers |
Section 3.3.2 below |
|
Grants and transfers to implementing parties |
Revenue from Non-exchange Transactions |
|
Consumption / distribution / sale of inventory |
Inventory |
|
Depreciation of PPE |
Property, Plant and Equipment |
|
Amortisation of intangible assets |
Intangible Assets |
|
Impairment |
Property, Plant and Equipment; Intangible Assets; Financial Instruments |
|
Travel costs, Daily Subsistence Allowance (DSA), Contingent Cost Reimbursement for Troops and Police |
Sections 3.4 below. |
|
Lease expenses |
Leasing |
|
Contingent Owned Equipment (COE) |
Leasing and Accounts Payable |
|
Purchase of assets below capitalization threshold |
Section 3.2.5 below |
|
Letter of Assist (LOA) |
Section 3.3 below |
|
Provisions |
Provisions |
|
Conference Paymaster |
Section 3.4.5.2 below |
|
Finance costs |
Financial Instruments |
|
Utilities & insurance |
Sections 3.2 below |
2 Summary of IPSAS Accounting Policies
2.1 Timing of Recognition - Delivery Principle
The delivery principle is one of the key concepts of accrual based accounting. Whilst no specific standard exists regarding the delivery principle and the recognition of expenses, the concept represents a core part of IPSAS 1.
Under the delivery principle, the timing of recognition of expenses and assets will occur when the goods and/or services are received by (i.e. 'delivered' to) the UN, and not on receipt of an invoice or payment in cash. Determination of the receiving date is therefore a crucial decision point.
The delivery principle focuses on the timing of recognition regardless of whether it concerns an expense or an asset.
2.2 General Accounting Policies
2.2.1 Recognition of Goods Based on Incoterms
The recognition point of goods delivery will be based on the individual Incoterms set each time the UN procures goods from a supplier. This may therefore be at an early stage than receipt of goods in a UN warehouse or office.
For specific clauses in contracts signed by the UN which override standard Incoterms, the UN must recognize the delivery of the goods at the point specified in the contract.
Click here to a quick link to Guidance Note on Incoterms 2010.
2.2.2 Recognition of Services under the Delivery Principle
As it is more difficult to determine when a service has been delivered than for delivery of goods, the UN should recognize expenses for services by reference to the stage of completion of the transaction at the reporting date.
Expenses for services should be recognized in line with agreed milestones, for example on a quarterly basis for contingent owned equipment (COE), or on a monthly basis for flight hours.
Where precise details of the exact costs are unknown at the year-end (for example if work is ongoing and no invoices or completion certificates are available by the end of the year), an estimate of the extent of the service delivered up to the year-end should be made.
Where there is one specific act noted within a service contract that is more significant than the rest of the acts under the contract, expense recognition is postponed until the significant act has been carried out.
Note: Please refer to Corporate Guidance on the Delivery Principle for policies on specific expenses (e.g. COE expenses).
2.2.3 Splitting Unliquidated Obligations (ULOs) into Delivered and Undelivered Portions
At the end of financial year, there may be several ULOs where the payment of invoices has not yet been made, has been made partially, or where invoices have not yet been received. Of these ULOs, a proportion may relate to goods and services that have in fact been delivered in the financial year. Therefore, the value of those ULOs must be split between the delivered and undelivered portions when preparing the financial statements:
1. Delivered portions: only the value of the ULO relating to service or goods delivered up to the year-end should be recognized in the financial statements through a year-end accrual.
2. Undelivered portions: the remaining ULO relating to services or goods to be delivered after the year-end should not be recognized as an expense or asset in the financial statements.
Note: Please refer to Corporate Guidance on the Delivery Principle for detailed process and examples.
2.3 Reference
For further information on accounting policies relating to the above topics, refer to:
· Corporate Guide on the Delivery Principle; and
3 Desktop Procedures
This chapter will focus on the 'expenses' process within the overall procurement process. Please see the Accounts Payable Chapter (section 3.2) for details of processes following delivery of goods and services. The contracting process has a very limited accounting impact and thus is only covered very briefly in this chapter.
3.1 Introduction to Procurement Lifecycle: Requisition to Delivery
Procurement process, central to the operations of the UN, is made up of the following activities:
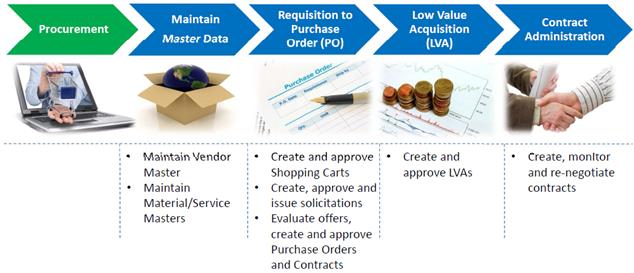
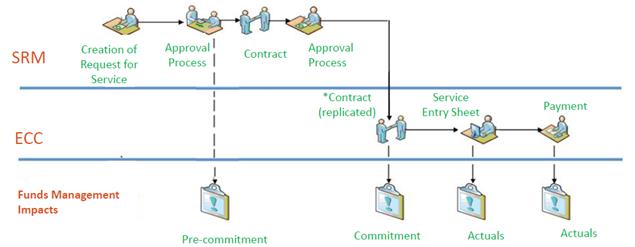
The following diagram shows an overview of the expenses recognition process and how procurement activities fit in the process whether these activities occur in Umoja SRM or ECC systems.
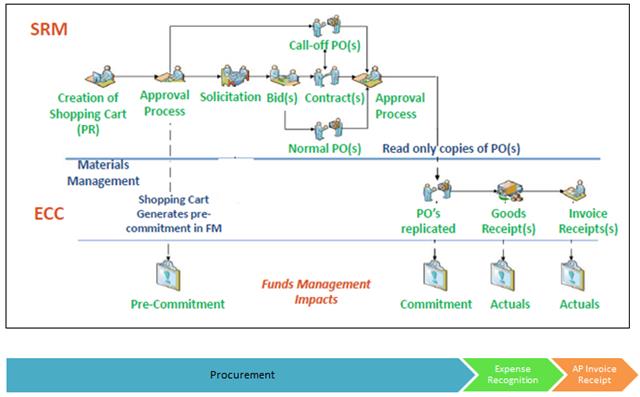
In Umoja, there are two primary mechanisms through which expenses for goods and services may be recognized:
1. Supplier Relationship Management (SRM) system - a web-based Umoja application used specifically for procurement and requisitioning activities; and
2. Funds Commitments - a type of earmarked fund to encumber Funds in current or future periods, if budget is available, creating an obligating document, such as a PO, MOD or OBMO. Fund commitments are used for expenses only when goods and services cannot be procured through SRM and include commitments for travel.
3.2 Supplier Relationship Management (SRM) Processes
The processes below are applicable for procurement activities related to goods and services expense recognition that are conducted in SRM.
3.2.1 Requisitioning Process Overview
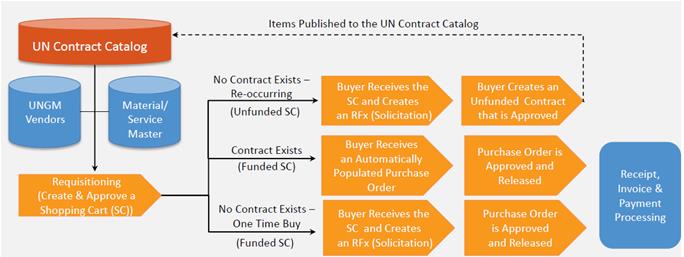
The requisitioning process is a self-service procurement process wherein an authorized User identifies the need for goods or services and initiates a procurement request in the form of a Shopping Cart (SC). Umoja provides Requisitioners with the functionality to search for goods or services that are covered in existing UN Systems Contracts and local contracts through the use of the UN Contract Catalog.
3.2.2 Contract Catalog
In Umoja SRM, the UN Contract Catalog stores all existing contracts from which Requisitioners can select and add items to their Shopping Carts. After bids have been reviewed, evaluated and an award decision has been made, either a PO or contract can be created. If a Requisitioner creates a Shopping Cart (for which a contract already exists) without a designated Source of Supply, the Buyer can create a PO for the Shopping Cart calling off that contract. Contracts or POs can be created from a Solicitation in Umoja SRM only after all evaluations of bids are complete and the Statement of Award has been issued. Detailed information about a contract, such as Contract Basic Data, Financial Rules and Pricing can be entered by editing a contract.
3.2.3 Create, Monitor, Renegotiate Contract and Catalog Content
Contract creation is a centralized procurement process wherein a long term agreement is established for the goods and services of repetitive, strategic and long term importance. The process minimizes the requirement of time-consuming and repetitive solicitation process for a frequently used item or service. Contracts are awarded after a competitive solicitation and award process.
The contract monitoring process tracks and measures supplier performance accurately. Automatic alerts for timings, quantities and total values, etc. are set up in the system. If an alert is raised, the Contract Manager reviews the report on the contract to check if any action is recommended. Based on the action to be taken, different events are triggered by this process. The contract monitoring process identifies claims, disputes and actions are taken accordingly. The contract monitoring process is tied to other processes in procurement, quality control, receiving and finance processes in order to track issues in supplier performance and take actions.
Contract re-negotiation is a standardized process used to keep contracts updated based on requirements and extend them if necessary. It involves collaboration between different parties within the UN such as the supplier, requisitioning office, procurement office, etc. The re-negotiation process tracks changes made to the contract. The process also enables approvals in cases where it is necessary.
The Create and Maintain Catalog Content process focuses on catalogue content management functions and procurement catalogues enabling users to search, compare, and procure products and services from suppliers and negotiated contracts. With this component the UN can provide negotiated contracts and supplier catalogues in a Web-based environment, import catalogue structures or data and transfer catalogue items to internal procurement application.
3.2.4 Requisitioning Process for Goods
This chapter starts at the point at which a contract for goods or services is available in the UN Contract Catalog for the purposes of requisitioning.
The following process is used for ordering a Shopping Cart (Purchase Requisition) in SRM:

3.2.4.1 Creating a Shopping Cart
Before starting a Shopping Cart, the Requisitioner should determine the overall requirements for the goods or services and estimate the total value of the requirement. If the estimated total cost of Shopping Cart is up to the threshold of USD 4,000, the LVA process should be followed (see section 3.2.5 below).
In order to create a shopping cart, the following steps should be followed after logging in to Umoja SRM:
A. Steps to create a shopping cart
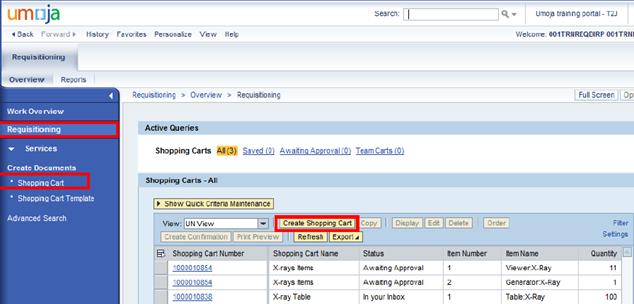
A.1. Click the Requisitioning tab.
A.2. Click Requisitioning in the left navigation bar. The Requisitioning Overview page is displayed - here you can view all your previous Shopping Carts with at the line items level with their current status.
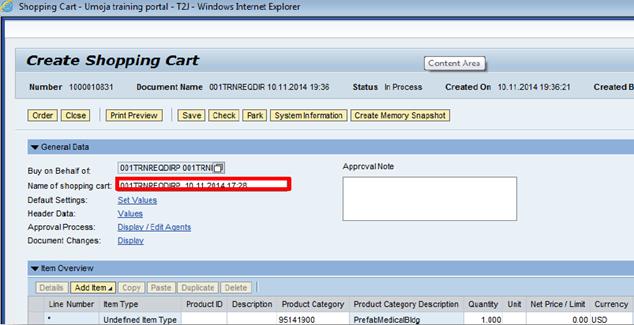
A.3. In the left navigation bar, click Shopping Cart under the Create Documents section or click the Create Shopping Cart button.
A.4. The Create Shopping Cart screen opens in a new window or tab.
3.2.4.2 Adding Items to a Shopping Cart
The Requisitioner creates the Shopping Cart by adding items to it. The User must enter the item specifics such as price, quantities and delivery dates, as well as, Account Assignment such as the cost center and fund.
There are four main ways to add an item (requirement) to a Shopping Cart (in order of preference):
· Contract catalog: used to add items provided by Systems or Local contracts;
· Internal goods/services: used to add items that already have a Material/Service Master record in Umoja. These items do not necessarily have an existing contract;
· Shopping cart template: this pre-populates most of the required fields for items that are commonly ordered; and
· Free description: by exception only when an item cannot be found in the Contract Catalog or in the Internal Goods/Services listing.
3.2.4.2.1 Add Items to a Shopping Cart - Contract Catalog
Contract catalog is the first option that should be used by Requisitioners when searching for an item, as it is the easiest and most efficient way to carry out requisitioning and procurement.
After shopping carts with items from the contract catalog are approved, a pre-populated PO is automatically generated and sent to the Buyer for review and release for approval. This could include procuring from a System Contracts or adding funding for a multiple fiscal period contract. Solicitation is not required because the contract has already been approved by the contracting authority and further solicitation of the requirement is not needed.
B. The steps to add an item using the Contract Catalog are as follows:
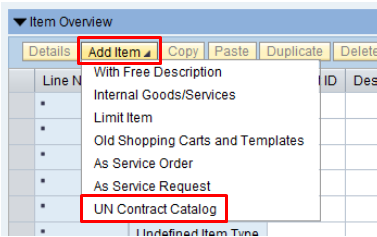
B.1. Click the Add Item button.
B.2. Select the Contract Catalog item. The Procurement Catalog screen will open in a new window or tab.
B.3. Search for an item using the Keyword field. Alternatively, search by Product Group (Product Category), Contract ID, Contract Reference Number, etc. A user can also browse by Category or Supplier.
B.4. Click the Search button.

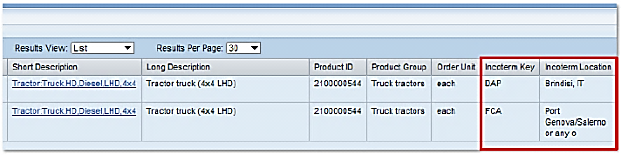
B.5. Click the check box next to the item you would like to add. The columns to the right show information, such as Incoterms, Supplier, Contract Reference Number and Price.
B.6. Click the Quantity field to type in the desired quantity.
B.7. Click the Add to Cart button or click the Shopping Cart icon in the Action column.
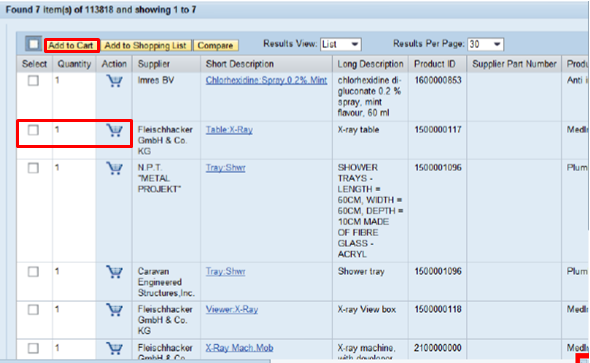
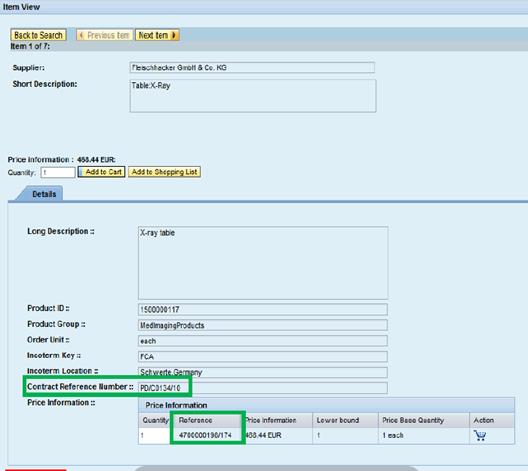
B.8. Clicking on the item Short Description in the Catalog launches the Item View for that contract item.
The Requisitioner can view the particular item details, and specifications of the items will be found in the Long Description field. Further specifics/details of contract items can be requested from the Buyer (Contract Reference listed).
Note: Contract Reference Number is the contract number assigned by the Buyer whereas the Umoja Reference number is the contract number assigned by Umoja.
B.9. Click the Check Out button when all items have been added which will return to the Create Shopping Cart screen.
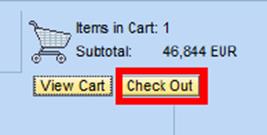
Note: It may be the case that there are multiple contracts available for a particular item. This can occur when multiple Incoterms or other contractual terms (e.g. minimum delivery time) are available. Contact the Procurement section if you are unsure of which Incoterms to use for your Shopping Cart.
3.2.4.2.1.1 Adding Items to a Shopping List
Within the Contract Catalog search screen, the Shopping List function can be used to quickly add items that are frequently ordered from existing System and local contracts.
C. To add an item to the Shopping List:
C.1. Search for the item in the catalog.
C.2. Select the desired item.
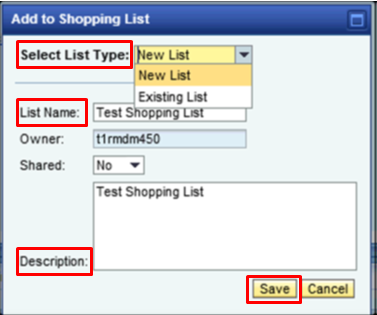
C.3. Click the Add to Shopping List button.

C.4. Select List Type: New List or Existing List.
C.5. Name your New List or select an Existing List.
C.6. Add any details in the Description field about the list.
C.7. Click the Save button.
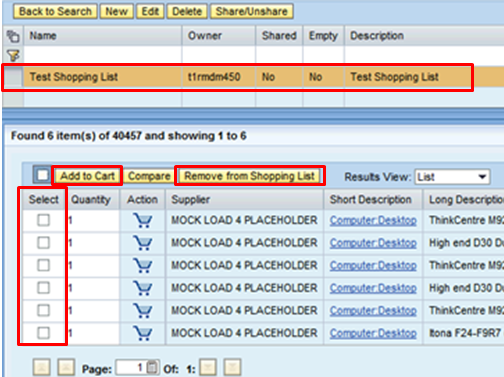
3.2.4.2.1.2 Accessing Saved Shopping Lists
D. Steps to access a saved Shopping List and view previously saved items:
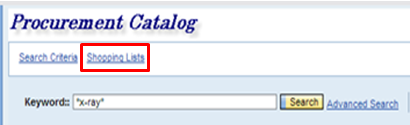
D.1. From any page within the Catalog, click the Shopping Lists link.
D.2. Select the relevant Shopping List.
D.3. Select the items and quantities that you wish to add or remove to your current shopping cart, and then click Add to Cart or Remove from Shopping List.
3.2.4.2.2 Add Items to Shopping Cart - Internal Goods/Services
If an item is NOT listed in the Contract Catalog (i.e. not available from an existing contract), it is necessary to add it by the Internal Goods/Services option. This will let you search the Umoja Material/Service Master database and identify the item(s) you wish to requisition.
Items in the Material/Service Master support faster processing of Shopping Carts through procurement and also enables for downstream processes (e.g. goods receipt, inventory) and consistent identification of goods and services to facilitate accurate reporting.
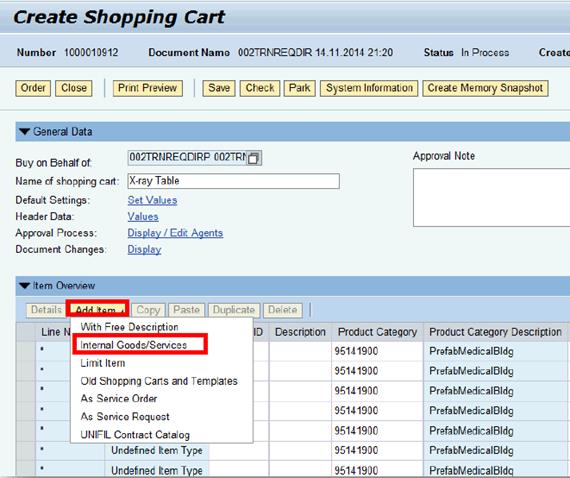
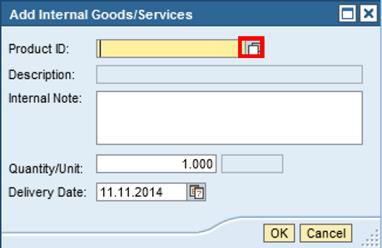
E. Steps to add an item using the Internal Goods/Services option are as follows:
E.1.
Click the Add Item button from the Create Shopping Cart
screen and select the Internal Goods/Services option à the Add Internal Goods/Services
pop-up window is displayed. Click the Matchcode ![]() button to
access the advanced pop-up search window for the Product ID.
button to
access the advanced pop-up search window for the Product ID.
OR
E.2.
Enter the Product ID in the Product ID field, if known.
Otherwise, you will need to search for the appropriate product by clicking the Matchcode
button ![]() to open the advanced search
pop-up window.
to open the advanced search
pop-up window.
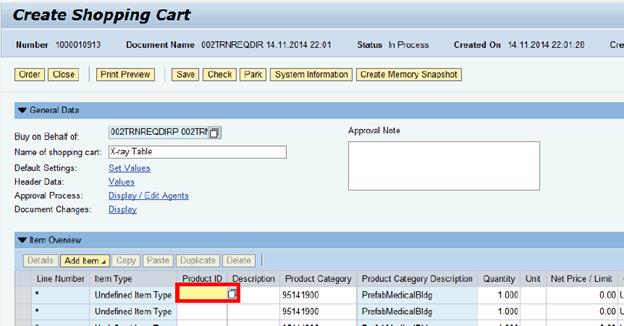
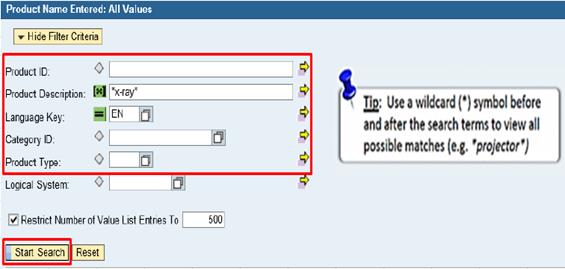
E.3. Enter search terms in any of the available fields, then click the Start Search button.
E.3.1. The Category ID field can be used to narrow down your search to a specific Product Category.
E.3.2. The Product Description field should be used to search based on descriptive phrases.
E.3.3. The Product Type field has two possible values: 01 for Material and 02 for Service.
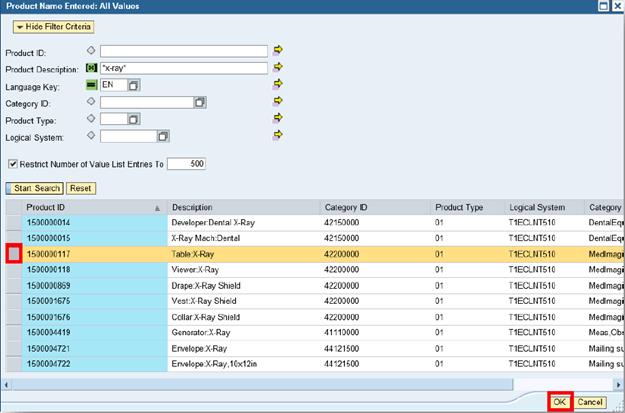
E.4. Click the grey box next to the appropriate line item to select it
E.5. Click the OK button to add the item to the Shopping Cart.
3.2.4.2.2.1 Freight Costs
If an item from the contract catalog with Incoterms that require freight forwarding (for example FCA), the system will prompt and require the Requisitioner to add a line to the Shopping Cart for freight costs. A Help Display is available.

For non-contract catalog items added via the internal goods/services that require freight, a freight line still need to be added although Umoja will not provide a warning as such of the above case.
F. Steps to add the line item for Freight Charge costs:
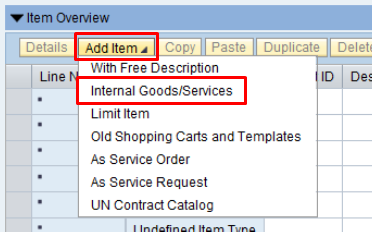
F.1. Click the Add Item button in the Item Overview section.
F.2. Select the Internal Goods/Services option. The Add Internal Goods/Services window will display.
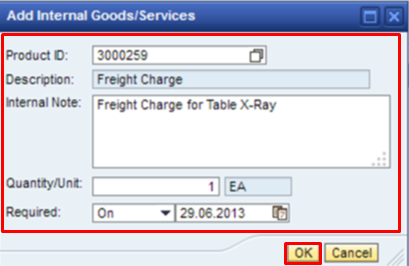
F.3. Enter the following parameters in the window to add the Freight Charge line item:
• Product ID: 3000259 (Category is 78100000);
• Description: Freight Charge;
• Quantity/Unit: 1 EA; and
• Required: Same delivery date as item.
F.4. Click the OK button to add item to the shopping cart.
F.5. Add estimated Net Price for freight (e.g. 15% of value).

3.2.4.2.3 Add Items to a Shopping Cart - Template
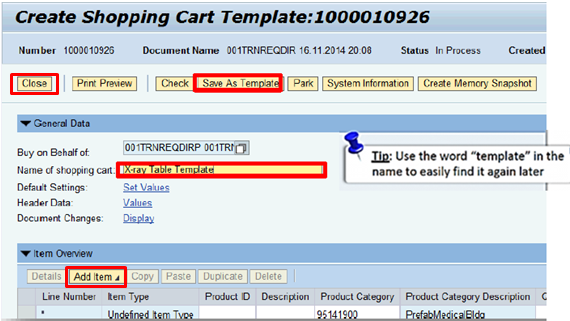
Shopping Cart templates can be created for recurring requirements. The first step is to create and save a template by creating a shopping cart and adding items to it.
G. Steps to create a shopping cart template:
G.1. In Umoja SRM, click the Requisitioning tab.
G.2. Click Requisitioning in the left navigation bar à the Requisitioning Overview page is displayed.
G.3. From the left navigation bar, click Shopping Cart Template under the Create Documents section.

G.4. Add items as you would with a standard Shopping Cart and complete any (or all) other fields (for example, Item Details, Account Assignment, etc.).
G.5. Enter a name for the Template and click the Save As Template button.
G.6. Click the Close button to return to the SRM home screen.
H. Steps to create a Shopping Cart from the saved template:
H.1. Create a Shopping Cart from the Requisitioning area on the SRM home screen.
H.2. Click the Add Item button.
H.3. Select the Old Shopping Carts and Templates option.
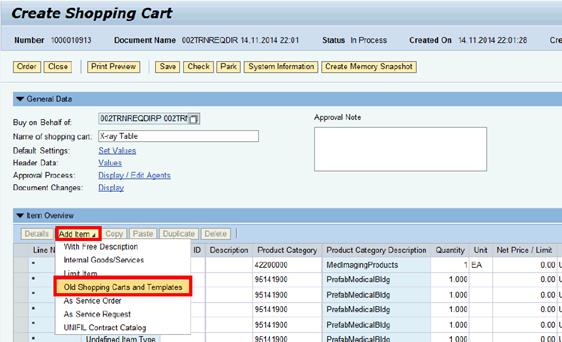
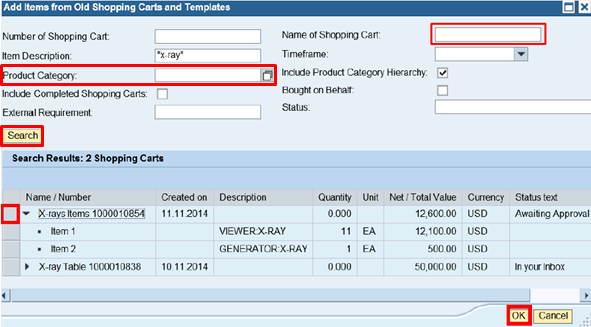
H.4. In the pop-up window, enter the template name in the Name of Shopping Cart field. If you do not know the name you can search for the template based on other criteria, such as Product Category à click Search.
H.5. Select the desired template.
H.6. Click the OK button.
All items in the template will be added to your Shopping Cart, along with their corresponding details, as completed in the template. You can then edit any Shopping Cart or Item details before ordering the Shopping Cart as normal.
3.2.4.2.4 Add Items to a Shopping Cart - Free Description
Adding items to a Shopping Cart using the free description option should be done as an exception only.
Since most items procured by the UN are already found in the Internal Goods/Services database, using free description will increase the time needed by the Procurement staff to follow up, and determine the requirements, before processing the Shopping Cart.
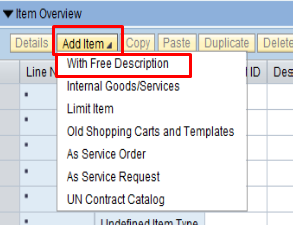
I. Steps to add an item using free description are as follows:
I.1. Click the Add Item button.
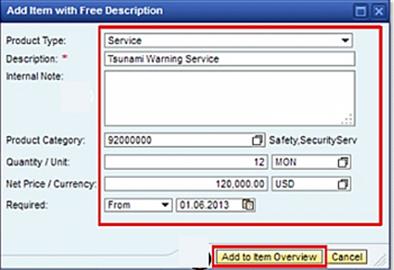
I.2. Select the With Free Description option. The Add Item with Free Description pop-up window will open.
I.3. In the open window, fill in the following fields:
· Product Type: Goods or Service.
· Description: Free text description of the product.
· Product Category: Required field. Use the Matchcode icon to search for a general Product Category which matches, as closely as possible, the type of good/service being requested.
· Quantity / Unit.
· Net Price / Currency: Estimated value.
I.4. Click the Add to Item Overview button to add the item to the Shopping Cart. The window will close and the item will be added to the Shopping Cart.
Note: Many financial fields for the Shopping Cart, such as GL Account, are automatically populated based on the selected Product Category.
3.2.4.3 Completing Item Details in Shopping Cart
After all the required items are added to the Shopping Cart, the next step is to edit the item details for each of the line items.
The Shopping Cart Item Detail tabs, such as Item Data, Account Assignment, Notes and Attachments, Delivery Address, Sources of Supply, Availability and Approvals Process Overview need to be reviewed and/or completed before a Shopping Cart can be successfully ordered.
J. Steps to edit an item data are as follows:
J.1. Select the required line item.
J.2. Click the Details button. Alternatively, click the hyperlink line item number to open up the item details tabs at the bottom of the page. Scroll up to return to the overview of the Shopping Cart.

J.3. Complete the item details for each line item in the Shopping Cart by working your way across the Item Detail tabs (from left to right) and by confirming/completing the necessary fields.
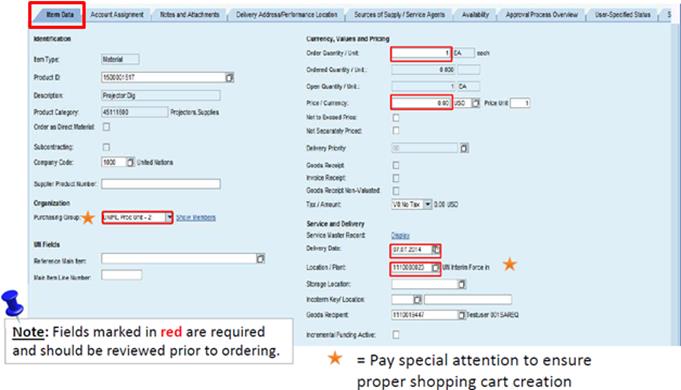
3.2.4.3.1 Item Data
The Item Data tab allows you to edit basic information such as Quantity, Estimated Price, Delivery Date and so on.
3.2.4.3.2 Account Assignment
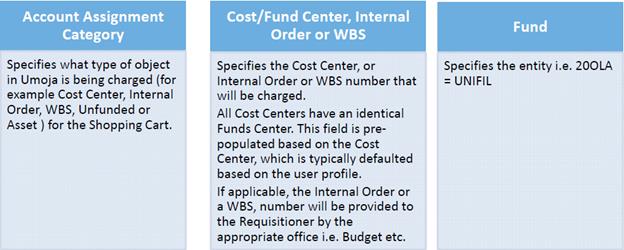
All Shopping Carts need to have accurate account assignment information before they can be ordered in order to determine funding. The key fields that the Requisitioner needs to validate for Account Assignment are:
After the Requisitioner submits the Shopping Cart for approval, Umoja SRM will perform an availability check (AVC) to determine if sufficient funds are available to cover the estimated total cost of the Shopping Cart. Only after the Shopping Cart has been approved will there be budgetary impacts (i.e. a 'Pre-commitment' of funds).
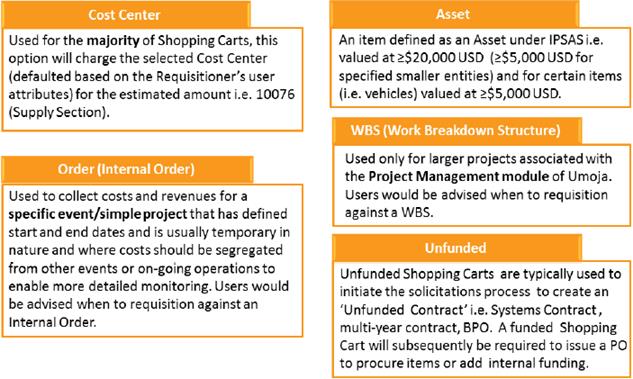
While the default value of 'Cost Center' should be used as the Account Assignment Category for the majority of Shopping Carts, it may be necessary to select another option. The key categories to be familiar with are:
Accounting impact:
This stage of the SRM process is critical in determining the subsequent accounting treatment for the goods and services ordered. Whilst expenses or assets will be recognized upon delivery of the goods and services, it is at this account assignment stage that:
· The GL account is assigned for the relevant expenses; and
· The determination of expense, plant & equipment or inventory is made.
Correct entry of the account assignment details is thus critical in later accounting entries.
Note: Inventory will be recognized as an asset until it is consumed as per IPSAS 12. This Chapter focuses on the initial assignation of asset/expense when ordering. Please refer to section 3.4.2 of the Inventory Chapter of the Finance Manual for determination of the point at which the inventory is consumed and expensed.
K. The steps to enter the account assignment information are as follows:
K.1. Click the Account Assignment tab.
K.2. Select the line 0001 by clicking the grey box beside the line item or on the item hyperlink.
K.3. Click the Details button to display the account assignment details.
Note: Much of the information on this tab is pre-populated based on the material/service being requisitioned and your user profile information. However, some fields should still be reviewed and completed.
K.4. Enter the Fund to be used (usually same across one entity) and press Enter to populate the Budget Period.
K.5. Select the appropriate Account Assignment Category.
K.5.1. For the majority of Shopping Carts, the Account Assignment Category should be left as Cost Center - default Cost Center is based on your user profile.
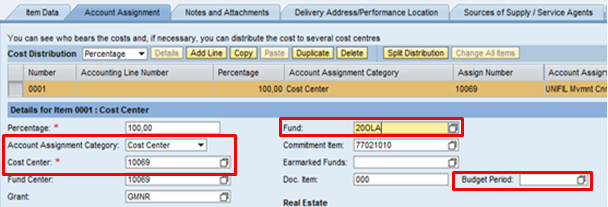
Note: For items that have been added using free description, it may be necessary to enter the Cost Center and other financial information for the requirement. Click the Matchcode icon to search for a Cost Center.
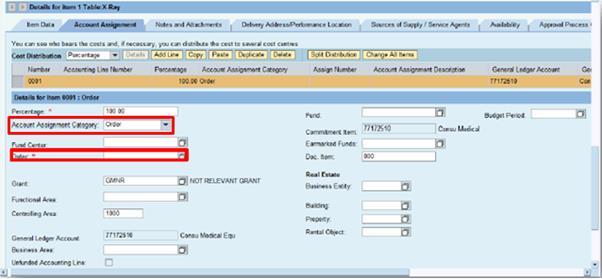
K.5.2. For items that are funded using the WBS Element or Order account assignment, use the drop down menu from the Account Assignment Category field and select WBS element or Order as appropriate à enter the reference number provided in the WBS Element or Order field that will appear to automatically populate the Fund Center.
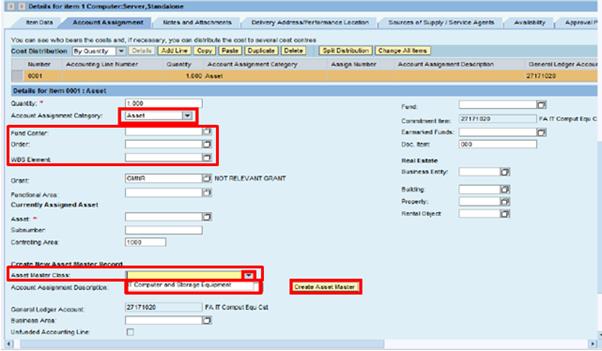
K.5.3. For assets, select Asset from the drop down menu à enter either Fund Center, WBS Element or Order for the funding source and select the option provided in the Asset Master Class before clicking the Create Asset Master button to create a unique Asset Master Record number.
K.5.4. Unfunded Account Assignment Category is selected in order to create an unfunded Shopping Cart that will initiate the solicitation process to establish and unfunded contract such as a Blanket Purchase Order (BPO), multiple fiscal period contracts, etc.
Although called 'Unfunded', the Shopping Cart should include the total estimated value of the requirement over the lifetime of the proposed contract (including optional years). Due to the selection of the category, when the Shopping Cart is approved, there is no pre-commitment of funds.
Note: In creating a BPO, you may attach a list of proposed items to be covered by the blanket purchase to the Shopping Cart.
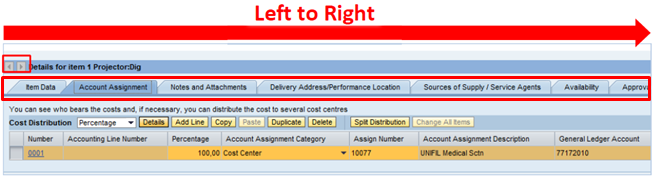
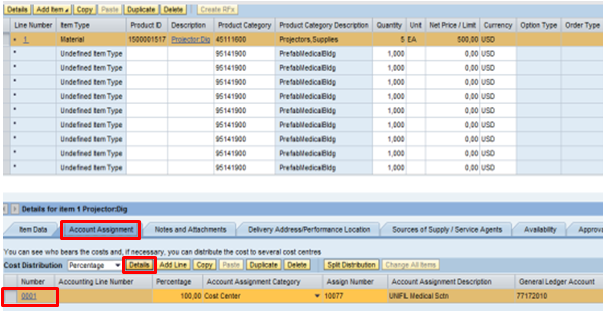
K.6. To split the costs of a Shopping Cart between Cost/Fund Centers, it is necessary to create a new line item for each Cost Center/Account Assignment.
For example, if a central team is creating a Shopping Cart for 5 digital projectors that will be divided between two Cost Centers, the Shopping Cart and Account Assignment should be formulated as follows:

3.2.4.3.3 Notes and Attachments
Notes and attachments may be added in the Notes and Attachments tab.
· Notes section: User can add text for suppliers or internal notes for buyers by clicking the respective links; and
· Attachment section: Any relevant files needed for the procurement process can be added by clicking the Add Attachment button.

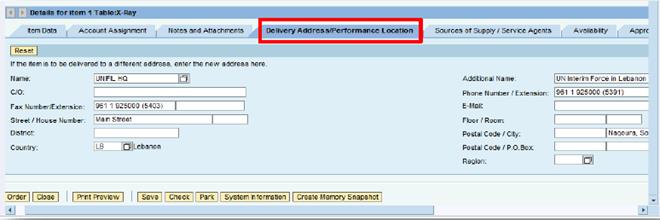
3.2.4.3.4 Delivery Address
User can use the functions in this tab to review and change the default delivery address of each line item in the Shopping Cart.
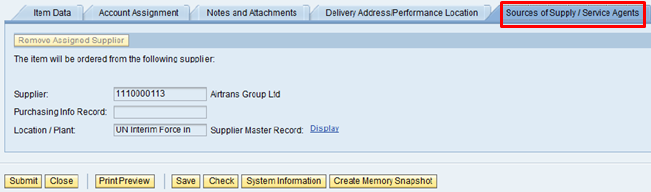
3.2.4.3.5 Source of Supply/Service Agents
Based on the Product Category/ID of each item, the system will indicate if a contract catalog item and therefore a source of supply/service agent exist. For items that are not ordered through the Contract Catalog, the source of supply/service agent may also be added in this section by clicking the Assign Supplier button.

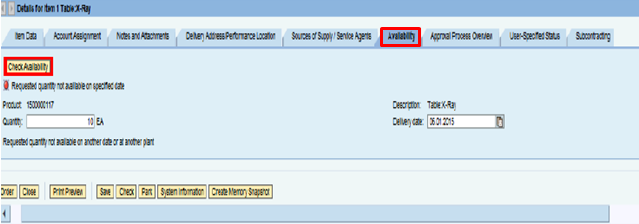
3.2.4.3.6 Availability
Prior to creating a Shopping Cart, Requisitioner should run the Stock Availability Report in ECC (T-code: ZLE_STCK_OVRVW) to verify the availability of a material at their plant on the required date and create a stock reservation as appropriate.
3.2.4.4 Saving and Ordering a Shopping Cart
L. Steps to check, save and order a Shopping Cart:
L.1. Before the Shopping Cart can be ordered, it must first be checked for any potential errors. Click the Check button at the top of the screen and the system will check for any potential errors or warnings with the Shopping Cart.
·
Error ![]() : If an error is displayed
it must be rectified before the Shopping Cart can be ordered. For
example: An error is displayed if there is a missing Fund, Account Assignment,
or other Funds Management error.
: If an error is displayed
it must be rectified before the Shopping Cart can be ordered. For
example: An error is displayed if there is a missing Fund, Account Assignment,
or other Funds Management error.
·
Warning ![]() : If a warning is
displayed, the user should review the warning and make necessary
adjustments, if needed. However, the Shopping Cart can still be ordered, even
if there is an active warning. For example: A warning is displayed if an
existing contract is available for an item.
: If a warning is
displayed, the user should review the warning and make necessary
adjustments, if needed. However, the Shopping Cart can still be ordered, even
if there is an active warning. For example: A warning is displayed if an
existing contract is available for an item.

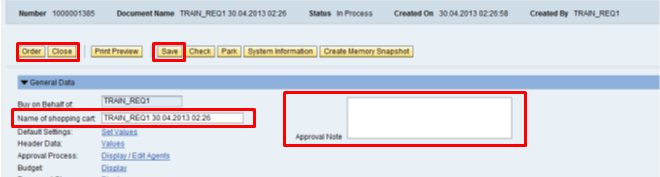
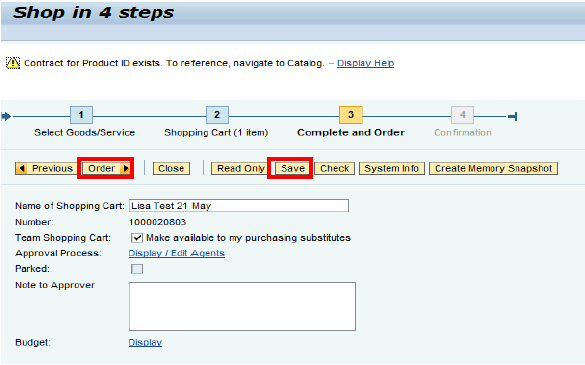
L.2. Enter any notes for the Approver in the Approval Note field. You can also view any replies written by the Approver in this field, after the Shopping Cart has been ordered.
L.3. To give a specific, contextual name to the Shopping Cart, click the Name of shopping cart field and edit with any relevant name for reference. For example: Digital Projectors for Supply.
L.4. Click the Save button if you intend to complete the Shopping Cart at a later time. Note: A Shopping Cart that has been saved is only viewable by the Requisitioner who created it.
L.5. Click the Order button to submit the Shopping Cart for approval.
L.6. Click Close button to return to the Requisitioning page.
3.2.4.5 Editing and Amending Shopping Carts
The process to edit and amend a Shopping Cart depends on the Shopping Cart's stage of ordering or approval.
1 Shopping Cart has not been ordered: Any changes can be made to the selected Shopping Cart by clicking the Edit button to open the Shopping Cart in edit mode or click the Delete button to cancel the Shopping Cart entirely.
2 Shopping Cart has been ordered but not yet approved:
· Click the Edit button of the selected Shopping cart and proceed to make any edits as required. When the Order button is clicked after editing, a message will warn you that the Shopping Cart will be re-entered into the approval queue, but you can continue.
· Click the Delete button to cancel the Shopping Cart and a message will warn you that the Shopping Cart will be removed from the approval queue, but you can continue.
3 Shopping Cart has been approved and ordered:
· Contact the Procurement office for assistance, referencing the Shopping Cart number, as changes cannot be made by Requisitioner.
· Buyers can make edits to some fields in the Shopping Cart: Price (when item is not from the Catalog), Quantity, Item Description (if Free Text item), Delivery Date, Incoterm, Purchasing Group.
3.2.4.5.1 View and Edit Team Carts
The Team Cart functionality allows Requisitioners to view and edit Shopping Carts of other Requisitioners within the same Organizational Unit (e.g. Section). Members of the same unit (Requisitioners) can 'take over' and edit another team member's Shopping Carts in 'Saved' status and can also view (only) other Shopping Carts in their section that are in 'Approved' and 'Awaiting Approval' status. This is useful when the person is on leave and a fellow team member must finalize a partially completed Shopping Cart.
If you edit another Requisitioner's Shopping Cart, you will be asked if you wish to 'take over' the Shopping Cart, at which time it will become your Shopping Cart. After a Requisitioner saves a Shopping Cart, it automatically becomes visible to others of the same unit (there is no need to tick the field in the Shopping Cart screen to make Team Carts available to substitutes in the Shopping Cart).
Initially, all Requisitioners must flag the check box 'Show my Team Carts' (and press Apply) in their Requisitioning Overview for each predefined Active Query (i.e. All, Saved, and Awaiting Approval) in the Quick Criteria Maintenance filter.
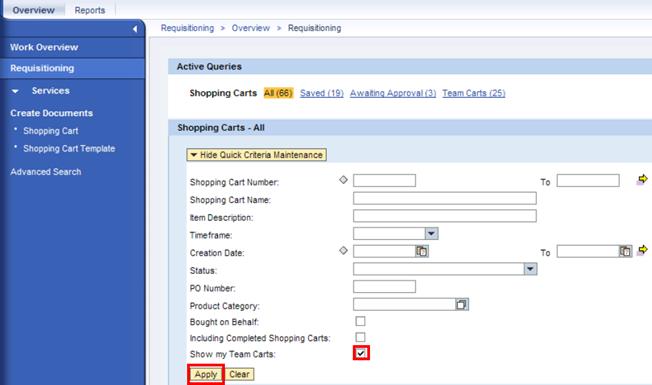
Note: This step needs to be performed only for the first time in each query, as this check box will subsequently remain flagged (unless you clear the filter criteria).
M. The steps to take over a Shopping Cart in Umoja are:
M.1. In the Active Queries section, click the Team Carts query link.
Note: In this scenario, the Requisitioner is currently logged in with the User ID FL2SAREQ. Since User ID FL1SAREQ and User ID FL2SAREQ are within the same Organizational Unit, Shopping Carts created by User ID FL1SAREQ are visible in this view.
M.2. Identify and select the Shopping Cart to be taken over.
Reminder: Only those Shopping Carts that have a 'Saved' status can be taken over.
M.3. Click the Take Over button

M.4. A confirmation message displays on the screen stating that the ownership of the Shopping Cart has been taken over.
![]()
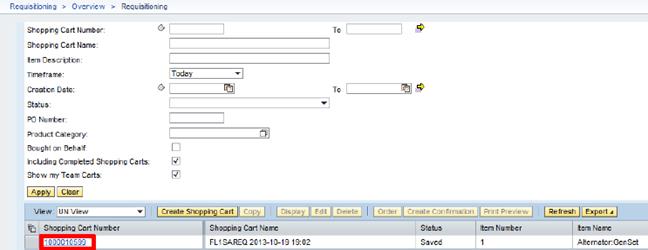
M.5. Click the All query link à click the Refresh button.

M.6. Identify the Shopping Cart that was taken over to edit as required and save or order as appropriate.
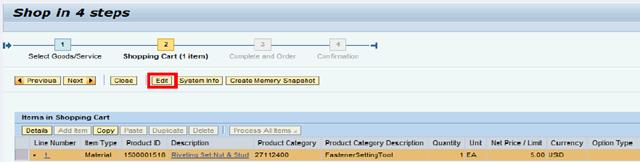
M.7. Click Edit to make the necessary changes to the Shopping Cart.
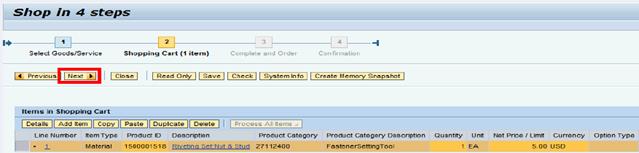
M.8. Make any necessary changes and click Next.
M.9. Make any further required modifications and click Order or Save and Close as appropriate.
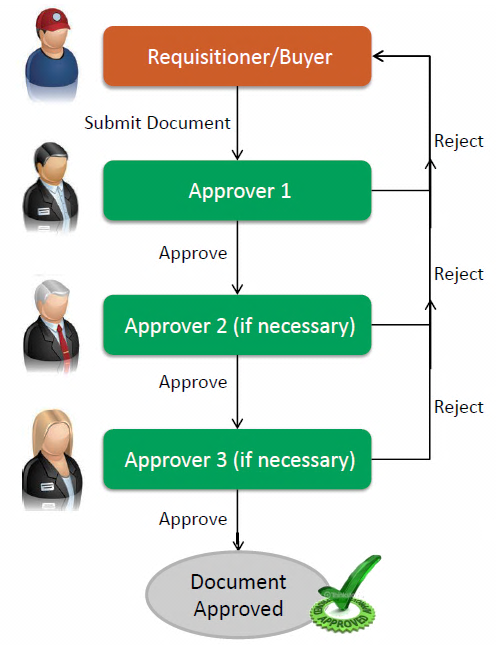
3.2.4.6 Reviewing and Approving Shopping Carts
The following process flow illustrates the Shopping Cart approval process:

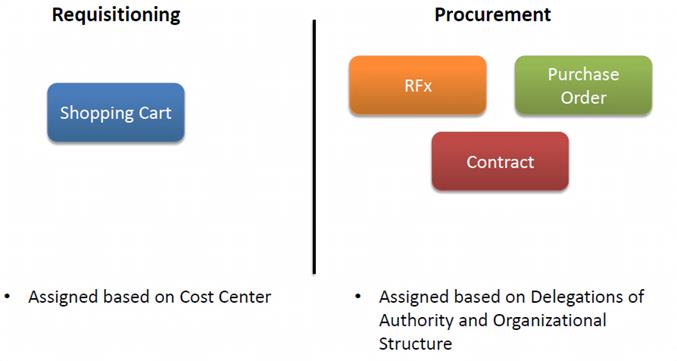
Users are assigned to the Approver Enterprise Role in order to receive system access to approve documents in Umoja SRM.
Approvers are automatically assigned to these documents based on Delegations of Authority, the items being procured, their Purchasing Group or other information. Some documents, such as Shopping Carts, require only one approver. Others may require several levels of approval before they can be published.
Below is a list of the major document types in Umoja SRM, and how their approval is aligned to the Requisitioning or Procurement functions.
An example of an approval workflow is shown below:
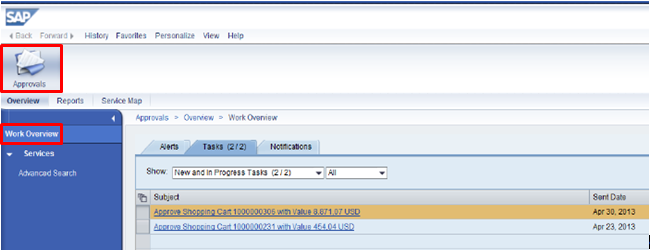
The Work Overview screen shows a personalized list of all documents waiting for approval or other action. Approvers can open documents to view more detail.
N. The Work Overview may be navigated as follows:
N.1. Click the Approvals tab at the top of the screen.
N.2. Click the Work Overview link in the left-hand menu. The Work Overview will open, listing all the documents awaiting your action.
N.3. To review a particular document, click the task name link. The document will open in a new window or tab.
N.4. Once the document is open, they can review and either approve or reject the document.
During this overview, we will follow the approval process for a Shopping Cart ordered by the Engineering section. This shopping cart contains the line items added by the Requisitioner as well as a line item for Freight. The Approver for the Engineering Cost Center must review each of the top two line items. The Freight line is reviewed and approved separately.

The requirements in the Shopping Cart should be reviewed in more detail before a decision is made.
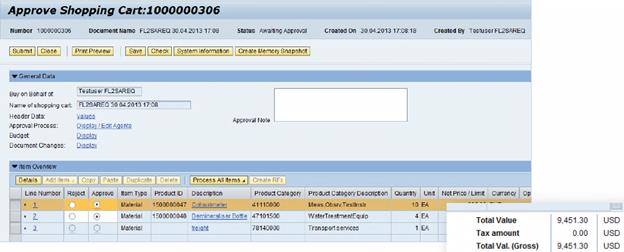
Some of the important sections of the Shopping Cart screen are:
1 Approval Note - This field shows any notes or specific points that have been highlighted for the Approver by the Requisitioner. If a Shopping Cart is rejected, the Approver may add a comment instructing the Requisitioner on the issues that need to be rectified.
2 Item Overview -To view the details of a line item, select it (by clicking the gray box next to it) and click the Details button.
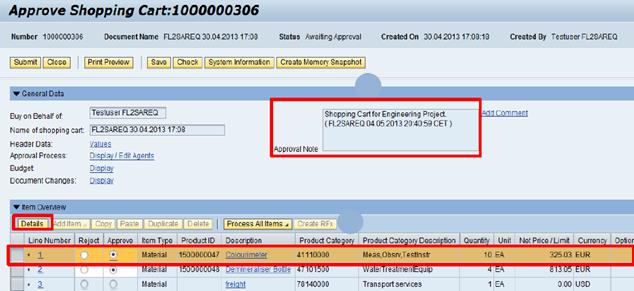
Note: From an accounting perspective, it is key to ensure that the Category, General Ledger Account and Delivery Date are correctly identified as these will drive later accounting entries for expense and/or asset recognition.
No accounting entries are generated at this stage of the requisitioning process - expenses are recognized later, upon delivery of the goods and/or services requisitioned.
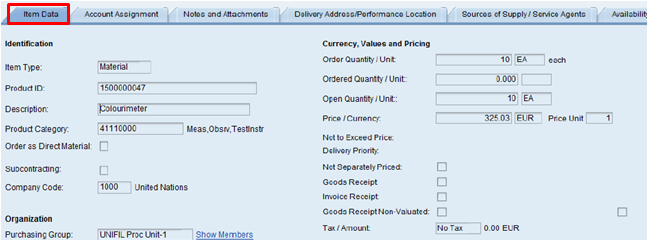
3.2.4.6.1 Review Item Data
After clicking the Details button, the first tab that loads is the Item Data tab. On this tab, you can review fields such as:
· Product ID: The unique ID for the Product in the Umoja Material/Service Master.
· Product Category: The general type of product/material. Product Categories are assigned in accordance with UNSPSC classifications.
· Other fields, such as Quantity/Unit, Price/Currency, and Delivery Date.
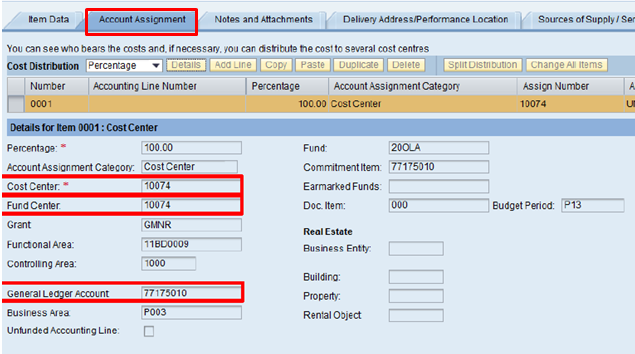
3.2.4.6.2 Review Account Assignment
The Account Assignment tab shows where costs are being distributed for that line item. The fields on this tab, with the exception of the Fund field, are automatically derived for the Requisitioner. These fields include:
· Fund Center - Every Cost Center is mapped to an identical Funds Center;
· Cost Center; and
· General Ledger Account.
3.2.4.6.3 Review Notes and Attachments
The Notes and Attachments tab shows any additional information that the Requisitioner has included on the Shopping Cart.
· Supplier Text is used when the Requisitioner would like specific text to be seen by the bidders during the Solicitation process. (The Buyer will be able to edit this text).
· Internal Notes may be used to convey special instructions to the Buyer.
· Attachments are used for any files, such as an SOW, that are relevant to the Shopping Cart.

3.2.4.6.4 Review Sources of Supply
The Sources of Supply tab shows potential vendors for the line item. Vendors will appear on this tab if the Requisitioner added the item from a Systems Contract visible to them in the UN Contracts Catalog. If the Requisitioner did not add the item using a Contract, but one or more is available to procure from, those will appear as well. For items that have no active Systems Contracts, no vendors will appear on this tab.
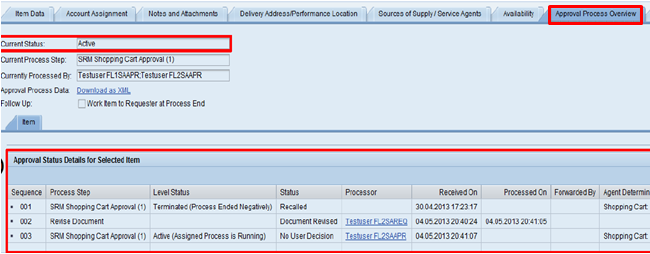
3.2.4.6.5 Review Approval History
The Approval Process Overview tab shows:
· The current approval status of the line item.
· Detailed header approval status. Every line item shows the sequential decisions made by Approvers in the document's history.
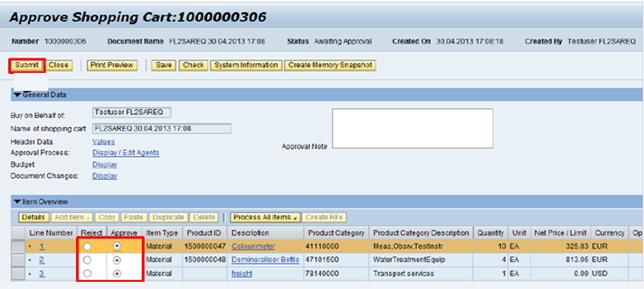
3.2.4.6.6 Approving a Shopping Cart Line Item
O. To approve a Shopping Cart Line Item:
O.1. Approve or reject the items in the shopping cart by clicking the Approve or Reject buttons for each line.
O.2. Click the Submit button after you have reviewed all line items.
3.2.4.6.7 Rejected Shopping Carts
If a Shopping Cart is rejected by the Approver, follow-up action from the Requisitioner may be necessary depending on the reasons for the rejection. The Requistioner may:
1 'Accept' the Approver's decision of rejection, resulting in the deletion of the Shopping Cart or the rejected line item(s) on the Shopping Cart; or
2 Make the required changes, corrections or edits and then re-submit (order) again the Shopping Cart for approval.
Below are the steps a Requisitioner can perform once a Shopping Cart is rejected:

3.2.5 Requisitioning Process for Low Value Acquisitions (LVA)
Low Value Acquisitions facilitate the procurement of low-value goods and services according to the UN Procurement Manual and Financial Rules. The Low Value Acquisitioner Enterprise Role can use the Low Value Acquisitions (LVA) process to create a Purchase Order under the following conditions:
· The item (good/service) does not exceed USD 4,000 and the item is not a contract catalog item; or
· The item (good/service) does not exceed USD 4,000 and the item is a Blanket Purchase Order (BPO) contract catalog item.
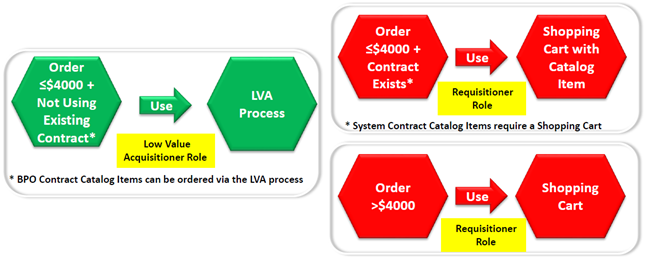
Note: Only the scenario in green is for action by the Low Value Acquistioner Role.
To create, order and receive and LVA in UMOJA SRM, the following tasks must be completed:

3.2.5.1 Create an LVA
The process for creating an LVA is similar to creating a Shopping Cart except for the following distinctions:

P. The steps to create an LVA PO in Umoja SRM are:
P.1. Click the Requisitioning tab.
P.2. Click Purchasing in the left navigation area.
P.3. Under Create Documents, click Purchase Order.
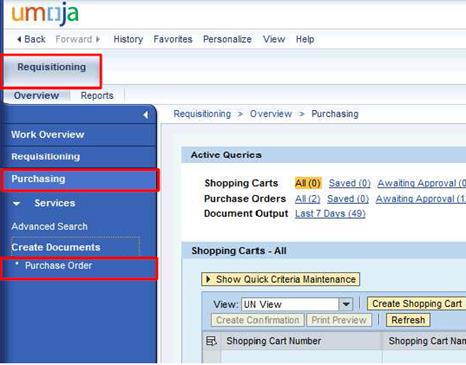
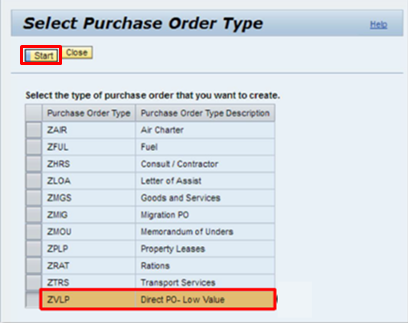
P.4. In the Select Purchase Order Type window, click ZVLP - Direct PO-Low Value PO type.
P.5. Click Start.
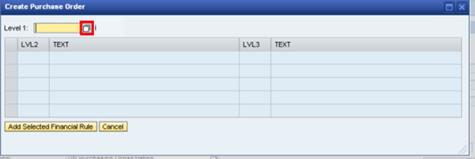
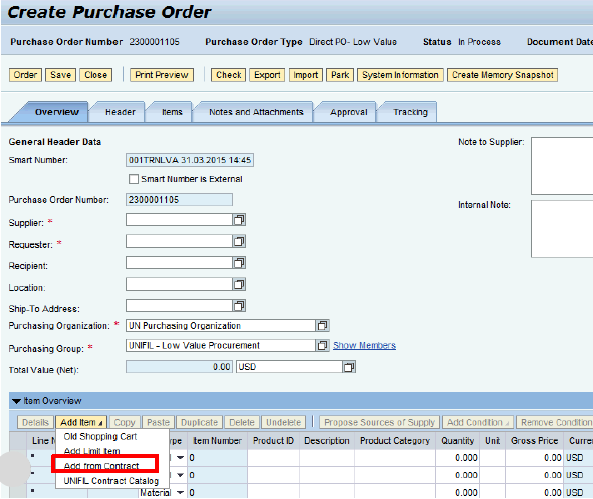
P.6. The Create Purchase Order screen is displayed.
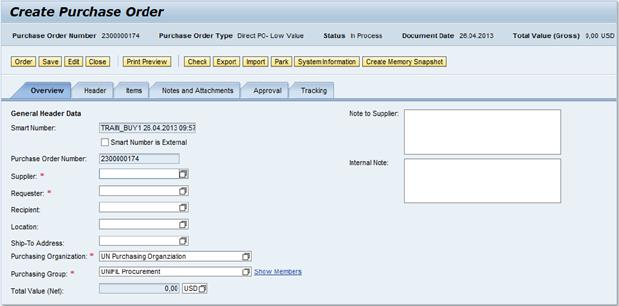
3.2.5.2 Edit Overview Data
After creating a draft LVA, the Overview data must be entered. This includes:
· Supplier;
· Requester;
· Recipient;
· Location; and
· Ship-To Address.
Q. Steps for adding information in the Overview tab are:
Q.1. Click the Overview tab.
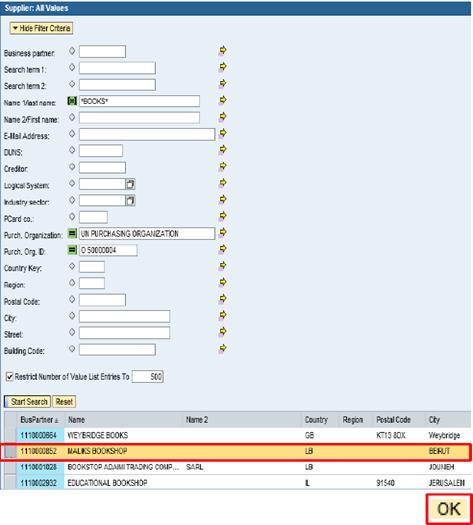
Q.2. Click the Matchcode icon next to the Supplier field à the Supplier Search window is displayed.
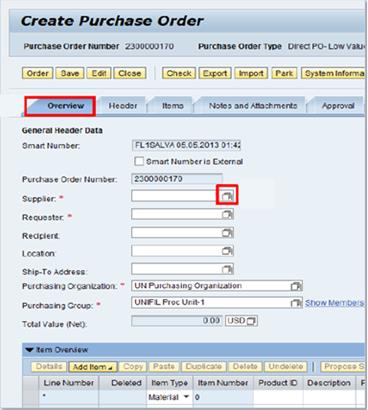
Q.3. Enter the required search terms in the respective fields to find the desired supplier.
Q.4. Click the Start Search button.

Note: Use the asterisk symbol (*) on both sides of the word to conduct a 'wildcard' search which is useful if you do not know what the exact full name of the supplier.
Q.5. Select the supplier from the search results and click the OK button.
Note: If the selected supplier does not exist in Umoja SRM, a request for a new 'Low Value Vendor' (form in iSeek) must be submitted through the appropriate channels. The vendor will then be created in Umoja by the Commercial Business Partner Team.
Q.6. Enter the Business Partner ID number for the Requester and Recipient fields by either typing it in or by conducting a search using the Matchcode icon.
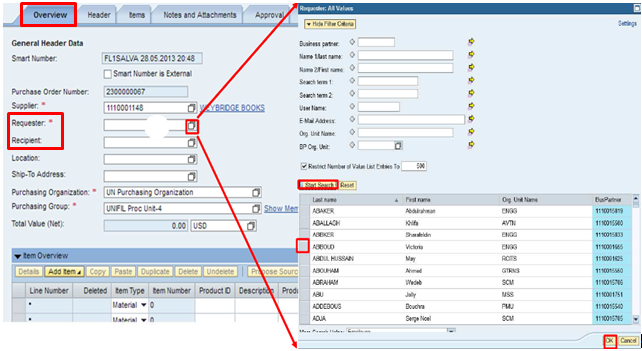
Note: The Requester field is required and typically defaults. The Recipient is the person who ultimately requires the goods/services and can be included if required.
Q.7. Enter the Business Partner ID number for the Location and Ship-To Address by either typing them in the fields or by conducting a search using the Matchcode icon.
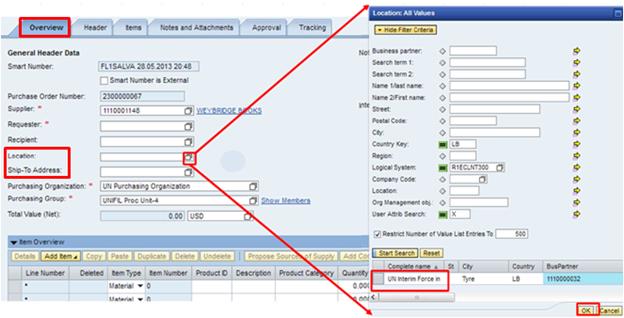
Note: The Location is used to designate the entity whose users can undertake the 'receiving' in Umoja. With Ship-To Address, make sure that all items requiring bar coding to be delivered to Central Receiving.
3.2.5.3 Edit Data Header
Information to be entered into the Header tab includes:
· Financial Rule;
· Currency;
· Payment Terms; and
· Incoterms/Location.
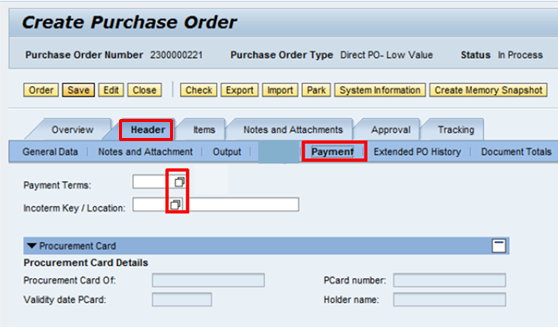
R. Steps for adding information in the Header tab are:
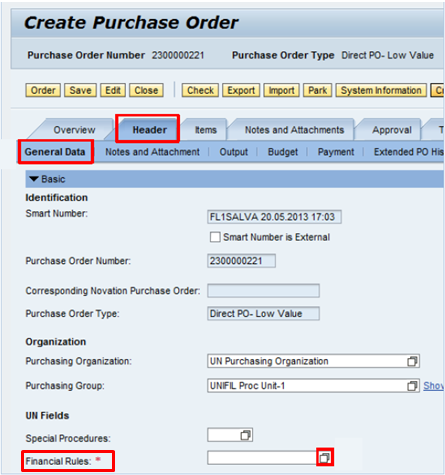
R.1. Click the Header tab.
R.2. Under General Data, click the Matchcode icon next to the Financial Rules field in order to select the correct Financial Rule for the basis of award for the LVA.
R.3. Click the Matchcode icon next to the Level 1 field to open the Level FRR Selection window.
R.4. According to the Financial Rules and Regulations, the 105.16(a)(x) must be selected for all LVAs. Select the 105.16 option and click the OK button.
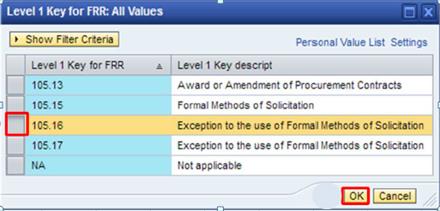
The list of all Level 2 and Level 3 rules will be displayed in a new window.
R.5. Scroll down and select the (a)(x) option, then click Add Selected Financial Rule button.

R.6. If required, click Payment under the Header tab to add Payment Terms and/or Incoterm Key/Location information.
R.7. Click the Matchcode icons next to both fields to search for appropriate values for Payment Terms and Incoterm Key/Location.
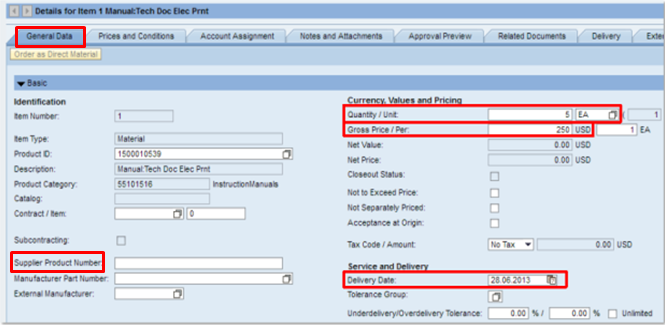
3.2.5.4 Edit Item Data
Data to be added and edited with the Items tab includes:
· Product ID;
· Product Category;
· Quantity;
· Price per Unit;
· Delivery Date;
· Account Assignment; and
· Pricing Information (if necessary).
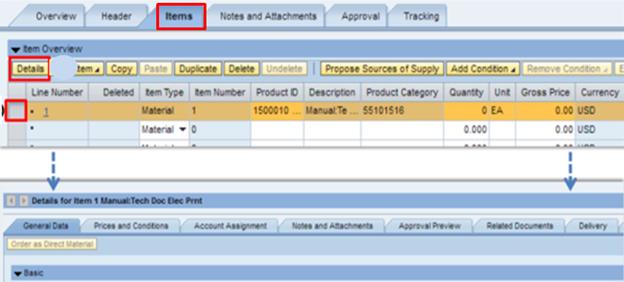
S. The steps for adding the goods or services to the LVA are:
S.1. Click the Items tab, and under the Item Overview section, click the Product Category field. If you already know the Product ID, skip to next step.
S.2. Enter the ID for the Product Category, or click the Matchcode icon to search for one.

S.3. Click the Product ID field. Enter the Product ID and press Enter, or click the Matchcode icon to search for one.

S.4. Complete the additional item details for each line item by clicking the gray box on the left to select the line item you wish to modify.
S.5. Click the Details button. Alternatively, click the hyperlink line item number to open the item details section at the bottom of the browser page.
S.6. Edit basic item information such as Quantity, Price per Unit, and Delivery Date on the General Data tab. Enter the Item Number and Supplier Product Number obtained from the external price list.
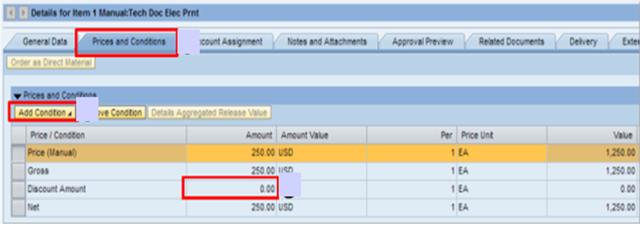
S.7. If required, click the Prices and Conditions tab to add information on pricing condition or discount amount.
S.8. Edit the amounts in the Discount Amount field as necessary.
S.9. Add a new Pricing Condition by clicking the Add Condition field to view a drop-down list with options.
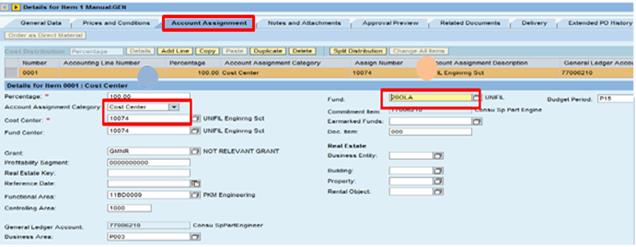
S.10. Click the Account Assignment tab to review and edit the details on how costs will be allocated for the LVA items.
S.11. Click the Details button to open the Account Assignment screen or alternatively, click the hyperlink line item number e.g. 0001.

S.12. In the open window, enter the appropriate fund in the Fund field and confirm the appropriate Account Assignment Category is selected from the drop-down menu and the Cost Center is correct.
S.13. Press Enter to automatically populate the other information.
S.14. Click the Notes and Attachments tab to add texts and attachments to the LVA as necessary.
3.2.5.5 Add Blanket Purchase Orders (BPO) Contract Catalog Items
In Umoja, Blanket Purchase Orders (BPO) items are an example of Product Category Contract Catalog Items, which are items that are published to the Contract Catalog with only a Product Categories instead of Product IDs. For instance, a BPO may be linked to the Product Category for General Motor Components. Any products that fall under that Product Category may be added to an LVA, using the linked BPO. Once added, the User must:
· Add an appropriate Product/Service ID; and
· Add the price and specific part number by referring to an external price list/catalog.
T. Steps to add an item from a BPO Product Category Contract to an LVA PO:
T.1. Click Add Item button and select Add from Contract from the drop-down menu.
T.2. Enter the BPO contract number in the Contract Number field and click the Start button to search for the relevant contract catalog(s).
Note: Liaise with the Procurement section or other offices to obtain the BPO contract number as required.
T.3. Select the required item(s) and click the Assign button to add the item(s) to the LVA PO.
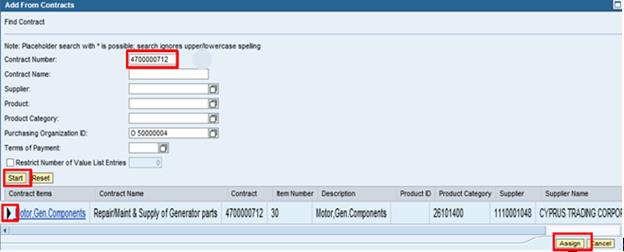
Note in the search results that the Product Category is included but the Product ID field is blank which indicates that the item(s) is part of a BPO contract.
T.4. Add the appropriate Product ID by clicking the Matchcode icon in the Product ID field to open the search screen.
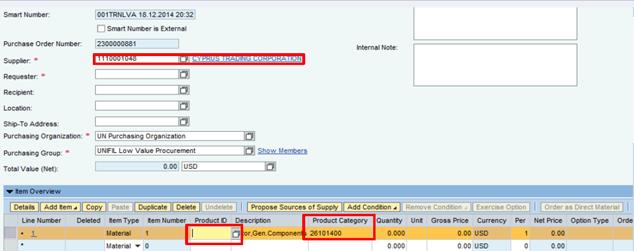
Note that the Supplier and Product Category have been automatically populated as the item has been selected from a Product Category BPO Contract Catalog Item.
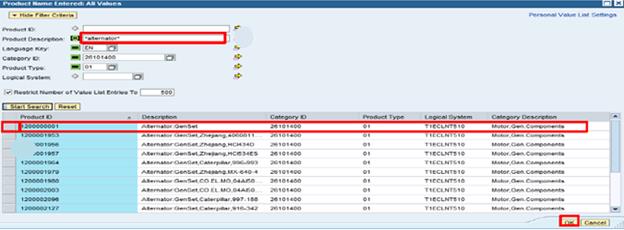
T.5. In the pop-up window, delete the pre-populated Product Description and replace with a more detailed description and select the required Product ID from the list à click OK to return to the Create Purchase Order screen.
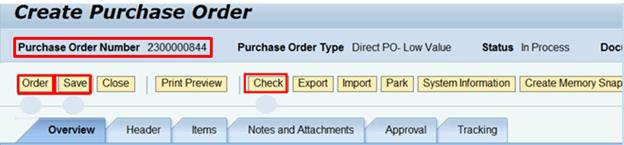
3.2.5.6 Checking and Ordering LVAs
LVAs are checked and ordered in the same manner as Shopping Carts as detailed in previous sections.
U. Steps to check and order the LVA PO:
U.1. Click the Check button to check for any warnings or errors. Any errors need to be rectified before an LVA can be ordered.
U.2. Click the Save button to save the LVA to be completed at a later time.
U.3. Click the Order button to submit the LVA for approval, noting the PO number.
3.2.5.7 Reviewing and Approving LVA
Using Workflow, Umoja SRM automatically assigns Approvers to LVAs based on the Funds Center (i.e. Cost Center). LVAs are approved in the same manner as Shopping Carts as detailed in section 3.2.4.6.6 above.
3.2.5.8 Editing Existing LVAs
V. The steps to view a list of previously created LVAs, along with their status, and edit an LVA are:
V.1. On the Umoja SRM home screen, click the Requisitioning tab.
V.2. Click the Purchasing option from the left-hand menu.
V.3. Click Purchase Orders 'All' or other criteria as required and click Refresh button.
V.4. Click the Show Quick Criteria Maintenance button to search for an LVA by various criteria. You may also use the Advanced Search function.
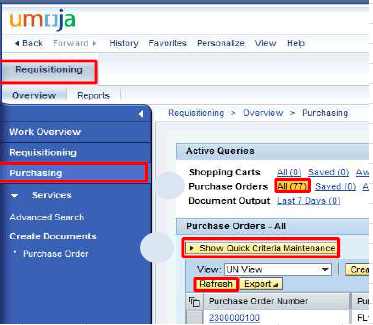
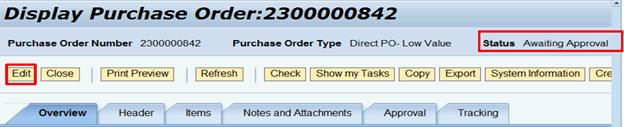
V.5. Once you have found the LVA you would like to edit, click the Document Number to open the LVA in a new window.
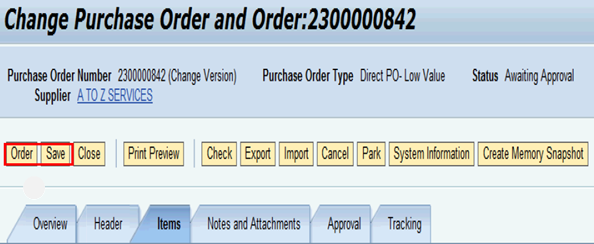
V.6. Click the Edit button to enter the edit mode.
V.7. Make all required changes, then click Save or Order as appropriate.
Note: No accounting entries are generated at this stage of the requisitioning process - expenses are recognized later, upon delivery of the goods and/or services requisitioned.
3.2.6 Inbound Goods - Receiving and Receipting
Inbound goods process is performed when receiving goods from commodity vendors and shipment from other locations. Inherent in this process is the tracking of inbound goods movement and, upon receipt, basic verification to affirm that goods being received conform to the Purchase Order/contract. The end-to-end process from Procurement to Goods Receipt in Umoja is as follows:

Within this process, the Goods Receipt (3) is split into:
1. Virtual Goods Receipt - as per PO Incoterm, the transfer of ownership to the UN does not take place at the final destination.
2. Physical Goods Receipt - as per PO Incoterm, the transfer of ownership to the UN takes place at the final destination/central receiving.

Each of the steps in the inbound goods process are discussed below.
3.2.6.1 Accessing Inbound Delivery Document
Depending on available information, there are several methods available to find an inbound delivery document. The most common is way to find the document is by viewing the PO. Another way is through the Inbound Delivery Monitor.
3.2.6.1.1 View a Purchase Order (PO)
Since inbound deliveries are created against Purchase Orders, an Inbound Coordinator can find a specific Inbound Delivery by viewing the PO in Umoja ECC. This method is good if PO number is the only information available to the Inbound Coordinator.
W. Steps to view a PO / Transaction Code: ME23N
W.1. Enter ME23N in the Command field and click Enter à the initial screen displays the last PO the User opened.
W.2. To open a new PO, click the Other PO button (left of the Print Preview button).
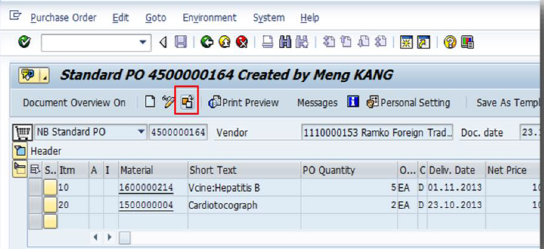
W.3. In the pop-up window, enter the PO number and press Enter or click the Other Document button.

W.4. The original Purchase Order showing on the screen consists of the following:
W.4.1. Identifying information such as PO number, Vendor, and Doc. date.
W.4.2. PO Header with several tabs of header level information. Note the Incoterms field may be empty.
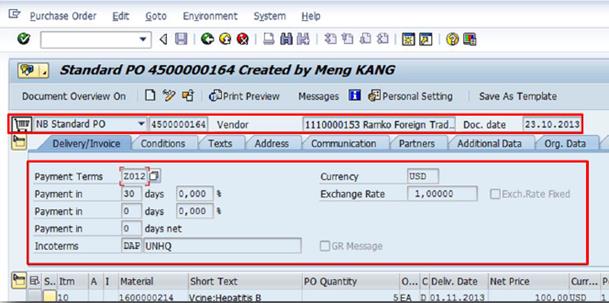
W.4.3. Item overview and line item details. Review the line item details for information such as Delivery Date, Quantity and Notes contained in different tabs.
W.5. In the Line Item Detail section, click the Purchase Order History tab to view the history of receiving actions performed on this PO, for example the Movement Type, the Material Document Number (from a good receipt), the Goods Receipt Posting Date, etc.

Note: the User can click any of the underlined fields to open the referenced document, for example Material Document.
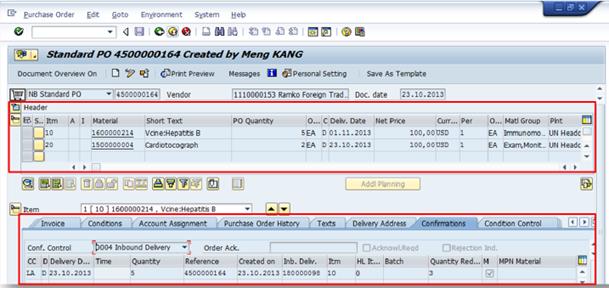
W.6. The Inbound Delivery document number is found on the Purchase Order's Confirmations tab.
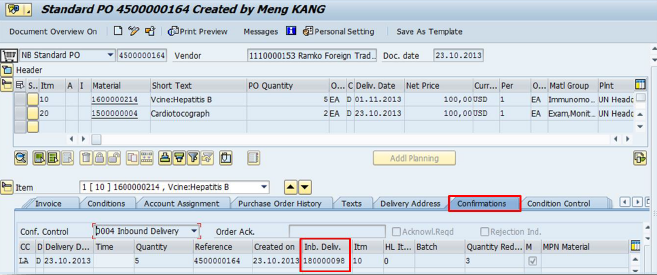
Note: A PO may have multiple Inbound Deliveries. Each Inbound Delivery has one Incoterm, one Delivery Date and one Goods Receipt Date.
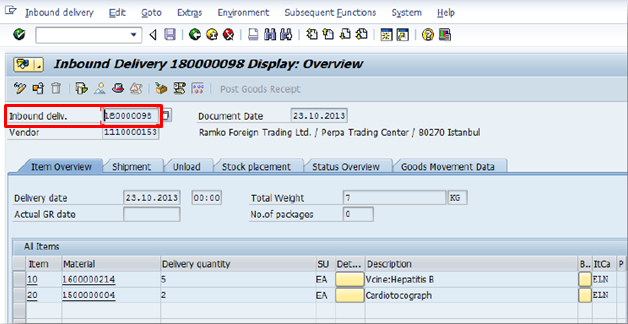
W.7. Double click on the Inbound Delivery document number to bring up the Inbound Delivery document window.
3.2.6.1.2 View Inbound Delivery Monitor
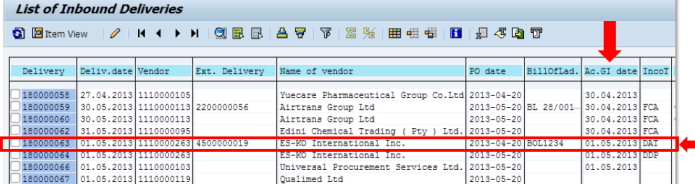
Another method to find an inbound delivery document is by viewing the Inbound Delivery Monitor. Using this method, the Inbound Coordinator can also view multiple inbound deliveries.
The Inbound Delivery Monitor is the key functionality that allows UN locations to have transparency on incoming deliveries and their status.
Note: After goods receipt is posted for the full quantity in the inbound delivery, it can no longer be updated as the delivery is considered 'complete'.
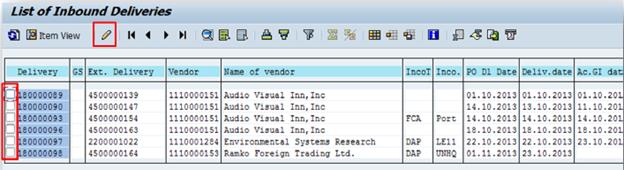
X. Steps to view a list of inbound deliveries / Transaction Code: VL06I
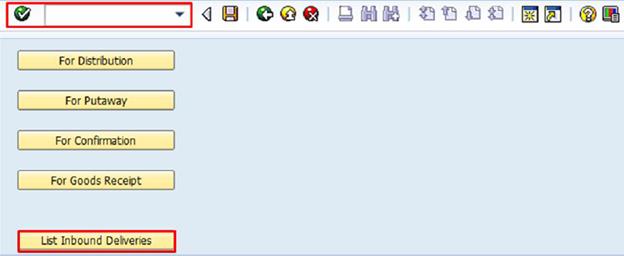
X.1. Enter VL06I in the Command field and click Enter to display the Inbound Delivery Monitor screen.
X.2. Click the List Inbound Deliveries button.
X.3. In Shipping Point/Receiving Pt, enter the Plant/Mission code. Ensure the delivery dates matches the desired search timeframe or leave it blank to list all.
Optionally, scroll down to Total Goods Movement Status and enter 'A' to filter Inbound Deliveries for which a Goods Receipt has NOT been processed already.
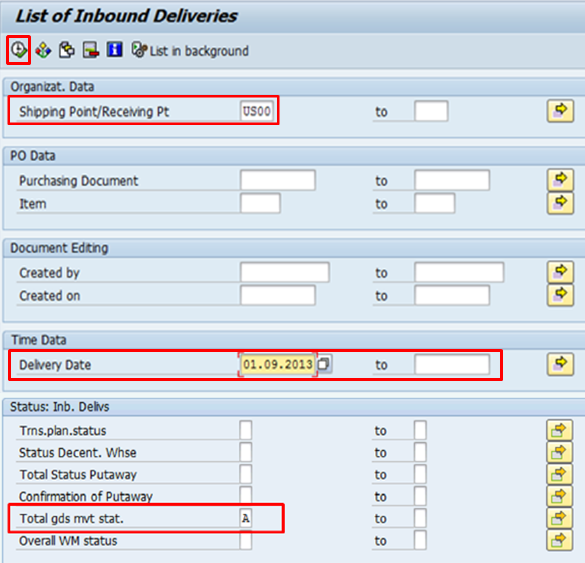
X.4.
Click the Execute ![]() button to
generate the Inbound Delivery report.
button to
generate the Inbound Delivery report.
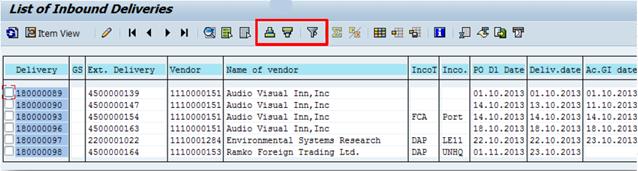
X.5. Find the corresponding Inbound Delivery based on the PO or other known information. To view an Inbound Delivery, double click the document number and review the document for the necessary information.
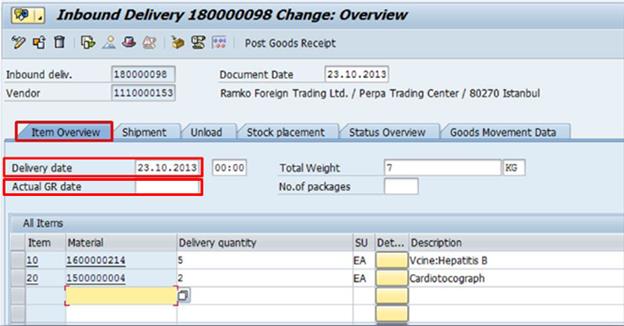
3.2.6.2 Updating Inbound Delivery
An inbound delivery contains information regarding several key dates to support the goods movement and delivery process for UN locations. It is a 'living document' which is updated as delivery and shipping information becomes available and/or changes.
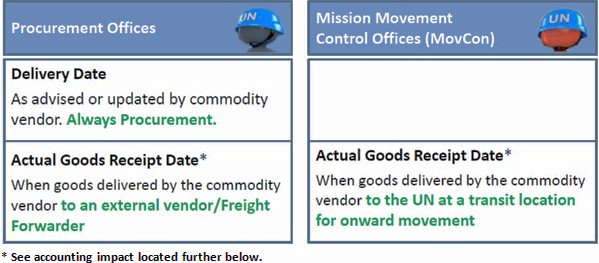
The document is updated by both Procurement and Mission Movement Control Offices acting as Inbound Coordinators. The offices are responsible to update the following specified date fields captured on the Item Overview tab of the Inbound Delivery screen:
Note: These steps begin after finding the inbound delivery document through associated PO (T-code ME23N) or Inbound Delivery Monitor (T-code VL06I).
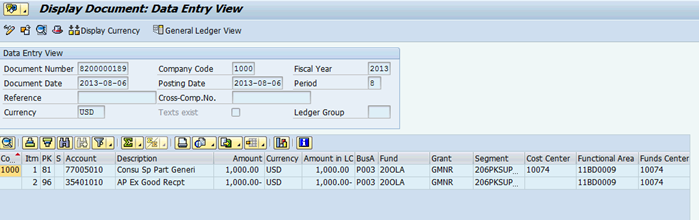
Accounting impact
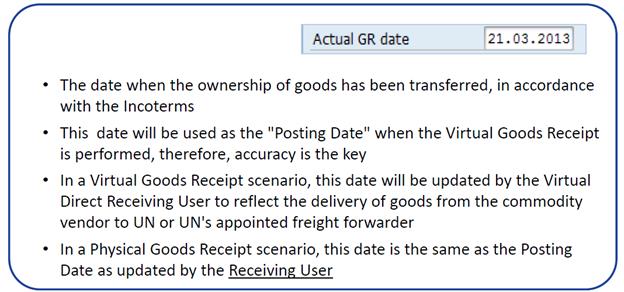
The actual goods receipt date is key for accounting purposes - under IPSAS, it is at this date that the goods will be recognized (either as an asset or an expense, depending on the accounting policy followed):
Dr Assets / Expenses XX
Cr GRIR acct XX
The following screenshot illustrates the accounting entries generated from expenses processed from SRM:
Scenario 1 - Vendor Delivers Goods at Origin or Other Named Place
The mission has ordered some fuel storage tanks and vehicle spare parts from a Systems Contract. The goods are to be delivered to the mission's local port of entry.
In this scenario, the overall steps relating to the Inbound Delivery process are:
1. Umoja automatically creates an Inbound Delivery in the system for this delivery using the information from the PO (for example delivery date, materials, etc.).
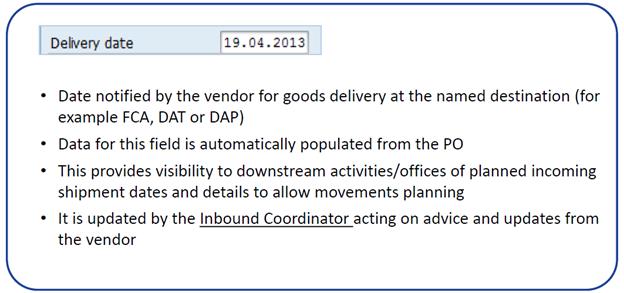
2. The Inbound Coordinator updates the Delivery Date in the Inbound Delivery if the commodity vendor provides an update.
3. The Inbound Coordinator confirms that the goods are delivered to the port and uploads the delivery documents and any onward shipping documents. He or she also updates the Inbound Delivery with the quantity received and the Actual GR Date field.
4. The Virtual Receiving User runs the Inbound Delivery Report as often as locally needed. This report provides the Mission/offices with the visibility and shipping details and documents of forecasted inbound shipments. The goods are to be delivered to the local port of entry.
3.2.6.2.1 Update Delivery Date
Y. Steps to update the delivery date / Transaction Code: VL06I
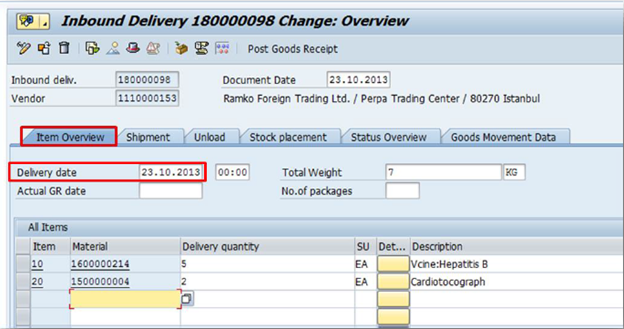
Y.1.
Continuing from step X.5 above, select the box next to
corresponding Inbound Delivery and click the Change Inbound Deliveries
![]() icon.
icon.
Y.2. On the Item Overview tab of the opened Inbound Delivery document, update the Delivery date as advised by the commodity vendor.
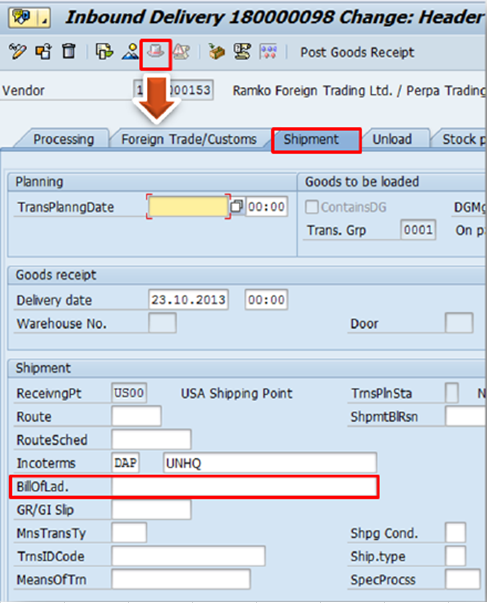
Y.3.
Click the Header ![]() button
to view the Header Details section.
button
to view the Header Details section.
Y.4. On the Header Details screen, click the Shipment tab and enter the Bill of Lading number for the inbound shipment in BillOfLad field under the Shipment section.
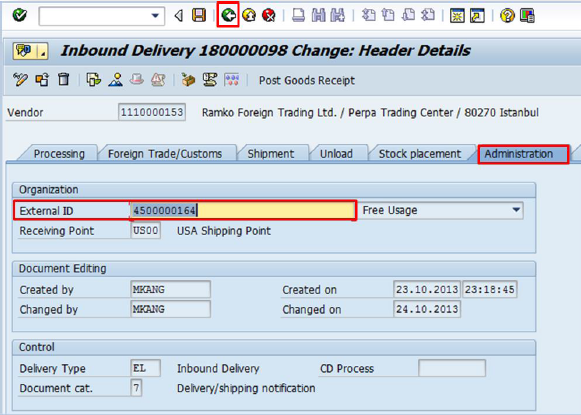
Y.5. On the Administration tab, the External ID field in the Organization section displays the PO number for reference.
Y.6. Press the Back button to exit the Header section.
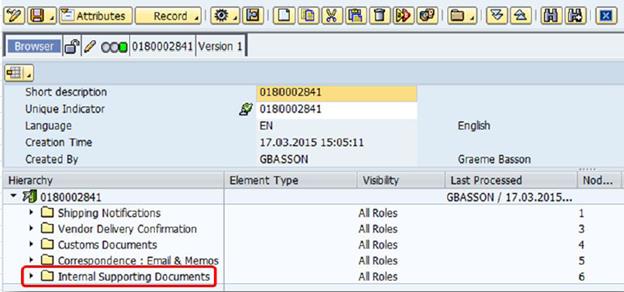
Y.7. Upload the inbound shipment documents (for example Bill of Lading) when available from the commodity vendor by clicking the Services for Objects button à select Records Management Logistics from the list.

Y.8.
In the open window, click the Display/Change button ![]() and select the Internal
Supporting Documents folder.
and select the Internal
Supporting Documents folder.
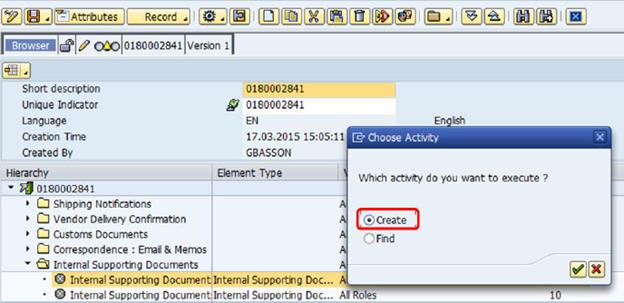
Y.9. Click the Create button to upload a new document à on the pop-up window, select Create activity and press Enter.
Y.10. From the menu appearing on the right side of the scree, click the Application button and choose From File menu to select the file to be uploaded.

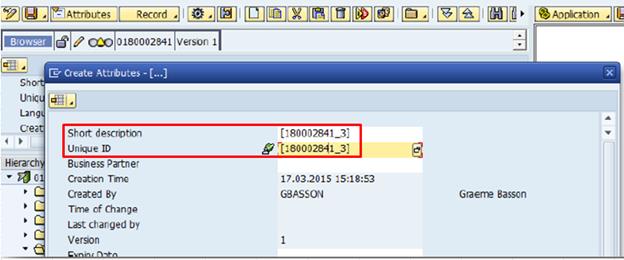
Y.11. In the new window, populate the Short description and the Unique ID with the following the name convention: inbound delivery number_a sequential number (e.g. 180002804_1, 180002804_2, etc.).
Y.12.
Click the Save ![]() button
when all updates are completed.
button
when all updates are completed.
3.2.6.2.2 Update Actual Delivery Date
In preparation for a Virtual Goods Receipt, the Inbound Coordinator(s) will need to update again the date in the Inbound Delivery document to reflect the delivery date of goods from the commodity vendor to the UN or UN's appointed freight forwarder.
Z. Steps to update actual delivery date / Transaction Code: VL06I
Z.1. Once the appropriate Inbound Delivery is open and in edit mode, click the Item Overview tab and update the Actual GR date.
Z.2. Update the Delivery quantity fields for each line item as reported by the vendor and confirmed in attached documents.

Note: If the actual quantity received is less than the expected quantity, another Inbound Delivery is generated for the undelivered quantity.
Z.3.
Click the Header ![]() button
to view the Header Details section.
button
to view the Header Details section.
Z.4. On the Shipment tab, enter ZFPO in the Means of Transport Type (MnsTransTy) field and enter the freight PO number in Transport ID Code (TrnsIDCode) field for downstream reference if follow-on freight is arranged and a PO number is available.

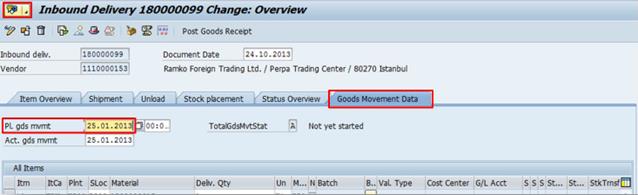
Z.5. Click the Goods Movement Data tab --> update the Planned Goods Movement Date (Pl. gds mvmt) to the expected date the goods will arrive at the receiving location to provide downstream visibility.
Z.6. Click the Services for Objects button and select Records Management Logistics from the list to attach additional documents (for example Delivery Note or for follow-on freight movement). See previous steps (Y.7 to Y.11) for details.
Z.7.
Click the Save ![]() button
when all updates are completed.
button
when all updates are completed.
Note: Once the Virtual Goods Receipt is done, the Inbound Delivery is 'closed' and further updates/information cannot be made to the Inbound Delivery.
3.2.6.3 Virtual Goods Receipt
IPSAS requires goods to be received at the point of transfer in ownership from the commodity vendor to the UN, as dictated by the appropriate Incoterms. This can occur before goods are physically received by the UN office/location. In Umoja, this is considered as a Virtual Goods Receipt.
The Virtual Goods receipting (when vendor delivers goods at origin or other named place) process is as follows:

This section will only cover the Virtual Goods Receipt part of the process.
Continuing with our scenario, the commodity vendor has now delivered the fuel storage tanks and vehicle spare parts at the mission's port of entry to the mission's local freight forwarder. The freight forwarder has confirmed receipt from the commodity vendor by delivery note and has informed the Inbound Coordinator who updated the Inbound Delivery accordingly and attached the delivery documents.
The Virtual Receiving User runs the Inbound Delivery report using the T-code VL06I to list the delivery expected and notes that a particular delivery arrived at the port. Refer to previous section for detailed steps.
The User then conducts a Virtual Goods Receipt in Umoja in order to register the 'first receipt' and transfer of ownership from Vendor to the UN.
AA. Steps to perform Virtual Goods Receipt / Transaction Code: VL06I
AA.1. Enter VL06I in the Command field and press Enter.
AA.2. Click the For Goods Receipt button to access the Good Receipt functionality.
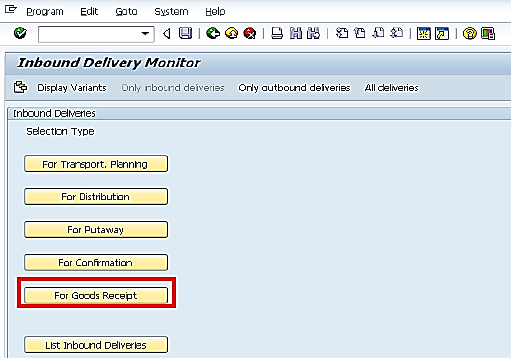
AA.3. Click the All Selections button to allow the User to input the Plant/Mission code(s) in the Shipping Point/Receiving Pt field.

AA.4. Enter
the required information to filter the Good Receipt list and press Execute ![]() icon.
icon.

AA.5. Open the corresponding Inbound Delivery (double click) to review all details and attached documents (for example quantity, etc.).
AA.6. Enter/generate batch numbers, if applicable, based on the material(s) being received by selecting the line item and click the Batch creation button. The expiration date (Exp date) needs to be entered.
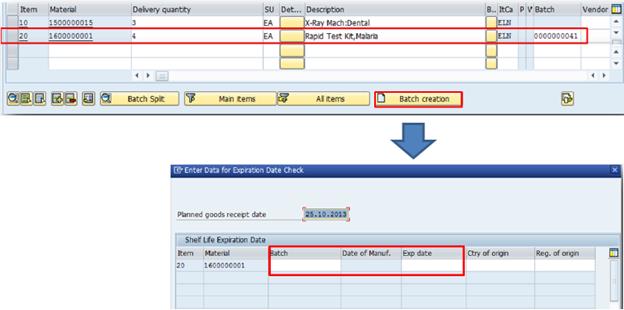
Note: If a batch number is unknown, the system will automatically generate a batch number.
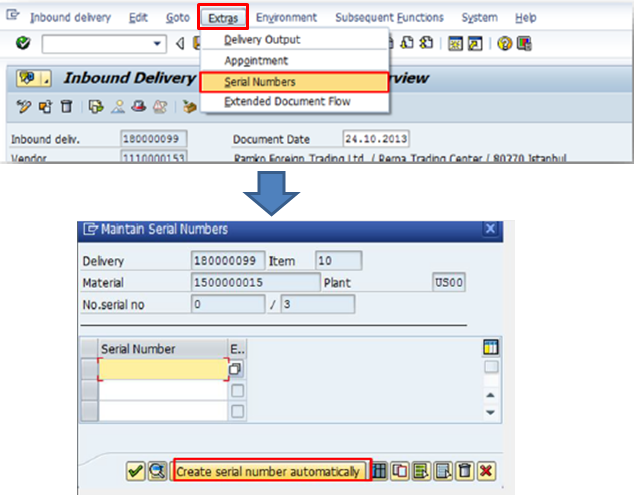
AA.7. If applicable, generate the serial number(s) by clicking the Extras button from the navigation menu à select Serial Numbers from the drop down menu à click the Create serial number automatically button.
AA.8. When completed, while in Edit mode, click the Post Goods Receipt button to post the Virtual Goods Receipt.
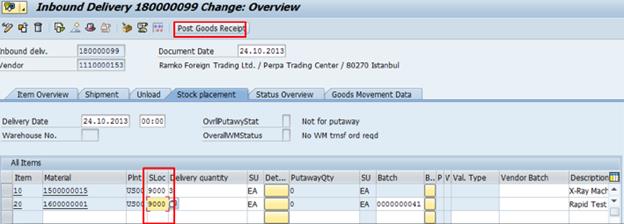
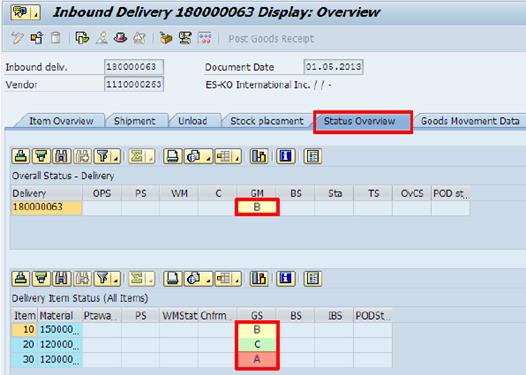
AA.9. To confirm that the Goods Receipt has posted or to view the status of the delivery, the Virtual Receiving User should return to the Inbound Delivery Document in which the Status Overview tab will show which goods have been received and indicate any partial receipts, as well as overall status:
• A is not yet received
• C is completely received
• B is partially received
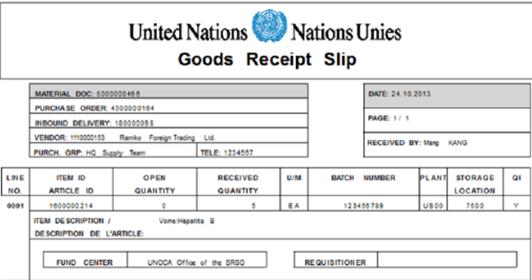
AA.10. At this point, the system prompts the User to print the Goods Receipt slip. The Goods Receipt slip is generated along with a Material Document (system term for a Good Receipt document) for each Inbound Delivery.
3.2.6.4 Physical Goods Receipt
Physical Goods Receipt refers to process where commodity vendors deliver directly to the UN office/location as dictated by the appropriate Incoterms. Upon delivery to the destination by vendor/vendor's shipping company, thereby transferring ownership, the Receiving User conducts a Physical Goods Receipt against the Inbound Delivery.
The following flowchart highlights the key stages in the Physical Goods receipting process.
An example will be used to guide users through the process.
Scenario 2 - Vendor Delivers at Destination
The mission has ordered some medical supplies for direct delivery to the mission location. During the shipment, the commodity vendor has updated the Inbound Coordinator with shipping information and documents. The Inbound Coordinator has updated the Inbound Delivery, as required.
As part of this scenario, we will also receive goods to Blocked Stock to simulate a discrepancy (damage) in the shipment.
The Receiving Users runs the Inbound Delivery report using T-code VL06I to view the expected incoming shipments and the Planned Goods Movement dates to manage the Inbound Delivery workload for the receiving office. Alternatively, if the specific Inbound Delivery number is known, use T-code VL33N to display that particular Inbound Delivery.
Upon delivery, the Receiving User conducts a discrepancy check to physically review the goods as compared to the Inbound Delivery and looks for noticeable damage. This includes reviewing details such as quantity, type of goods, etc. The Receiving User can also refer to PO details if needed though the Inbound Delivery document in Umoja.
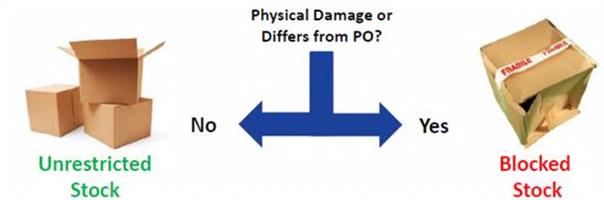
Once it has been has confirmed that the items show no discrepancy against the PO and therefore the goods can be received to Unrestricted Stock, the Receiving User then can perform the Physical Goods Receipt.
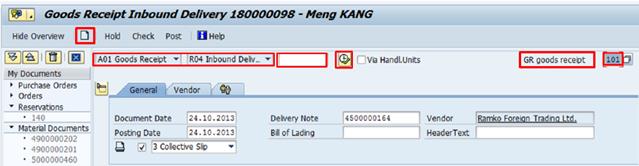
BB. The steps to perform Physical Goods Receipt / Transaction Code: MIGO
BB.1. Enter MIGO in the Command field and press Enter.
BB.2. Select Goods Receipt and Inbound Delivery from the drop down list à enter the Inbound Delivery number, obtained from the Inbound Delivery Monitor or from the PO.
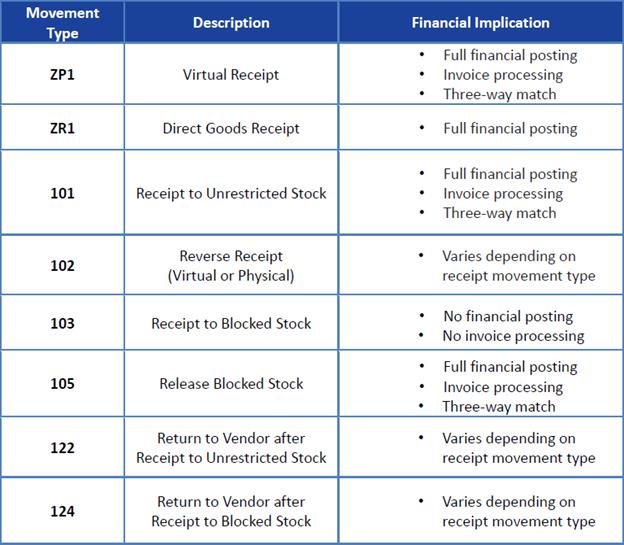
BB.3. Enter the movement type for Physical Goods Receipt in the GR goods receipt field (e.g. 101 to Unrestricted Stock).
As a reference, table below shows the different types of Goods Receipt movement types:
BB.4. Click the Execute button --> information from the Inbound Delivery populates on the screen.
Note: In case
of wrong Inbound Delivery number or any other entry errors, use the Start
Over ![]() icon to clear the
populated data.
icon to clear the
populated data.
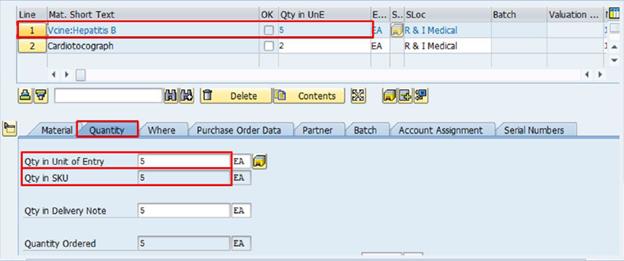
BB.5. In the Physical Goods screen that appears, for each line item that has been delivered click the button in the Line column to select the line item.
BB.6. Click the Quantity tab where Quantity Ordered and Quantity Received are listed à enter the actual quantity received in the Qty in Unit of Entry field and press Enter to automatically update the amount in the Qty in SKU field.
Note: The Qty in UnE from Item Overview section is also updated.
BB.7. In the Where tab, revise the Storage Location (if necessary). It is possible to search among all Storage Locations at the assigned Plant.
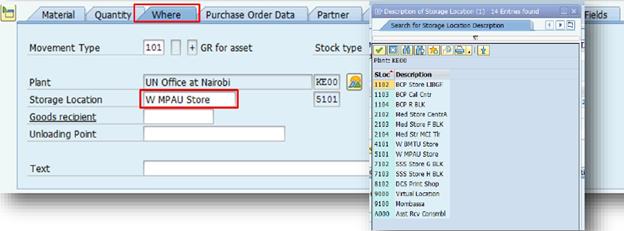
Note: For non-IM (Inventory Management) locations, when receiving a fixed asset, the system will prompt for a storage location. Enter A000 if it has not been done already.
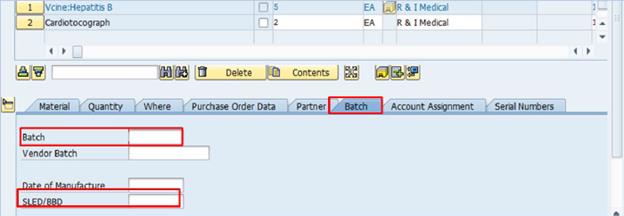
BB.8. Click the Batch tab à enter the batch number of the received material in the Batch field and the batch expiration date in the SLED/BBD field.
BB.9. In the Serial Numbers tab, check the Create Serial Nos Automatically for the system to generate serial numbers.
BB.10. Select the item OK check box at the bottom of the screen when ready to post.

BB.11. Once the quantity has been updated, information verified and all items have been ticked for processing, click the Check button at the top.
BB.12. If the system detects a warning or an error, a display log will pop up with a system message for each line item. For example, a message that informs the user the quantity of goods remaining that have not been received (the 'deficit').
·
A triangle ![]() denotes a warning to the user
- further processing can still occur.
denotes a warning to the user
- further processing can still occur.
·
A red circle ![]() denotes
an error - further processing can NOT occur.
denotes
an error - further processing can NOT occur.
BB.13. Review the log and close the pop-up window.

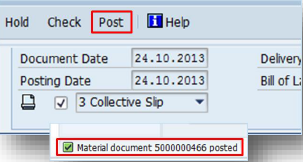
BB.14. Click the Post button.
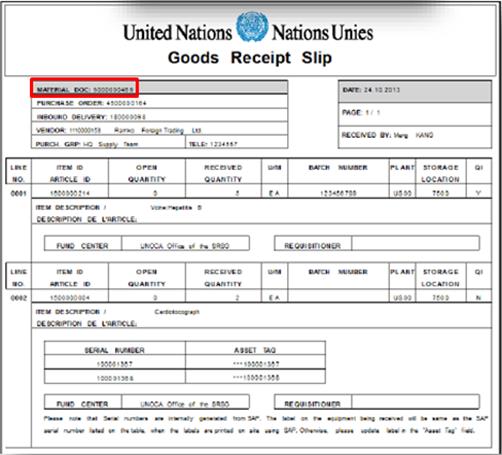
BB.15. At this point, a pop-up appears prompting the user to print the Goods Receipt Slip which contains the system document information, as well as the items and quantities received.
BB.16. The Material Document (system term for a Good Receipt document) is automatically generated. The Material Document number appears at the bottom of the screen when the goods are posted. It serves as proof of the goods receipt in the system.
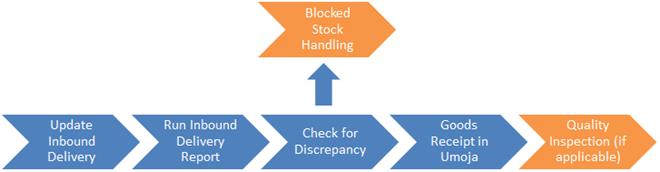
3.2.6.5 Returns and Reversals
Showing below are different Movement Types for receiving and returning goods into Blocked Stock and Quality Stock.

This section covers Blocked Stock handling and Goods Receipt reversal using below example as a guide to follow through the process.
Scenario 3 - Variation: Blocked Stock Handling
During the visual physical inspection, the Receiving User discovers that an item is damaged. Therefore it needs to be received as Blocked Stock, while the issue is resolved with the commodity vendor (offline). The Receiving User needs to attach pictures of the damaged goods to the receipt to Blocked Stock transaction using the Services for Object button.
Blocked Stock is an exceptional process and should only be used in cases of damaged goods.
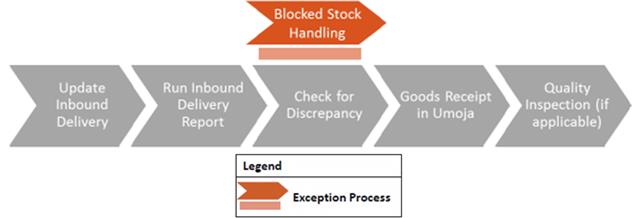
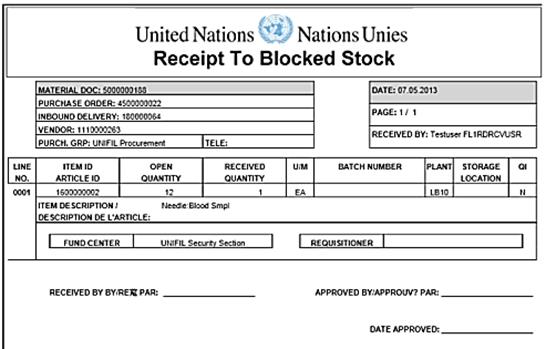
The Receiving User performs the T-code MIGO (as shown previously) but uses a movement type 103 to receive is item to Blocked Stock. The invoice processing is blocked and a Blocked Stock slip is generated.
After the Receiving User reports the issue to the Requisitioner, the Buyer would collaborate with the vendor and Requisitioner to resolve the discrepancy. A decision will be made to either accept the goods or return the goods to the vendor.
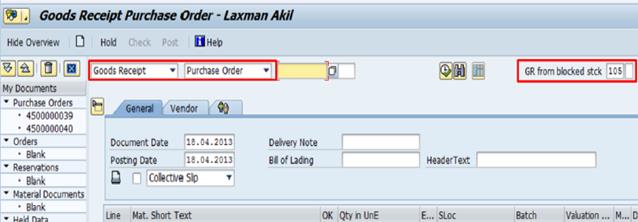
CC. The steps to perform returns / Transaction Code: MIGO
CC.1. If the goods can be accepted, the Receiving User selects Goods Receipt in reference to a Purchase Order and uses movement type 105 and the related PO number to release the goods from Blocked Stock to Unrestricted Stock.
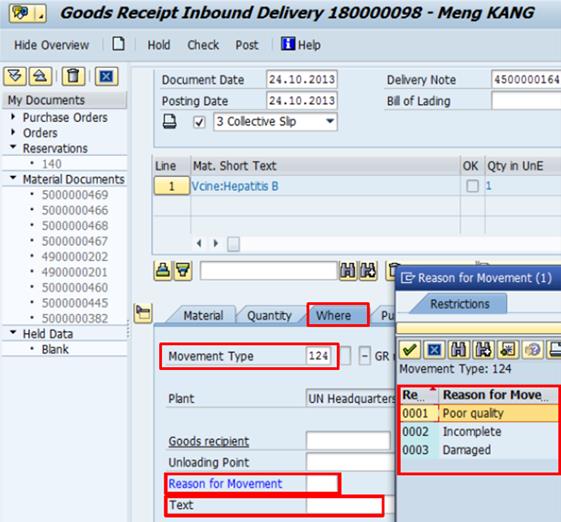
CC.2. If the goods cannot be accepted, the Receiving User needs to choose a movement type to indicate a 'return to vendor' status.
Note: The return movement type (122 or 124) depends on which Stock Type the goods were originally received to.
CC.3. In the Where tab, complete the Reason for Movement before the return is posted.
DD. Steps to perform reversals / Transaction Code: MIGO
DD.1. If a goods receipt transaction needs to be completely reversed (for example error or non-vendor return scenarios), select Cancellation in reference to a Material Document. This completely cancels the receipt with all line items and quantities.
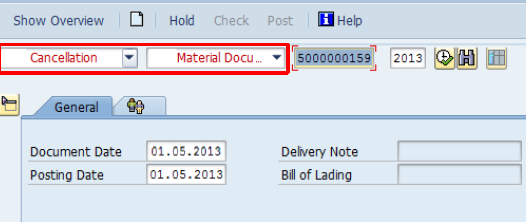
Note: If the payment has already been processed, the Receiving User needs to notify the Requisitioner that the reversal action is complete. The Requisitioner then works with finance and other relevant offices to reverse the payment (offline).
The refunds for SRM are processed through a credit memo in transaction MIR7 and the refunds for Funds Commitment are processed through a credit memo in transaction FV65.
DD.2. To reverse only selected line items:
DD.2.1. Select Goods Receipt in reference to a Purchase Order and enter the related PO number.
DD.2.2. Enter the movement type 102 to reverse a Goods Receipt.

DD.2.3. The Receiving User can specify the line item and quantity (in the Quantity tab) to reverse. If the material is one that requires quality inspection, ensure that the correct Stock type is selected in the Where tab. Remember that you are always returning from the stock the goods are currently in (Unrestricted, Blocked or Quality).

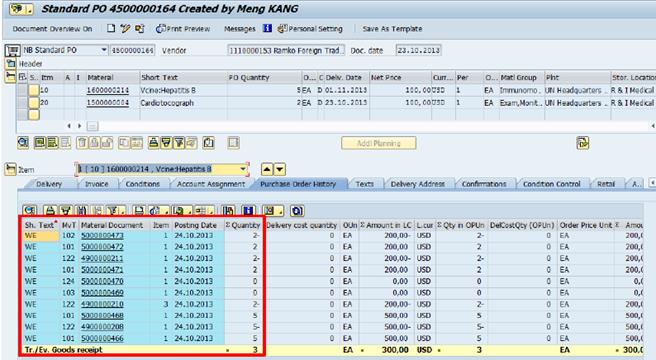
EE. Confirming reversal transactions / Transaction Code: ME23N
The user can verify the reversal posting from the Purchase Order screen.
EE.1. Enter ME23N in the Command field and press Enter.
EE.2. Click the Other PO button to enter the corresponding PO number à press Enter.
EE.3. Click the Purchase Order History tab to view all receipt and reversal transactions for each line item, as well as the corresponding Material Documents. Note that all financial postings from the receipt are reversed and the Movement Types are in the MvT column.
3.2.6.6 Notifications and Reports
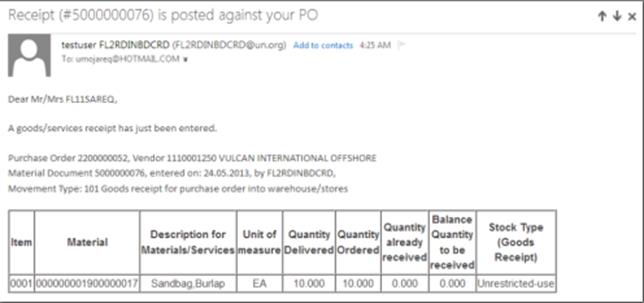
Umoja ECC creates email notifications during the Goods Receipt process:
· Every Goods Receipt posting generates an email notification to the Receiver, Requisitioner and Buyer listed in the PO;
· Emails are generated for Receipts (including under-delivery) and reversals and will indicated the Stock type (for example Blocked Stock, Unrestricted Stock or Inspection);
· When goods as serialized, an email notification is generated to the Requisitioner which includes the details of the Equipment Records generated; and
· Inbound Coordinators will not receive email notifications.
Below is an example of a goods receipt notification by email:
There are several key reports used across the Umoja Logistics process. For example, on the Purchase Order Report, the user can double-click information such as the PO number, Vendor number, etc. to navigate to the corresponding screen. Below is the list of reports, with their respective T-codes, relevant to Inbound Goods process:

3.2.7 Requisitioning Process for Services
The requisitioning process for services is identical to requisitioning for goods. However, the Shopping Cart should be set up in a way that facilitates the potential for partial receipt of services, and the payment of those services in Umoja.
The Requisitioner must plan for and be aware of how the service is expected to be delivered and if partial service delivery/payment is predicted. This is to ensure the downstream service receipts can be made for a partial service delivery. For example, if the unit of service delivery is 'Quantity 1 Each', then it won't be possible to receive only 50% of the service, in the event of partial delivery. This will further complicate the invoicing and payment process for this service. Certain units of measure do allow a less than 100% receipt (e.g. months, weeks, etc.).
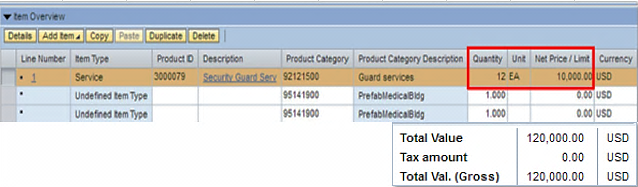
For example, a Requisitioner would like to create a Shopping Cart for one year of security services. They have found the relevant Service Master ID and added it to the Shopping Cart with a quantity of 1 EA (each) for the one year of service at the estimated fixed price of USD 10,000 per month, for a total of USD 120,000 for the year.
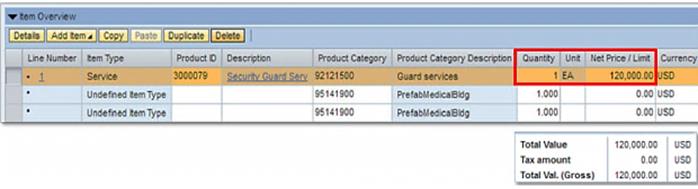
However, when it comes time to receive this service in Umoja, the Requisitioner will find that the service provider is expecting to be paid monthly, after each month of security service is 'delivered' (i.e. partial service delivery).
New Shopping Carts and/or Purchase Orders would be required to rectify the issue:
1 A way to create this Shopping Cart to allow partial receipt by month, would be to add quantity 12 units (months) of Security Services. This way, the user receiving services will be able to receive 1 'unit of service' each month.
2 Other techniques for requisitioning for Services to allow partial receipt:
a. Simply flip the quantity and price (e.g. Qty 500,000 Units @ USD 1 EA) - allows for a variation in service delivery/payment (i.e. not a fixed period cost, such as USD 10,000/month); or
b. Separate line items for each unit of service to be received (e.g. each month/day).
3.2.7.1 Requesting Consultants and Individual Contractors (ICs) Services
The following diagram shows the steps necessary to request, contract and pay Consultants and Individual Contractors (ICs) in Umoja.
In Umoja, Consultants and Individual Contractors (IC) are treated like vendors and created as Business Partners (BPs) in the Umoja Vendor Master. This facilitates the process of requesting their services, reviewing and approving their recruitment and processing their payment.
Requesting for Consultants and ICs services in Umoja is performed by initiating a request in the form of a Shopping Cart once an office identifies a need for Consultant or IC services.
FF. The steps for requesting Consultants and ICs services:
Once a Consultant/IC has been selected and accepted the offer for services, the Requisitioner verifies if the Consultant/IC has a Business Partner Master Record with Vendor Role in Umoja. The Requisitioner can use T-code MK03 to search for the record utilizing various search fields (i.e. first name, last name, city and address). If a match exists, the Requisitioner can proceed and create a Shopping Cart to request for the services. Otherwise, the Requisitioner must request (offline) the HR Partner to create a master record for the Consultant/IC.
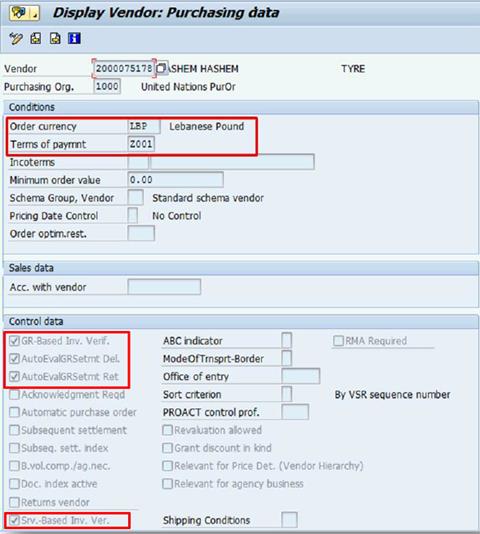
Note: Review the information in the following sections in the Display Vendor Purchasing data screen:
· Order currency: currency in which the Vendor is to be paid
· Terms of paymnt : should always be set to Z001 (pay immediately)
· Ensure the Evaluated Receipt Settlement (ERS) indicators are set to allow the Requisitioner to receive the service by means of a Service Entry Sheet (SES) and to record in the PO the quantity and value of the accepted service.
Shopping Carts for services from Consultants and ICs are created in the same way as goods and other services noted in section 3.2 above.
Once a cart is created, items may be added in three ways:
• Internal Goods/Services;
• Old Shopping Carts and Templates; and
• Saved Shopping Cart Template.
FF.1. Requisitioning through the Internal Goods/Services follows the same process as explained in section 3.2.4.2.2 above with the following notes to the process:
1 There are two product Category ID relevant to Consultant and IC services:
• Individual Consultant Services -80111600; and
• Individual Contractor Services -80111700.
In addition, each specific service is assigned a unique Product ID. Given below are the Product IDs available in Umoja for Consultant and IC Services:

Note: If Product ID 3000464 - Individual Consultant Services (Delivery) is selected, it is recommended that a separate Shopping Cart is created for each Consultant. Generally, Consultants by Delivery are expected to deliver complex outputs. Therefore, the Shopping Carts raised to request their services are made of several diverse lines with each individual output briefly explained in the Internal Note.

2 When a Product ID for Consultant and IC is selected, the Required period switches automatically to Between and will require a start and end date.

3 In the Item Data tab under the Service and Delivery section, review the Location/Plant to ensure that the information is correct as this indicates which entity can perform the services receipt in Umoja and is different to the Delivery Address (location where Consultant/IC will perform his/her duties). The Location/Plant information is pre-populates based on the Requisitioner's User Profile created when access is granted but can be modified as required.
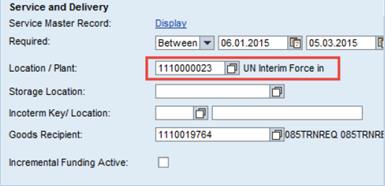
4 In the Notes and Attachments tab, attach the following mandatory documents indicated in ST/AI/2013/4:
· Terms of Reference of the assignment;
· Technical evaluation report outlining the selection process;
· PHP of the selected candidate;
· Email confirmation of the fee level agreed with HR; and
· Any other documents in connection with the recruitment process.
If available at the time of creating the Shopping Cart, the Requisitioner may also up-load the following documents which are required by the HR Partner to complete the approval of the request:
· Copy of highest education degree/diploma obtained;
· Employment certificate from, or copy of contract with, the last employer;
· Copy of national passport or national ID card;
· Copy of the birth certificate; and
· Certificate of good health and proof of medical insurance (when required).
5 In the Delivery Address /Performance Location tab, the contact person in the location who will supervise/monitor the Consultant/IC activities should be uploaded in the C/O field.
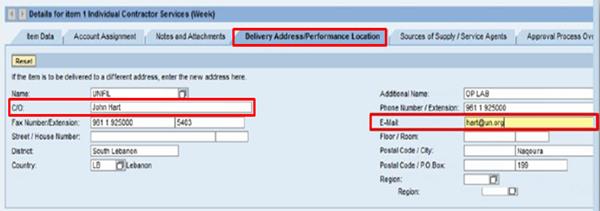
6 In the Sources of Supply/Service Agents tab, enter the Consultant/IC's BP number in the Preferred Supplier field which will allow for a Draft Contract (PO) for the selected Consultant/IC to be automatically generated when processed by the HR Partner.
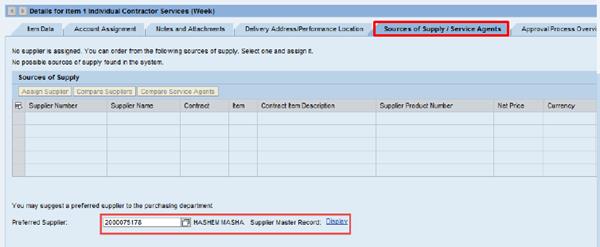
FF.2. SRM allows the Requisitioner to create a Shopping Cart Template for future use by copying an old Shopping Cart to minimize the data entry process. This function can be very useful in the process of extending contracts for Consultants and IC's.
It follows the same process as explained in section 3.2.4.2.3 above. Make sure to double check Purchasing Group and Delivery Date to verify if they have been carried forward in the copied lines.
FF.3. Once all the details have been completed, the Shopping Cart(s) can be Saved and Ordered, Edited or amended and reviewed and Approved following the same steps as in section 3.2.4.4, 3.2.4.5 and 3.2.4.6 respectively.
3.2.7.2 Service Receipt - Service Entry Sheet (SES)
In Umoja, a Service Entry Sheet (SES) is used to confirm delivery of services that have been contracted (i.e. a PO line item for services). It also captures other data, information or attachments related to the service delivery within the system document, for example: time sheets, flight completion reports, fuel delivery slips, etc.
Once the services has been rendered by the Consultant/IC in accordance with the payment condition stipulated in the contract, the Requisitioner is responsible to create an SES in Umoja to confirm delivery of the services.
SES's are similar in nature to Goods Receipt documents used for receipt of materials or goods. In the UN, all intangible goods (e.g. software) are contracted and delivered as a service, and are therefore received using an SES. However, while services rendered by commercial Vendors are approved by the Shopping Cart Approver, services rendered by Consultants and ICs are approved by the HR Partner associated with the Requisitioner who raised the Shopping Cart.
An approved SES must be entered into Umoja before the invoice can be processed and the UN can pay for the contracted services. Once the SES process is completed, the Accounts Payable (AP) Approver will verify the acceptance of the SES through the self-billing report and will post the payment from the report.
The graphic below compares the Service Receipt process with the Goods Receipt process. Note the similar function of the SES and the Goods Receipt documents.

The high level steps required in the process of creating and approving a Service Entry Sheet in Umoja are as follow:

3.2.7.2.1 Creating Service Entry Sheet (SES)
When creating a Service Entry Sheet, the Requisitioner has the option to create individual receipt documents or multiple SES to receive services of several Consultants and ICs in one transaction.
Note: Multiple SES is not applicable for Consultant with a contract 'by Delivery' (Product ID 300464).
3.2.7.2.1.1 Individual SES
GG. Steps to create an individual SES / Transaction Code: ML81N
GG.1. Prior to creating the SES, review the corresponding PO which can be accessed through T-code ME23N.
GG.2. Determine the amount of service to received, then enter ML81N in the Command field. The screen displays the last PO that was being processed by the user.
GG.3. Click the Other Purchase Order button to enter the PO that you will be receiving against.
GG.4. In the pop-up window, enter the PO number in the Purchase Order field or search using the Matchcode function and click the Continue icon.

GG.5.
Click the Create Entry Sheet ![]() icon
to create a blank SES that 'adopts' or copies the information of the PO that
was entered in the previous step.
icon
to create a blank SES that 'adopts' or copies the information of the PO that
was entered in the previous step.
Note: If
creating an SES for a service that is repeating and has had similar SES created
before click the Copy Entry Sheet ![]() icon
which will copy the information from the previous SES.
icon
which will copy the information from the previous SES.
GG.6. In the Basic Data tab, click the Service Sel. Button to display the services that are listed on the PO and allow the user to select which services are to be received with this SES transaction.
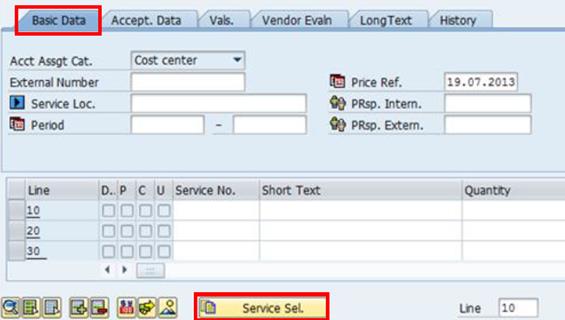
GG.7. In the Service Selection pop-up window, confirm the corresponding PO number in the From Purchase Order field and click the Continue icon.
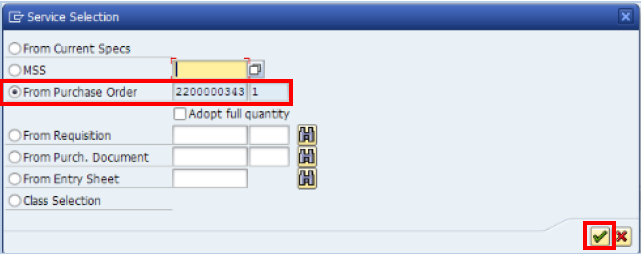
GG.8. Click the grey box on the left of each corresponding line item to select the specific services from the PO that are to be received with this SES. More than one line can be selected and the quantities received will be updated in subsequent steps.
GG.9. Click the Services button to 'adopt' or copy the service details from the PO to the SES, and to continue with the completion of the SES.
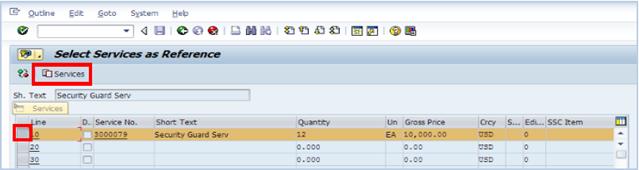
GG.10. Click the Accept. Data tab and update the Posting date to the date the services were actually received or the last day they were received in case of service delivery which takes place over a period of time.
GG.11. Confirm the quantity of services to be received for each line item in the Quantity column, and adjust as required. Enter a description of this transaction/service receipt in the Short Text field as a reference (40 character limit). For example: 'HQ Guard Services for July 2013'.
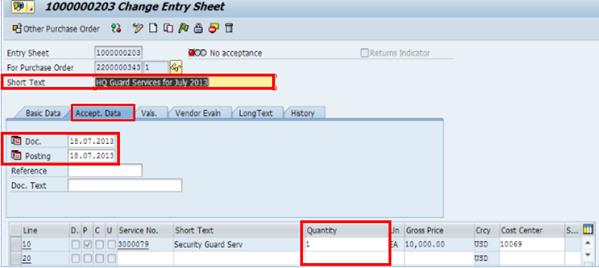
GG.12. Select Records Management Logistic from the Services for Object drop-down list to add an attachment.
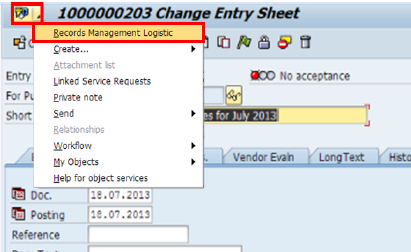
GG.13.
Click the Save ![]() button
to save the SES and release it to the workflow for approval.
button
to save the SES and release it to the workflow for approval.
HH.Steps to view and approve SES / Transaction Code: ML84 and ML81N
HH.1. When advised by the Requisitioner (offline), the Approver enters into Umoja and approves the SES.
HH.2. Using T-code ML84¸ the Approver will be able to produce a report with all SES's that have not been 'accepted' (approved) - indicated by a red traffic light icon.
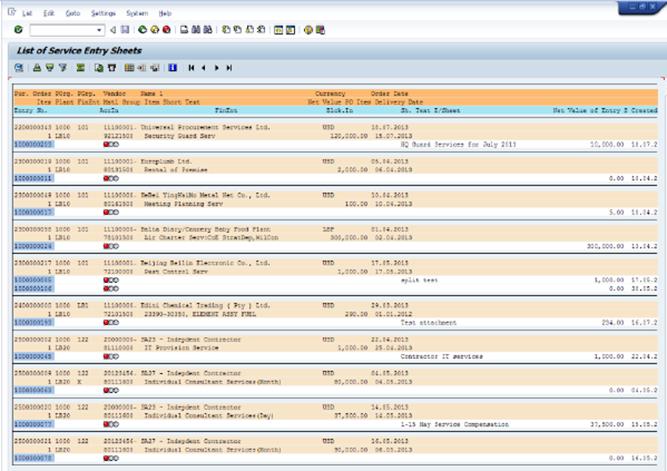
Note: The Approver can double click on the SES number in the report to view the SES in Display Mode (only).
HH.3. Using the T-code ML81N, on the Service Entry Sheet screen, click the Other Purchase Order button to retrieve a saved SES for approval.
HH.4. In the pop-up window, type the Entry Sheet (SES) number that needs approval and click the Continue icon.

HH.5.
In order to approve the SES, it must be in the Edit mode à click the Entry Sheet menu from
the navigation pane à select the Display
<--> Change menu item. Alternatively, simply click the Display
<--> Change ![]() icon on the SES to change to
Edit mode.
icon on the SES to change to
Edit mode.

HH.6.
After verifying that all the information on the SES is accurate,
click the Accept/Flag ![]() icon to accept/approve the
SES. The SES status will then change to 'Will be accepted' status.
icon to accept/approve the
SES. The SES status will then change to 'Will be accepted' status.
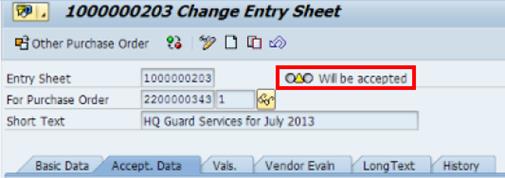
HH.7. Click the Save icon to save and post the accepted SES. A Material Document (a system term for a Goods/Services Receipt) is created and the SES is also assigned a Material Document number. The status of the SES is now 'Accepted' (i.e. Approved).
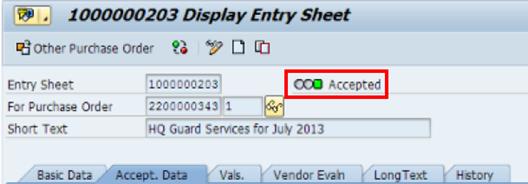
Accounting impact:
Upon approval of the SES, the expense relating to the service provided will be recognized in the FI GL:
Dr Expense XX
Cr Accounts Payable XX
The expense will be recognized in the period to which the 'Posting' date refers, in line with IPSAS requirements. It is therefore critical that this date is accurately entered in the SES.
3.2.7.2.1.2 Multiple SES
Umoja allows Requisitioner to process multiple SES at the same time in order to initiate payment for Consultants and ICs. To speed up the process, a variant needs to be created and saved in the system.
A Variant is a report set specifying a default layout and setting defined values for fields. It provides the automatic input on the transaction initial screen and thus minimizes entries and reduces errors.
II. Steps to create a variant / Transaction Code: ZSA_CREATE_SES
II.1. Enter ZSA_CREATE_SES in the Command field and press Enter.
II.2. Enter information into the following fields, where necessary:
· Plant: A location where goods and services are procured and received. It corresponds to a country for HQ and OAHs or to a Mission/Support Centre in Peacekeeping.
· Fund Center From - to
· Purchase Order From - to

II.3. Click Goto from the navigation menu à select Variants à click the Save as Variant item.
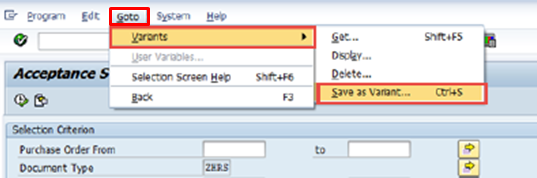
II.4. Enter a name in the Variant Name field and a brief description in the Description field.
II.5. Click the Save icon.
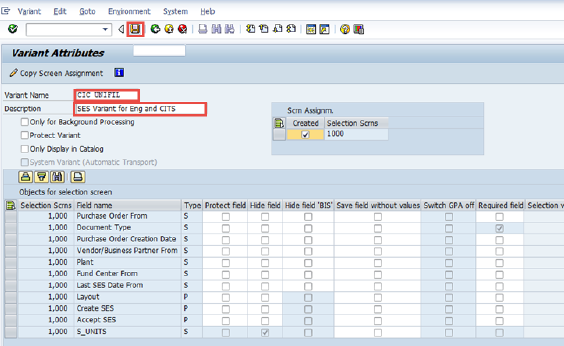
JJ. Steps to create multiple SES / Transaction Code: ZSA_CREATE_SES
JJ.1.
In the open window, click the Get Variant ![]() icon.
icon.
JJ.2. Select the variant created from the Variant Directory and press Enter.

JJ.3.
Back in the initial page, click the Execute ![]() icon.
icon.
JJ.4. In the form displays, starts creating a multiple SES:
JJ.4.1. click SES Header Text box and enter your text, for example: IC Service Sep 14

JJ.4.2. Copy the text using Ctrl+C and paste the text to the other empty fields of the same column using Ctrl+V.

Note: Enter text in the SES NOTE field only if required otherwise, leave the field blank.
JJ.4.3. Enter the initial date covered by the SES in the Service Period From field and the end-date covered in the SES in the Service Period To field.
Note: In case of weekly or monthly contract, the Service Period From/To fields shall cover One Week or One Month of service only. If you need to raise payment for additional weeks/months, a separate SES for each week/month of service is to be created separately.
JJ.4.4. In Confirmed Quantity field corresponding to an hourly contract (hourly = HR) / daily contract (daily = DAY), enter the number of service-hour / service-day delivered by the Consultants/ICs in the service period as indicated in the attendance record.

JJ.4.5. In the DOA field corresponding to the monthly contract (monthly = MON), enter the number of days of absence accrued by the Consultants/ICs during the service period.
JJ.4.6. If required, populate the Posting Date field. Posting date is the date in which the transaction is recorded in the balance sheet. The system automatically defaults the current date as the posting date.

JJ.4.7. Review all available fields à select the line items to be submitted to the HR Partner for approval and click Create Service Entry Sheet button.
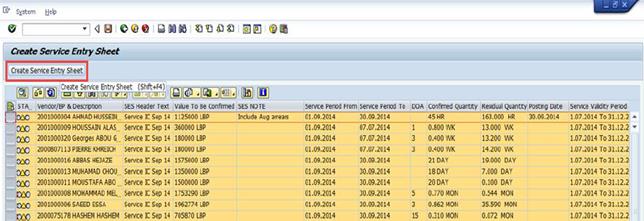
JJ.4.8. Click+Drag the scrollbar to the far right of the screen to read the message associated with the line items displaying RED status.
Note: RED status indicates that the SES creation failed. GREEN status indicates that the SES was successfully created.
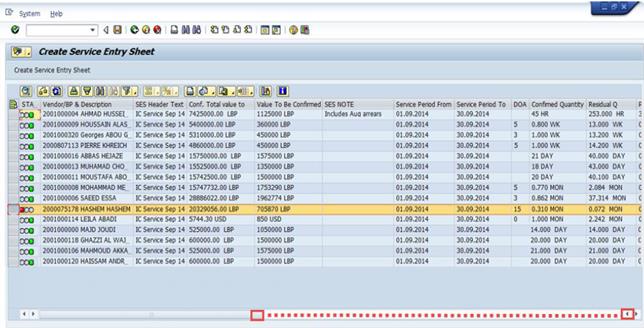
JJ.4.9. Review the errors and amend accordingly.
KK. Steps to approve multiple SES / Transaction Code: ZSA_ACCEPT_SES
KK.1. When advised by the Requisitioner (offline), the Approver (HR Partner) enters into Umoja using the T-code ZSA_ACCEPT_SES and approves the multiple SES.
KK.2.
In the open window, click the Get Variant ![]() icon and select the
variant from the Variant Directory and press Enter.
icon and select the
variant from the Variant Directory and press Enter.
KK.3.
Click the Execute ![]() icon
when back in the initial page.
icon
when back in the initial page.
KK.4. In the open window, select/click the lines to verify the information in detail.
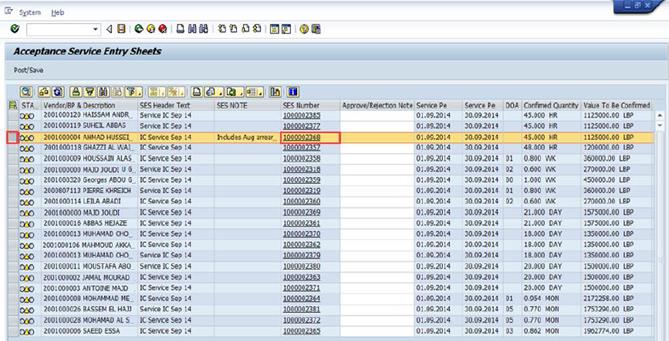
Note: Prior to approving the SES, the Approver must verify all relevant information, such as Consultant/CI name, service period, days of absence, confirmed quantity, value to be confirmed and SES note from the Requisitioner.
KK.5. If required, the Approver can enter messages addressed to the Requisitioner in connection with a specific line item by clicking the Approve/Rejection Note.

KK.6. Once reviewed, select line item(s) that needs to be accepted and click the Post/Save button.
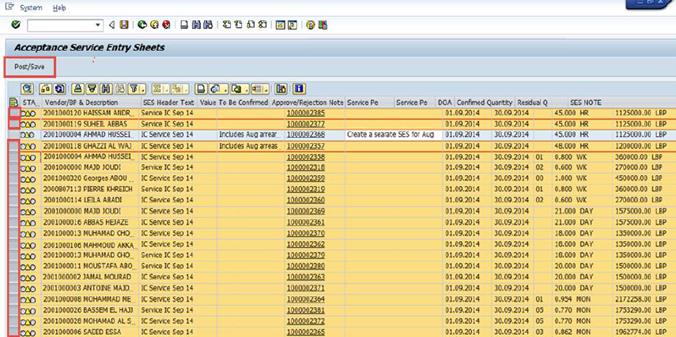
KK.7.
If no further action is required, exit the screen by clicking the
Exit ![]() button.
button.
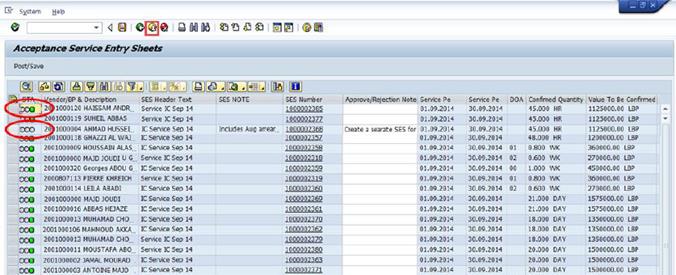
Note: The Green status indicates that the SES is approved and available for financial posting. The Grey status indicates that the SES in not approved.
3.2.7.2.2 Reversing and Deleting a Service Entry Sheet (SES)
A user can reverse an SES entry (e.g. received quantity on the SES incorrect, posting date incorrect, other error that requires the SES to be reversed, edited and re-approved).
LL. Steps to reverse an SES / Transaction Codes: ME23N and ML81N
LL.1. Prior reversing an SES, view the PO using T-code ME23N and select the Purchase Order History tab to confirm that a Service Receipt needs to be reversed (note the SES number).
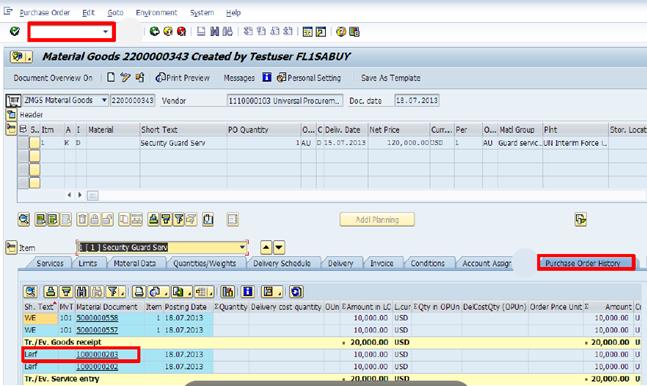
LL.2. To reverse the SES, enter ML81N in the Command field and press Enter.
LL.3. Click the Other Purchase Order button to retrieve the SES to reverse à in the pop-up window, type the Entry Sheet (SES) number that needs to be reversed and Click the Continue icon.
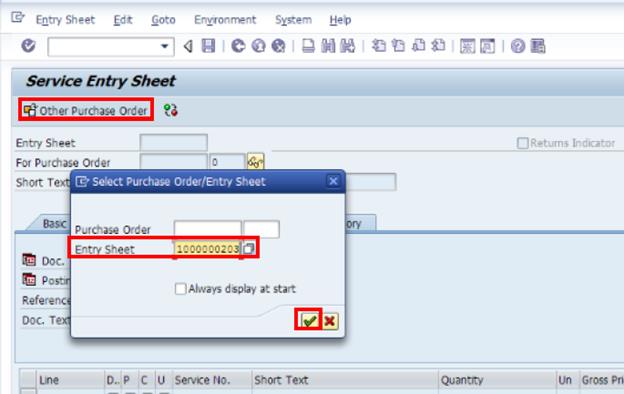
LL.4. Click the Entry Sheet menu to edit the data in the SES.
LL.5.
Select the Display <--> Change menu item. Alternatively,
simply click the Display <--> Change ![]() icon
on the SES to change to Edit mode.
icon
on the SES to change to Edit mode.
LL.6.
Click the Revoke Acceptance ![]() icon
to reverse this SES. After clicking the icon, the Approve button appears
again and the status of the SES is changed from 'Accepted' to 'Acceptance
revoked'.
icon
to reverse this SES. After clicking the icon, the Approve button appears
again and the status of the SES is changed from 'Accepted' to 'Acceptance
revoked'.

LL.7.
Click the Save ![]() icon. A
pop-up window appears for the user to add reference information (note the
reason of the reversal).
icon. A
pop-up window appears for the user to add reference information (note the
reason of the reversal).
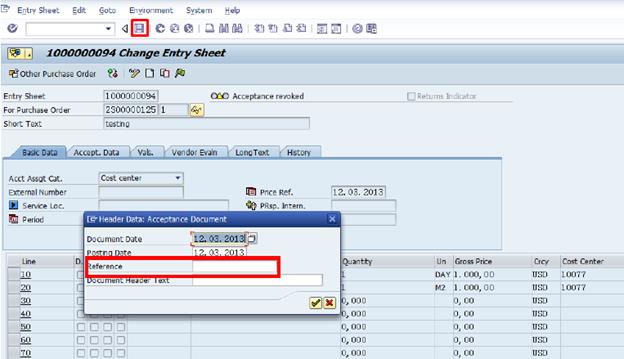
LL.8. When the transaction has been saved, the SES is saved with a 'No acceptance' status.
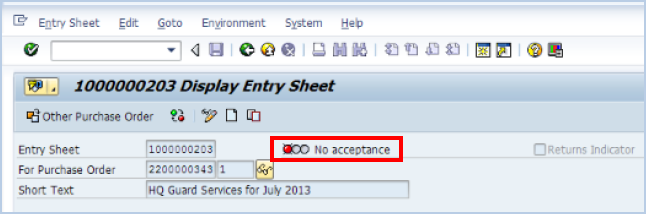
Note: The PO's history would now display a 102 movement type against a new Material Document number to show that the SES has been reversed in a separate transaction. The invoice posting is also reversed.
The SES can also now be edited/corrected, saved, and re-approved, and will retain the same SES document number.
MM. Steps to delete an SES / Transaction Code: ML81N
MM.1. If the SES has to be deleted completely, type ML81N in the Command field and press Enter to open the SES.
MM.2. Click the Entry Sheet menu and select the Display <--> Change menu item/icon.
MM.3. Click the Delete icon to delete the SES.
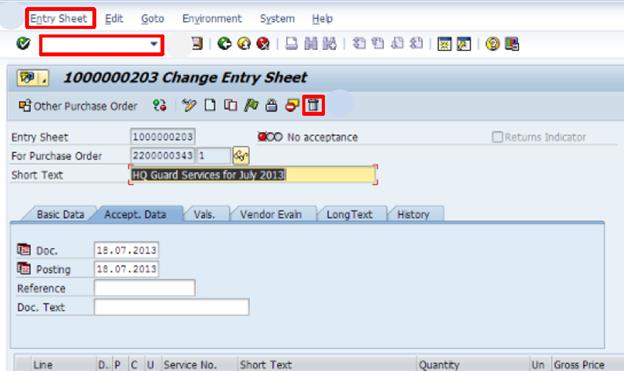
MM.4. The status is now 'Deleted'.
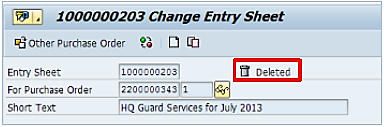
Note: The SES still appears on the PO's Purchase Order History screen. However, the amount now shows USD 0.
While the SES has been deleted, the original SES document and number will remain in the Purchase Order History, along with the posting date for historical reference/auditing.
An associated Material Document is also generated by the system with a Movement Type 102 to show the deletion/reversal of receipt and is also now displayed in the PO history.

3.3 Funds Commitment Processes
Earmarked funds (e.g. funds blocks, funds reservations) are business transactions that claim budget that is already allocated for expected expenditures. The tool used to upload/enter a budget allotment, monitor and report on its use is the Budget Control System (BCS). Budget types are used for categorizing and sub-dividing the budget in the BCS.
There are five distinct types of earmarked funds that are used differently depending on the nature and need for setting aside funds in the current budget period. Different earmarked funds documents are used for recording theses business transactions.
|
Types of Earmarked Funds |
Usage |
Example |
|
Funds Pre-commitments |
· Used primarily to pre-encumber funds in the current budget period, if allotment is available · Similar to creating a purchase requisition for the acquisition of goods and services · Required before creating funds commitments · Document types: 10.11 and 12 |
Requisition to purchase: building materials, office supplies, utility bill |
|
Funds Commitments |
· Used primarily to encumber funds in the current budget period, if allotment is available · Similar to creating a PO for the acquisition of goods and services · Can only be created by referencing the appropriate approved funds pre-commitment · There is a range of document type, e.g. 30 and 51 |
Utility bill, education grants |
|
Business Travel Commitments |
· Currently used in Missions until the full travel module is rolled out to all UN entities · Used primarily to encumber funds in the current budget period, if the allotment is available · Do not require a pre-commitment · Solely used for upcoming official travel costs · Differentiated by a distinct approval process within each business area · Document type: 45 |
Travel for training, official business travel |
|
Funds Reservation |
· Used primarily for reserving funds for an approved programmed or project in the current budget period · Can be directly utilized · Used to make an early claim for parts of the budget, based on estimated costs without knowing the supplier of products or services. · Document type: 60 |
Immediate evacuation of mission elections |
|
Funds Block |
· Used primarily for blocking funds in the current budget period · Used for approved, specified events or activities that are anticipated to occur in the near future · Funds cannot be utilized until un-blocked · Document type: 70 |
DDR |
Actual spending of budgets is at the Commitment Item Level. For instance, when a purchase order is raised in SRM to purchase Medical Equipment, the Commitment Item 27172510 - Fixed Asset Medical Equipment Cost, will be associated with the order. However, budgets will not be given to specific Commitment Items, but rather to a Class of Commitment Items. While a Commitment Item tells us the nature of expenditure, a Funds Center shows who is responsible for managing a budget.
If goods and services cannot be requisitioned with SRM, expenses can be recognized using manual invoices directly in Accounts Payable module. Based on Umoja business rules, an expense with value of more than USD 4,000 will require a Fund Commitment reference.
Accounting Impact:
No IPSAS accounting entries are directly generated from the entry, transfer, supplementation and return of allotments. IPSAS does however require the preparation of a statement of comparison of budget and actual amounts, and of reconciliation between budgetary results with the cash flows reported in the cash flow statement.
The Funds Commitment process is summarized below:

3.3.1 Funds Pre-Commitments
Funds Pre-commitment is a process to pre-encumber funds in current reporting periods if the budget is available. It is a claim of an estimated amount of funds in anticipation of entering a binding agreement to spend these funds at a future date.
3.3.1.1 Creating a Funds Pre-Commitment
The process of creating a Funds Pre-commitment is depicted below:
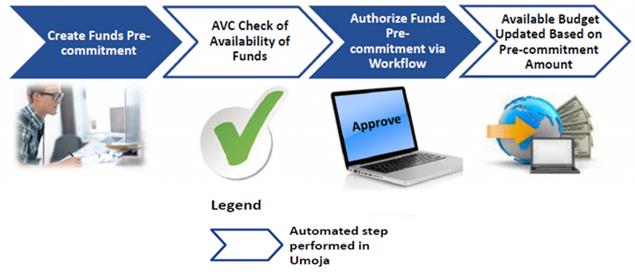
NN. Steps to create a Funds Pre-commitment / Transaction Code: FMY1
NN.1. Type FMY1 in the Command field and press Enter à the Funds precommitment: Create InitScrn screen displays.
NN.2. Enter the appropriate data in the following fields and click Enter:
· Document type: This field indicates the type of pre-commitment you are creating (Document type 10 - General Reservation of Funds)
· Company Code: The Company Code defined for the UN is 1000
· Currency/rate: Enter the currency in which the pre-commitment is being created
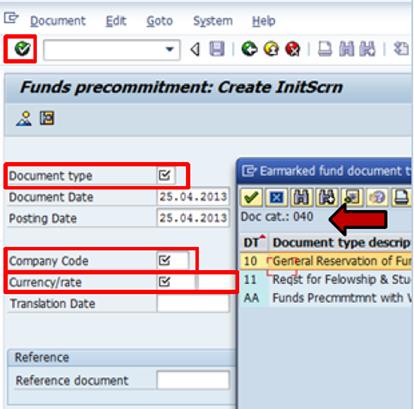
NN.3. On the Funds precommitment: Create Overview scrn screen, the sections are:

NN.4. In the Funds precommitment: Create Overview scrn screen, enter the appropriate data in the following fields:
· Doc.text: General description of pre-commitment you are creating
· Original Amount
· Text: Specific description of pre-commitment line item
· Fund: To determine the business area
· G/L Account: To determine the nature of the expenditure
· Cost Center: To determine the responsibility level

Note: All other fields are automatically populated in Umoja after relevant data is entered in the required fields in Line item section. If you are creating a line item referencing a grant as a funding source, Internal Order or WBSE becomes a mandatory field.
NN.5. Click the Check icon to confirm that the data entered in the Funds Pre-commitment is correct.
NN.6. Click the Park Document button to submit the Funds Pre-commitment for certification via workflow. This is equivalent to posting the Funds Pre-commitment and starting off a workflow.
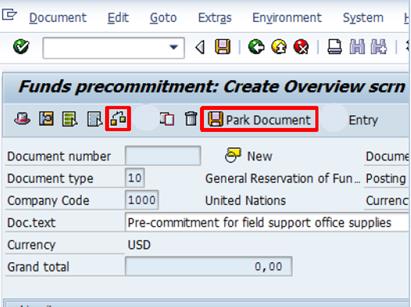
Note: A parked document may be retrieved for any review before it is certified or approved.
NN.7. The Funds precommitment: Create InitScrn displays with the Document Number in the left hand corner of the Status Bar.
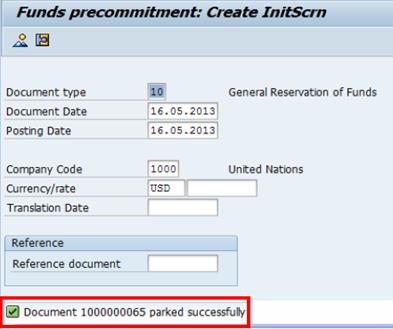
NN.8. AVC Check of Funds Availability
The AVC Check of Funds Availability is an automatic process in Umoja that ensures that there is budget available to create a pre-commitment. If the budget is not available, there will be an error message displayed in the left hand corner of the Status Bar. The AVC Check is carried out at the class level.
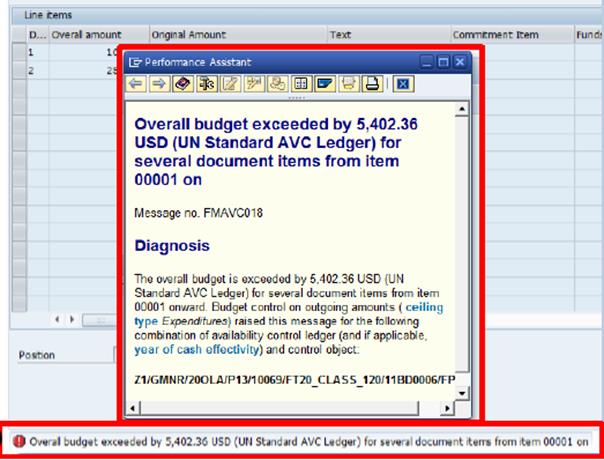
Within the Status Bar, select the image adjacent to the displayed error message to display the basic details of an AVC check error.
3.3.1.2 Authorizing a Funds Pre-Commitment via Workflow
The parked Funds Pre-commitment is reviewed by the Budget Office Approver and certified by a Certifying Officer through a workflow, if all the entries are in order. However, it can be rejected if entries are not in order.
If it is rejected, the role that created the pre-commitment must retrieve it and make necessary corrections. Once approved, it will be referenced in creating a Funds Commitment.
This certification is in line with the UN Financial Regulations and Rules on such delegated authority.
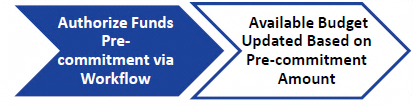
OO. Steps to approve a Funds Pre-Commitment / Transaction Code: SBWP
OO.1.
Enter the SBWP in the Command field and press Enter
or alternatively, click the Business Workplace ![]() icon.
icon.
OO.2. In the Business Workplace screen, click the Workplace icon to display all items waiting for action.
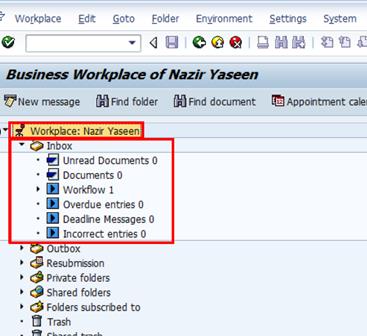
OO.3. Click the Inbox à select the Workflow icon to expand the line items waiting for review.
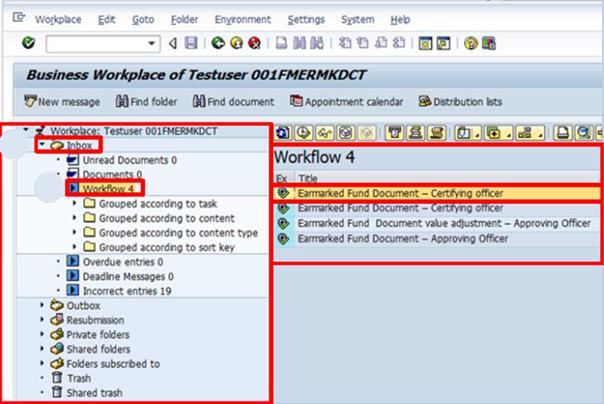
OO.4. Select the appropriate button from the Decision Options list to perform decision steps:
· Certify: to certify/approve the earmarked fund
· Reject for Revision/Modification: to allow changes to the earmarked fund
· Reject: to reject the earmarked fund and send the workflow back to the creator
· Cancel: to keep the work item in the inbox without performing any action.

3.3.1.3 Reviewing a Funds Pre-Commitment
In Umoja, a parked document can be displayed in order to review the pre-commitment's authorization status, details of the line items and consumption history.
PP. The steps for viewing a Funds Pre-commitment / Transaction Code: FMY3

PP.1. Type FMY3 in the Command field and press Enter à the Funds precommitment: Display InitScrn screen displays.
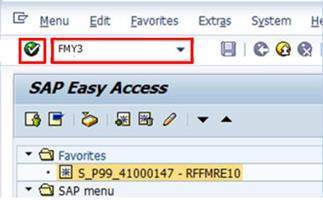
PP.2. Type the document number in the Document number field and click the Enter icon.
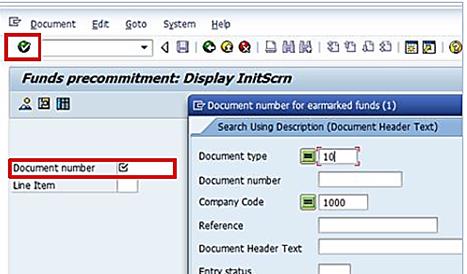
Note: If the Funds Pre-commitment document number is not readily available, click the Matchcode icon, or select F4 (Help), to search for a Funds Pre-commitment document number.
If you enter a single line item in the Line Item field, the Funds precommitment: Display InitScrn screen will pull back only that search result.
You may choose to display a Funds Pre-commitment at a higher line-item level (multiple line item view), or in a more detailed fashion (single line item view). Both display options are available on the Funds precommitment: Display InitScrn screen.
·
Fast Data Entry ![]() icon (A): to view multiple line items (default option)
icon (A): to view multiple line items (default option)
·
Detailed Line Item ![]() icon (B): to view a single line item
icon (B): to view a single line item
·
Select Documents via processing list
![]() icon (C): to see document details through earmarked
funds journal report.
icon (C): to see document details through earmarked
funds journal report.
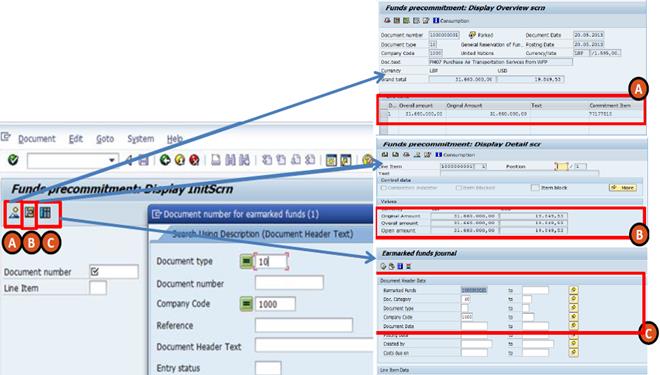
PP.3. In the Funds precommitment: Display InitScrn screen, click the Consumption icon à the Earmarked Funds: Display Consumption History page displays.
The Consumption icon provides additional details about the Funds Pre-commitment and the expenditures recorded against it.
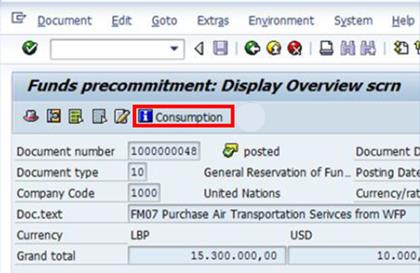
Note: Unapproved pre-commitments will have no consumption levels to report. They will still appear in a parked status.
If the pre-commitment has not yet been authorized via workflow or if it has not been referenced against a Funds Commitment, there will be no consumption history. In such cases, when you select the Consumption icon, the screen will display 'There is no usage data' in the lower left hand corner of the Status Bar.
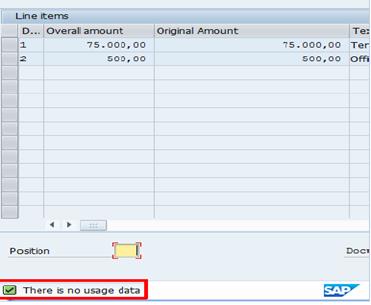
PP.4. Review the following financial activities related to the Funds Pre-commitment in the Earmarked Funds: Display Consumption History screen:
· Doc. No: Refers to the pre-commitment document number.
· Reference: The Funds Commitment document referencing the pre-commitment.
· Consumption: Refers to the amount consumed by all Funds Commitments.
· Open amount: Refers to the remaining budget left on this pre-commitment.
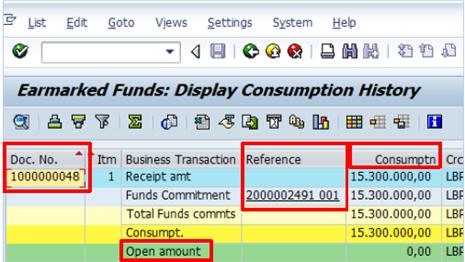
3.3.1.4 Modifying a Funds Pre-Commitment
An already approved Funds Pre-commitment can be modified in Umoja by performing one of the following two activities:
1 Increase/decrease the value of a Funds Pre-commitment (Value Adjustment); or
2 Add an additional line item to an approved Funds Pre-commitment (Change).
3.3.1.4.1 Value Adjustment Process
In order to increase/decrease the value of an already approved Funds Pre-commitment, value adjustment document needs to be completed.
A value adjustment is equivalent to modifying an approved Funds Pre-commitment. Once Funds Pre-commitment has gone through a workflow and is approved, any subsequent action changing the monetary value must go through a workflow again.
Modification of Approved Funds Pre-commitment Amount = Value Adjustment.
The overview of the value adjustment process is as follows:

Note: You can only modify a Funds Pre-commitment after it has been through a workflow.
QQ. Steps to modify an approved Funds Pre-commitment amount / Transaction Code: FMY2
QQ.1. Type FMY2 in the Command field and press Enter à the Funds precommitment: Change InitScrn screen displays.
QQ.2. Enter the Funds Pre-commitment document number in the Document number field or search the document number using the Matchcode icon and click the Enter icon.
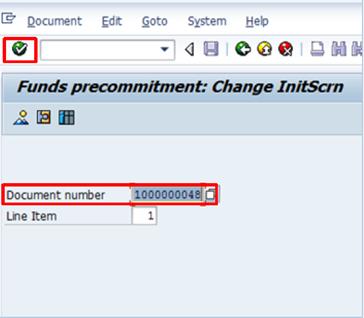
QQ.3. In the Funds precommitment: Change Overview screen that opens, Input the amount by which the original amount will be increased or decreased and Save the document.
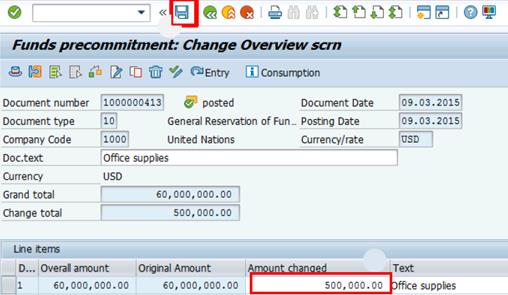
3.3.1.4.2 Add Additional Line Items Process
In order to add an additional line item to an already approved Funds Pre-commitment, you must complete a unique type of value adjustment document.
Scenario 4
· Suppose a Funds Pre-commitment has been created for three items, but now a fourth line item needs to be included.
· Suppose, a line item was left out from the Funds Pre-commitment when it was initially created and sent it through workflow for approval.
In such cases, you are not modifying the current Funds Pre-commitment line items, but actually adding a new one against the same Funds Pre-commitment amount.
The overview of the process is as follows:

Note: You can only change a Funds Pre-commitment after it has been through workflow to be approved or rejected.
RR. Steps to add additional line item / Transaction Code: FMY2
RR.1. Type FMY2 in the Command field and press Enter à the Funds precommitment: Change InitScrn screen displays.
RR.2. Enter the Funds Pre-commitment document number in the Document number field or search for the document number by selecting the Matchcode icon and click the Enter icon.

RR.3. In the Funds precommitment: Change Overview screen, add the new line item details as required. Relevant master data element field such as Amount changed, text, G/L Account, Funds Center will be activated to enable adding the new line.
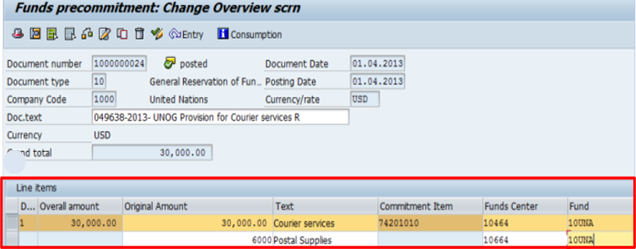
RR.4. Click
the Check ![]() icon and then click the
Save icon à the Funds
precommitment: Change IntScrn displays. A confirmation of the
pre-commitment's value adjustment appears in the left hand corner of the Status
Bar.
icon and then click the
Save icon à the Funds
precommitment: Change IntScrn displays. A confirmation of the
pre-commitment's value adjustment appears in the left hand corner of the Status
Bar.

Note: When you click the Save icon, it is equivalent to parking the value adjustment and starting off a workflow.
RR.5. Approve Funds Pre-commitment via workflow following the same steps as laid out in section 3.3.1.2.
3.3.1.5 Marking Funds Pre-Commitment as Completed
The mark 'Complete' can be used when a Fund Pre-commitment is no longer required and the earmarked amount is be released back to the allotment and made available for other business requirements.
The key stages of the completion process are as follows:
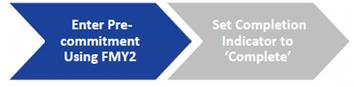
SS. Steps to mark Funds Pre-commitment as completed / Transaction Code: FMY2
SS.1. Type FMY2 in the Command field and press Enter à the Funds precommitment: Change InitScrn screen displays.
SS.2. Enter the pre-commitment document number in the Document number field.
SS.3. Enter a relevant number in the Line Item field and click the Enter icon à the Funds precommitment: Change Detail scr displays.
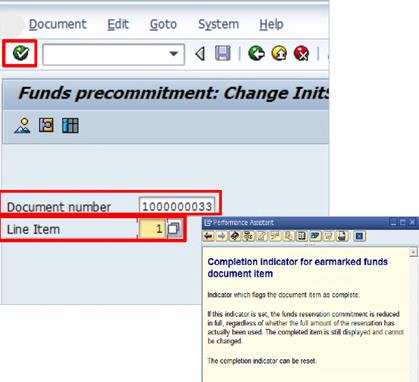
SS.4. Select the Completion indicator check box. This is equivalent to marking the Funds Pre-commitment as 'completed' à click the Save icon.
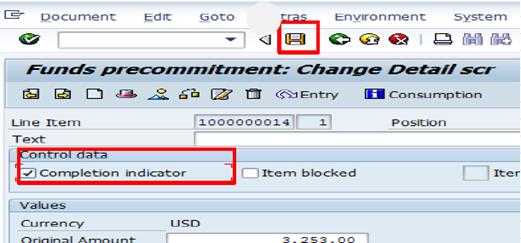
Note: After selecting the Completion indicator check box, select F1 to learn more about the features of specific fields in Umoja. This step can be applied to any field in Umoja which requires further clarification.
SS.5. Authorize Funds Pre-commitment marked as completed via workflow follows the same step as create Funds Pre-commitment.
3.3.2 Funds Commitments
Funds Commitment process involves creating an obligating document, such as a PO, MOD or OBMO. A Funds Pre-commitment is always required in order to create a Funds Commitment.
3.3.2.1 Creating a Funds Commitment
The end-to-end process of creating a Funds Commitment is outlined below:

TT. Steps to create a Funds Commitment / Transaction Code: FMZ1
TT.1. Type FMZ1 in the Command field and press Enter à the Funds commitment: Create InitScrn screen displays.
TT.2. Enter the relevant document type in the Document type field. This field indicates the type of commitment you are creating. Search the appropriate document number using the Matchcode icon.
Note: Use Document type 31- Letter of Authorization / Letter of Assist to issue Funds Commitment for UN Volunteers (UNVs) in which no pre-commitment is needed.
TT.3. Type 1000 in the Company Code field.
TT.4. Type the currency in which the commitment is being created in the Currency/rate field.
TT.5. Click the Enter icon.
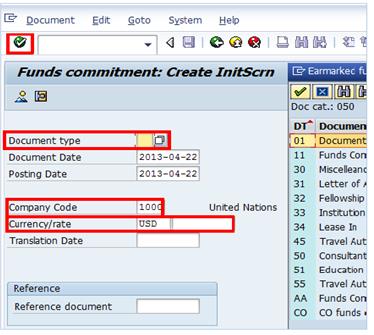
TT.6. On the Funds commitment: Create Overview scrn screen, the sections are:
· Header Section (top box): Contains fields such as Document number relevant to the commitment you are creating. The document number will be populated once you park the document; and
· Line items Section (bottom box): Contains specific fields you enter regarding the commitment you are creating.
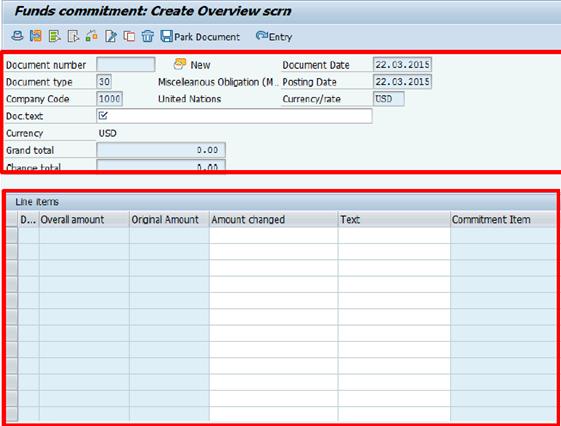
TT.7. In the Line items section, enter the required details in the following fields:
• Original Amount
• Text: Specific description of the commitment line item
• Fund: Determines the business area
• GL Account: Determines the nature of the expenditure
• Cost Center: Determines responsibility level
• Funds precommitment document number
• Items for Fund precommitment
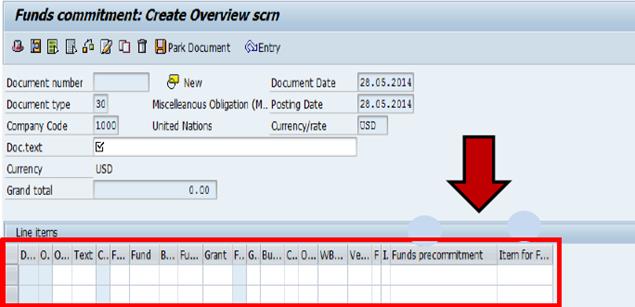
Note: All other fields are automatically populated in Umoja after relevant data is entered in the required fields within the Line items section. If you are creating a line item referencing a Grant as the funding source, Internal Order or WBSE becomes a mandatory field.
TT.8. Click the Check icon to confirm the data entered in the Funds Commitment is correct.
TT.9. Click the Park Document icon. This is equivalent to posting the Funds Commitment and starting off a workflow à a document number is displayed in the left hand corner of the Status Bar signifying that the Funds Commitment document is successfully parked and routed to the workflow.
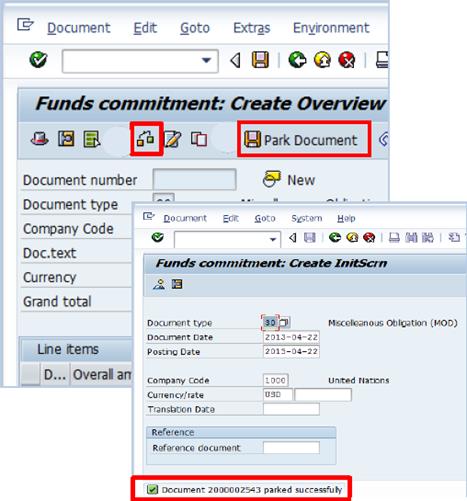
3.3.2.2 Authorizing a Funds Commitment via Workflow
The parked Funds Commitment is approved by approving officer through workflow once all entries are in order. Once approved, it will be referenced when processing appropriate accounts payables.
It is always required to create a Funds Pre-commitment before creating a Funds Commitment. An approved pre-commitment is necessary in order to process a Funds Commitment.
The process for approving a Funds Commitment is as follows:

Refer to section 3.3.1.2 for step by step processed in Umoja through T-code SBWP.
3.3.2.3 Reviewing a Funds Commitment
In Umoja, a parked Funds Commitment document can be displayed in order to review the authorization status, details of line items and consumption history, etc. The processes follow the same steps as for reviewing a Funds Pre-commitment document in section 3.3.1.3 with the following differences:
1 Use T-code FMZ3 to open the Funds commitment: Display InitScrn screen.
2 Use the Funds Commitment document number as reference to enter the Funds commitment: Display Overview scrn screen.
3 In reviewing the financial activities showing in the Earmarked Funds: Display Consumption History screen:
• Doc. No: Refers to the Funds Commitment document number
• Reference: The Accounts Payable document referencing a Funds Commitment document
• Consumption: Refers to the amount consumed by Accounts Payable documents
• Open amount: Refers to the remaining budget amount on this Funds Commitment
• Business Transaction: Type of document utilizing the Funds Commitment
• Set 'complete': Indicator that the funds are being returned to allotment (liquidating the Funds Commitment)
• Trigger document: Refers to FI document utilizing the Funds Commitment
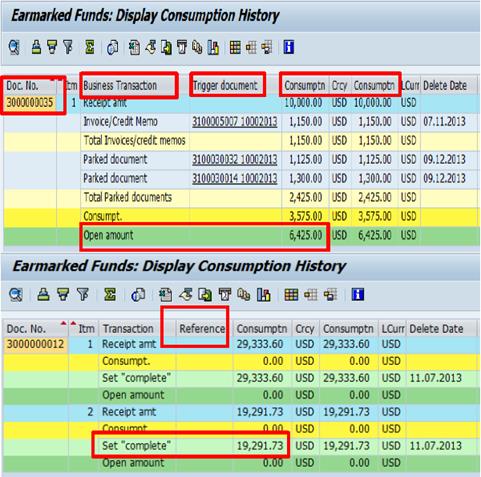
3.3.2.4 Modifying a Funds Commitment
An already approved Funds Commitment can be modified in Umoja by performing one of the following two activities:
1 Increase/decrease the value of a Funds Commitment (Value Adjustment); or
2 Add an additional line item to an approved Funds Commitment (Change).
The processes of the two activities follow the same steps as adjusting the value of a Funds Pre-commitment and adding line items to an approved Funds Pre-commitment describe in section 3.3.1.4.1 and 3.3.1.4.2 respectively with the following differences:
1 Use T-code FMZ2, for both activities, to open the Funds commitment: Change IniScrn screen.
2 Enter the Funds Commitment document number as reference to open the Funds commitment: Change Overview scrn screen.
3 In adding additional line item, a reference to Funds Pre-commitment document is required for the new line item added.
Note: A Funds Commitment can only be modified after it has gone through a workflow (approved or rejected).
3.3.2.5 Marking Funds Commitment as Completed
The process to mark Funds Commitment as complete is similar to Funds Pre-commitment as describe in section 3.3.1.5 with the following differences:
1 User T-code FMZ2 to open the Funds commitment: Change IniScrn screen.
2 Enter the already created Funds Commitment number in the Document number field to open the Funds commitment: Change Detail scrn screen.
3.3.2.6 Expense Recognition for Funds Commitments
Once Funds Commitments have been raised, Users can then recognize expenses for goods and services delivered in the financial year.
Two scenarios exist in this regard:
1. Invoices received by the end of the financial year; and
2. Invoices have not been received by the end of the financial year.
3.3.2.6.1 Invoices Received by the End of Financial Year
Where invoices have been received by the end of the financial year, these can be processed against the Funds Commitments raised. This is done by raising a Manual Vendor Invoice using T-code FV60 within the Accounts Payable module based upon the invoice received. The process to raise Vendor Invoices and its approval is described in detail in section 3.2.2 of Accounts Payable Chapter of the Finance Manual.
Funds Commitments must exist for all expenses over USD 4,000. If a Funds Commitment does not exist, or is not referenced in the Vendor Invoice entry, the invoice cannot be saved as complete. In Umoja, when a manual invoice is saved as complete encumbrance of funds takes place:
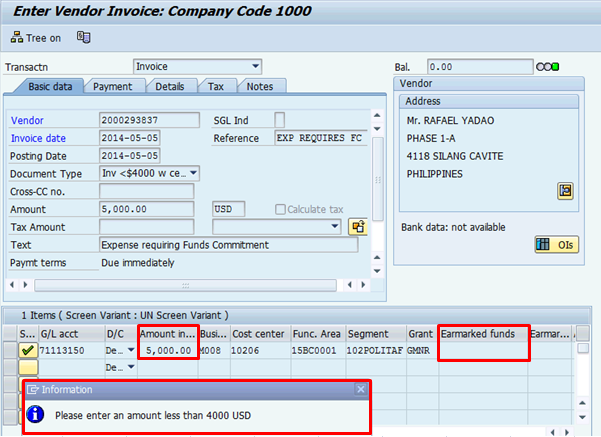
When the Funds Commitment is then referenced to the Earmarked funds field, the Vendor Invoice can be saved as complete.
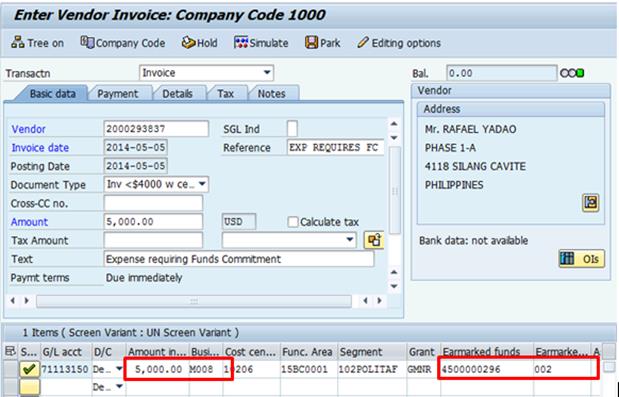
After clicking on the Save button, the following message will appear: 'Document 3100005261 was parked in company code 1000'.
![]()
The invoice will automatically be routed to appropriate approver for review and subsequent posting of transaction through Umoja approval workflow. The following accounting entry is then made in the FI module:
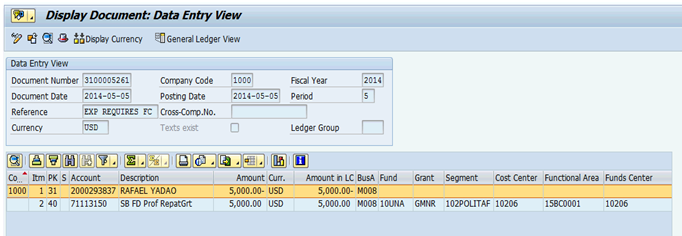
Accounting Entry:
Upon recognition of the expense, the credit entry is made directly into the Accounts Payable GL account, and not through the GRIR suspense account used by SRM:
Dr Expense USD 5,000
Cr Accounts Payable USD 5,000
As per the screenshot above for the example of a repatriation payment due:
|
Date |
GL |
GL short description |
Debit |
Credit |
|
31 Dec 20XY |
71113159 |
SB FD Prof Repatgrant |
5,000 |
|
|
|
20000293837 |
Mr A. Staff (individual AP account) |
|
5,000 |
The flowing Fund Commitment document reference is made through the Manual AP invoice when expense is recognized:

3.3.2.6.2 Invoices have not been Received by the End of Financial Year
If invoices have not been received by the end of the financial year, but goods and services have been delivered, the expense will need to be recorded at the financial year end through a year-end accrual.
Year-end accruals are raised through manual journal vouchers (JVs). Guidance on the raising of manual Journal Vouchers can be found in section 3.2 of General Ledger Chapter of the Finance Manual.
Accounting Entry:
The effective accounting entry for the year-end expense accrual will be:
Dr Expense USD 5,000
Cr Accruals (Liabilities) USD 5,000
See Corporate Guidance on the Delivery Principle for further guidance on the use of estimates when raising accruals.
|
Date |
GL |
GL short description |
Debit |
Credit |
|
31 Dec 20XY |
71113159 |
SB FD Prof Repatgrant |
5,000 |
|
|
|
35109810 |
AP Accrued Expense Man |
|
5,000 |
3.3.3 Funds Reservation
Funds Reservation in Umoja allows a business transaction to reserve budget amounts for a future business event without the immediate creation of a purchase order or purchase requisitions. It can be liquidated against other earmarked funds documents as well as against actual expenditures.
3.3.3.1 Creating and Authorizing a Funds Reservation
The end-to-end process of reserving funds is as follows:

UU. Steps to create and authorize a Funds Reservation / Transaction Code: FMX1 and SBWP
UU.1. Type FMX1 in the Command field and press Enter à the Funds reservation: Create InitScrn screen displays.
UU.2. Enter the appropriate data in the following fields:
· Document type: 60 - indicates the document type for Funds Reservation
· Company Code: 1000.
· Currency/rate: Indicates the currency in which the pre-commitment is being created

UU.3. Click the Enter icon à the Funds reservation: Create Overview scrn screen displays.
UU.4. Enter data in the following required fields:
· Doc.text: General description
· Amount changed
· Text: Specific description
· Fund
· G/L Account
· Cost Center: The funding source of the Funds Reservation

Note: All other fields are automatically populated after relevant data is entered in the required fields.
UU.5.
Click the Check ![]() icon
to confirm the data entered in the Funds Reservation is correct à a confirmation message will display on
the left corner of Status Bar.
icon
to confirm the data entered in the Funds Reservation is correct à a confirmation message will display on
the left corner of Status Bar.
![]()
UU.6.
Click the Park Document ![]() icon
to trigger the document to workflow for approvals à a confirmation message with will display on the left corner
of the Status Bar.
icon
to trigger the document to workflow for approvals à a confirmation message with will display on the left corner
of the Status Bar.
![]()
UU.7. The parked document is reviewed and approved by an approving officer through workflow once all entries are in order. Refer to section 3.3.1.2 for step by step processed in Umoja through T-code SBWP. Once approved, it will be referenced when processing appropriate Funds Pre-commitment and Funds Commitment or Accounts Payable.
3.3.3.2 Reviewing, Modifying and Marking Funds Reservation as Completed
A parked and/or posted Funds Reservation document can be displayed for reviewing, modified for value adjustment or to add line item and can be set as complete in a similar process manner as the Funds Pre-commitment describe in sections 3.3.1.3, 3.3.1.4 and 3.3.1.5 respectively using the following T-codes:
|
Funds Reservation Process |
T-code |
|
Reviewing |
FMX3 |
|
Modifying - Value Adjustment |
FMX2 |
|
Modifying - Add a Line Item |
FMX2 |
|
Marking as Completed |
FMX2 |
3.3.4 Funds Block
Funds Block is used to block approved budgetary funds from use against any expenditure. A Funds Block cannot be liquidated against any other commitment or actual expenditure. It is earmarked for specific events or activities that are anticipated to occur in near future within the budget period. When the event or activity materialize, the Funds Block must be removed by marking it as 'complete' and then it must be converted to another type of earmarked fund ready for utilization. It can be converted partially or in full for the appropriate budgetary use.
3.3.4.1 Creating and Authorizing a Funds Block
The process of creating a Funds Block is depicted below:
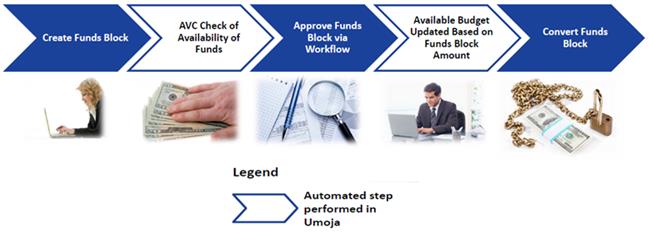
VV. Steps to create and authorize a Funds Block / Transaction Codes: FMW1 and SBWP
VV.1. Type FMW1 in the Command field and press Enter à the Funds blocking: Create InitScrn screen displays.
VV.2. Enter the appropriate data in the following fields:
· Document type: 70 - indicates the document type for Funds Block
· Company Code: 1000.
· Currency/rate: USD

VV.3. Click the Enter icon à the Funds blocking: Create Overview scrn screen displays.
VV.4. Enter data in the following required fields:
· Doc.text: General description
· Amount changed
· Text: Specific description
· Fund
· G/L Account
· Cost Center: The funding source of the Funds Block
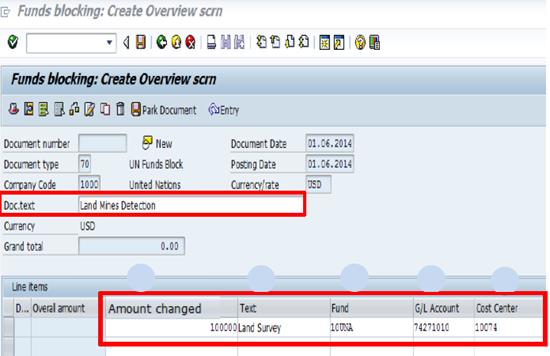
Note: All other fields are automatically populated after relevant data is entered in the required fields.
VV.5. Click
the Check ![]() icon to confirm the
data entered is correct à a
confirmation message will display on the left corner of Status Bar.
icon to confirm the
data entered is correct à a
confirmation message will display on the left corner of Status Bar.
VV.6. Click
the Park Document ![]() icon to trigger the
document to workflow for approvals à
a confirmation message with will display on the left corner of the Status Bar.
icon to trigger the
document to workflow for approvals à
a confirmation message with will display on the left corner of the Status Bar.
VV.7. The Funds Block document is reviewed and approved by an approving officer through workflow if all entries are in order. Refer to section 3.3.1.2 for step by step processed in Umoja through T-code SBWP. Once approved, the amount allocated in the Funds Block cannot be utilized for any financial transactions until the event or activity materializes. At that point, the fund is returned to budget.
3.3.4.2 Reviewing, Modifying and Marking Funds Blocking as Completed
In Umoja ,a parked and/or posted Funds Block document can be displayed for reviewing, modified for value adjustment or to add line item and can be set as complete in a similar process manner as the Funds Pre-commitment describe in sections 3.3.1.3, 3.3.1.4 and 3.3.1.5 respectively using the following T-codes:
|
Funds Block Process |
T-code |
|
Reviewing |
FMW3 |
|
Modifying - Value Adjustment |
FMW2 |
|
Modifying - Add a Line Item |
FMW2 |
|
Marking as Completed |
FMW2 |
3.4 Specific Topics: Travel Expenses
3.4.1 Travel Process Overview
There are two main activities within the travel process in Umoja:
1 Creating travel request; and
2 Processing expense report submitted by traveller upon return.
Both activities start from the travellers entering their travel information into the Employee Self Service (ESS) module in Umoja in which the information will flow through the system until the travel expenses are being settled through the FI module in ECC Umoja.
Diagrams below show the high-level travel processes in Umoja:


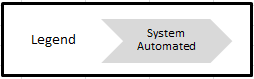
3.4.1.1 Types of Travel in Umoja
There are four types of travel associated with the travel process:
1 Official travel, such as within mission travel, official business, training, temporary duty (TD), sabbatical, escort - medical, medical evacuation, security evacuation, medical/security evacuation of uniform personnel, such as Formed Police Unit (FPU), UN Military Experts on Mission, Military Staff Officers/Contingent Member Troops and UN Police (UNPOL).
2 HR travel, such as appointment for finite duration, temporary replacement, post and consultant; temporary assignment; transfer/reassignment; separation/repatriation; transportation of human remains; interview for post and finite duration position; competitive exam for post, finite duration and GTA; and secondment for post, finite duration and GTA position.
3 Entitlement travel, such as home leave, family visit, reverse family visit, education grant travel, reverse education grant travel and rest and recuperation.
4 Uniformed personnel travel relating to deployment and repatriation of UN Military Experts on Mission (UNMEM), UN Police, Military Staff Officers/Contingent Member Troops, Formed Police Unite (FPU) and Government Provided Personnel/Corrections Officers/Justice Officers.
The focus of this section will be on processes related to official and uniformed personnel travels. Refer to section 3.3 of Chapter on Employee Benefits for processes related to HR and entitlement travels.
3.4.1.2 Roles and Responsibilities
The following Umoja Enterprise roles are involved in the Travel process:
|
Roles |
Responsibilities |
|
Traveller |
Create and submit ESS Travel and Shipment Requests and Expense Reports |
|
Travel Administrator -All/UP/UNV/NS |
Create ESS Travel and Shipment Requests and Expense Reports on behalf of all Secretariat staff and non-staff/Uniformed Personnel (UP)/UN Volunteer (UNV)/Non-staff only travellers |
|
Travel and Shipment Approver (TSA) |
Review, certify and submit all Travel Requests, Travel Expense Reports and shipments from all categories of personnel |
|
Travel Processing Officer |
Approve Travel Requests from all categories of personnel |
|
Travel Shipment Processor |
· Receive, review and process Shipment Requests from all categories of personnel · Reject, return Shipment Requests, along with reason (mandatory) · Submit Shipment Requests to TSA for creation and approval of Funds Commitment · Forward Shipment Request to another Travel Shipment Processor for reasons of efficiency and effectiveness |
|
Travel Claims Processor |
Receive, review, process and approve all Travel Expense Reports where manual review and approval is required |
|
Ticket Billing Processor |
Receive, process and approve all electronic invoices received from travel service providers |
3.4.2 Financial Transactions
Umoja system is an integrated system and most of its modules integrate with each other to complete a process. Diagram below shows the integration across the Umoja modules, processes and activities.
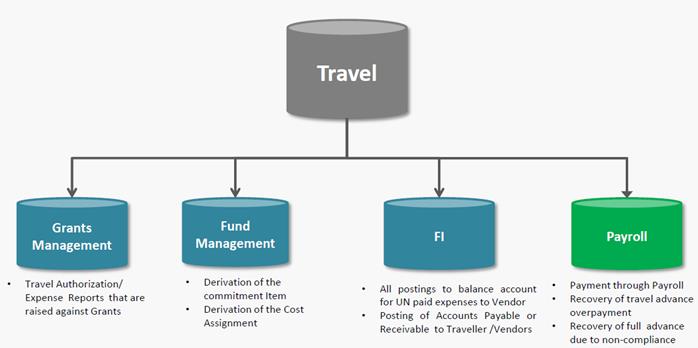
3.4.2.1 Document Types for Travel Postings
The following document types are created in the travel process:
|
Document Type |
|
|
TA |
· Created for Travel Advance postings · Reflected as 35XXXXXXXX |
|
TC |
· Created for Credit Memo and Travel Claim Recovery postings · Reflected as 32XXXXXXXX |
|
TG |
· Created for Ticket Invoice postings - invoices received from vendor · Reflected as 31XXXXXXXXXX |
|
TI |
· Created for Ticket postings and Travel Claim postings · Reflected as 31XXXXXXXX |
|
KZ |
· Created for disbursements · Reflected as 33XXXXXXXX |
3.4.2.2 Travel Postings
Once a Travel Request is approved, it is included in the posting run to FI. The results of the postings to FI are Travel Advance (TA) entries and Ticket posting (TI) entries.
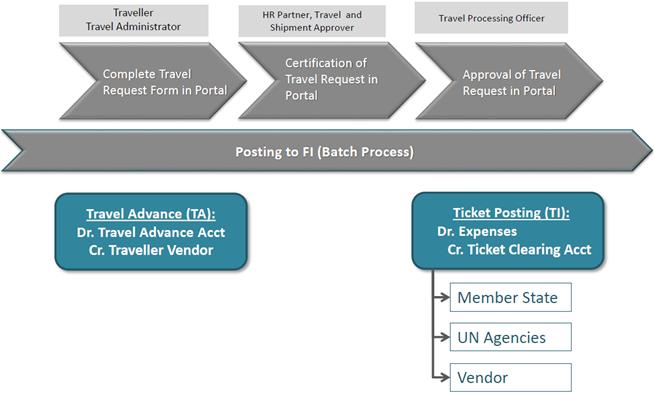
Note: This posting schema does not apply to UNDP.

Throughout the travel process, the commitments are automatically generated by the system as being triggered by the actions performed by the responsible Users of each event.
Once a Travel Expense Report is approved, it is included in the posting run to FI. The results of the postings to FI are Net Payable (TI) entries and Net Recoverable (TC) entries.
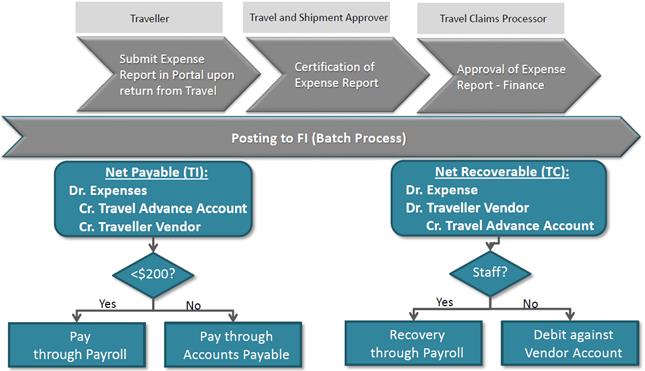
3.4.2.2.1 Ticket Posting
Ticket posting is first generated in the FI module when the Travel Request is approved. Below are the Travel Request workflow and a list of travel ticket posting entries generated throughout the key points of the process.
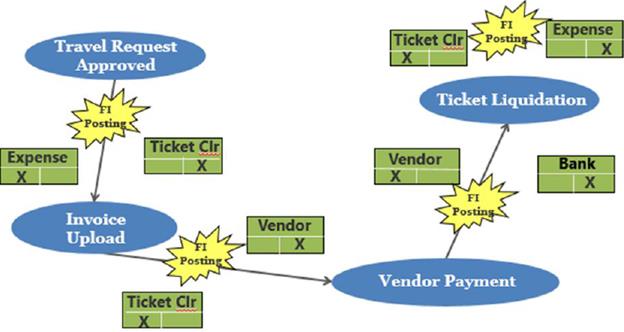
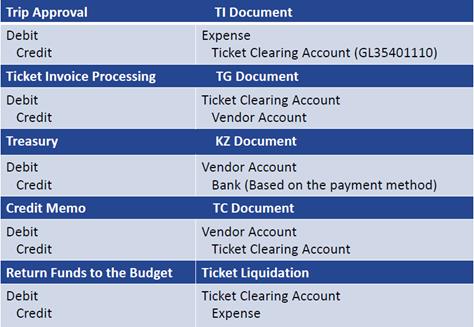
3.4.2.2.2 Travel Advances
Travel advances represent a specific type of expense relating to covering the costs of staff travel, and are paid in advance of the journeys to staff by the UN Secretariat. The Traveller or Travel Administrator may request an advance while creating the Travel Request through Umoja ESS, which will be released five days before official travel.
Within Umoja, expenses are recognized in the FI module at the point of the liquidation of the claim, which is upon approval of a travel claim (introduced as a Vendor Invoice FV60), which can be many months after the actual journey concerned. From an accounting perspective however, these expenses need to be recognized on the date of the journey, and not at the default Umoja date.
Below are the entries generated in the FI for travel advances through ESS once the request has been approved.
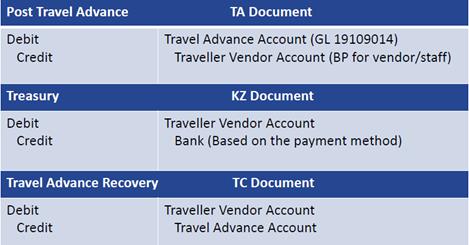
The posting details of payment methods available to the Traveller are as follow:
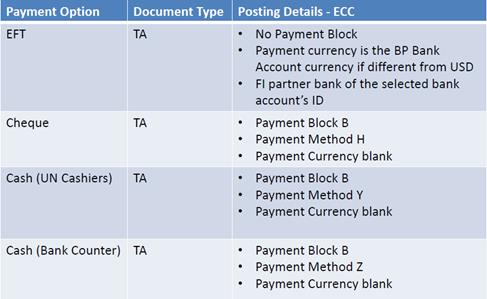
Note: Travel advances cannot be created in Umoja ESS after the Travel Request is approved.
3.4.2.2.3 Travel Expense Report
The Travel Expense Report is used by the Traveller to submit any reimbursement of travel expenses. Travellers are required to submit Travel Expense Report 14 days following the return of the trip to avoid potential recovery of travel advances from their payroll.
There are four types of Travel Expense Reports i.e. express, detailed, stand alone and shipment. Depending on the nature of the report, the workflow is routed as follows:
|
Expense Report Type |
Description |
Workflow |
|
Express |
· Traveller submits an Expense Report exactly as authorized Travel Request; expense only consists of daily subsistence allowances (DSA) and terminal fees · Use for home leave and official business travel with no deviation from the authorized travel |
Claim/Expense Report is processed automatically without any need for review and approval of the Travel and Shipment Approver (TSA) or Travel Claims Processor |
|
Detailed |
Traveller submits an Expense Report with a deviation (additional expenses, such as EBG fees) from the approved Travel Request |
Claim/Expense Report is routed to the Travel and Shipment Approver (TSA) and Travel Claims Processor for review and approval |
|
Stand Alone |
Traveller submits an Expense Report that has no association to a Travel Request |
Claim/Expense Report is routed to the Travel and Shipment Approver (TSA) and Travel Claims Processor for review and approval |
|
Shipment |
· Traveller submits an Expense Report for reimbursement of self-ticket or shipment entitlements on a post-factor basis · Expenses are not included in the original authorized travel |
Claim/Expense Report is routed to the Travel and Shipment Approver (TSA) for approval. |
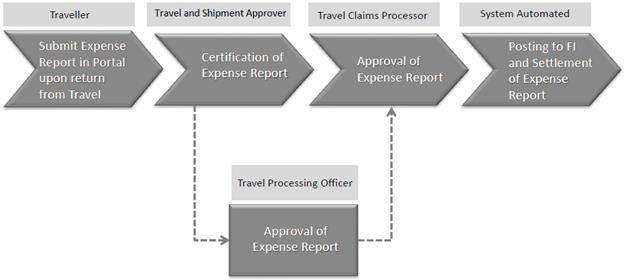
Below are the entries generated in the FI for approved Travel Expense Report with travel advance:
1. No deviation in the expense to the original authorized travel
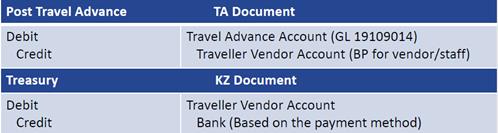
2. With deviation in the travel expense

The posting details of methods available for Travel Expense Report payments are as follow:
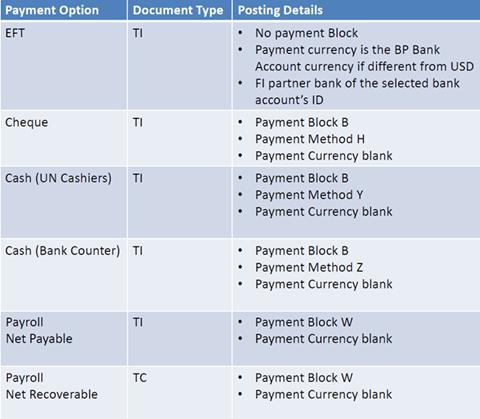
3.4.2.2.4 UNDP Travel
The Umoja Travel Solution provides functionality to issue financial authorizations to UNDP for the payment of travel advances, tickets and for claim settlement. To enable such function, the following are required to be entered in the Travel Portal when creating the Travel Request:
· The UNDP Vendor must be selected; and
· The UNDP financial authorization remarks must be updated.
Once the ESS travel transactions are posted to FI with the required details, a financial authorization will be automatically generated based on the posted FI document that has the following details:
· UNDP documents will have the Payment Method: U;
· The Text field will indicate the UNDP Vendor number and initial; and
· The Long Text field will indicate the remarks entered in the Travel Portal.
Upon receipt of Service Clearing Account (SCA) invoices from UNDP, any subsequent adjustment related to the ticket invoice, travel advance or claim settlement will have to be made in the Umoja Travel Solution.
· Adjustment entries to reconcile invoices for travel advances and travel claim payments are to be processed by the Travel Claim Processor
· Adjustment entries to reconcile ticket invoices received from UNDP are to be processed by the Travel Processing Office
Refer to section 3.2.5.5 of Chapter on Accounts Payable of the Finance Manual for detailed guidance on processing SCA received from UNDP.
3.4.2.2.4.1 Financial Authorization to UNDP for Payment of Advances and Ticket Costs
The Traveller cannot select UNDP as a travel advance payment option. The issuance of the Financial Authorization to UNDP for this payment can be requested by the Travel and Shipment Approver (TSA) by selecting/entering the following in the Travel Portal:
· Advance Payment Mode: UNDP
· UNDP Vendor
· Comments: UNDP Financial Authorization remarks
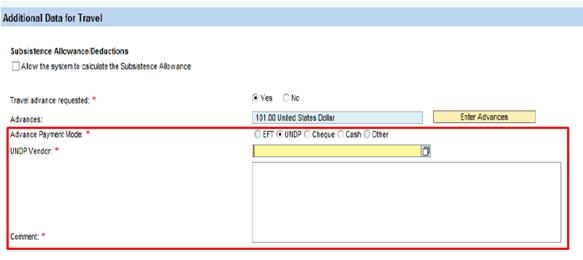
Once the Travel Request has been approved, the posting in FI will have the following details:

3.4.2.2.4.2 Financial Authorization to UNDP to Purchase Tickets
In order to issue this type of Financial Authorization to UNDP, the Travel Processing Officer (TPO) will need to enter the following information in the Travel Portal based on instructions from the TSA:
· Tickets to be issued through: UNDP
· Remark for Financial Authorization: UNDP Vendor number and initial
· Estimated Costs: maximum ticket costs up to which UNDP can purchase the tickets on behalf of the UN
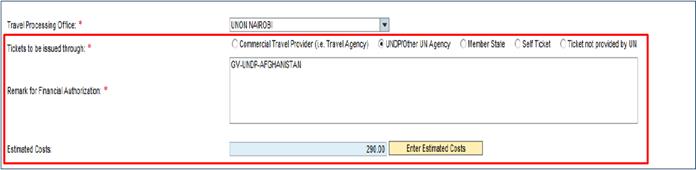 Once the Travel Request has
been approved, the posting in FI will have the following details:
Once the Travel Request has
been approved, the posting in FI will have the following details:

3.4.2.2.4.3 Financial Authorization to UNDP for Travel Claim Settlements
The issuance of Financial Authorization to UNDP to act as a pay agent for travel claim settlements or recoveries can be requested by TSA by selecting/entering the following when creating the Travel Request:
· Payment Mode: UNDP
· UNDP Vendor
· Comments: UNDP Financial Authorization remarks
When the Travel Expense Report (with travel advance) has been approved for processing (for payment or recovery), the postings in FI will have the following details:
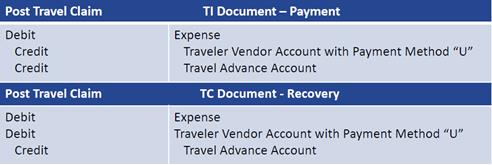
3.4.2.2.4.4 UNDP Billing Process
When the UNDP bills the UN for the disbursement of travel advances, ticket costs and travel claims (expense reports) and the amounts are not an exact match, the following actions are to be followed to enable the payment and reconciliation of the UNDP invoices:
1 Unmatched Travel Advances: The Travel Claims Processor will have to amend the travel advances to a higher or lower amount.
2 Unmatched Ticket Costs: The Travel Unit will have to amend the ticket costs to a higher or lower amount.
3 Unmatched Travel Claim Payments: The Travel Claim Processor will have to make the adjustments.
3.4.3 Reviewing Travel Postings
All travel transactions related to the Travel Requests and Travel Expense reports are posted to finance once the batch is executed. After the batch jobs have run and travel expense transactions are posted, Finance Officers may vie the financial entries.
WW. Steps to review travel postings / Transaction Code: ZTV_TRAVELACC
WW.1.
Enter ZTV_TRAVELACC in the Command field and click ![]() icon
to continue à the Travel Account
Analysis Report is displayed.
icon
to continue à the Travel Account
Analysis Report is displayed.
WW.2. Generate the Financial postings report by entering information into/selecting the following fields:
· Posting Date: date range of transactions
· Personnel No.
· Layout: /TRAVEL_FI
· Check Show Posting documents to ensure that the report displays the relevant financial documents only
WW.3. Click the Execute icon to generate the report.
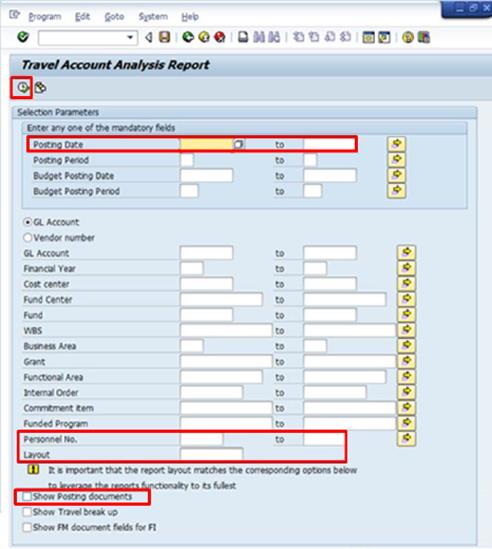
3.4.3.1 Ticket Posting
Ticket bookings are posted at the time of the Travel Request approval at which point the expenses are also recognized. To review ticket posting from the generated Travel Account Analysis Report¸ click the FI document that has the Doc. Type: TG (ticket invoices) and select the line where the GL Account is 35401110.
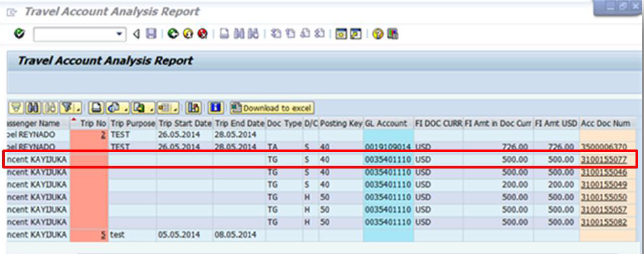
Expenses are debited to the GL account that is derived and credit entry is posted to the ticket clearing account:
· Debit: Expense Account (e.g. 72111211 - within Mission Travel)
· Credit: Ticket Clearing Account (35401110)

Where the approved travel ticket is for the following year travel, the expense will need to be reclassified as deferred charges/prepayments at year-end if meet the threshold of USD 1,000. Use T-code FBS1 and document type SZ in Umoja to raise a journal voucher for the reclassification entry following below posting schema:
· Debit: Deferred Charge Prepaid Expense (19201010)
· Credit: Expense Account (e.g. 72111211 - within Mission Travel)
Refer to section 3.2.3 of Chapter on General Ledger of the Finance Manual for guidance on raising journal voucher for accrual.
3.4.3.2 Travel Advance Posting
Including in a travel advance are the Daily Subsistence Allowance (DSA) entitlement and terminal expenses that are automatically calculated by the system and posted when the Travel Request is posted.
To review travel advance posting from the generated Travel Account Analysis Report, click the FI document that has the Doc. Type: TA and select the line where the GL Account is 19109014.
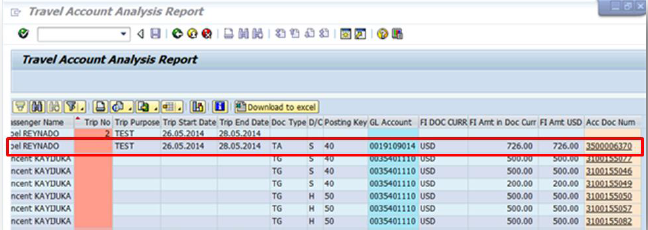
Travel advances are debited to travel advance account and credited to the traveller vendor:
· Debit: Travel Advance Account (19109014)
· Credit: BP Vendor (e.g. 2000067852)
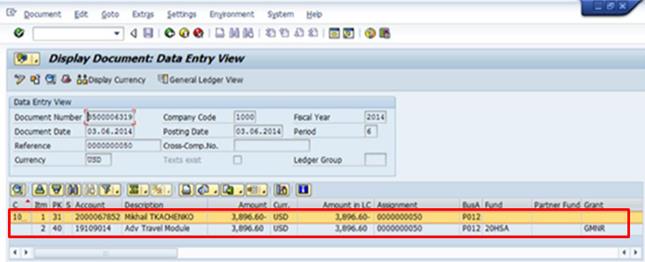
Note: The payment will be executed based on the payment modalities stored against the Vendor's BP default.
In a situation where travel is extended beyond the original travel date, an additional travel advance can be requested. The Travel and Shipment Approver (TSA) may request or change and advance up to a maximum of USD 15,000 in Umoja ESS by sending an email request to Finance uploading a copy of the travel authorization and stating the reason why the additional amount is requested. Request must be retained for audit purposes. Once a request for additional / reduction in advances is initiated, the Finance Officer mapped to the Travel Claim Processor role will be able to issue or create the advances in Umoja ECC.
Note: This additional / reduction in advances can only be requested when a Travel Request has been approved and the claim process has not been initiated. This process can only be carried out by Travel Claims Processor where manual reviews and adjustments to travel advance are required.
XX. Steps to create additional / reduce travel advances in ECC / Transaction Code: PR03
XX.1. Enter PR03 in the Command field and press Enter to display Trip Advances screen.
XX.2. Enter the PersonnelNo for whom the additional / reduce travel advance is to be created à press Enter to display all Travel Requests.
XX.3.
Select the Trip no. against which the advance is to be
added / reduced à click the ![]() icon to edit the travel
advance details.
icon to edit the travel
advance details.
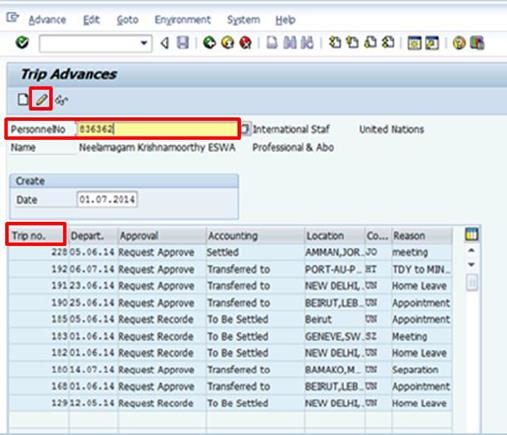
XX.4. Input the additional (positive) or reduction (negative) Amount based on the Traveller's entitlements à press Enter to validate the data correctly.
XX.5. Uncheck the box under the Cash column to ensure that the advance is correctly posted.
XX.6.
Click the ![]() icon to save the changes which
will put this entry as part of the next batch process. Once the posting run
executes, the changes to the advance amount is posted to FI.
icon to save the changes which
will put this entry as part of the next batch process. Once the posting run
executes, the changes to the advance amount is posted to FI.
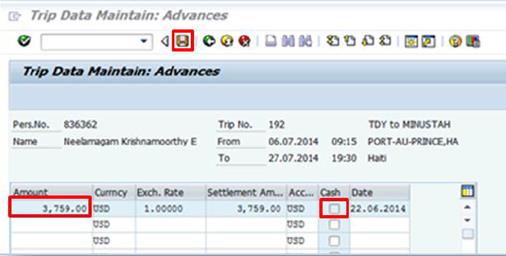
Where travel occurs in the same financial year as the travel claim submission, no adjusting entries will be required in Umoja as the expenses will be recognized in the correct financial year. However, at the end of the financial year, there will be several cases where advances have been paid, and where travel has been undertaken, but where the claim has not yet been submitted by the staff member.
In these cases, the year-end closure procedures will need to include a process for determining the value of outstanding travel advances where travel has occurred by the end of the financial year. This process includes three key phases:
1. Identifying the population of travel advances to review where a full claim has not been made;
2. Determining the extent to which travel has occurred for each of those claims prior to the financial year-end; and
3. Raising a (reversing) manual journal voucher to recognize the expense.
YY. Overview of year-end process for travel advances:
YY.1. Identify the population of travel advances / Transaction Code: FBL1N or ZAPBFL1N
YY.1.1. At the year-end, use T-code FBL1N or ZAPFBL1N to run Vendor Line Item Display in Umoja. Travel advances are tagged with a specific GL indicator 'T' in subsidiary ledger.
YY.1.2. Use the following parameters:
· Dynamic Selection screen enter the following values:
o Account group: Z020 Staff.
o Special GL indicator: T.
· Enter the Company code: 1000.
· Select Open items and enter the date.
· Type: Special G/L transactions.
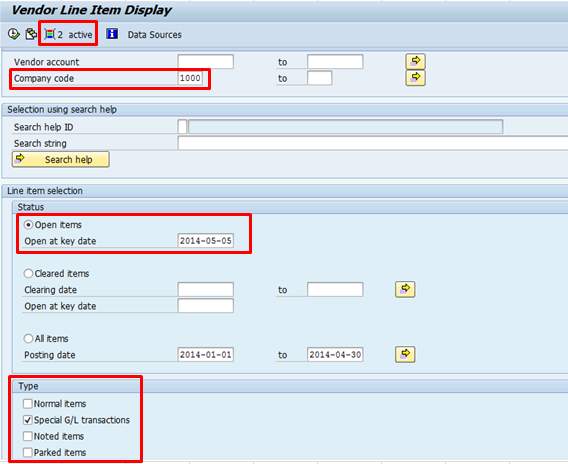
This report will list all outstanding travel advances and indicate the amount advanced to the staff member for travel.
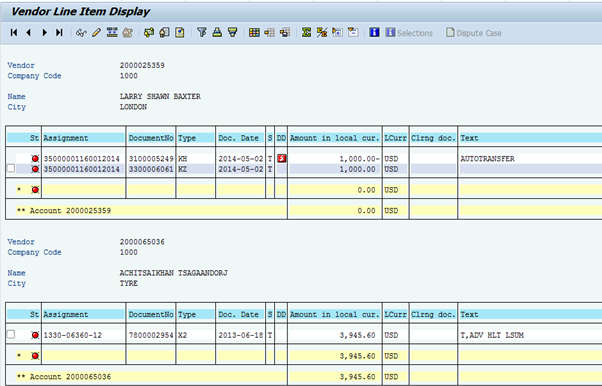
YY.2. Determining the extent to which travel has occurred
The report should then be examined on a case-by-case basis to establish which travel has been fully or partially completed during the financial year. If necessary, the relevant staff member should be contacted to confirm which costs out of the travel advance have been incurred to the end of the financial year.
Estimates of costs incurred may be required where supporting documents are unavailable. Refer to Corporate Guidance on the Delivery Principle for further guidance on the use of accounting estimates.
YY.3. Raising a (reversing/accrual) manual journal vouchers
In Umoja, a journal voucher should be raised for the total travel costs identified using T-code FBS1 and document type SZ following below posting schema:
· Debit: Expense G/L Account as per the commitment (7XXXXXXX)
· Credit: AP Accrued Expense Manual (35109810)
As the Funds Commitments related to the travel advances will be included in the accrual of group-1 obligations, outstanding travel advances at year-end will need to be offset to the accrued payable account using T-code FBS1 as follow:
· Debit: AP Accrued Expense Manual (35109810)
· Credit: Travel Advance Manual (19109015)
Refer to section 3.2.2 of Chapter on General Ledger of the Finance Manual for guidance on raising reversing journals or accrual journals at year-end.
3.4.3.3 Travel Expense Report Posting
Once a Traveller submits an expense report upon return and it is reviewed by the Approving Agents, it is posted to FI following approval by Finance and the successful batch execution. To review the travel expense report posting from the generated Travel Account Anaylsis Report, click the FI document that has the Doc. Type: TI.
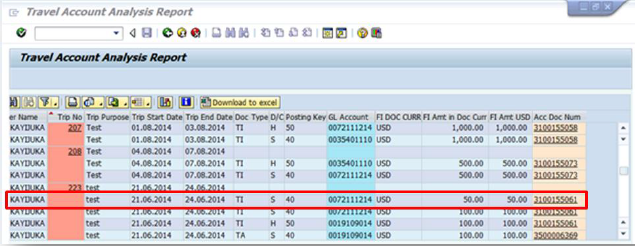
Where the Travel Request is attached to a travel advance:
1 The travel expense report is debited to the derived GL account and credited to the travel advance account if it is not recovered:
· Debit: Expense Account (derived GL account e.g. 72111214)
· Credit: Travel Advance Account (19109014)
2 The posting would either debit the traveller vendor if there is an overpayment or credit the Traveller vendor if a net payable is due:
· Debit: BP Vendor (e.g. 2000001075)
· Credit: Expense Account (derived GL account e.g. 72111214)
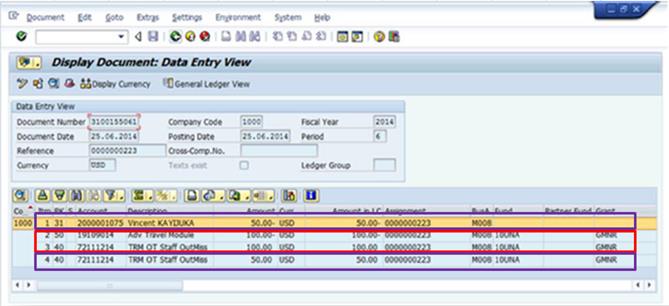
If travelers does not submit a travel expense report within 60 days following his/her return date, a travel advance recovery is initiated automatically. The program will identify claims which have not been submitted 60 days following the return date and reclassify the receivable from the balance sheet account to the vendor account. The batch program will post the following entries:
· Debit: BP Vendor (e.g. traveller vendor account)
· Credit: Travel Advance Account (19109014)
Note: Net payables of less than USD 200 are paid through payroll by creation of an IT0015 entry. Otherwise, they are paid by Accounts Payable based on the payment modalities selected in the travel expense report.
3.4.3.4 Items Blocked for Payment
To ensure that payments can be made, Finance Officer will need to review the items posted and release those that are blocked for payment.
ZZ. Steps to generate, review and release the list of items blocked for payment / Transaction Code: S_ALR_87012103 and FB02
ZZ.1. Enter Z_ALR_87012103 in the Command field and press Enter à the List of Vendor Line Items screen is displayed.
ZZ.2. Enter / select the following in the respective fields:
· Vendor account: enter 14*to exclude UNDP postings from the report
· Select Open Items button.

ZZ.3. Click the Dynamic Selection icon to display additional selection fields.
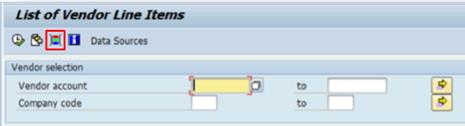
ZZ.4. Scroll down on the left pane and click the Document folder to expand.
ZZ.5. Scroll down and double click the Payment Block.
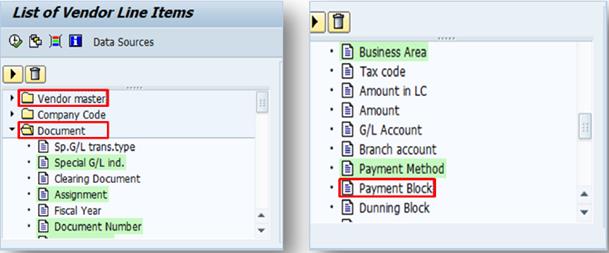
Note: The fields which are already included in the dynamic selection are highlighted in green.
ZZ.6. On the right side pane, scroll down and ensure that the Payment Block field is displayed.
ZZ.7. Click the Multiple Selection icon at the right of the Document Type field.
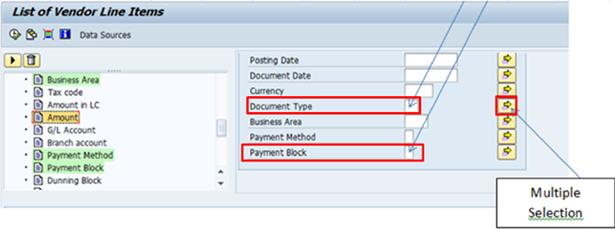
ZZ.8. In the open window:
· Click the Select Single Values tab
· Type in all of the required document types from travel postings: TA, TI, TC and TG
· Click the Execute icon
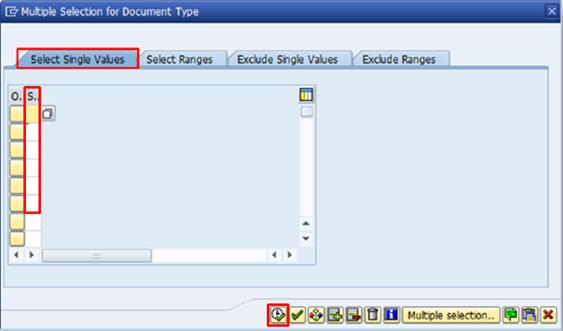
ZZ.9. Select B in the Payment Block field and click the Execute icon to generate the report.
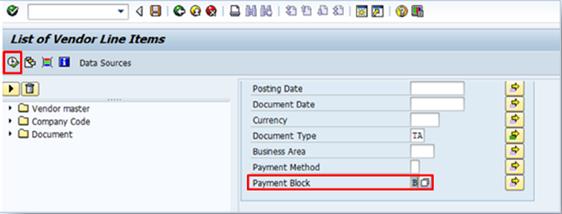
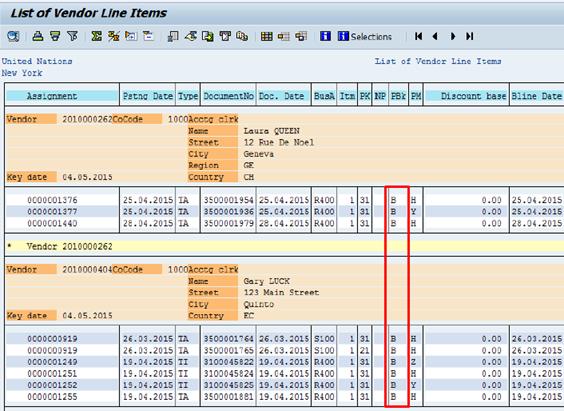
ZZ.10. Use T-code FB02 to remove the B blocks.
3.4.3.5 Travel Related Shipment Commitments
AAA. The steps to generate and review a report of commitments created by Travel Shipment solution / Transaction Code: S_P99_41000147
AAA.1. Enter S_P99_41000147 in the Command field and press Enter à the Earmarked funds journal screen is displayed.
AAA.2. Remove any default values from the fields and click the Dynamic Selection icon to display additional selection fields.
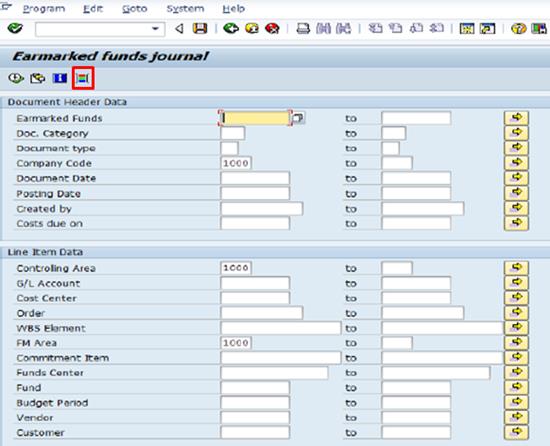
AAA.3. In the new window that opens, expand the View for Earmarked Funds Journal folder à double click Document Header Text.

AAA.4. On the right pane, type in Funds Commitment for Shipment Request* in the Document Header Text field and press Enter.
AAA.5. Click the Applied Selected Items button and the Save icon.
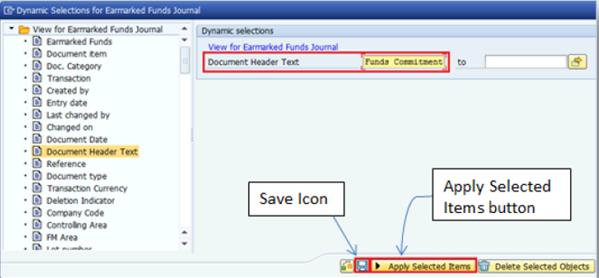
AAA.6. Enter 55 in the Document type field and 1000 in the Company Code field à click the Execute icon.
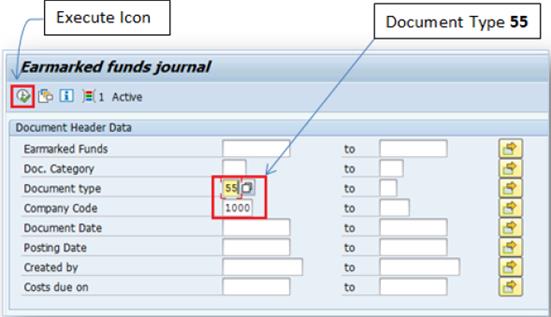
Note: 55 is the Funds Commitment document created by the Travel and Shipment Solution.
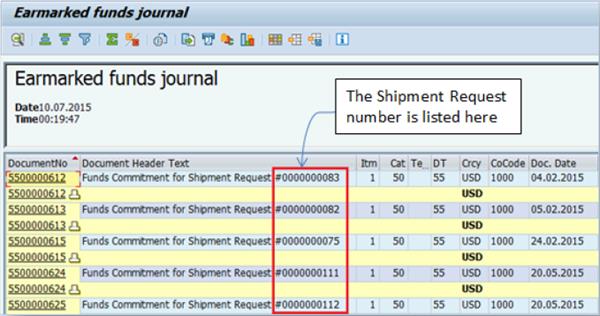
3.4.4 Ticket Billing Solution - Commercial Tickets
The ticket billing solution enables the upload of electronic invoices received from the ticket billing agent as a result of the selection in the Estimated costs grid of the ESS portal. In the ESS travel portal, the commercial ticket vendor must be selected in the Service Provider field of the Estimated costs screen. The important elements for the ticket invoices are the currency, ticket costs, index number, service provider, itinerary and the ticket transaction fees if applicable.
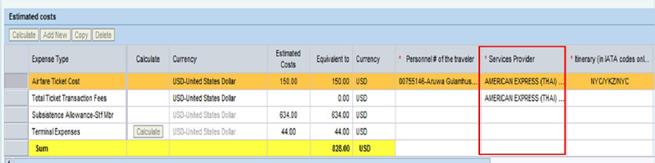
The two ways to upload invoices in ECC are the Excel Upload and Interface feed from the travel agent vendor. The invoices are uploaded in the system and automatically processed if matched or parked if not matched.
The three components required for the ticket billing solution are the File Upload, Matching View and Ticket Billing Portal.
3.4.4.1 File Upload
The commercial ticket billing process will enable the electronic invoice upload of the file through:
· Manual Excel Upload feature
· Automatic FTP file upload
The focus in this section will be on enabling electronic invoice upload of the file through Manual Excel Upload feature.
BBB. Steps to upload electronic invoice through Excel upload / Transaction Code: ZTV_TICKET_INTERFACE
BBB.1. Enter ZTV_TICKET_INTERFACE in the Command field and press Enter à the Ticket Invoice Upload Interface screen is displayed.
BBB.2. Populate the following fields:
· Travel Processing Office
· Vendor
· G/L Account : 35401110 (Ticket Clearing Account)
BBB.3. In the Load Ticket Billing Invoice section, click the Load Invoice From File radio button à upload the file from the Input files field.
BBB.4. Select the Test Run check box and click the Execute icon.
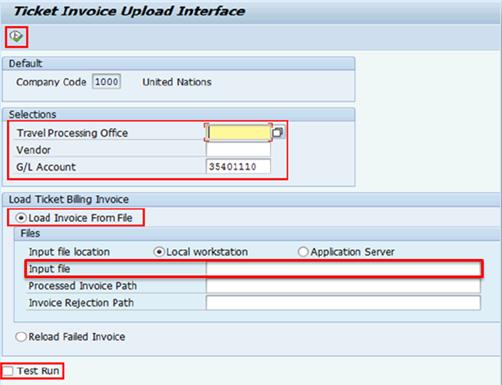
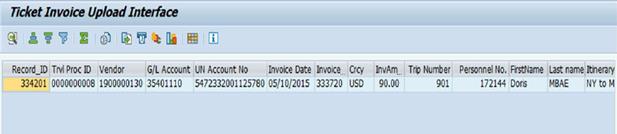
BBB.5. Click the Back icon to go to the previous screen à uncheck the Test Run box and click the Execute icon.

3.4.4.2 Matching View Process
All invoices received with corresponding trips matched the invoice file by the three matching criteria, which are Trip Number, Personnel Number and Billed Ticket amounts that are less or equal to the booked amounts plus tolerance are automatically posted in FI with a Payment Block: R and Document Type: TG. The posting entries are:
· Debit: Ticket Clearing Account (35401110)
· Credit: Vendor Account (e.g. 1900000130)
Note: Where credits or refunds are required, the Trip Number and Personnel Number will be used to determine the automatic posting of the credits.
The process flows for the commercial ticket vendor billing program for a Debit Invoice is as follow:
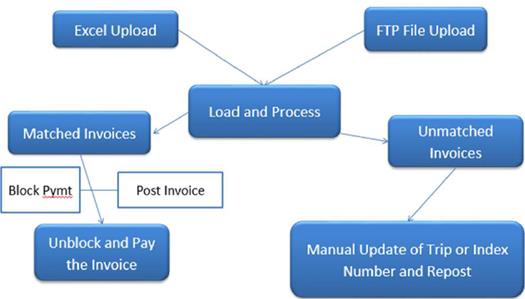
CCC. Steps to carry out the matching process - Debit Invoice / Transaction Code: ZTV_TICKET_MATCHDESK
CCC.1. Enter ZTV_TICKET_MATCHDESK in the Command field and press Enter à the Travel Ticket Matching Desk screen is displayed.
CCC.2. Populate the following fields:
· G/L account: 35401110 (Ticket Clearing Account)
· Open at key date
· Vendor
· Travel Processing Office
CCC.3. Click the Execute icon.
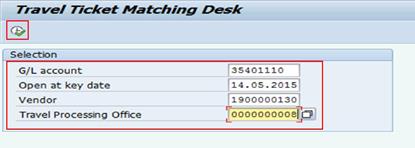
CCC.4. The six tabs of the Travel Ticket Matching Desk are displayed:
· All Pend Invoices - contains all of the invoices in the Matchdesk
· Travel View - contains the tickets posted and linked to the commercial vendor (Doc. Type: TI)
· Invoices View - contains invoices uploaded from the commercial vendor (Doc. Type: TG)
· Matched - contains the invoices that are matched and ready for payment
· Unmatched - contains the unmatched invoices
· Partially processed - contains invoices that should be either rejected or reprocessed
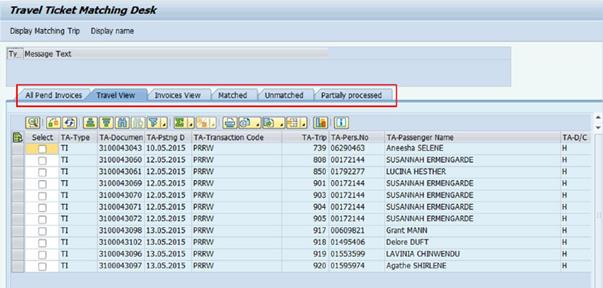
CCC.5. Click the Matched tab à select the invoices that are uploaded with a corresponding trip number and click the Display Matching Trip button to launch the Travel Request.
CCC.6. Select the invoices that are matched to the correct trips and click the Payment Options button to display the Additional data before unblocking screen.
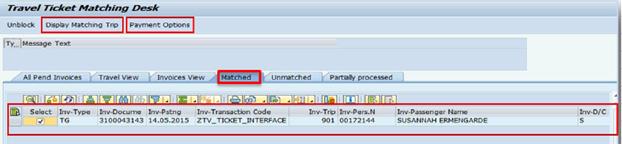
CCC.7. Select the bank displayed and click the Continue icon.
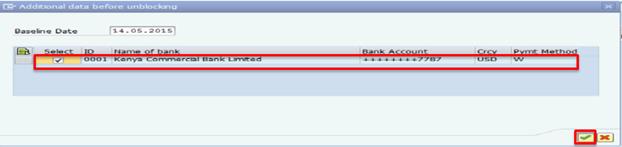
CCC.8. Click the Continue icon when the following message is displayed.
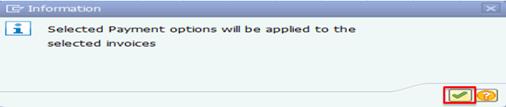
CCC.9. Back in the Travel Ticket Matching Desk screen, click the Save button.
CCC.10. Select the matched invoices and click the Unblock button to remove the payment block and change the baseline due date to today's date for immediate payment release.
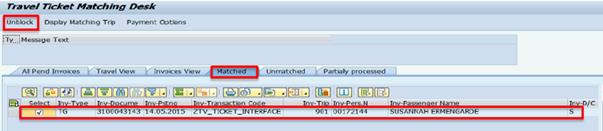
CCC.11. The message indicating that the Document 31XXXXXXXXXX unblocked and Changes have been saved will be displayed.
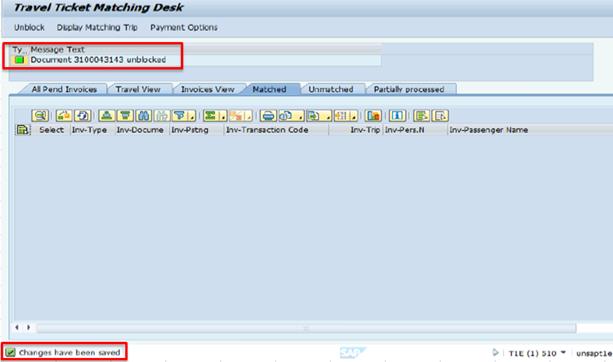
CCC.12. To clear the postings, click the All Pend Invoices tab à select all the invoices related to the trip (Doc. Type: TI and TG). For an example, use we use Trip 903.
CCC.13. Click the Clear button to clear the travel postings and the corresponding invoices for the trip.

CCC.14. The message Clearing for trip 0000000XXX was done will be displayed.
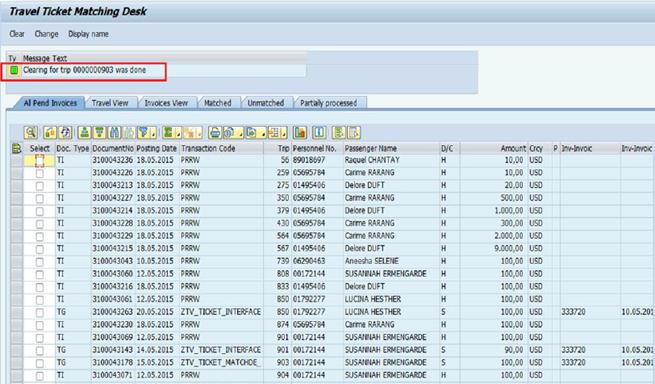
In the event where the ticket invoices are unmatched, some of the possible scenarios and respective actions are as follows:
1 The billed amount is higher than the obligated amount plus the tolerance amount
Action:
· Travel Processing Office amends the Travel Request to increase the ticket cost.
2 The Trip Number or Index Number does not match the existing travel authorization
Actions:
· Request the Travel Agent to resent the rejected records and new file upload using the same unique reference record; or
· The Ticket Billing Processor investigates and updates the correct Trip Number and/or Index Number internally and reprocesses the invoices.
3 System related issues
Action:
· Raise an iNeed ticket to be escalated to the Umoja Team for analysis.
3.4.4.3 Ticket Liquidation
Where a Credit Invoice is received, the process flows for the commercial ticket vendor billing program is as follow:
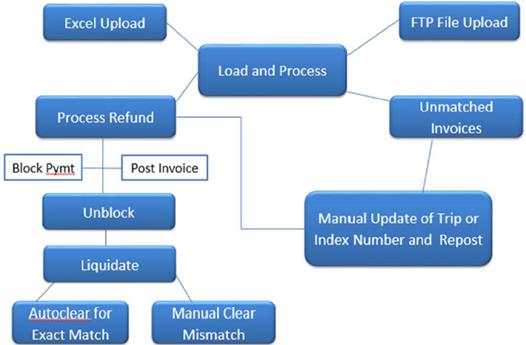
Since payment is not required, a liquidation of the approved ticket is required to complete the process.
DDD. Ticket liquidation process / Transaction Code: ZTV_TICKET_LIQUIDAT
DDD.1. Enter ZTV_TICKET_LIQUIDAT in the Command field and press Enter à the Travel Ticket Related Commitment Liquidation screen is displayed.
DDD.2. Populate the following fields:
· Vendor
· Trip End Date from - to
· Travel Processing Office
· Travel agent clearing account: 35401110 (defaulted)
DDD.3. Click the Execute icon.
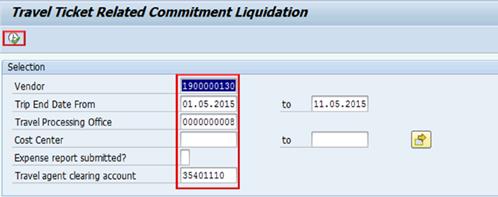
DDD.4. From the list, choose a trip by clicking the Select check box (e.g. Trip Number: 912) and click the Process commt. Adjustment button.
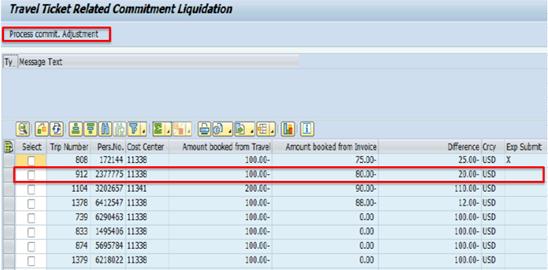
Note: The Difference column represents the difference between the amount posted from the Travel Request (Amount booked from Travel) and the commercial invoice (Amount booked from Invoice).
DDD.5. The message Trip 0000000XXX liquidation done will be displayed and the Difference will be liquidated.
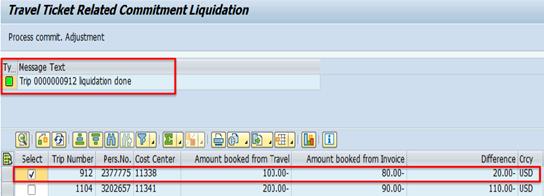
3.4.4.4 Ticket Processing
There are several ways or reports that can be generated to review ticket processing:
· Report on paid invoices (refer to EEE)
· Report on open items (refer to FFF)
· Report on cleared items for a particular trip (refer to GGG)
EEE. Steps to generate or to view list of paid invoices / Transaction Code: ZTV_TICKET_PROCESSED
This report is used to identify individual or multiple invoices.
EEE.1. Enter ZTV_TICKET_PROCESSED in the Command field and press Enter à the Processed invoices from Ticket Billing and Reconciliation solution screen is displayed.
EEE.2. Populate the following mandatory fields:
· Invoice Date or Document Date
· Travel Processing Office
EEE.3. Click the Execute Icon
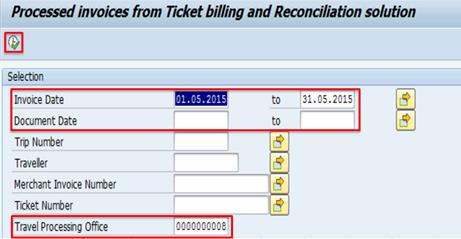
Note: The record displayed below is split into two screenshots to provide a complete picture of the processed invoices.
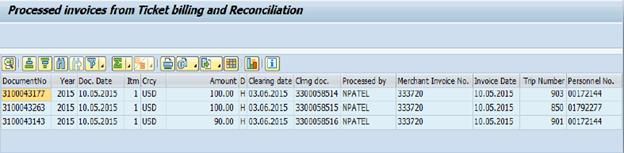
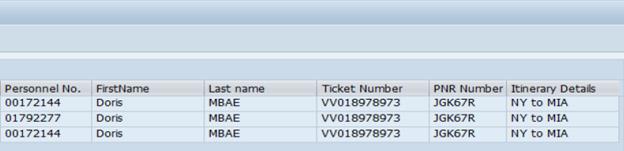
FFF. Steps to generate or to view open items / Transaction Code: FBLN3
FFF.1. Enter FBLN3 in the Command field and press Enter à the G/L Account Line Item Display screen is displayed.
FFF.2. Populate the following fields:
· G/L account: 35401110 (Ticket Clearing Account)
· Under the Line item selection section, select the Open items radio button and keep the Open at key date field blank

FFF.3.
Click the Execute ![]() icon
to generate the report.
icon
to generate the report.

GGG. Steps to generate or to view cleared items for a particular trip / Transaction Code: FBLN3
GGG.1. Continuing from the above report (step FFF.3), select the Assignment column and click the Filter icon.
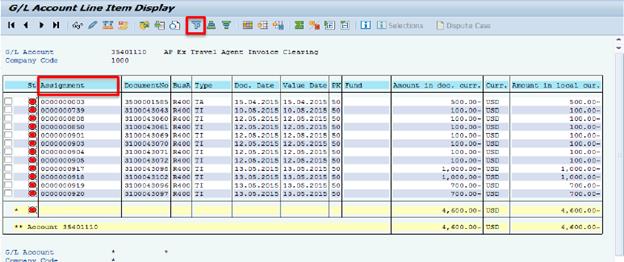
GGG.2. Enter the trip number (e.g. 904) using wildcards (*) before and after the trip number to view the items in the clearing account related to the invoice.
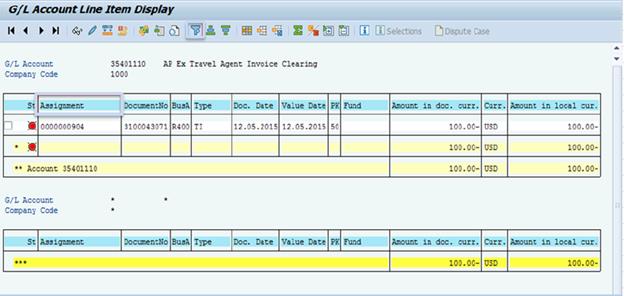
3.4.5 Special Settlement Processes
The Umoja process used to settle all travel related invoices involves use of both ESS and ECC. The Travel Request must be created for Travellers through Umoja ESS and the settlement will be processed through Umoja ECC.
3.4.5.1 Payment of Ticket Expenses to Member States
This process involves reimbursements to Member States for ticket expenses related to the official travel of delegates.
The key points of the processes are as follow:
1 In Umoja ESS:
· The Travel Request created for the Travellers must indicate that the Member States will provide the tickets
· The Member State information must be selected in the Additional Data for Travel page and as Service Provider in the Estimated costs grid
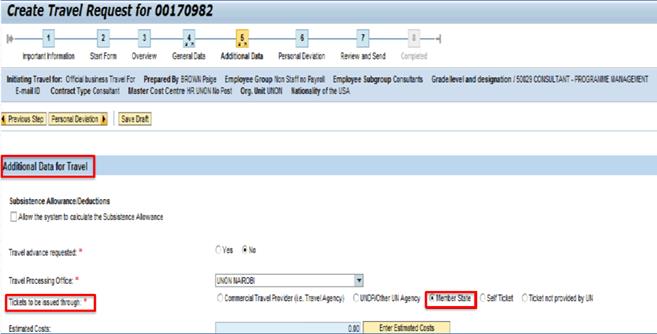

2 In Umoja ECC:
· After completion of the trip, Finance Officer to create a payment to the Member State using T-code: FV60. Refer to section 3.2.2 of Chapter on Accounts Payable for detailed processes using T-code FV60 (invoice processing without a PO).
Below are the entries and their respective document types generated in the FI throughout the process once the Travel Request has been approved:
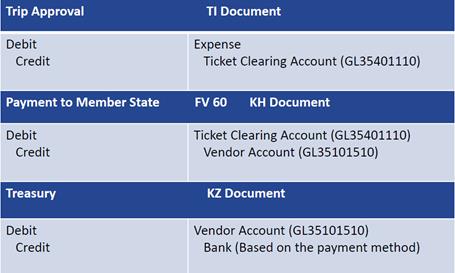
3.4.5.2 Payment to Conference Paymaster and Disbursement to Participant
The process involves the use of both ESS and ECC.
Processes in Umoja ESS
The highlights of the processes are as follow:
1 The Travel Request created for each traveller must indicate the Event ID of the conference in the Basic Details section of the travel portal
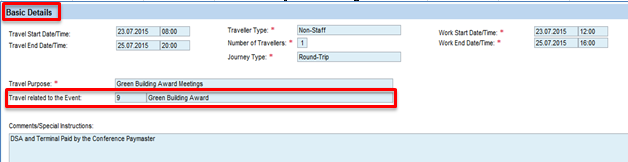
2 The No option should be selected on the Travel advances requested in the Additional Data for Travel page as the advances will be paid by the Conference Paymaster

3 Upon completion of the event, an expense report must be created for each traveller paid by the Conference Paymaster
4 The Conference Paymaster payment option and the event are to be indicated on the General Data page of the travel portal
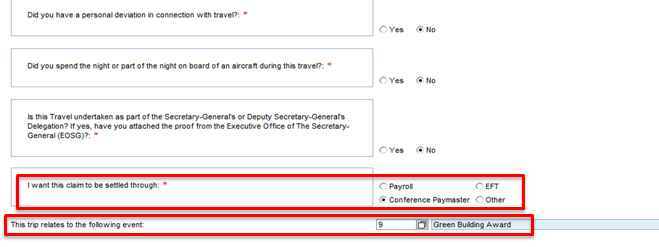
5 The expense report is to be approved by the Travel Conference Unit (TCU)
Processes in Umoja ECC
1 The Conference Paymaster receives the funds payable to the event participants as a down payment
HHH. Steps to create down payment for the Conference Paymaster / Transaction Code: F-47
Down payments are Notes Items which means that only a one line entry is recorded in Umoja.
HHH.1. Enter F-47 in the Command field and press Enter à the Down Payment Request screen is displayed.
HHH.2. Populate the following fields:
· Document Date: current date
· Type: KA
· Posting Date: date of entry
· Reference: Event ID (e.g. 9)
· Doc.Header Text: Conference Paymaster
· Account: BP number of the Conference Paymaster
· Trg.sp.G/L ind.: K
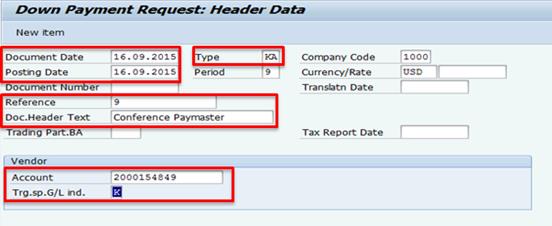
HHH.3. Click the Enter icon.
HHH.4. On the next screen, populate the following fields:
· Amount
· Bus. Area
· Due on
· Pmt Method (payment method)
· Cost Center
· Fund or WBS Element
· Text: Conference Paymaster and the relevant Event ID (e.g. 9)
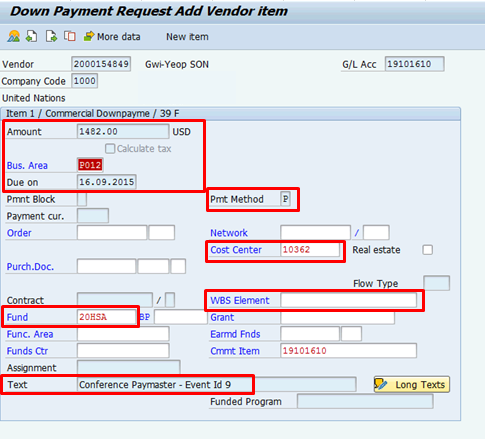
HHH.5. Click the Save icon to submit the down payment for approval and press Enter to generate the posting message.
![]()
2 The Approving Officer reviews and approves the down payment request via business workplace
III. Steps to review and approves down payment request / Transaction Code: SBWP
III.1. Enter SBWP in the Command field and press Enter.
III.2. On the left side, click the Inbox to expand à click on the Grouped according to task folder under the Workflow folder and select the Downpayment document - Approving Agent.
III.3. Select the related document from the list displayed on the right side à click on the Display Document link located under the Objects and attachments area at the bottom of the screen.

III.4. On the window that opens:
· The G/L Account for the down payment is 19101610 which is the same displayed in the Commitment Item field
· As a Noted Item, only one line is reflected in the document
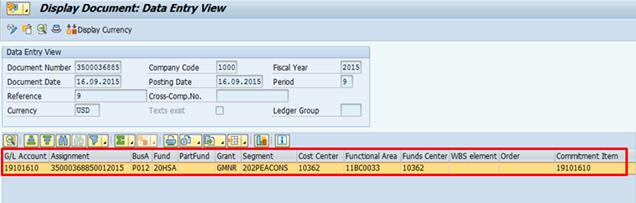
III.5. Double click on the line to verify the payment block D and the payment method.

III.6. Go back to the business workplace à double click on the Down payment request - Approving agent line.

III.7. Approve the document or indicate the justification for an alternative decision in the Justify Your Decision text box.
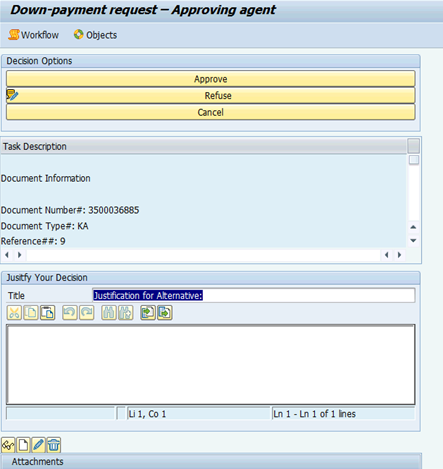
III.8. The Document is Posted message will be displayed upon approval.
3 The Treasury will disburse the down payment to the Conference Paymaster and the FI entries will be shown as follow:
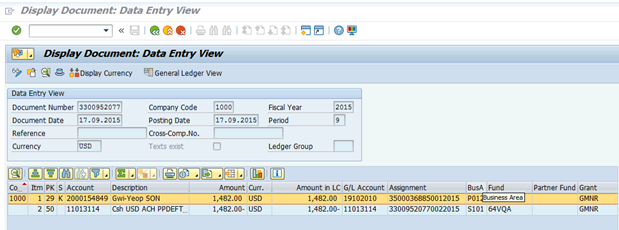
4 Upon approval of the expense report by the Travel Conference Unit (TCU), the FI posting will:
· generate payment method (Pmt. Method): D and does not reflect any payment block
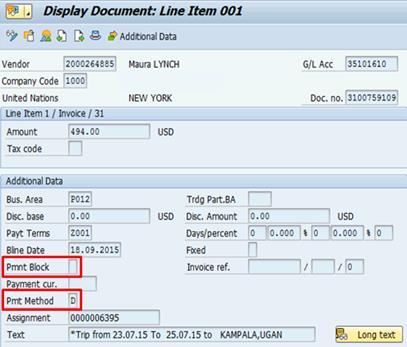
· show the Event ID in the Ref.key 2 field of the header
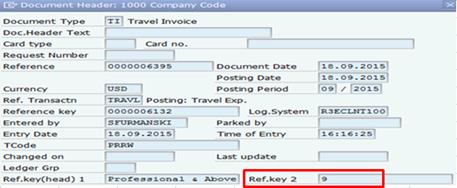
· generate the following entries:
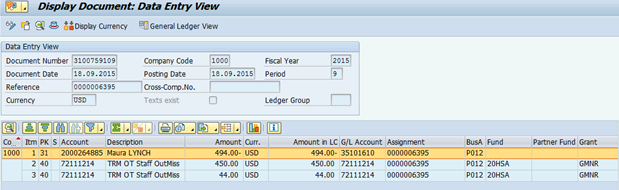
· generate the following entries when disbursed by the Treasury:
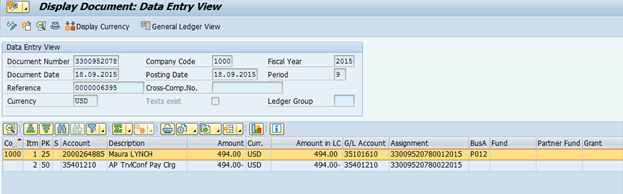
5 The responsible Officer needs to clear the down payment account by reclassifying the account to the vendor account
JJJ. Steps to reclassify posting / Transaction Code: F-54
Note: Only the amount expended should be reclassified.
JJJ.1. Enter F-54 in the Command field and press Enter à the Clear Vendor Down Payment screen is displayed.
JJJ.2. Populate the following fields:
· Document Date: current date
· Reference: Manual Clearing
· Doc.Header Text: Conference Paymaster
· Account: BP number of the Conference Paymaster
· Assignment: copy the text from the Down Payment document (e.g. 35000368850012015)
· Text: copy the text from the Down Payment document (e.g. Conference Paymaster - Event Id 9)

JJJ.3. Double click on the line that indicates the correct Treasure document number and related amount.
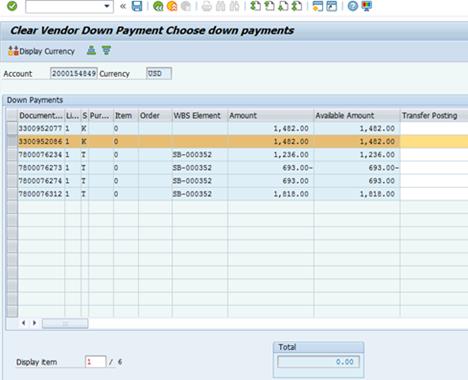
JJJ.4. Click the Document button from the navigation pane and select Simulate to display the Clear Vendor Down Payment Display Overview screen.
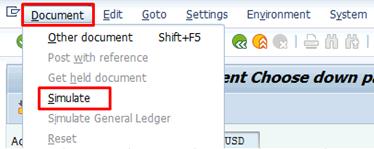
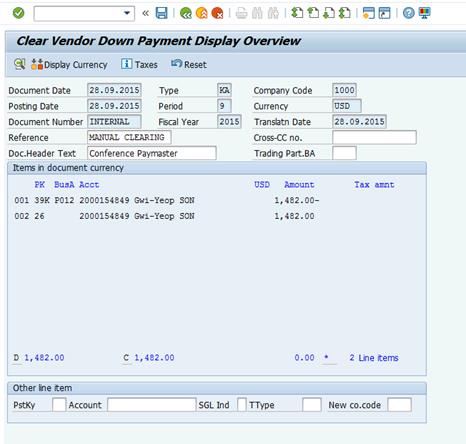
JJJ.5. The following warning message will be displayed.
![]()
JJJ.6. Click on the Enter icon and the document number will be displayed at the bottom of the screen.
![]()
6 The responsible Officer will also need to create an AP document using T-code FV60 in order to clear vendor account and finalize the process in ECC. Refer to section 3.2.2 of Chapter on Accounts Payable for detailed processes using T-code FV60, noting the followings:
· Use the BP number for the Conference Paymaster in the Vendor field
· Enter the Event ID number in the Reference field
· Type in Conference Paymaster in the Text field
· Use 35401210 in the G/L acct fields
· Enter the Amount paid for each expense report
· Enter the information for the Fund and Business Area fields
· Copy the information from Assignment and Text fields from the Reclassification (F-54) document and populate them to the respective fields of the FV60
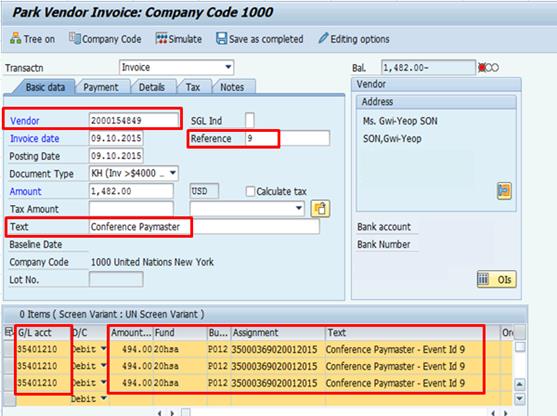
The entries of the above will be shown as follow:
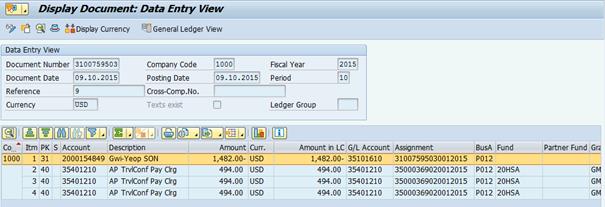
Below is the summary of entries and their respective document types generated in the Umoja ECC (FI) according to the process workflow.
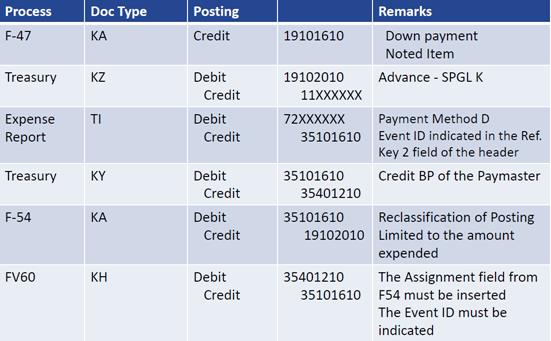
Note: The Reclassification (F-54) and creation of an AP document (FV60) should be processed together.
4 Business Partners
A business partner in the requisitioning process is any entity that is involved in a transaction, such as a vendor who sends an invoice. Vendors registered in UNGM are replicated in Umoja (Umoja SRM and ECC) as Business Partners. Business Partners can also be UN organizations, UN Staff Members and other parties. For further guidance on Umoja business partners, refer to the Umoja Overview Chapter of the Finance Manual.
December, 2016